
6.3: Kushan Empire 30 CE – 375 CE
- Page ID
- 219990

\( \newcommand{\vecs}[1]{\overset { \scriptstyle \rightharpoonup} {\mathbf{#1}} } \)
\( \newcommand{\vecd}[1]{\overset{-\!-\!\rightharpoonup}{\vphantom{a}\smash {#1}}} \)
\( \newcommand{\id}{\mathrm{id}}\) \( \newcommand{\Span}{\mathrm{span}}\)
( \newcommand{\kernel}{\mathrm{null}\,}\) \( \newcommand{\range}{\mathrm{range}\,}\)
\( \newcommand{\RealPart}{\mathrm{Re}}\) \( \newcommand{\ImaginaryPart}{\mathrm{Im}}\)
\( \newcommand{\Argument}{\mathrm{Arg}}\) \( \newcommand{\norm}[1]{\| #1 \|}\)
\( \newcommand{\inner}[2]{\langle #1, #2 \rangle}\)
\( \newcommand{\Span}{\mathrm{span}}\)
\( \newcommand{\id}{\mathrm{id}}\)
\( \newcommand{\Span}{\mathrm{span}}\)
\( \newcommand{\kernel}{\mathrm{null}\,}\)
\( \newcommand{\range}{\mathrm{range}\,}\)
\( \newcommand{\RealPart}{\mathrm{Re}}\)
\( \newcommand{\ImaginaryPart}{\mathrm{Im}}\)
\( \newcommand{\Argument}{\mathrm{Arg}}\)
\( \newcommand{\norm}[1]{\| #1 \|}\)
\( \newcommand{\inner}[2]{\langle #1, #2 \rangle}\)
\( \newcommand{\Span}{\mathrm{span}}\) \( \newcommand{\AA}{\unicode[.8,0]{x212B}}\)
\( \newcommand{\vectorA}[1]{\vec{#1}} % arrow\)
\( \newcommand{\vectorAt}[1]{\vec{\text{#1}}} % arrow\)
\( \newcommand{\vectorB}[1]{\overset { \scriptstyle \rightharpoonup} {\mathbf{#1}} } \)
\( \newcommand{\vectorC}[1]{\textbf{#1}} \)
\( \newcommand{\vectorD}[1]{\overrightarrow{#1}} \)
\( \newcommand{\vectorDt}[1]{\overrightarrow{\text{#1}}} \)
\( \newcommand{\vectE}[1]{\overset{-\!-\!\rightharpoonup}{\vphantom{a}\smash{\mathbf {#1}}}} \)
\( \newcommand{\vecs}[1]{\overset { \scriptstyle \rightharpoonup} {\mathbf{#1}} } \)
\( \newcommand{\vecd}[1]{\overset{-\!-\!\rightharpoonup}{\vphantom{a}\smash {#1}}} \)
\(\newcommand{\avec}{\mathbf a}\) \(\newcommand{\bvec}{\mathbf b}\) \(\newcommand{\cvec}{\mathbf c}\) \(\newcommand{\dvec}{\mathbf d}\) \(\newcommand{\dtil}{\widetilde{\mathbf d}}\) \(\newcommand{\evec}{\mathbf e}\) \(\newcommand{\fvec}{\mathbf f}\) \(\newcommand{\nvec}{\mathbf n}\) \(\newcommand{\pvec}{\mathbf p}\) \(\newcommand{\qvec}{\mathbf q}\) \(\newcommand{\svec}{\mathbf s}\) \(\newcommand{\tvec}{\mathbf t}\) \(\newcommand{\uvec}{\mathbf u}\) \(\newcommand{\vvec}{\mathbf v}\) \(\newcommand{\wvec}{\mathbf w}\) \(\newcommand{\xvec}{\mathbf x}\) \(\newcommand{\yvec}{\mathbf y}\) \(\newcommand{\zvec}{\mathbf z}\) \(\newcommand{\rvec}{\mathbf r}\) \(\newcommand{\mvec}{\mathbf m}\) \(\newcommand{\zerovec}{\mathbf 0}\) \(\newcommand{\onevec}{\mathbf 1}\) \(\newcommand{\real}{\mathbb R}\) \(\newcommand{\twovec}[2]{\left[\begin{array}{r}#1 \\ #2 \end{array}\right]}\) \(\newcommand{\ctwovec}[2]{\left[\begin{array}{c}#1 \\ #2 \end{array}\right]}\) \(\newcommand{\threevec}[3]{\left[\begin{array}{r}#1 \\ #2 \\ #3 \end{array}\right]}\) \(\newcommand{\cthreevec}[3]{\left[\begin{array}{c}#1 \\ #2 \\ #3 \end{array}\right]}\) \(\newcommand{\fourvec}[4]{\left[\begin{array}{r}#1 \\ #2 \\ #3 \\ #4 \end{array}\right]}\) \(\newcommand{\cfourvec}[4]{\left[\begin{array}{c}#1 \\ #2 \\ #3 \\ #4 \end{array}\right]}\) \(\newcommand{\fivevec}[5]{\left[\begin{array}{r}#1 \\ #2 \\ #3 \\ #4 \\ #5 \\ \end{array}\right]}\) \(\newcommand{\cfivevec}[5]{\left[\begin{array}{c}#1 \\ #2 \\ #3 \\ #4 \\ #5 \\ \end{array}\right]}\) \(\newcommand{\mattwo}[4]{\left[\begin{array}{rr}#1 \amp #2 \\ #3 \amp #4 \\ \end{array}\right]}\) \(\newcommand{\laspan}[1]{\text{Span}\{#1\}}\) \(\newcommand{\bcal}{\cal B}\) \(\newcommand{\ccal}{\cal C}\) \(\newcommand{\scal}{\cal S}\) \(\newcommand{\wcal}{\cal W}\) \(\newcommand{\ecal}{\cal E}\) \(\newcommand{\coords}[2]{\left\{#1\right\}_{#2}}\) \(\newcommand{\gray}[1]{\color{gray}{#1}}\) \(\newcommand{\lgray}[1]{\color{lightgray}{#1}}\) \(\newcommand{\rank}{\operatorname{rank}}\) \(\newcommand{\row}{\text{Row}}\) \(\newcommand{\col}{\text{Col}}\) \(\renewcommand{\row}{\text{Row}}\) \(\newcommand{\nul}{\text{Nul}}\) \(\newcommand{\var}{\text{Var}}\) \(\newcommand{\corr}{\text{corr}}\) \(\newcommand{\len}[1]{\left|#1\right|}\) \(\newcommand{\bbar}{\overline{\bvec}}\) \(\newcommand{\bhat}{\widehat{\bvec}}\) \(\newcommand{\bperp}{\bvec^\perp}\) \(\newcommand{\xhat}{\widehat{\xvec}}\) \(\newcommand{\vhat}{\widehat{\vvec}}\) \(\newcommand{\uhat}{\widehat{\uvec}}\) \(\newcommand{\what}{\widehat{\wvec}}\) \(\newcommand{\Sighat}{\widehat{\Sigma}}\) \(\newcommand{\lt}{<}\) \(\newcommand{\gt}{>}\) \(\newcommand{\amp}{&}\) \(\definecolor{fillinmathshade}{gray}{0.9}\)Introduction
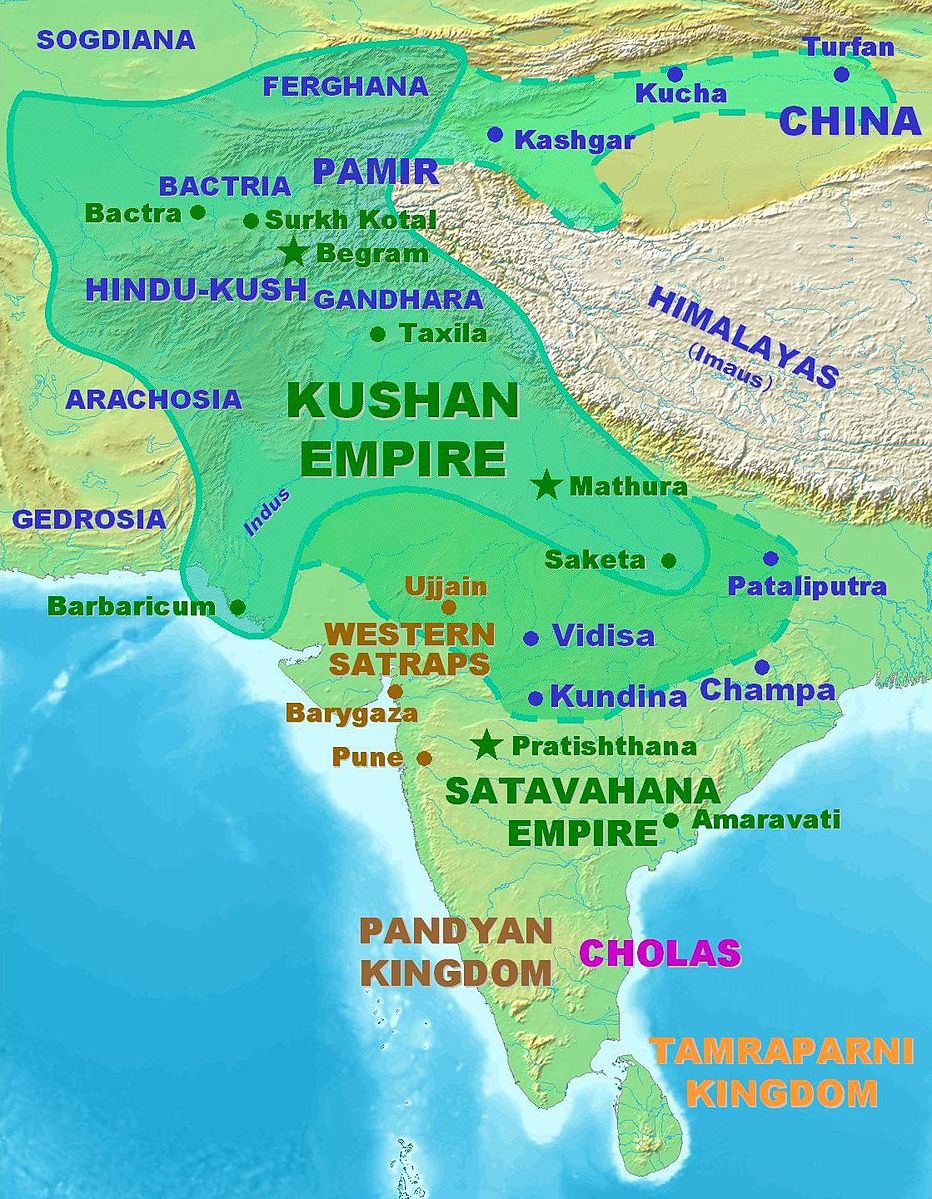
Although the Kushans were originally nomadic, they conquered and controlled a significant part of the Silk Road, touching into China and extending to the Mediterranean. The Kushan had an immense territory (6.3.1) from the first to the third centuries, including parts of today's northern India, Pakistan, and Afghanistan. The Kushan emperors supported Buddhism and actively propagated the religion into other countries, constructing religious complexes. Although they were major supporters of Buddhism, the emperors allowed other religions to co-exist and even supported some of them. The Kushan were a confederation of different tribes with multiple gods representing each culture. However, most religious beliefs coalesced around Buddhism.
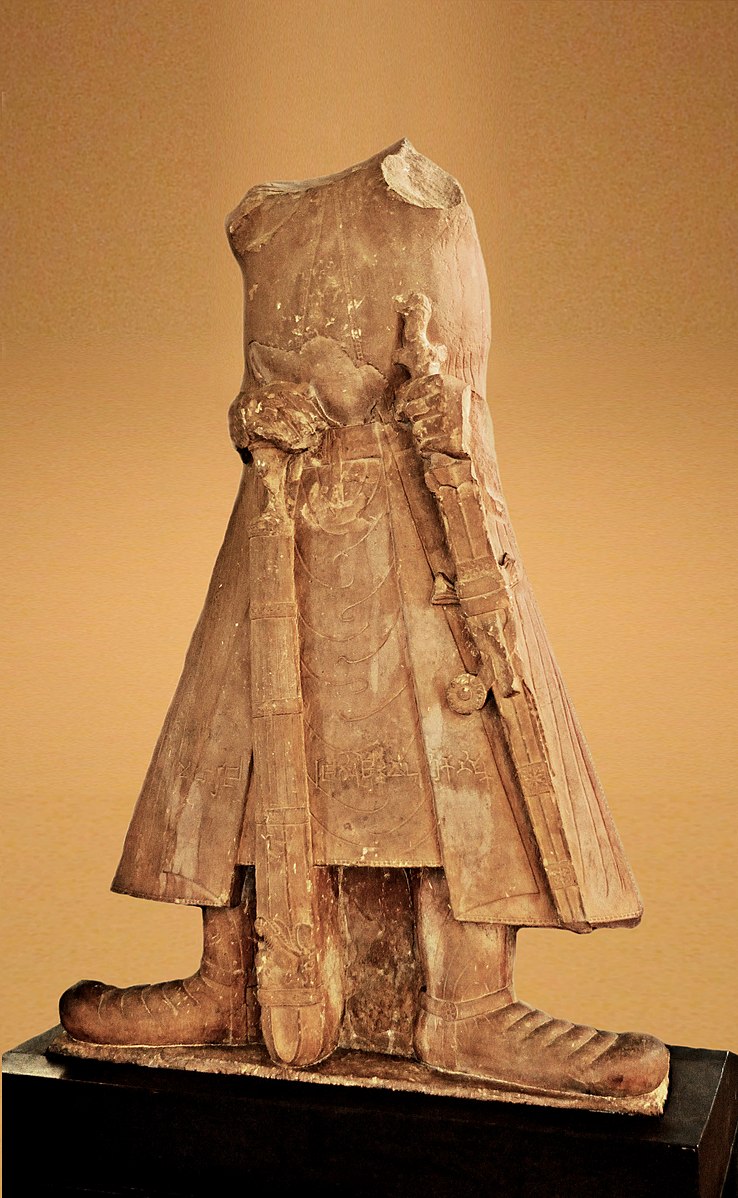
The Kushan Empire reached its highest influence during Kanisha's reign, a powerful emperor recorded on coins, inscriptions, and texts. A massive statue of Kanisha (6.3.2) was erected with an inscription (6.3.3) labeling him "Great King, King of Kings, Son of God, Kaniska."[1] Kaniska had the huge stupa in Peshawar constructed, and excavated ruins found an eighty-seven square meter foundation. Buddhist writings also describe the emperor as a significant supporter of Buddhism, even including Buddhist images on his coins.

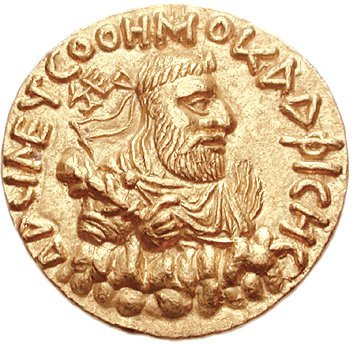
As the Kushan worked with the Romans, Persians, Han dynasty, and Aksumite Empire, the Kushan initially used a style of Greek language before adopting a form of Bactrian. The Kushans also exported Buddhism to other countries as part of the massive trade network. Each emperor produced a form of coins, especially Vima Kadphises. He introduced gold as the metal for coins and made the coins more elaborate as he was portrayed with a huge nose and a wart on one cheek (6.3.4). Buddhist imagery appeared on coins; however, other coins depicted Iranian, Greek, or Indian religious figures. Historians used the spread of coins to measure Kushan's influence on others across the Silk Road trade routes.
In the third century, unrest in some Kushan territories occurred, and the empire split into two parts. Local rulers wanted their independence and started movements for separation, causing more turmoil. Outside entities also started wars, and the empire was gone by the end of the fourth century. With little documentation about the empire, the surviving ruins present the most critical views of the civilization. Coins carry the images of the rulers, and the religious ruins display broad spiritual support, giving researchers essential knowledge of the culture.
Embark on a mesmerizing journey through time as we delve into the rich tapestry of the Kushan Empire, an extraordinary civilization that etched its mark on the ancient world. Unveil the captivating history and uncover the intriguing secrets of the Kushan Empire, from its enigmatic origins to the pinnacle of its influence under visionary leaders.
Gandhara
The site of ancient Gandhara was occupied by multiple civilizations throughout the millennia, including the Achaemenid, the Parthians, and Alexander the Great. During Alexander the Great, the concepts of classical Greek ideals were infused into the region. Ideally located, Gandhara was in the middle of the trade routes that crossed the region and controlled the high mountain passes. The Kushan Empire and the area of Gandhara were influential in spreading Buddhism, Hinduism, and Zoroastrianism throughout Asia. The Kushans constructed monasteries, stupas, and immense statues of Buddha in the region as part of the arts and culture of the civilization. In other cultures, Buddha was only portrayed as symbols. Kanishka the Great, who created large cities and encouraged the arts, was also the first person to have the Buddha made as a human figure. This image became one of the standard representations of Buddha and the center of lay and monastic devotional practices.
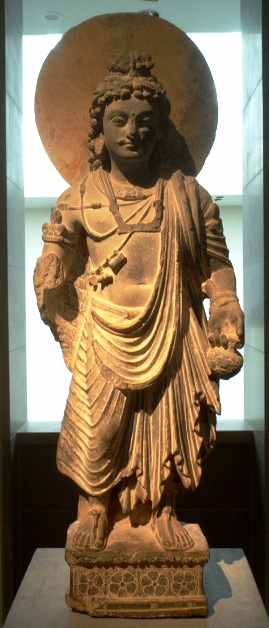
One of the early statues of an anthropomorphic Buddha (6.3.5), the figure stands one meter high. It is dressed in traditional Greek-like clothing of a toga draped with deep incised lines over the shoulder. His hair resembles a top-knot, and evidence of his stylized curly hair with small, circular lines on his head. His feet are bare, as many of his earlier portrayals depict his footprints, and the foot is the body part connecting with the earth. A large circular halo behind the head embodies his divinity. Other statues resembling those of Buddha were of the Bodhisattvas (6.3.6). The Bodhisattva was believed to be on the path of enlightenment and still postponing their salvation to help others. Under the Kushans, statues of a Bodhisattva were common and often resembled a Kushan prince and their specific accessories. The clothing is highly draped and layered, indicating the precision used by the artist. The statue has an elaborate hair design and carries a kumbha or wisdom urn in his left hand.
.jpeg?revision=1&size=bestfit&width=549&height=910)
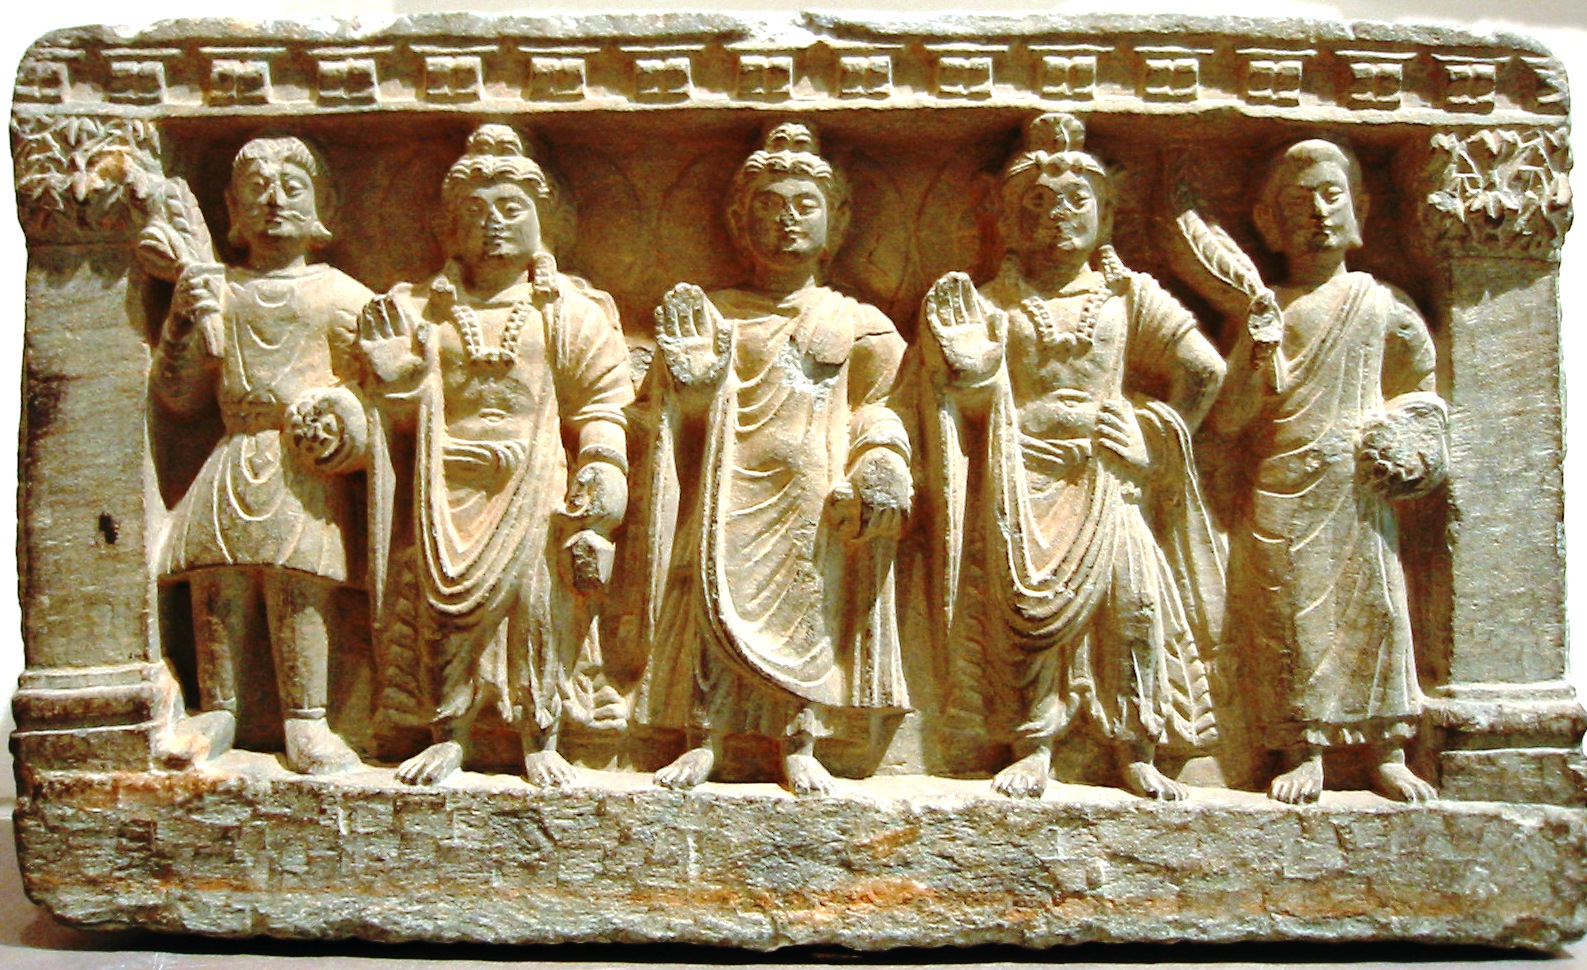
In the Kushan period, sculptures were highly influenced by Greek and Persian art, as seen in the curly hairstyle and draped clothing. Sculptors generally used mica-schist stone for carvings until they switched to stucco because stucco was moldable and easier to work with. A blended Indo-Greek style is visible in the frieze carving (6.3.7). Each figure has hairstyles and clothing similar to the Indo-Greek style. In the carving, Buddha stands in the middle wearing simple draped clothing and his hair in a plain top-know. On each side of the Buddha is a Bodhisattva dressed in more ornate clothing and accessories. A simply clad devotee stands on the left, and a monk in a long robe is on the right.
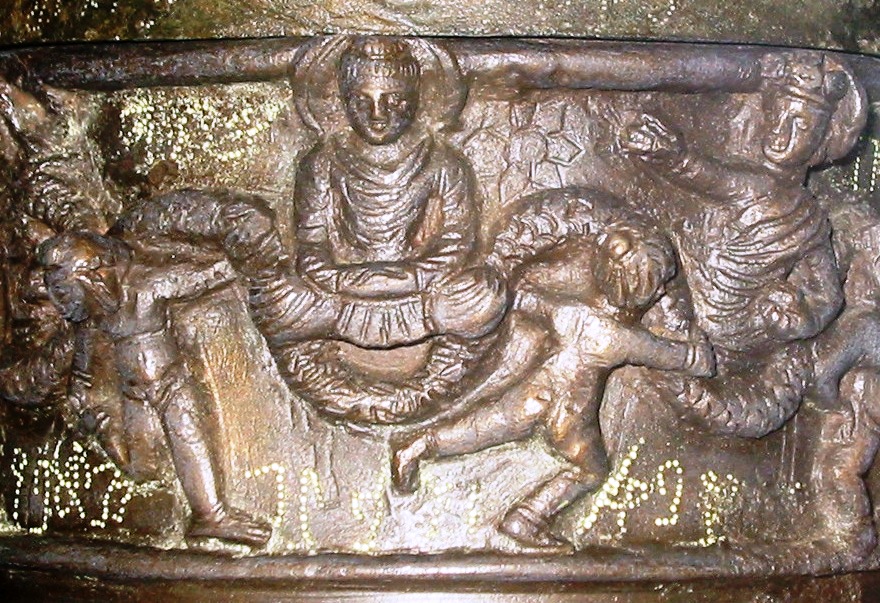
Sometimes, parts of Greek pantheons were incorporated into Buddhist imagery. One of the typical Greek gods, Heracles, was added to this image of the Buddha (6.3.8). The Kushan named him Vajrapani, the protector of Buddha, who sits on the cushion with his traditional draped clothing and curly top-knot hair. The nude, muscular Vajrapani carries a club to guard the Buddha. His toga, long hair, beard, and nudity reflect elements of Greek art.

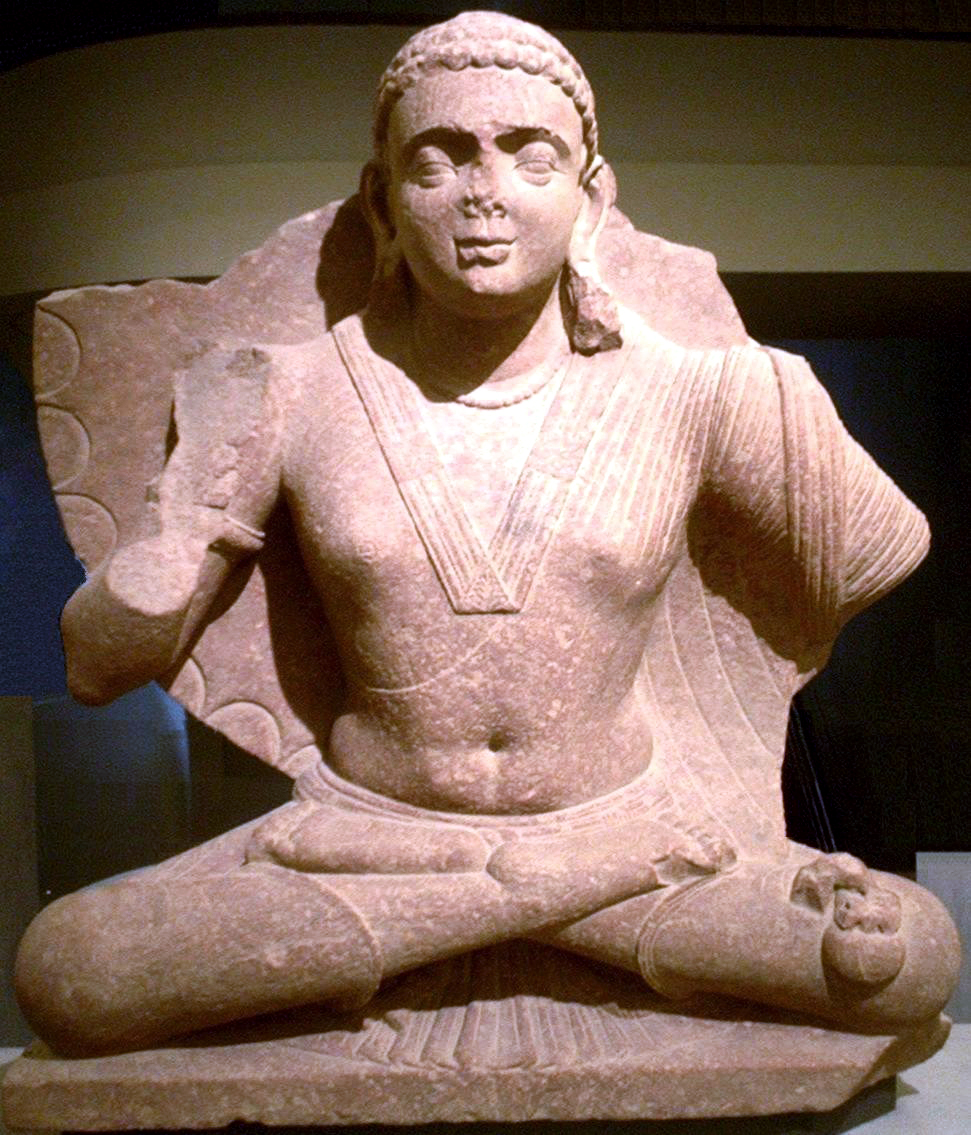
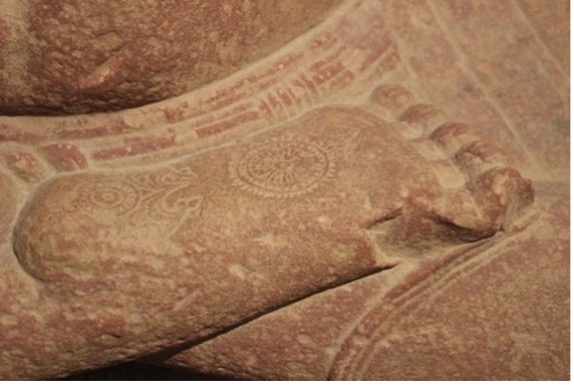
"Maitreya is the Buddha of the future, who will be born to teach enlightenment in the next age. According to Mahayana teachings, a Buddha is first born as a bodhisattva, and then after many lifetimes, progresses on to Buddhahood. The historical Buddha was himself referred to as a bodhisattva before becoming the Buddha."[2]The Maitreya is generally portrayed standing or sitting on a throne; his feet crossed right leg over the left leg. Usually, he would hold a kumbha in his left hand; however, his hand is missing. In this carving (6.3.9), the statue is made of sandstone. On the bottom of his right upturned foot (6.3.10), a chakra is inscribed, representing one of the spots for spiritual power where the foot connects with the earth.
Sirkap
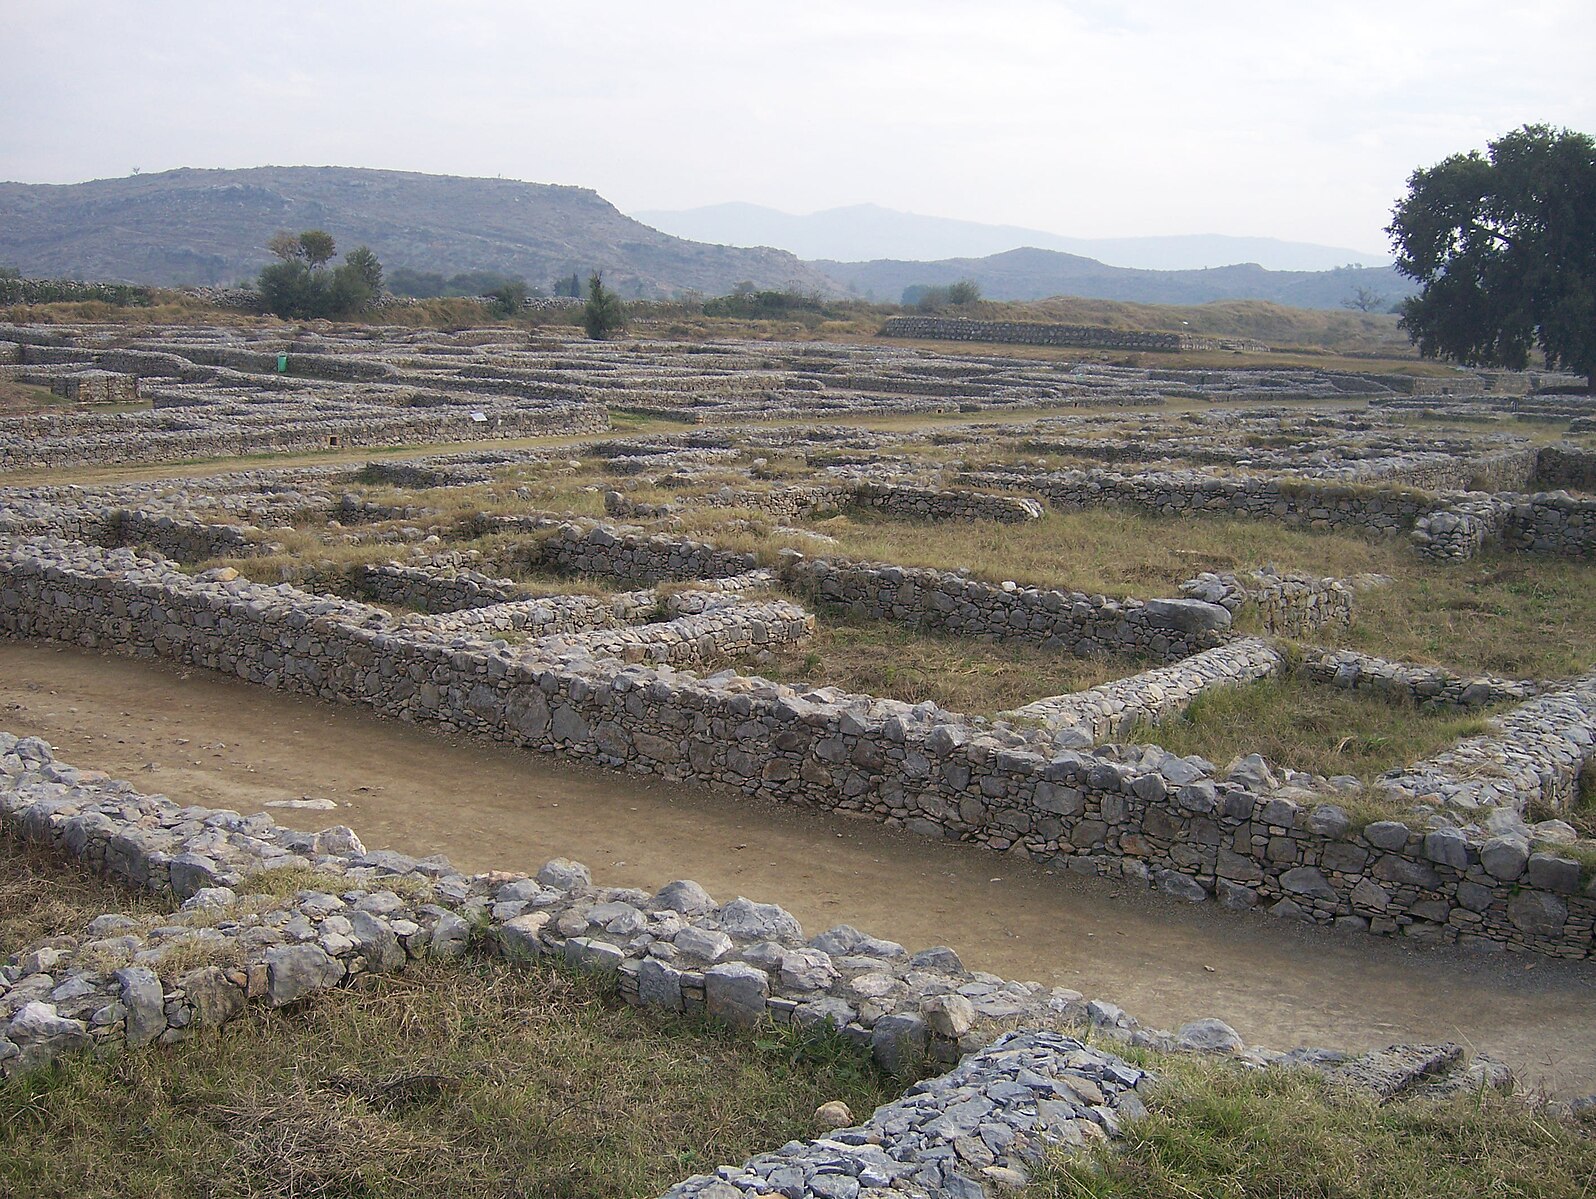
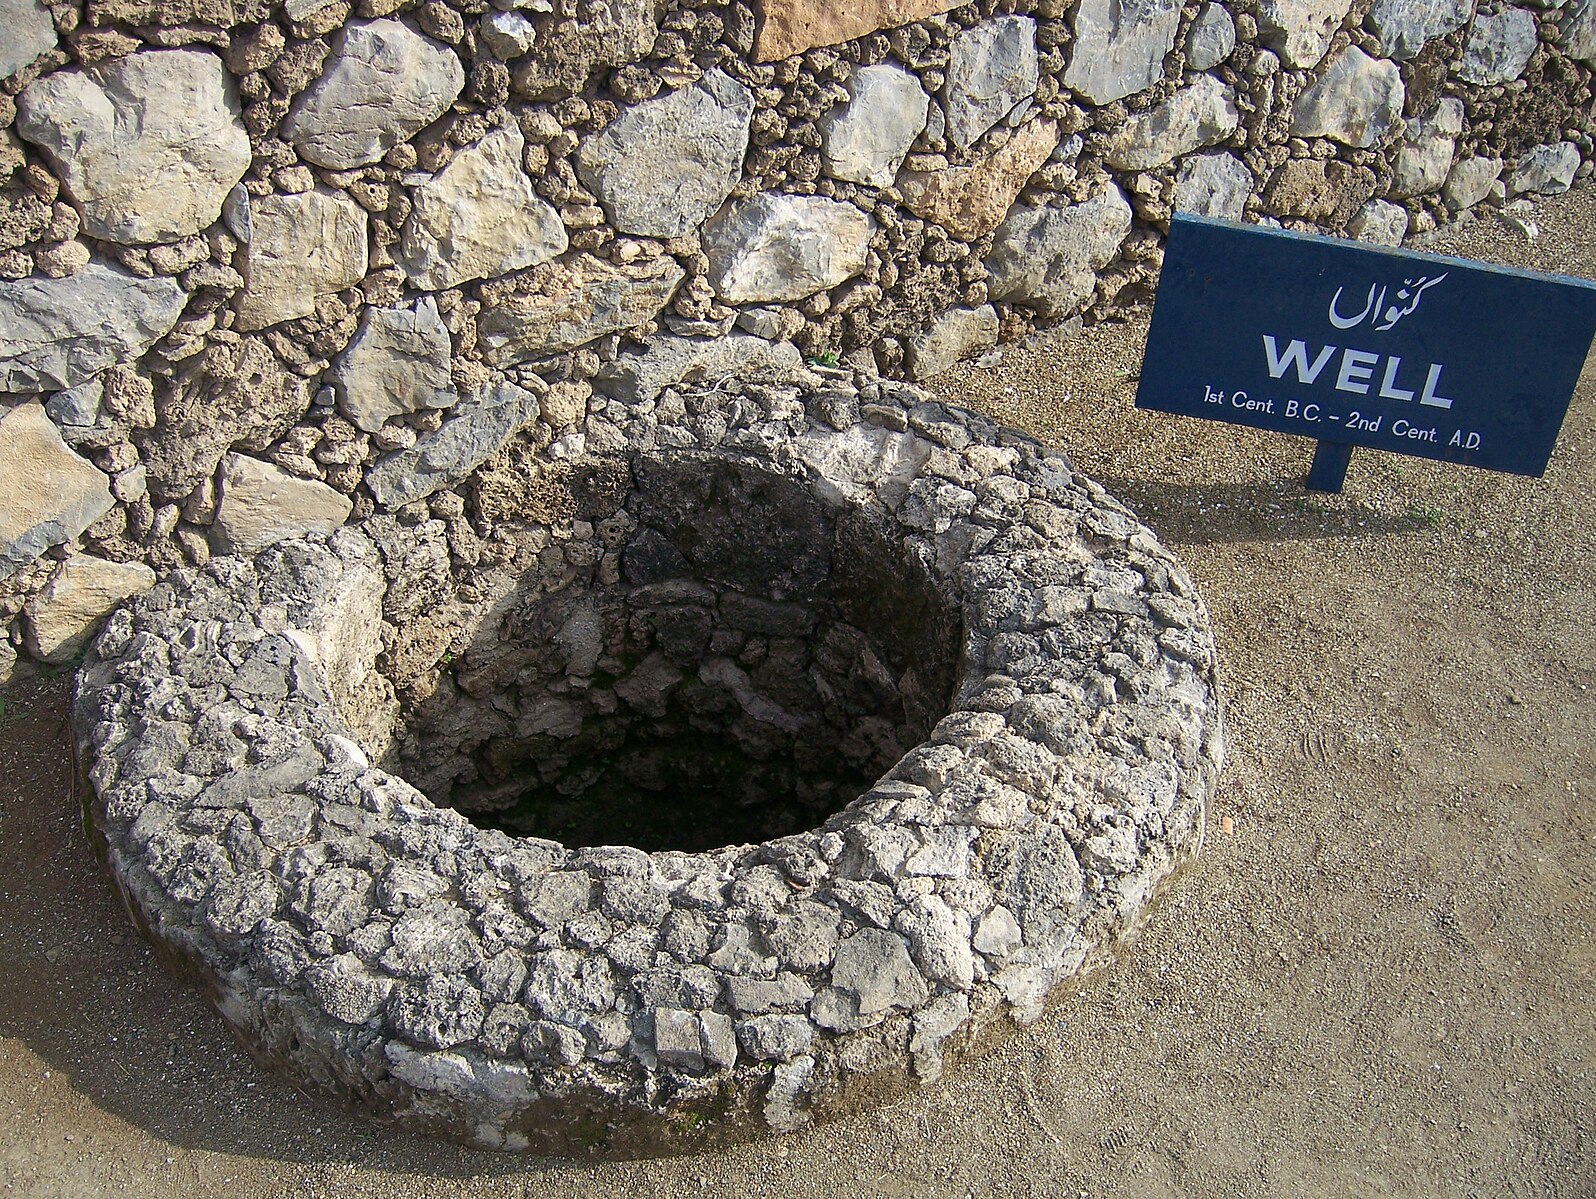
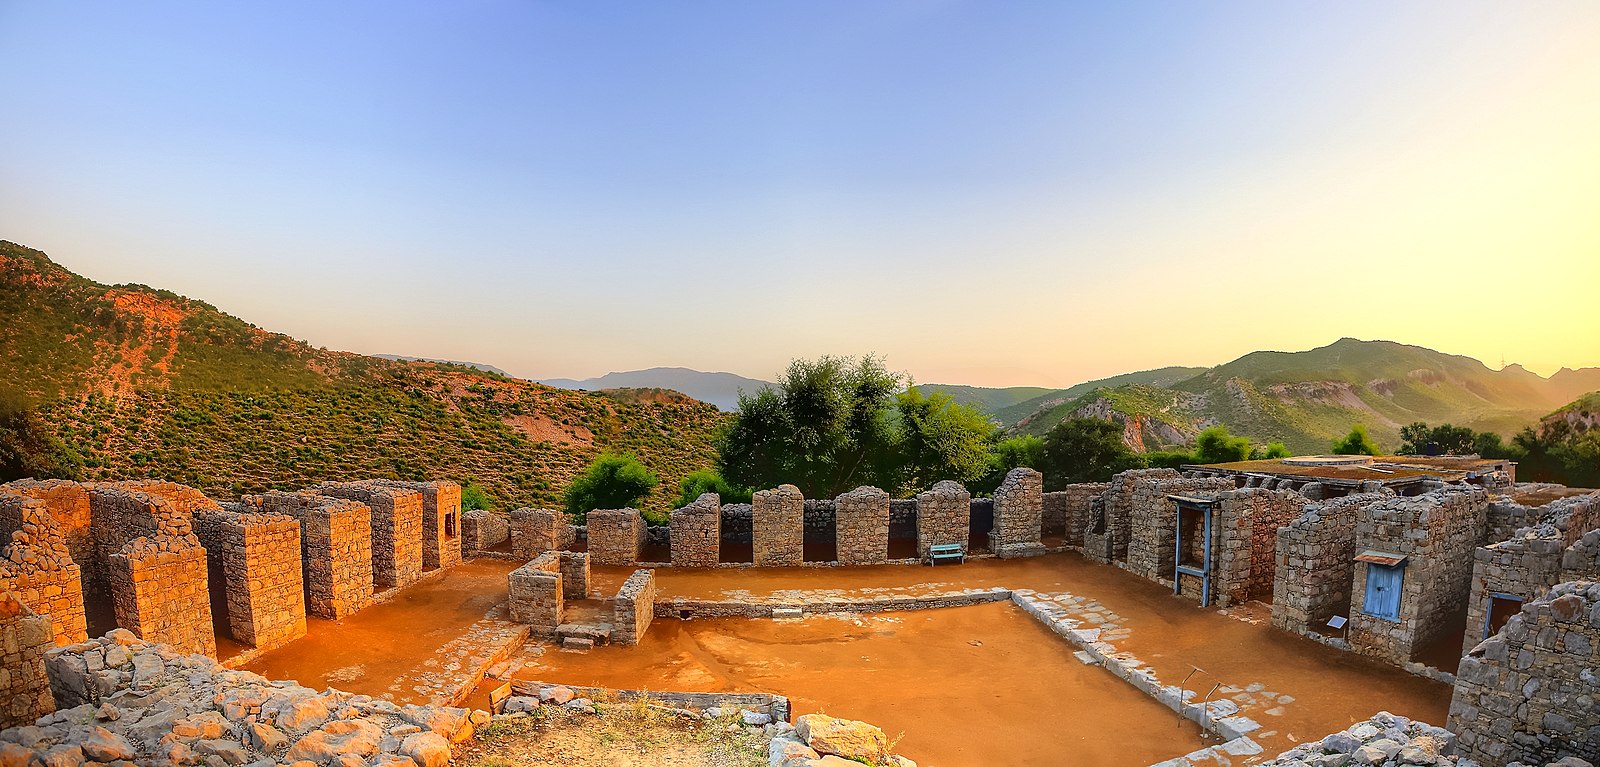
One of the ancient sections of Taxila is the ruins of the city constructed on the layout of a grid based on characteristics of Greek cities. The town had a main street and fifteen crossing streets meandering through the town. Guard towers, imposing walls, and massive gates were added to the main street for protection. Multiple buildings on part of the site were all aligned in rows and attached (6.3.11). The rock base of the buildings formed the structures believed to hold shops and housing. Larger spaces were generally for governmental space or more elite living spaces. Walls on the buildings were constructed with limestone rock, rubble, and mud mixed as a type of plaster. Historians believe the walls were painted because residual colored paint was found on the rubble. Wells (6.3.12) were made from the same material as the houses. Because water was necessary for the town, wells were located by the guard towers, helping protect the water supply. The city had different layers of cultural construction, making it difficult for historians to know who built some of the sections.
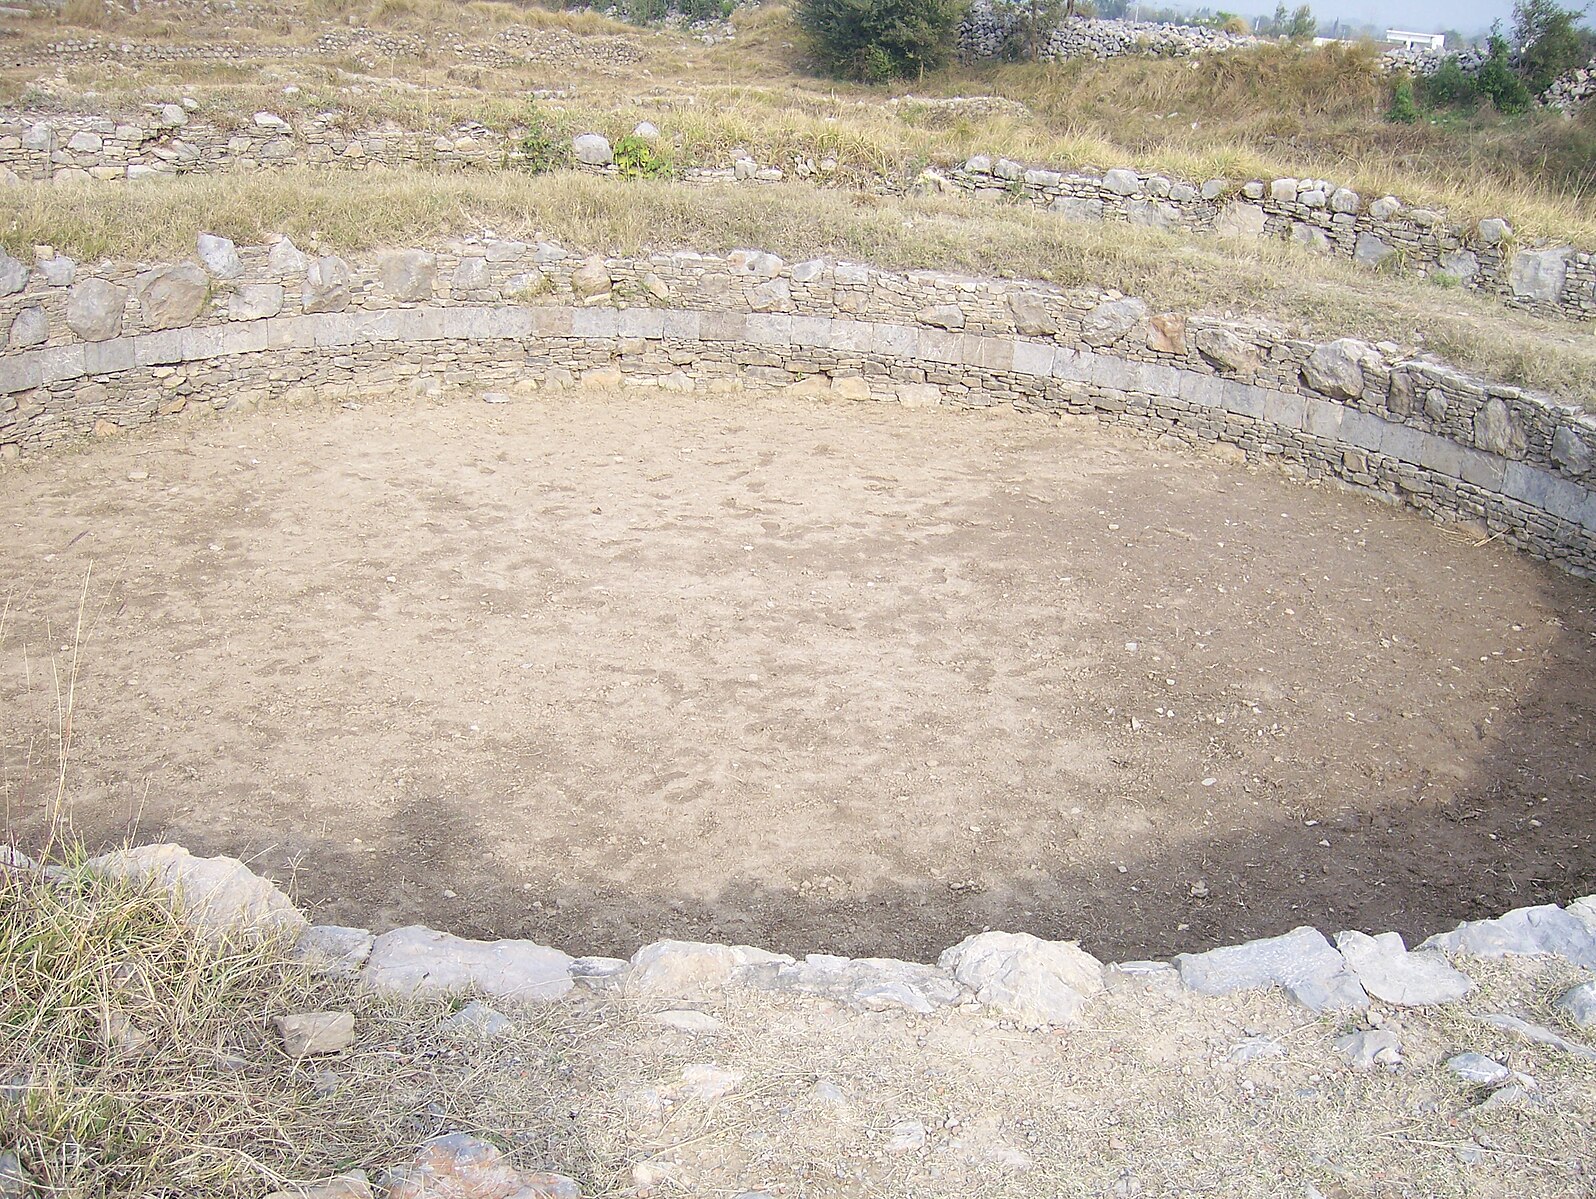
The Apsidal Temple (6.3.13) was considered the largest religious building in the region. Like the Parthenon, the temple was seventy meters by forty meters and built from the same rock as the rest of the town. The temple was called apsidal because of the semi-circular end of the building. The area (6.3.14) was probably covered with a hemispherical dome. Buddhist monks used the rooms in the temple, and historians believe the circular section may be remnants of a stupa.

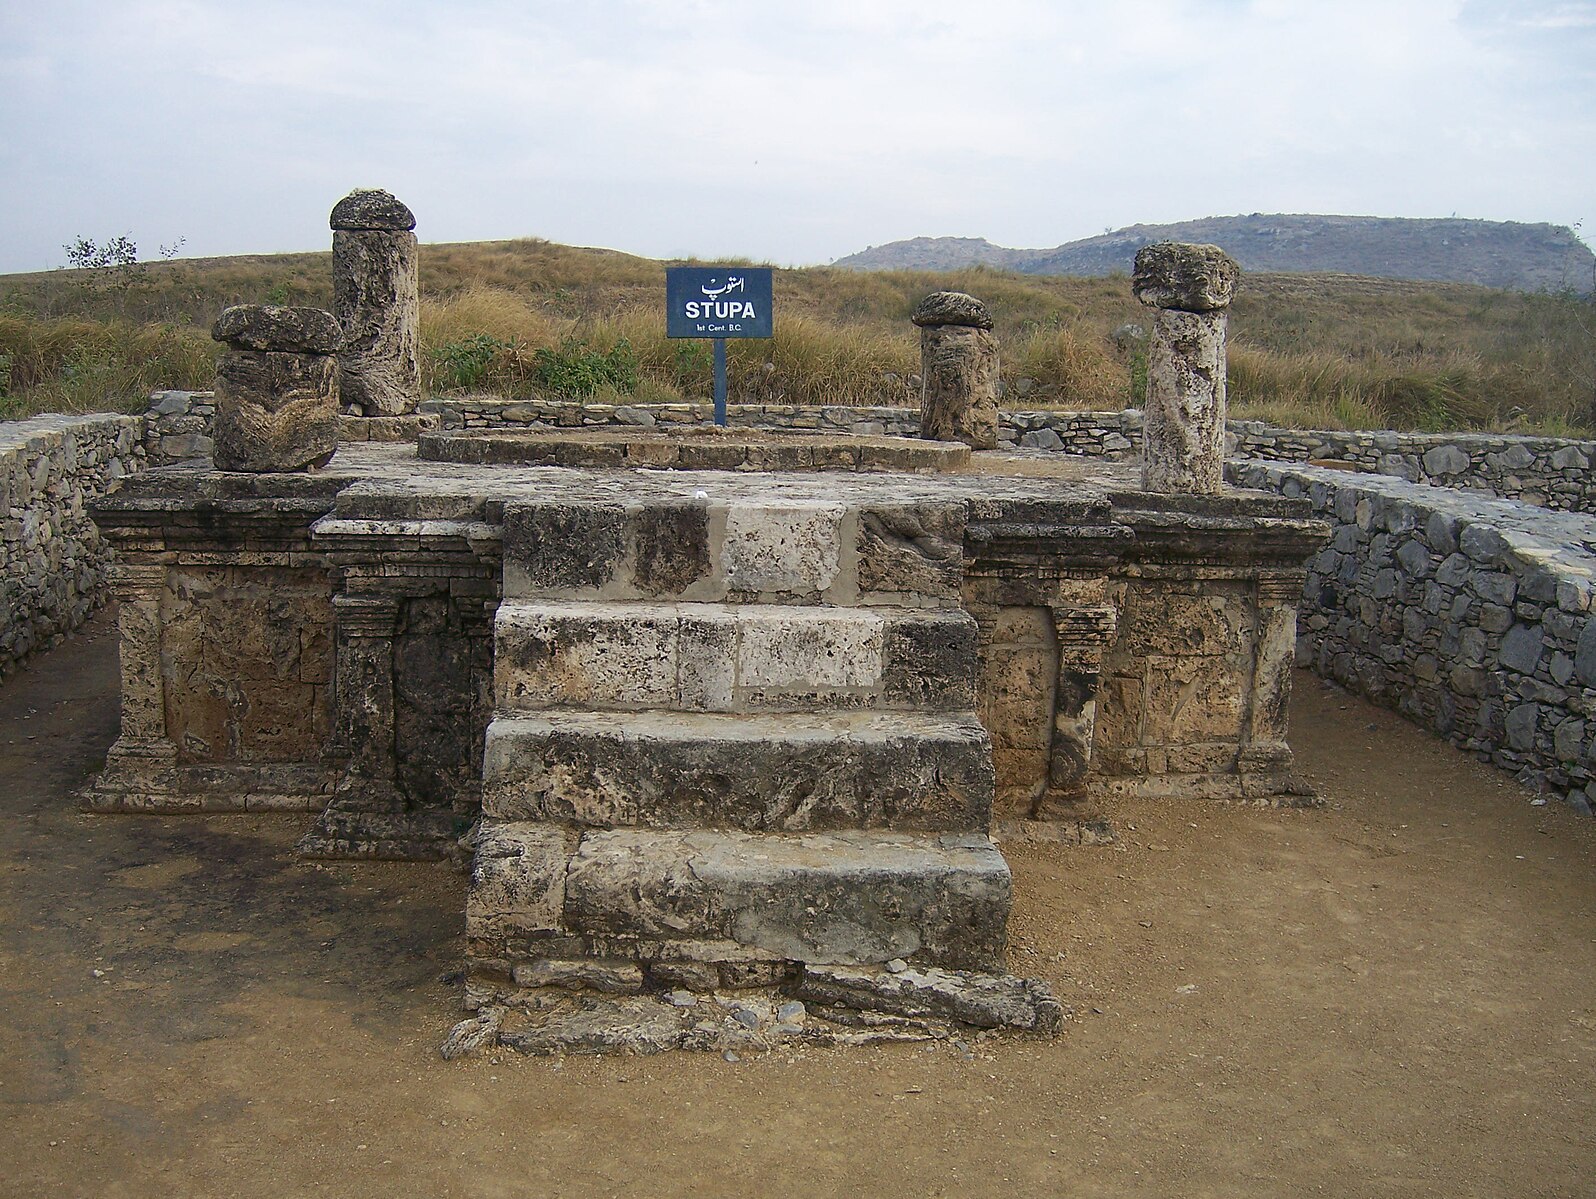
Facing the main street is a building called the 'double-headed eagle' shrine (6.3.15). The shrine had its walled court and steps to access the shrine. The faces of the walls are decorated with a bird perched on top, and one of the birds is a double-headed eagle. Rows of Corinthian capitals are evident, with only a few parts surviving. Architectural elements include a square podium and other outlines of a potential stupa as part of the site.[3]
Taxila is a significant archaeological site in the modern city of the same name in Punjab, Pakistan. It lies about 32 km northwest of Islamabad and Rawalpindi, just off the famous Grand Trunk Road.
Jaulian
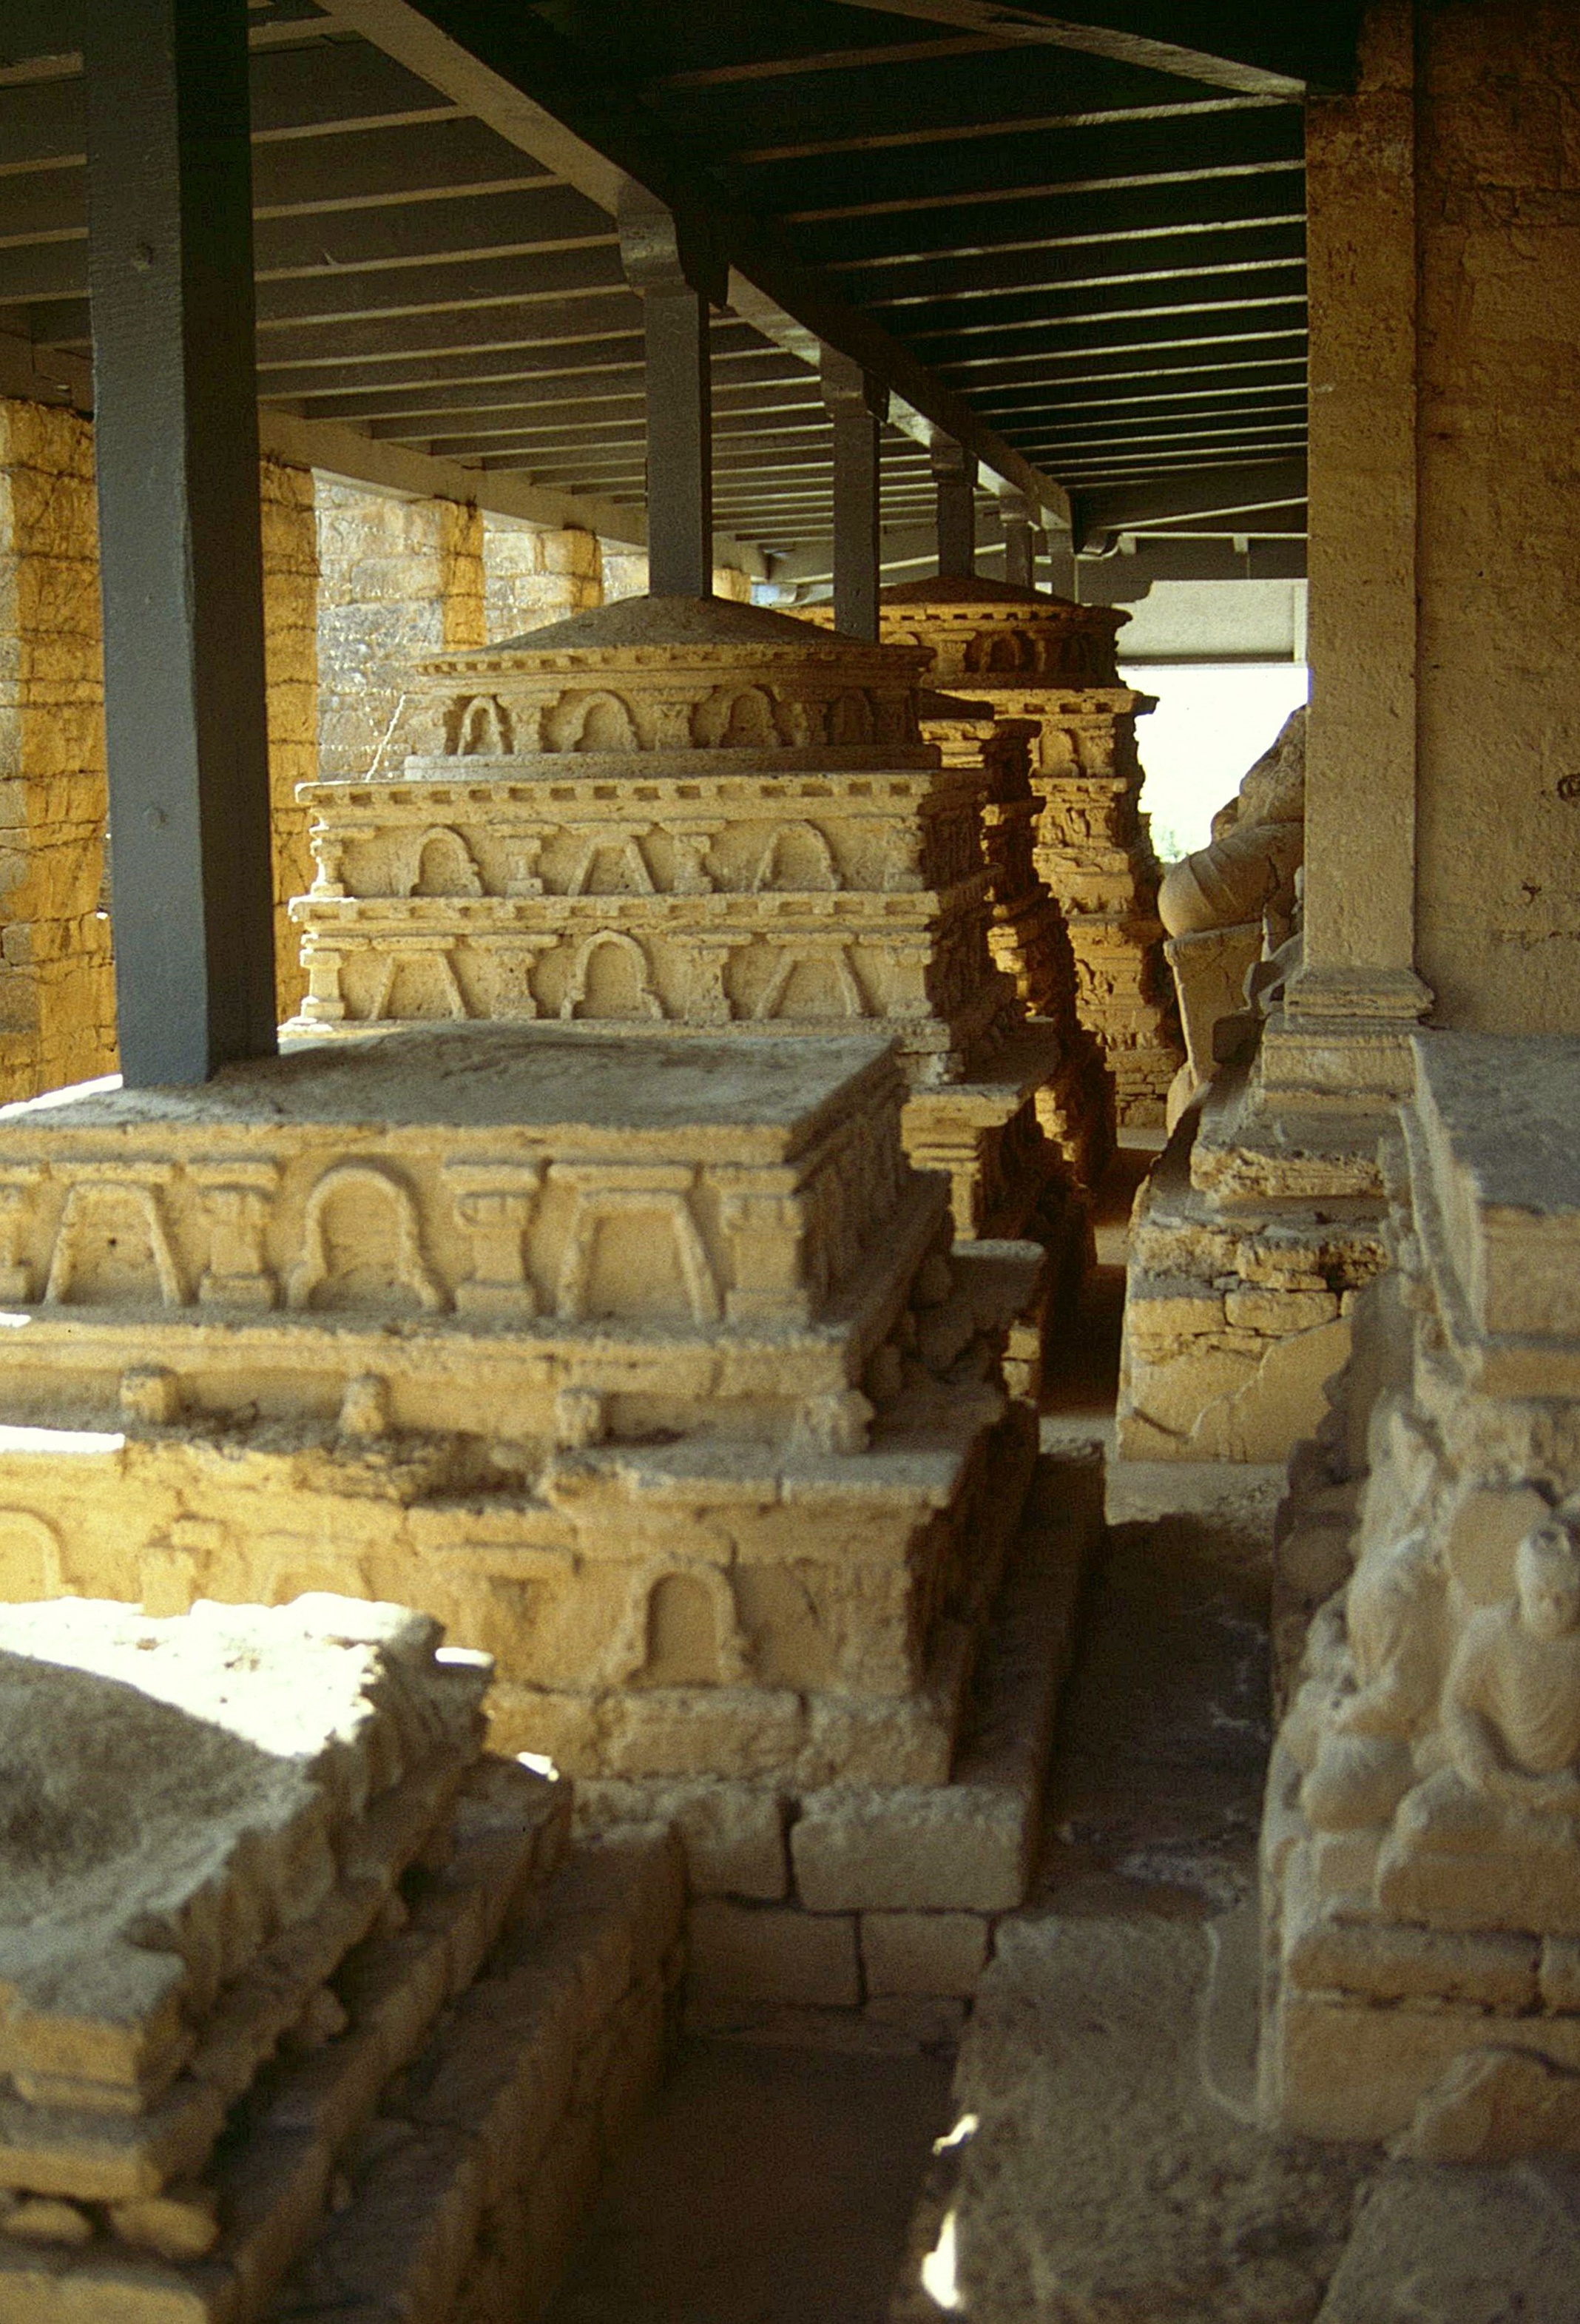
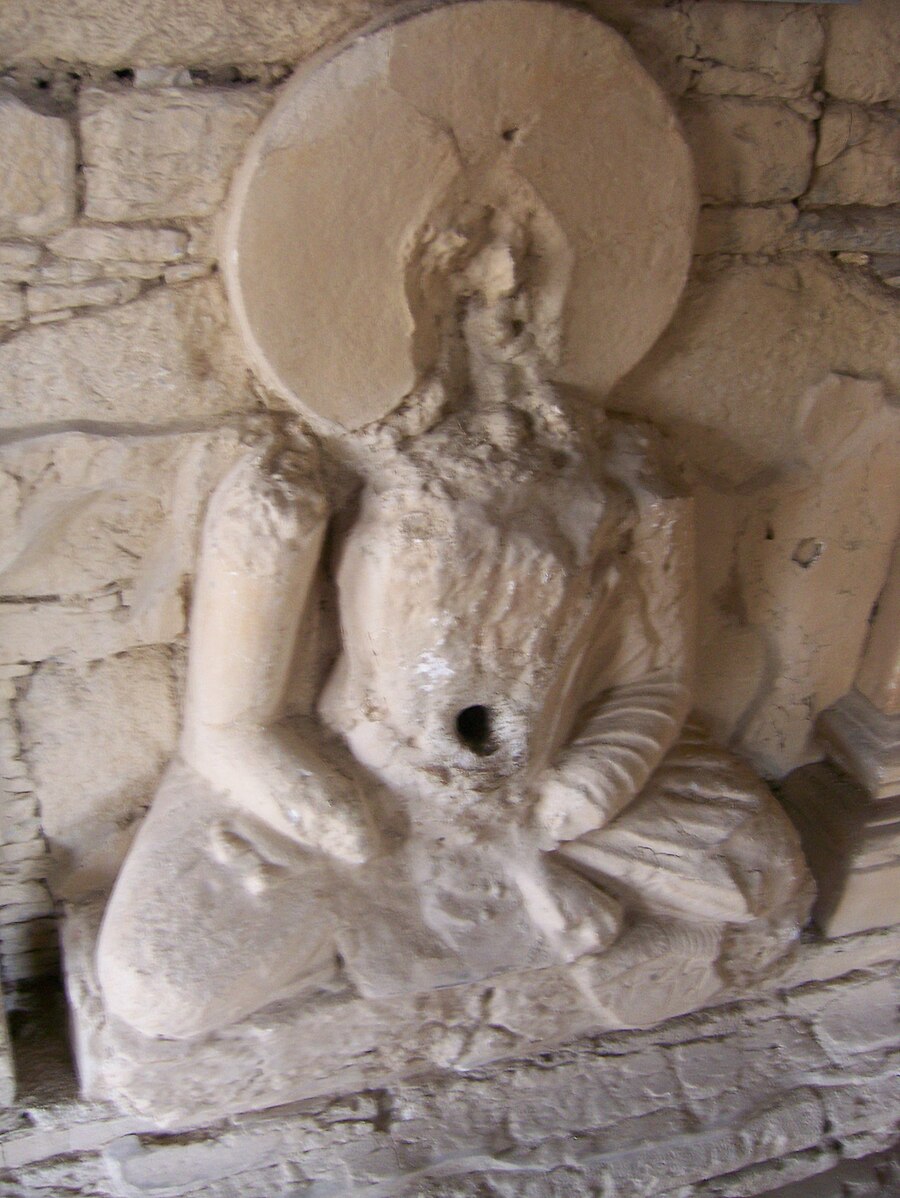
The Julian complex comprises the remains from a Buddhist monastery and a huge stupa or shrine. The buildings on the site were constructed as part of the Kushan Empire expansion. Although the site is severely damaged, archaeologists excavated one main stupa, twenty-seven subsidiary stupas (6.3.16), and two courts. The monastery was located on a hill and had fifty-nine chapels in the courtyards, all embellished with scenes of Buddha. The buildings were constructed of the usual stone rubble and mud to form the walls and then plastered with stucco. Historians believe the small stupas were used as tombs for the monks. Pilgrims and devotees went to the monastery for worship and donated funds for a specific stupa or a general fund. The twenty-seven small stupas featured a square base capped with circular drums and topped by a dome. Each stupa was unique; however, they usually followed a pyramidal pattern with three tiers getting smaller as they build upwards. Each of the tiers was filled with pilasters caved with religious symbols, including images of the Buddha or Bodhisattvas. This carving of the Buddha (6.3.17) demonstrates the typical posed position on a cushion with the representation of a halo. The overly large hole for the navel was initially a regular size. However, devotees making the pilgrimage to the site put their finger in the navel hole to pray for a cure or other petition, thus enlarging the hole over time.
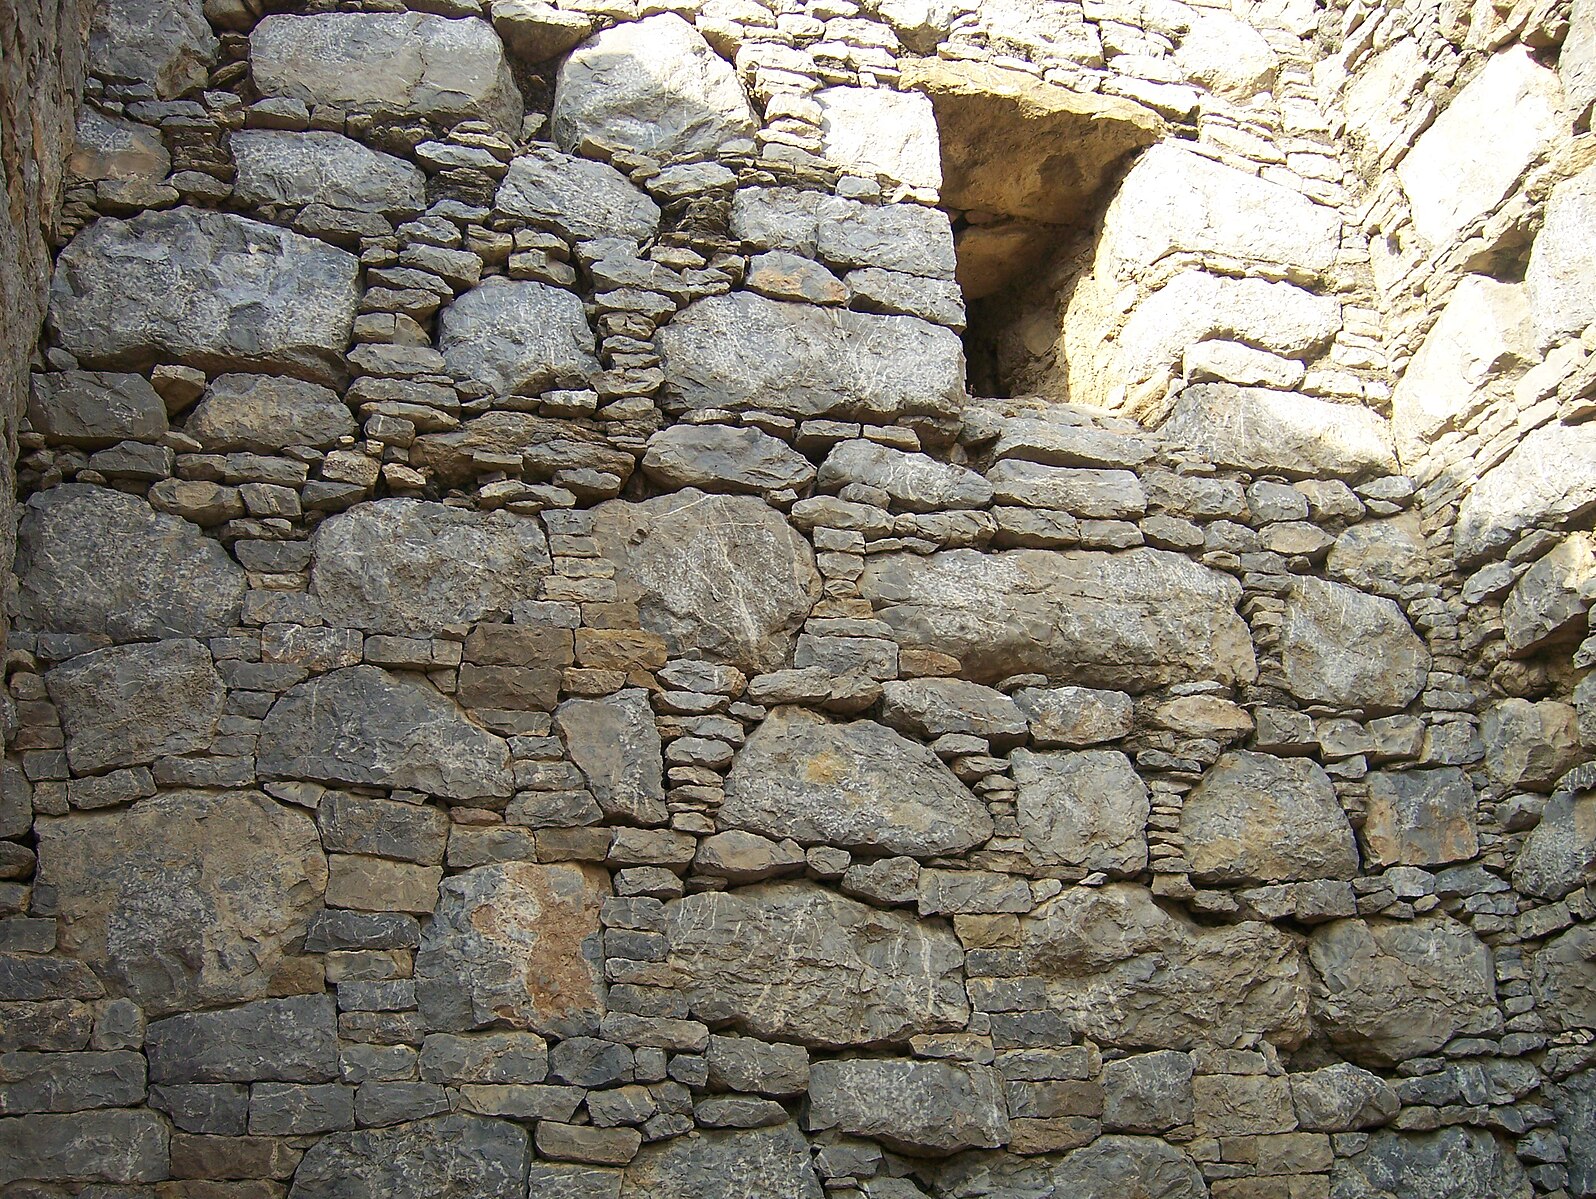
One section of the monastery was two stories high with twenty-eight rooms for students. The complex also had other general accommodations: a kitchen, assembly hall, storage spaces, and bathing pool. The monks had a special workroom where they created the Buddhist manuscripts. The student rooms were small, with an open window (6.3.18) for air and light and a small wall niche for a light source. Food was prepared in the shared kitchen for all the community, and the stone mills for grinding grain or spices remain today (6.3.19). Although the bathing pool (6.3.20) is filled with dirt now, it was located in the central position of the students' rooms for ritual bathing.

Kanishka Casket
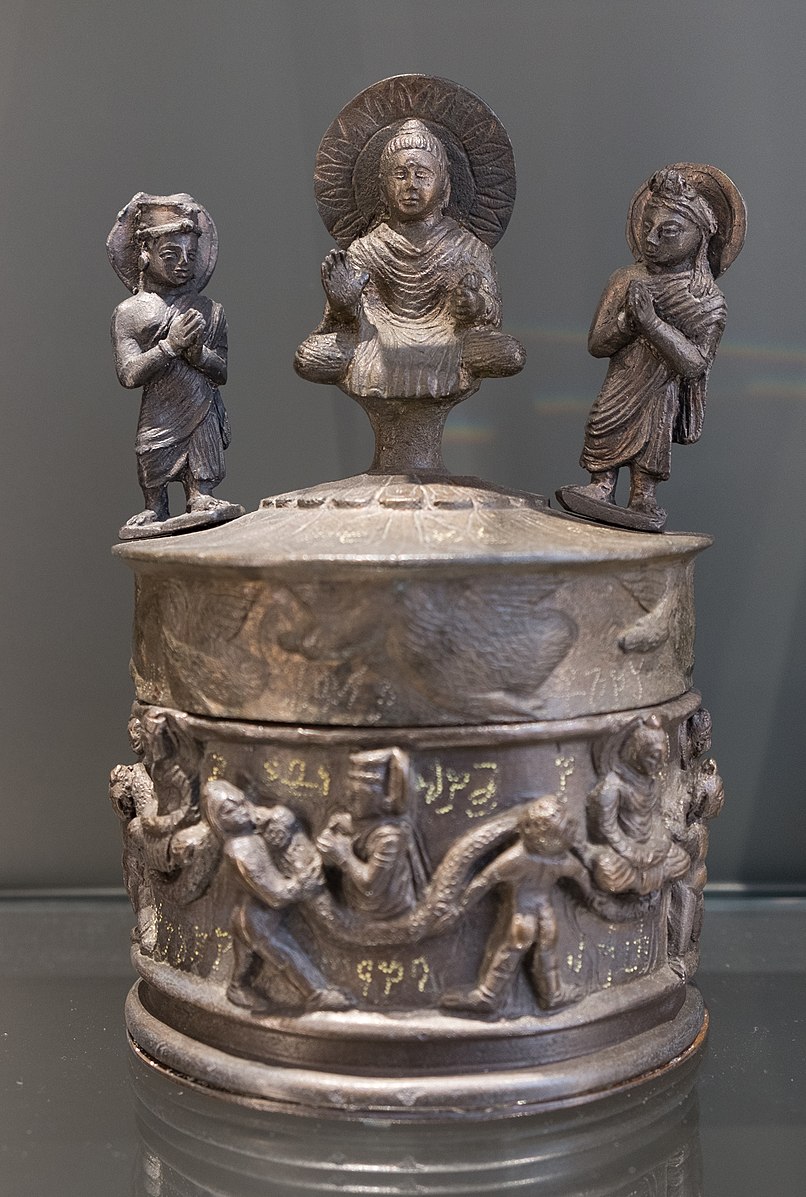
Kanishka the Great ruled the Kushan Empire from 127 to 159 CE and was considered one the most progressive leaders for his military and governmental contributions and support and expansion of Buddhism. Kanishka expanded the region and the reach of trade along the Silk Road and spread Buddhism to China. Kanishka's casket (6.3.21) was made to hold fragments unique articles. The British found the casket in 1908-1909 during the excavation of the Kaniska stupa. The casket was made from copper alloy and lead, believed to hold a few bone fragments of the Buddha. Three figures are standing on top of the lid. In the center is the Buddha with the large halo, and Brahma and Indra are on each side. The sides of the casket (6.3.22) are figures of the seated Buddha, a figure appearing to be meditating, and small cherubs with a garland encircling the casket.
[1] The Kushan Empire Retrieved from https://depts.washington.edu/silkroa...ans/essay.html