
6.2: Satavahana Empire (100 BCE – 300 CE)
- Page ID
- 219989

\( \newcommand{\vecs}[1]{\overset { \scriptstyle \rightharpoonup} {\mathbf{#1}} } \)
\( \newcommand{\vecd}[1]{\overset{-\!-\!\rightharpoonup}{\vphantom{a}\smash {#1}}} \)
\( \newcommand{\id}{\mathrm{id}}\) \( \newcommand{\Span}{\mathrm{span}}\)
( \newcommand{\kernel}{\mathrm{null}\,}\) \( \newcommand{\range}{\mathrm{range}\,}\)
\( \newcommand{\RealPart}{\mathrm{Re}}\) \( \newcommand{\ImaginaryPart}{\mathrm{Im}}\)
\( \newcommand{\Argument}{\mathrm{Arg}}\) \( \newcommand{\norm}[1]{\| #1 \|}\)
\( \newcommand{\inner}[2]{\langle #1, #2 \rangle}\)
\( \newcommand{\Span}{\mathrm{span}}\)
\( \newcommand{\id}{\mathrm{id}}\)
\( \newcommand{\Span}{\mathrm{span}}\)
\( \newcommand{\kernel}{\mathrm{null}\,}\)
\( \newcommand{\range}{\mathrm{range}\,}\)
\( \newcommand{\RealPart}{\mathrm{Re}}\)
\( \newcommand{\ImaginaryPart}{\mathrm{Im}}\)
\( \newcommand{\Argument}{\mathrm{Arg}}\)
\( \newcommand{\norm}[1]{\| #1 \|}\)
\( \newcommand{\inner}[2]{\langle #1, #2 \rangle}\)
\( \newcommand{\Span}{\mathrm{span}}\) \( \newcommand{\AA}{\unicode[.8,0]{x212B}}\)
\( \newcommand{\vectorA}[1]{\vec{#1}} % arrow\)
\( \newcommand{\vectorAt}[1]{\vec{\text{#1}}} % arrow\)
\( \newcommand{\vectorB}[1]{\overset { \scriptstyle \rightharpoonup} {\mathbf{#1}} } \)
\( \newcommand{\vectorC}[1]{\textbf{#1}} \)
\( \newcommand{\vectorD}[1]{\overrightarrow{#1}} \)
\( \newcommand{\vectorDt}[1]{\overrightarrow{\text{#1}}} \)
\( \newcommand{\vectE}[1]{\overset{-\!-\!\rightharpoonup}{\vphantom{a}\smash{\mathbf {#1}}}} \)
\( \newcommand{\vecs}[1]{\overset { \scriptstyle \rightharpoonup} {\mathbf{#1}} } \)
\( \newcommand{\vecd}[1]{\overset{-\!-\!\rightharpoonup}{\vphantom{a}\smash {#1}}} \)
\(\newcommand{\avec}{\mathbf a}\) \(\newcommand{\bvec}{\mathbf b}\) \(\newcommand{\cvec}{\mathbf c}\) \(\newcommand{\dvec}{\mathbf d}\) \(\newcommand{\dtil}{\widetilde{\mathbf d}}\) \(\newcommand{\evec}{\mathbf e}\) \(\newcommand{\fvec}{\mathbf f}\) \(\newcommand{\nvec}{\mathbf n}\) \(\newcommand{\pvec}{\mathbf p}\) \(\newcommand{\qvec}{\mathbf q}\) \(\newcommand{\svec}{\mathbf s}\) \(\newcommand{\tvec}{\mathbf t}\) \(\newcommand{\uvec}{\mathbf u}\) \(\newcommand{\vvec}{\mathbf v}\) \(\newcommand{\wvec}{\mathbf w}\) \(\newcommand{\xvec}{\mathbf x}\) \(\newcommand{\yvec}{\mathbf y}\) \(\newcommand{\zvec}{\mathbf z}\) \(\newcommand{\rvec}{\mathbf r}\) \(\newcommand{\mvec}{\mathbf m}\) \(\newcommand{\zerovec}{\mathbf 0}\) \(\newcommand{\onevec}{\mathbf 1}\) \(\newcommand{\real}{\mathbb R}\) \(\newcommand{\twovec}[2]{\left[\begin{array}{r}#1 \\ #2 \end{array}\right]}\) \(\newcommand{\ctwovec}[2]{\left[\begin{array}{c}#1 \\ #2 \end{array}\right]}\) \(\newcommand{\threevec}[3]{\left[\begin{array}{r}#1 \\ #2 \\ #3 \end{array}\right]}\) \(\newcommand{\cthreevec}[3]{\left[\begin{array}{c}#1 \\ #2 \\ #3 \end{array}\right]}\) \(\newcommand{\fourvec}[4]{\left[\begin{array}{r}#1 \\ #2 \\ #3 \\ #4 \end{array}\right]}\) \(\newcommand{\cfourvec}[4]{\left[\begin{array}{c}#1 \\ #2 \\ #3 \\ #4 \end{array}\right]}\) \(\newcommand{\fivevec}[5]{\left[\begin{array}{r}#1 \\ #2 \\ #3 \\ #4 \\ #5 \\ \end{array}\right]}\) \(\newcommand{\cfivevec}[5]{\left[\begin{array}{c}#1 \\ #2 \\ #3 \\ #4 \\ #5 \\ \end{array}\right]}\) \(\newcommand{\mattwo}[4]{\left[\begin{array}{rr}#1 \amp #2 \\ #3 \amp #4 \\ \end{array}\right]}\) \(\newcommand{\laspan}[1]{\text{Span}\{#1\}}\) \(\newcommand{\bcal}{\cal B}\) \(\newcommand{\ccal}{\cal C}\) \(\newcommand{\scal}{\cal S}\) \(\newcommand{\wcal}{\cal W}\) \(\newcommand{\ecal}{\cal E}\) \(\newcommand{\coords}[2]{\left\{#1\right\}_{#2}}\) \(\newcommand{\gray}[1]{\color{gray}{#1}}\) \(\newcommand{\lgray}[1]{\color{lightgray}{#1}}\) \(\newcommand{\rank}{\operatorname{rank}}\) \(\newcommand{\row}{\text{Row}}\) \(\newcommand{\col}{\text{Col}}\) \(\renewcommand{\row}{\text{Row}}\) \(\newcommand{\nul}{\text{Nul}}\) \(\newcommand{\var}{\text{Var}}\) \(\newcommand{\corr}{\text{corr}}\) \(\newcommand{\len}[1]{\left|#1\right|}\) \(\newcommand{\bbar}{\overline{\bvec}}\) \(\newcommand{\bhat}{\widehat{\bvec}}\) \(\newcommand{\bperp}{\bvec^\perp}\) \(\newcommand{\xhat}{\widehat{\xvec}}\) \(\newcommand{\vhat}{\widehat{\vvec}}\) \(\newcommand{\uhat}{\widehat{\uvec}}\) \(\newcommand{\what}{\widehat{\wvec}}\) \(\newcommand{\Sighat}{\widehat{\Sigma}}\) \(\newcommand{\lt}{<}\) \(\newcommand{\gt}{>}\) \(\newcommand{\amp}{&}\) \(\definecolor{fillinmathshade}{gray}{0.9}\)Introduction
In the northern part of the expansive region, the Maurya flourished; however, in the southern section, the Satavahana Empire (6.2.1) was beginning to grow. The empire lasted over four hundred years and was relatively successful while continually engaging in warfare with its neighbors. The origin of the empire is unknown; however, Simuka is listed as the first king in a Satavahana inscription. A monarchy became the system of government and was specified as hereditary. Governors ruled the employed advisors and the provinces. The Satavahana followed Buddhism like the Mauryan dynasty, and their support of Buddhism influenced art and architecture.

Sanchi Stupa
Although Emperor Ashoka initially constructed the Great Stupa at Sanchi, the subsequent dynasties added to the environment. In the Satavahana period, gateways (toranas) were added, and the torana could be plain or carved with symbols. The toranas at the Great Stupa were fifteen meters high and thirty-six meters across and placed in the north, south, east, and west openings. Each one was carved from sandstone, and because of the elaborate and integrated carvings, historians think the workers were originally ivory carvers from a nearby town.
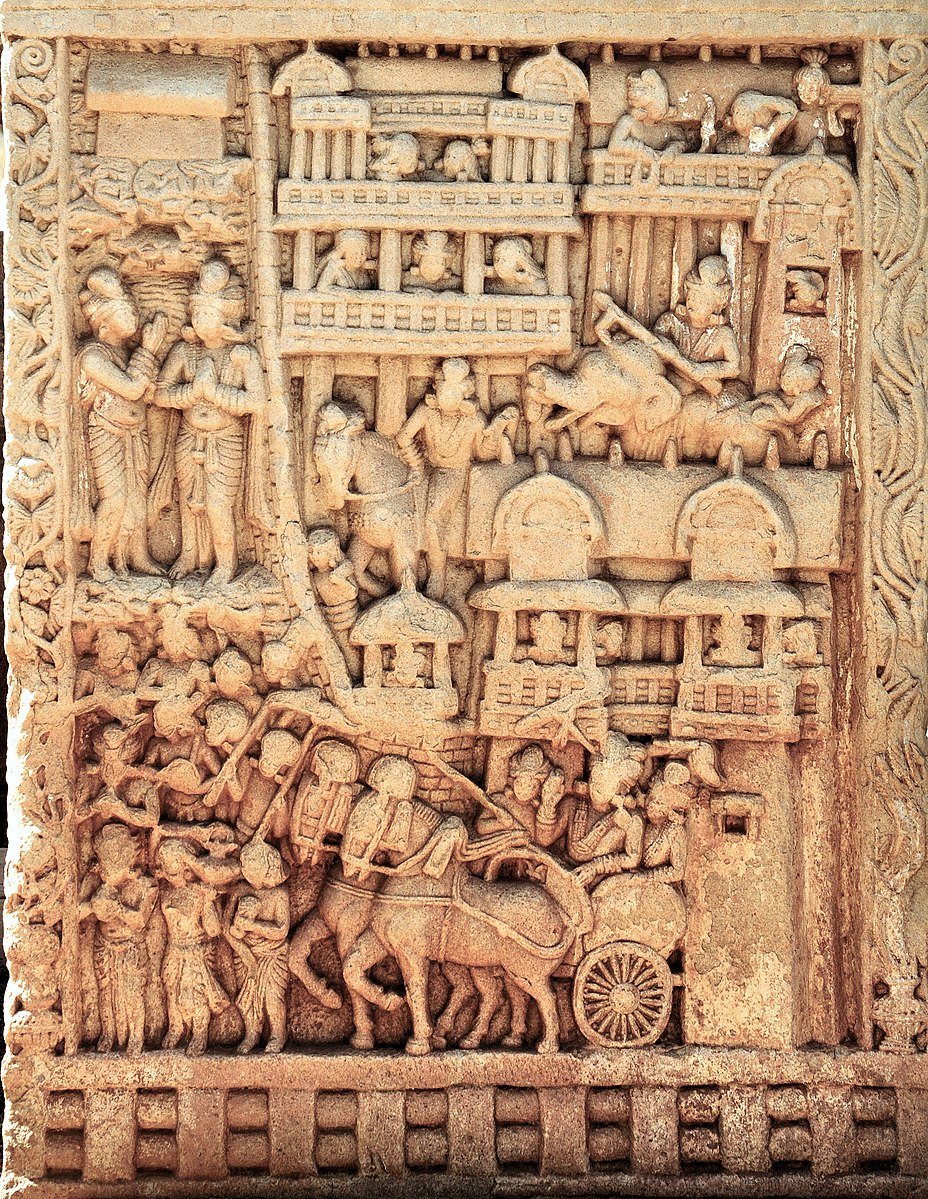
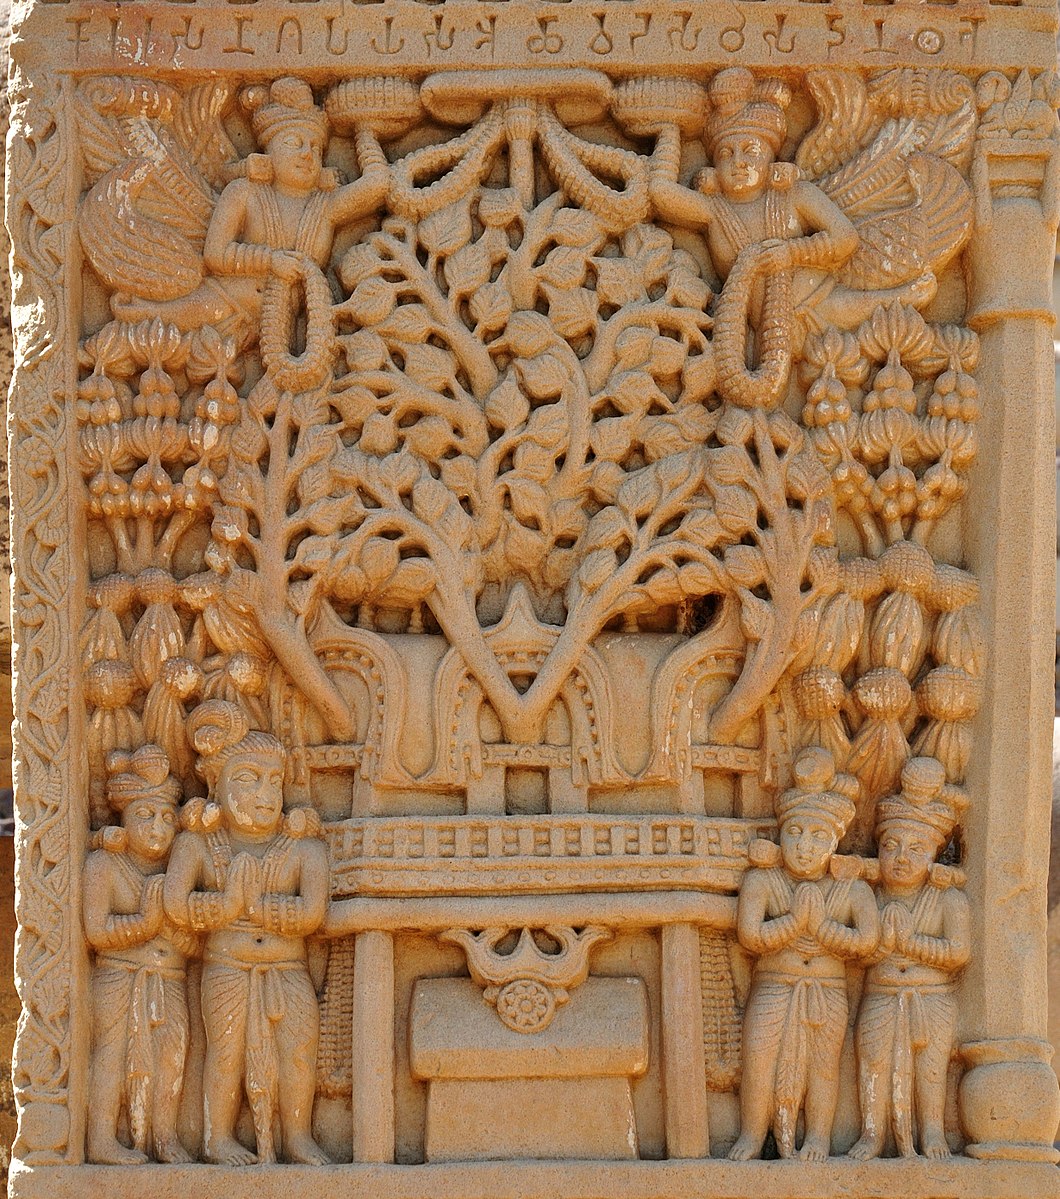
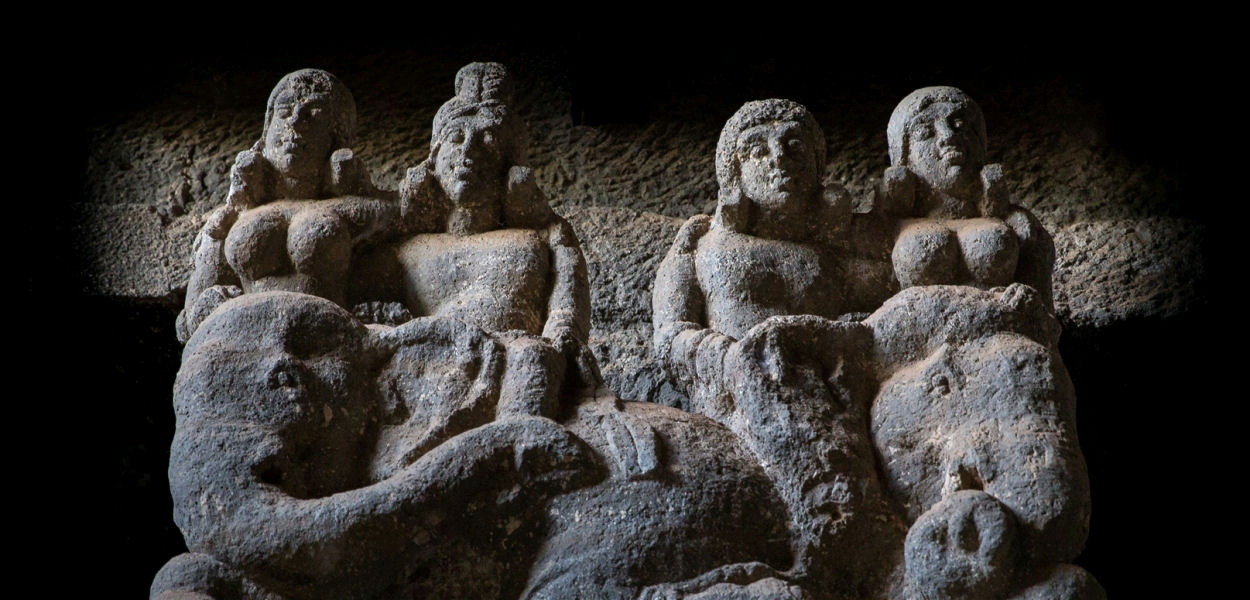
The top crossbar on the east gate (x.x) represents seven different Buddhas; the middle figure portrays the Great Departure of Buddha as he left the palace. The lower bar depicts Emperor Ashoka when he visited the Bodhi tree. The ends of the crossbars had sculptures on each section, and today, only a few elephants are left. Under the bottom bar, a Yakshi (x.x) adds not only decoration but the figure also provides architectural strength to the bars. Her pose is almost erotic, and she represents fertility. Elephants (x.x) stand behind her and are decorated in ceremonial attachments, along with winged lions and peacocks.
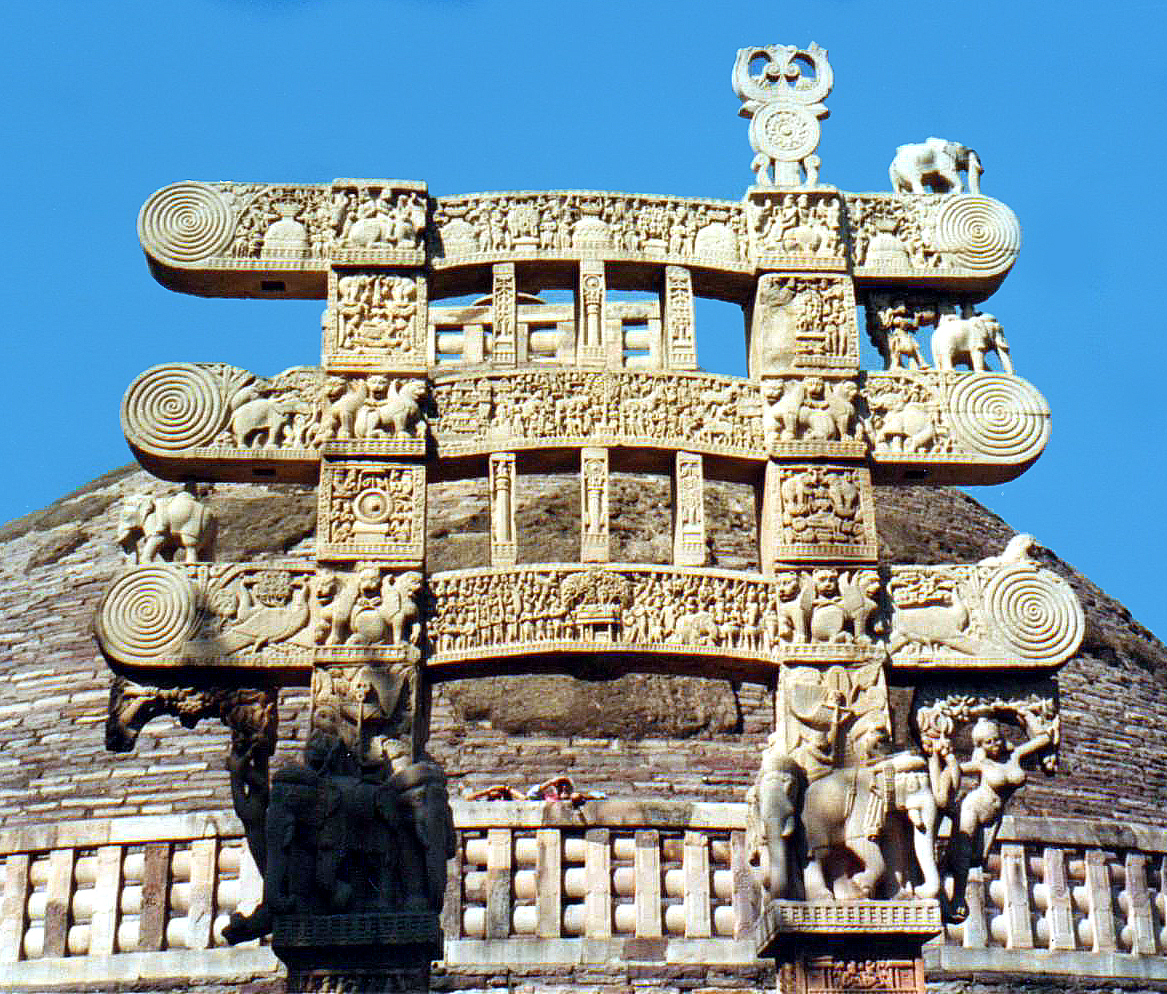
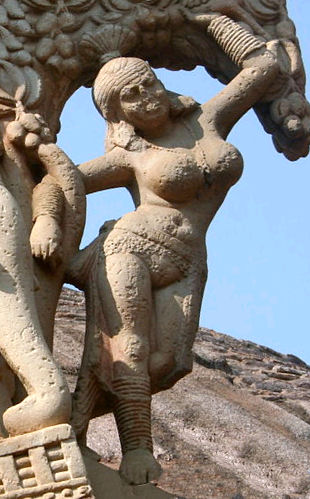
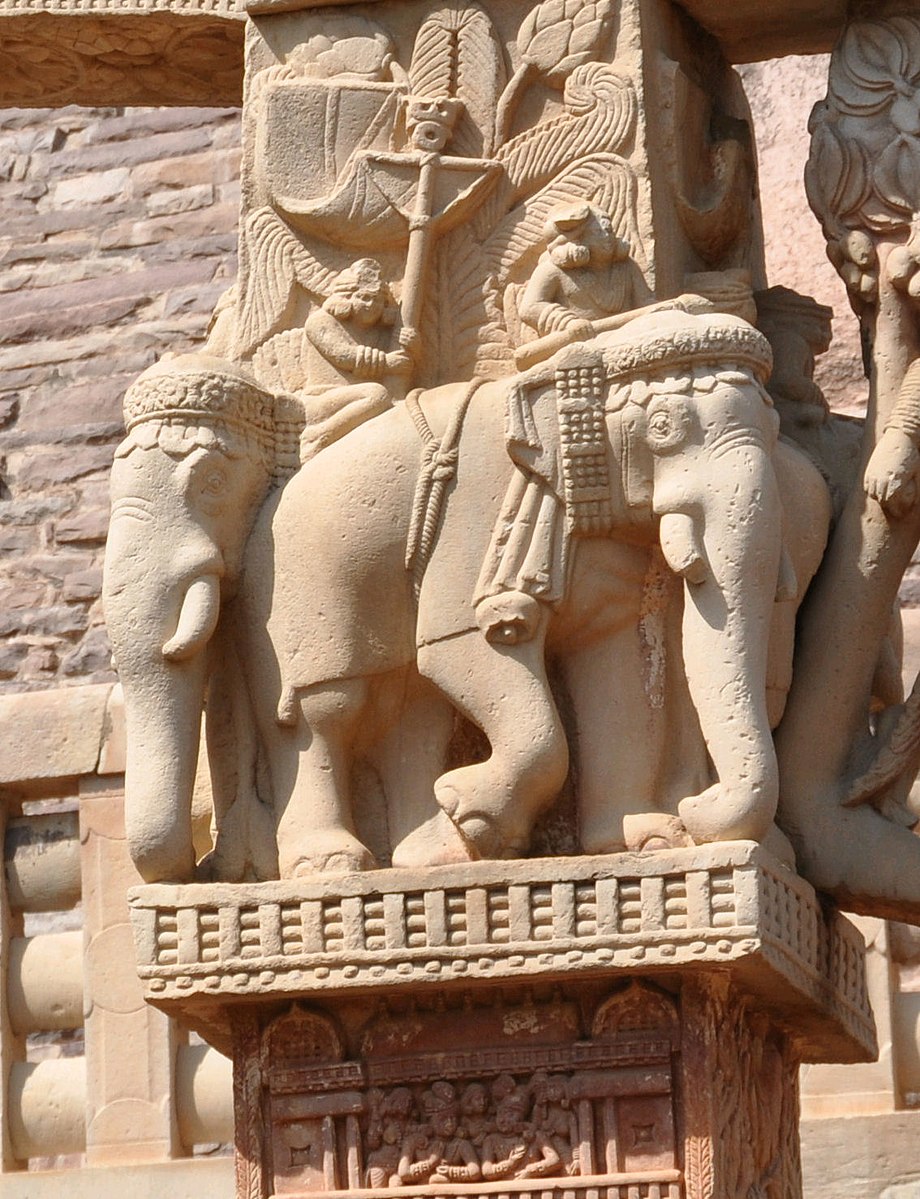 Figure \(\PageIndex{1}\): Elephant capital (Amigo&oscar, CC BY-SA 3.0)
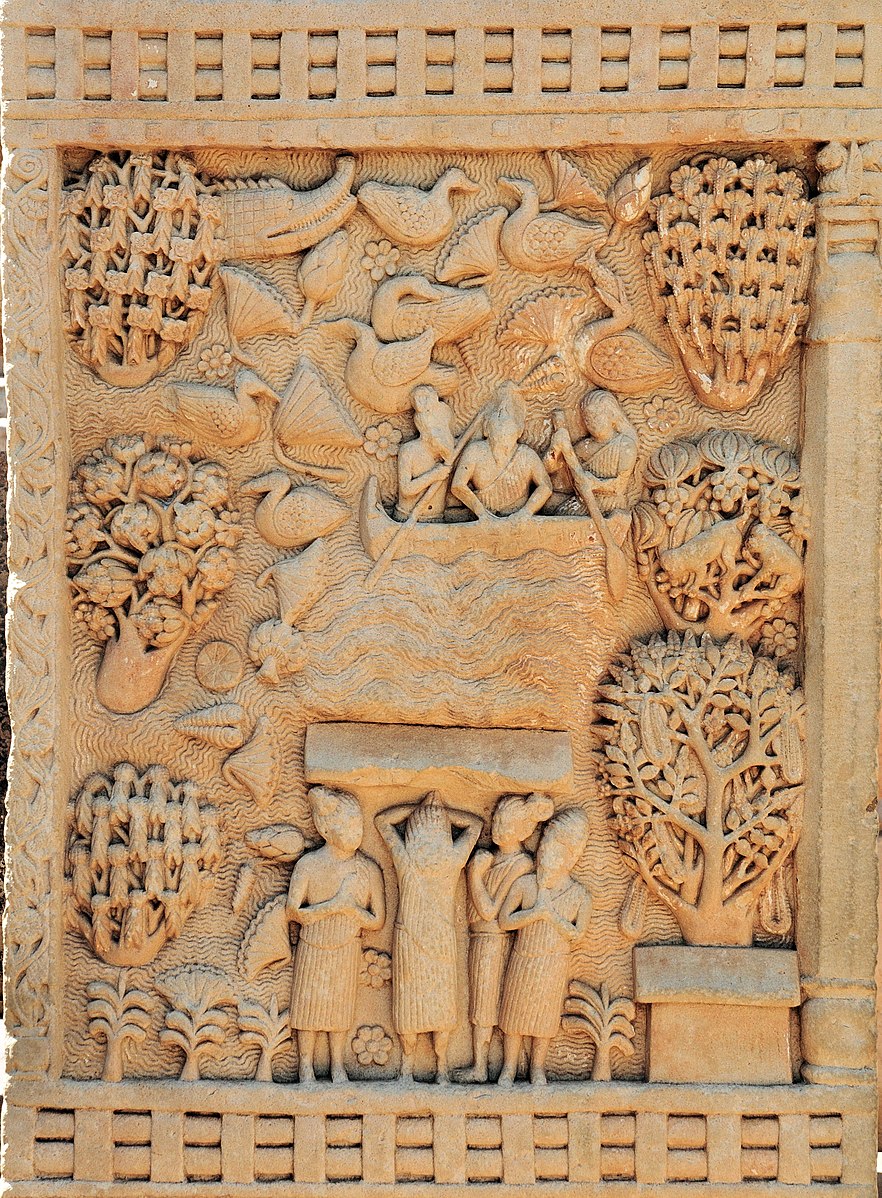
The cross bars on the panels were ornately carved to tell stories about the Buddha and different events. The river is flooded in the (x.x) Miracle of Buddha Walking on a River, and the boatmen are trying to save the Buddha. Buddha's image is not visible and is only represented by a path along the water and the empty throne. The other images are representative of multiple religious symbols. One local king, Bimbisara, supported Buddha and is depicted traveling with his court (x.x) to visit Buddha. Bimbisara travels in a chariot, and Buddha is shown as an empty throne. All the supporting courtiers are walking into the city. The Enlightenment of Buddha occurred under a Bodhi tree (x.x), so the emperor built a throne and temple to protect the tree. The branches of the Bodhi tree are seen through the temple windows, while four figures are visible at the bottom of the panel, posed in a stance of adoration.
"All four gateways were of similar design-the work of carpenters rather than of stone masons, and the marvel is that erections of this kind, constructed on principles so unsuited to work in stone, should have survived in such remarkable preservation for nearly two thousand years."[1]
Ajanta Caves
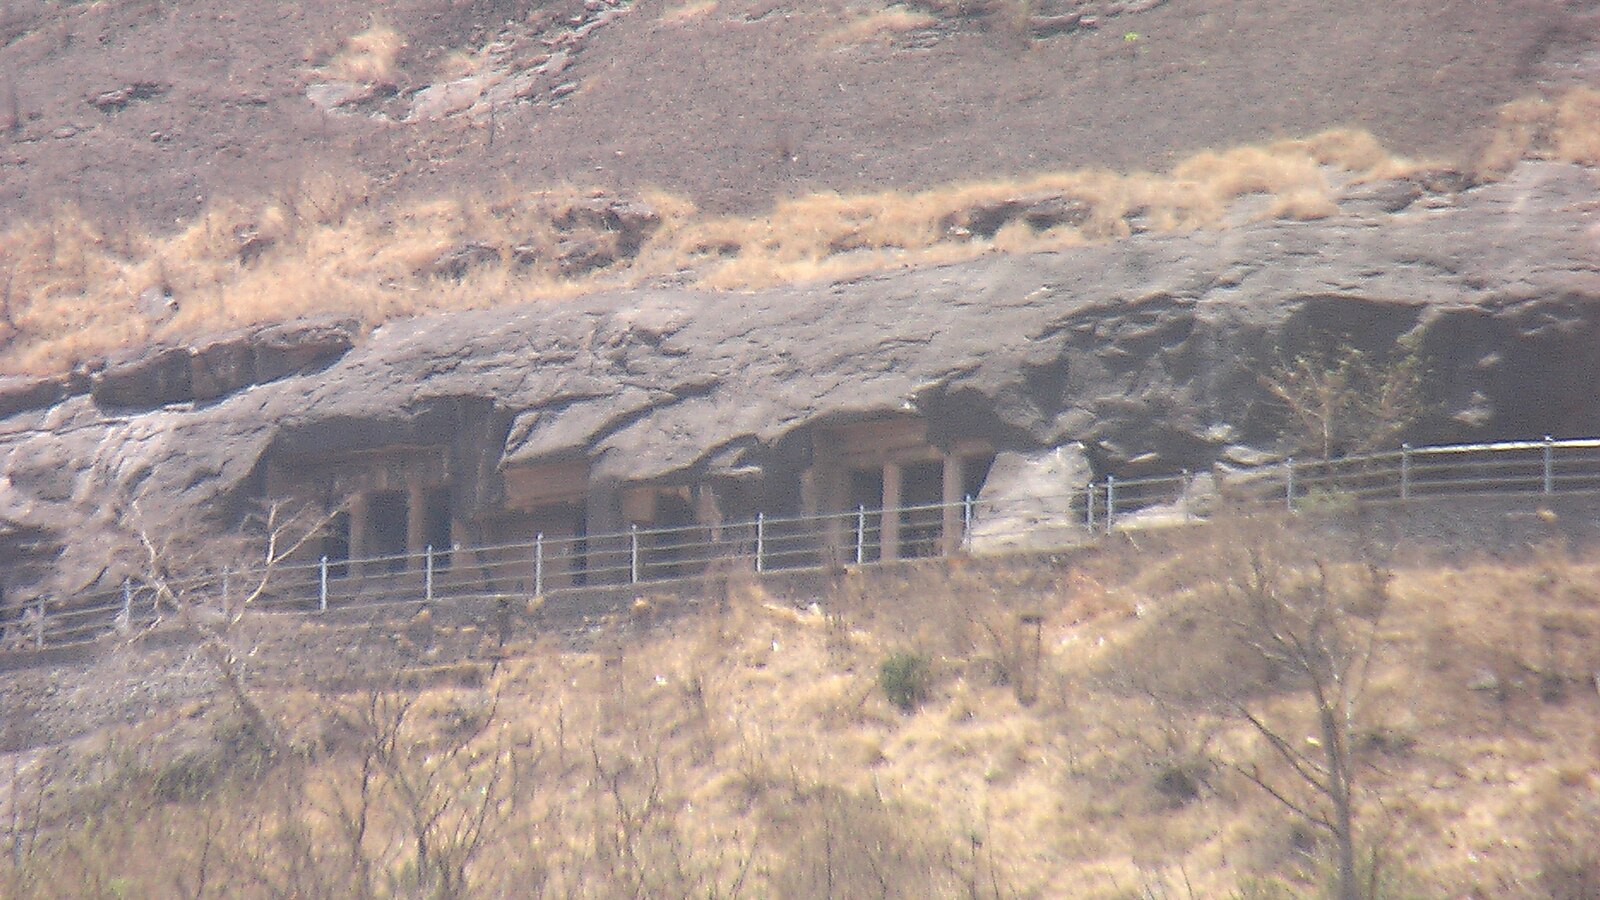
The Ajanta Caves are located in the dense forest on the Deccan Plateau. The first caves were carved about the same time as the construction of Sanchi Stupa (ca 200-100 BCE), with later caves created from 450 to 500 CE during the Satavahana Empire. Over twenty-five caves were carved into the hillside, providing places for Buddhists to worship. Over 200 monks and artisans used the caves to live, study, and paint or sculpt Buddha. Colorful and detailed paintings illustrated the lives of Buddha. The artwork and sculptures survive today because the site was abandoned and forgotten until the 19th century when it was excavated, finding the earliest surviving paintings of ancient India. The caves also presented a place for pilgrims and travelers to stop, meditate, and sleep overnight, a shelter from the monsoon rains, and a cool place during hot, dry periods. Some of the caves were incomplete, leaving a blueprint to understand how the masons and sculptors created the caves by working from the top to the bottom to excavate the caves and develop interesting architectural and sculptural shapes. People frequently donated money to help with construction and support costs, earning the donor an inscription on the cave wall.
The caves are (x.x) cut into the rock along the river gorge. Over time, the caves fell into disuse, and vegetation from the surrounding land grew over the face of the caves, rendering them invisible to the casual person. A British hunting party discovered the caves in 1819 when a British officer searched for tigers, and a local boy took the officer to the cave.
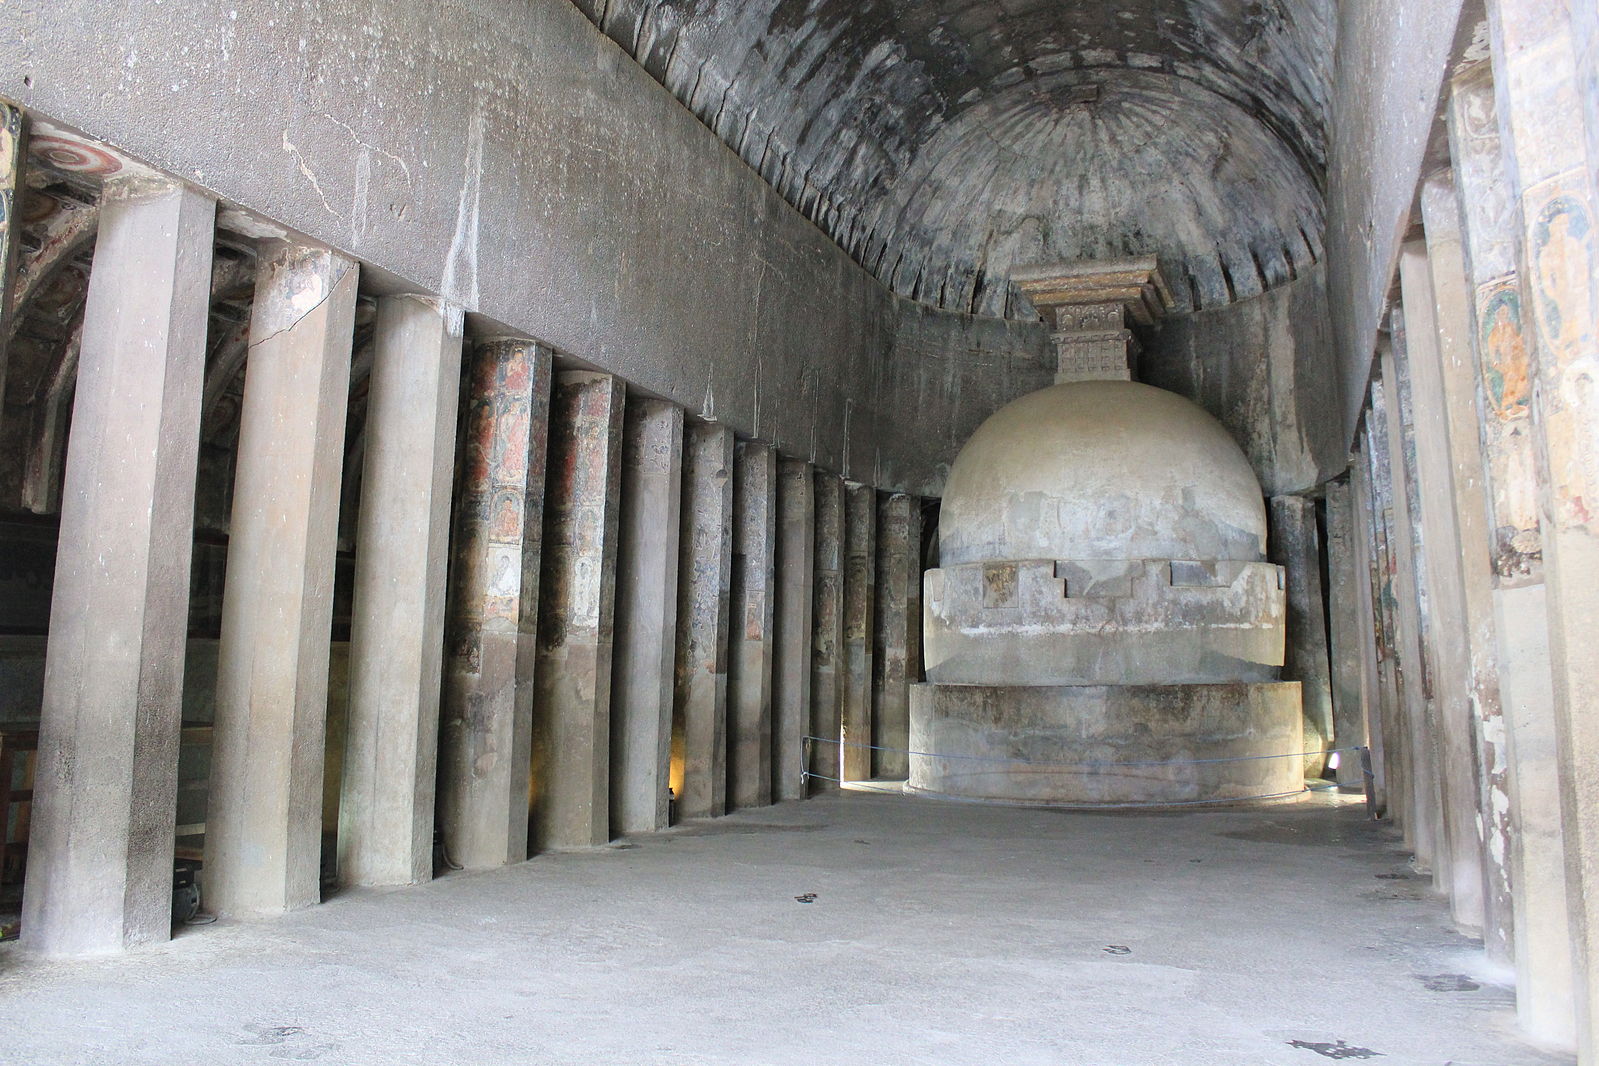
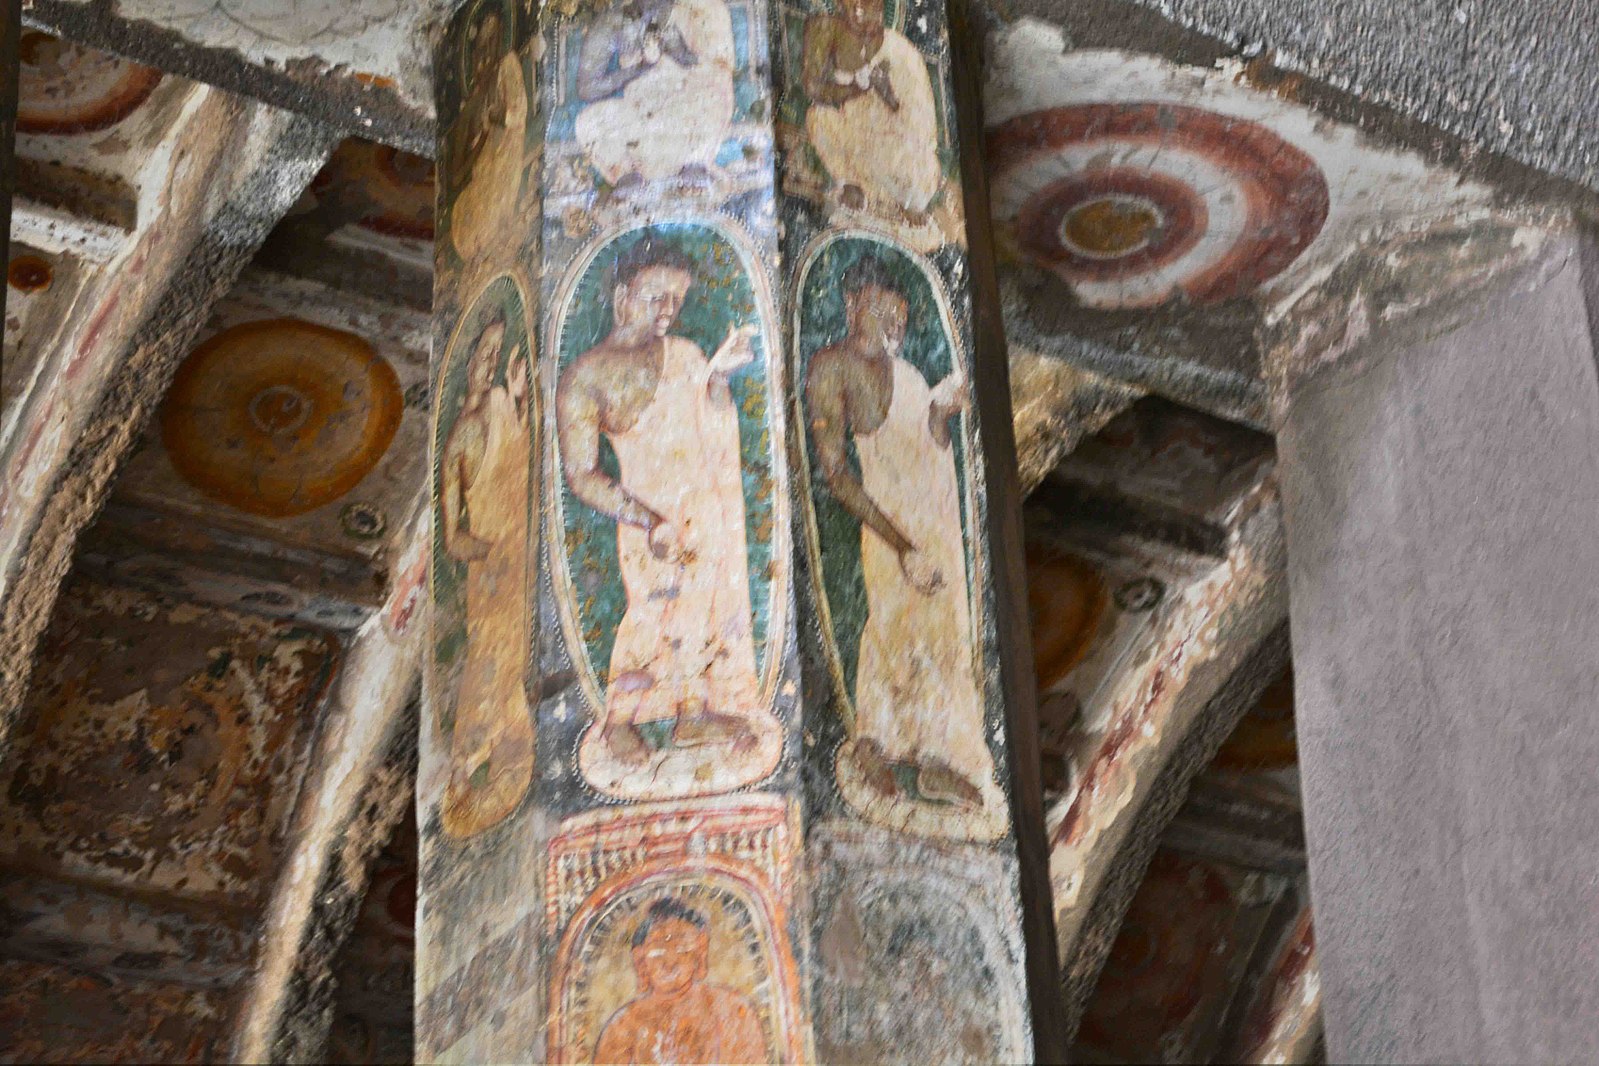
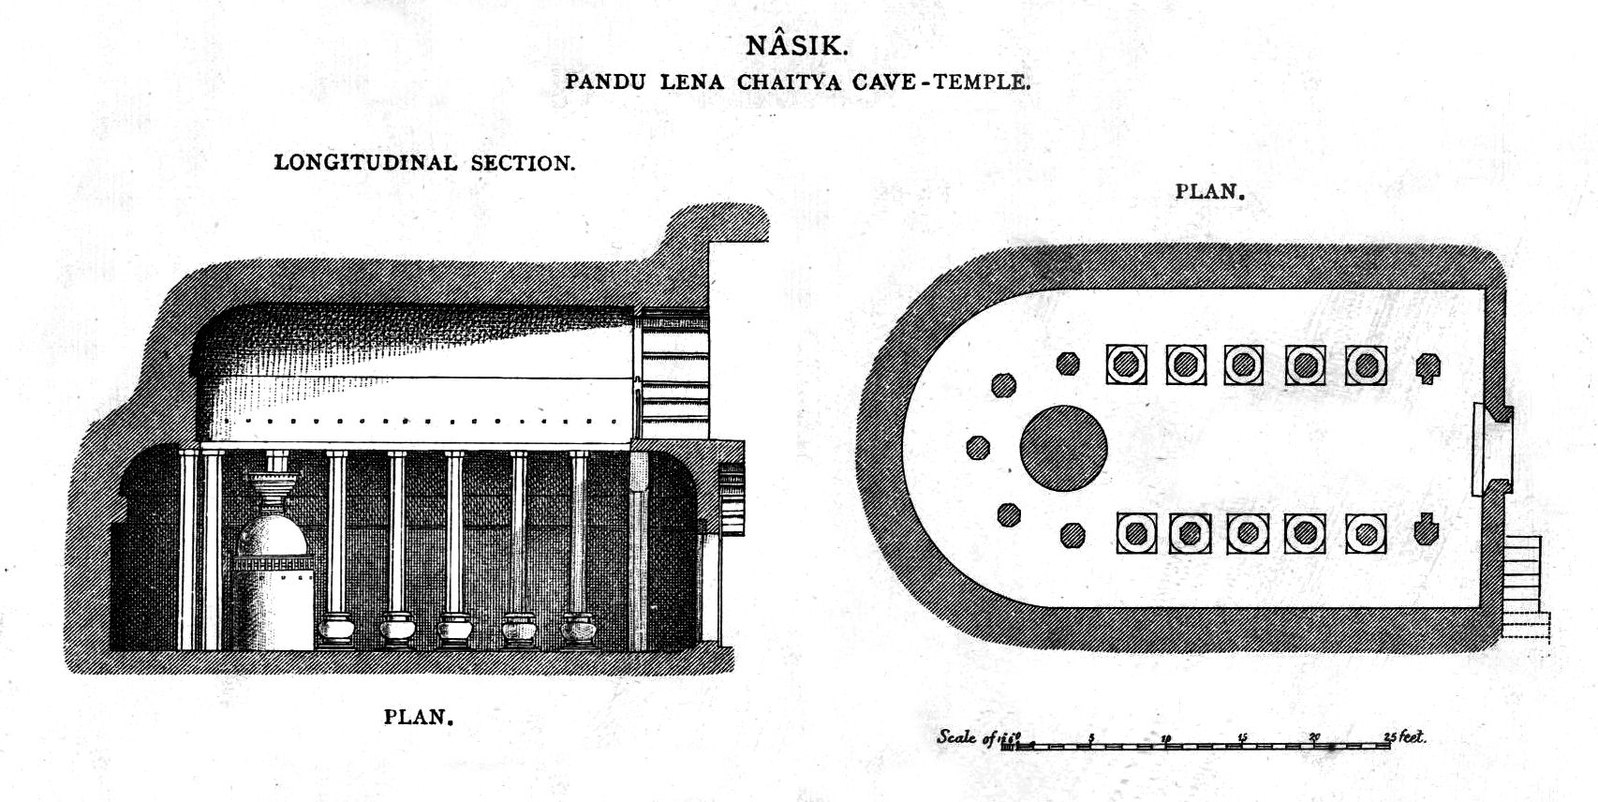
Ajanta was composed of two types of caves: square-shaped viharas (monasteries) with cells for the monks to live and the chaitya or worship halls. The chaitya is carved in the shape of a bullet and rounded at one end with an apse to contain a stupa. The tops of the caves had vaulted ribs stimulating wooden beams. The hall was lined with ornate pillars set away from the walls to allow worshippers a pathway to walk around the stupa. The paintings in the Ajanta caves represented early Indian customs, and the artists used natural materials for the paint colors except blue lapis lazuli. The specific color of blue was only found in Afghanistan. The paintings in the caves illustrate the fashion, drama, and lifestyles of the Buddhist world.
.jpg?revision=1&size=bestfit&width=785&height=589)
The first Buddhist cave monuments at Ajanta date from the 2nd and 1st centuries B.C. During the Gupta period (5th and 6th centuries A.D.), many more richly decorated caves were added to the original group. The paintings and sculptures of Ajanta, considered masterpieces of Buddhist religious art, have had a considerable artistic influence.
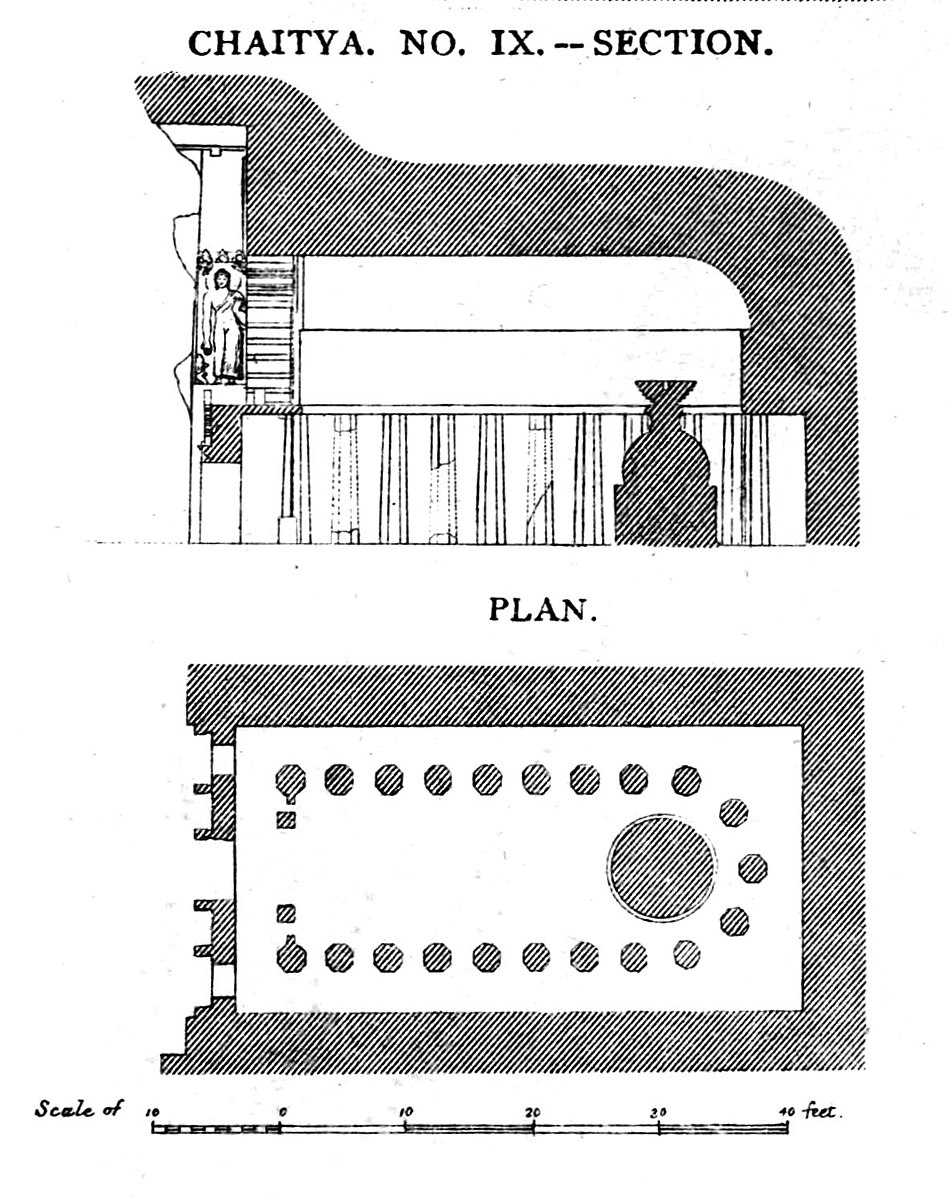
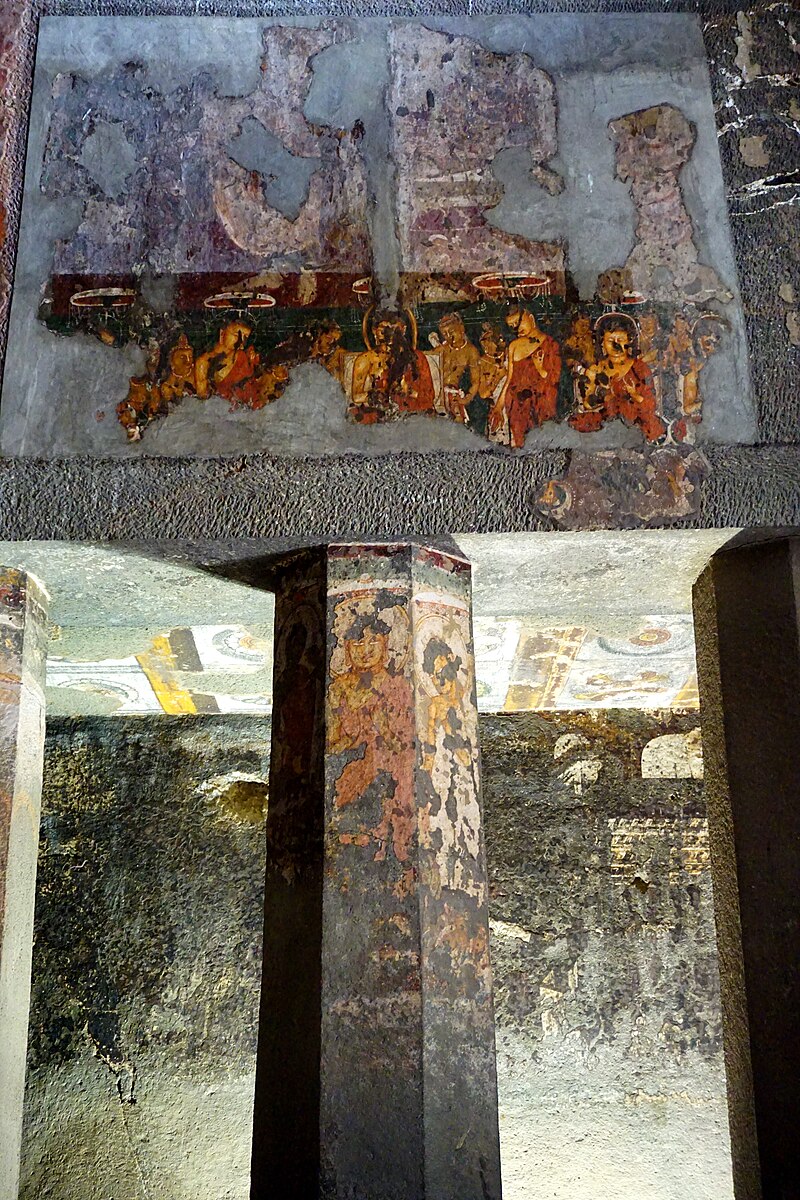
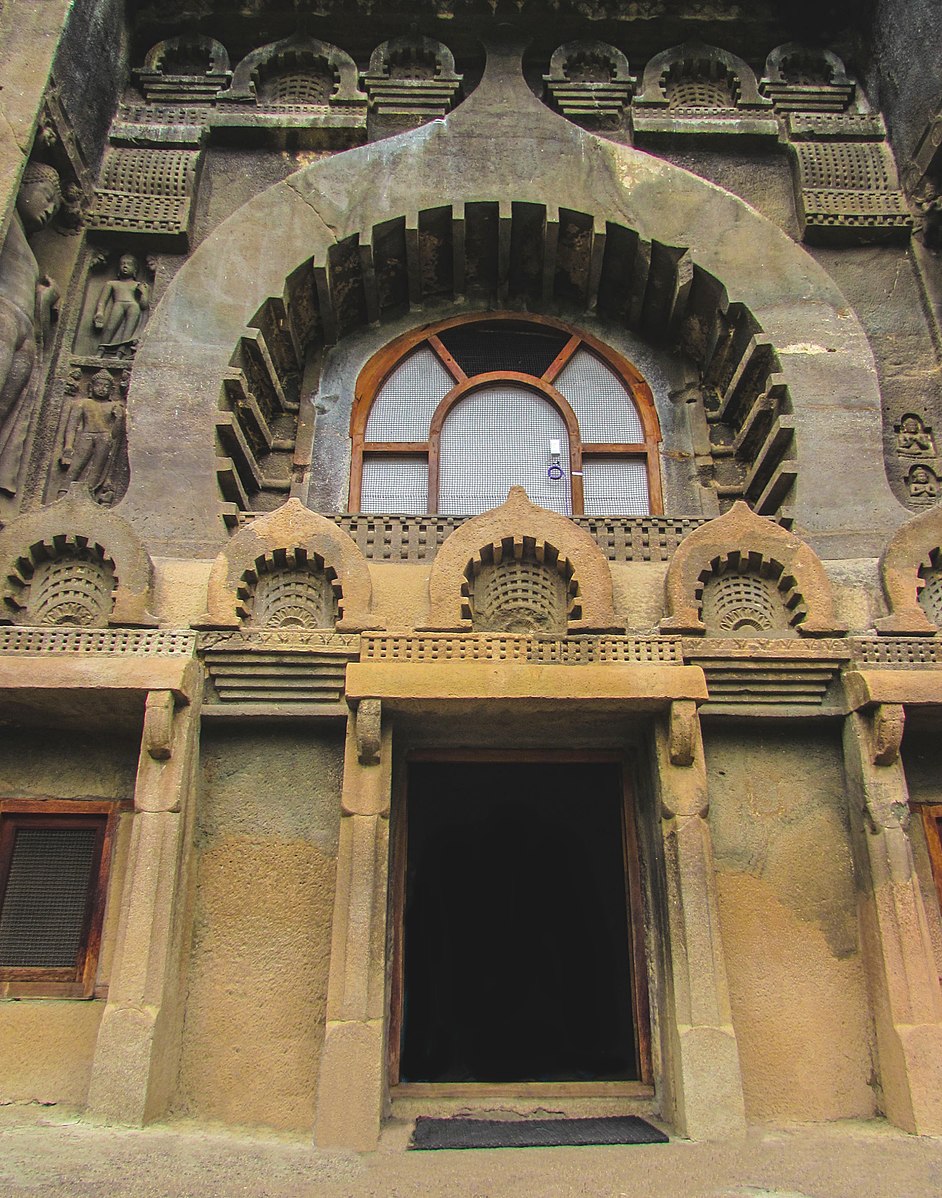
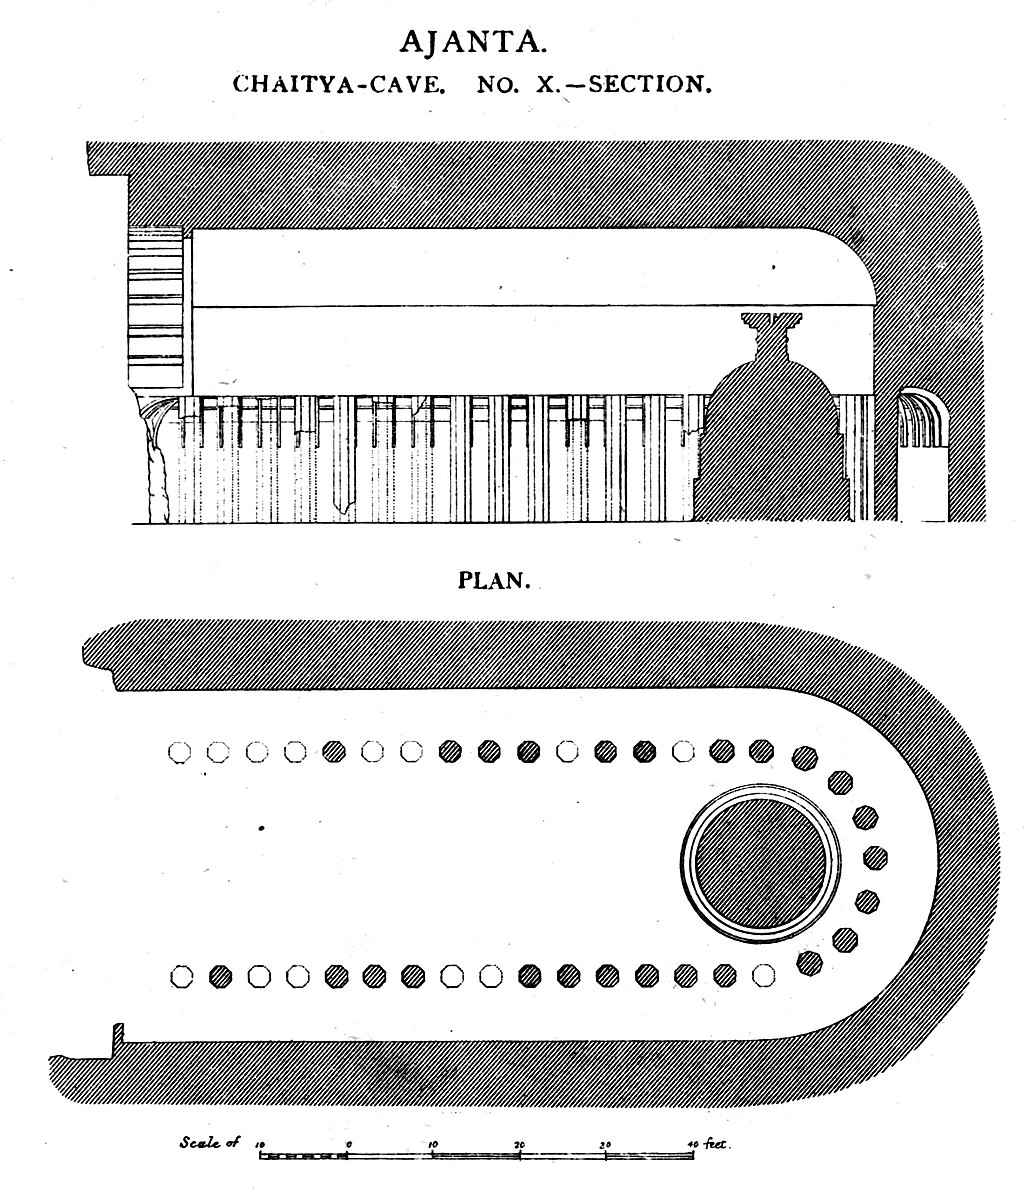
A map of the chaitya in Cave 9 (x.x) demonstrates how twenty-three pillars are positioned along the hallway and around the back of the stupa (x.x). The space between the pillars and the outer wall provided space for circumambulation or a pathway to circle the area while meditating. The high ceiling was vaulted and originally had wooden beams and rafters that had previously disintegrated, leaving the smooth, arched ceiling. The chaitya has two layers of paintings, one set created in the second half of the 1st century BCE and the other set in the 5th and 6th centuries CE. One scene (x.x) depicts Buddha and his supporters bringing garlands and offerings. The fresco was painted high above the pillar, and the orange robes of the supporters are still very visible today. The entrance to Cave 9 (x.x) is exceptionally ornate. A window sits atop the open door and under the elaborate archway. Because the workers constructed the cave from the top down in the rock, the window provided light for those working inside the cave. The façade had multiple niches around the doorway and was filled with statuary (x.x). The statue was not carved off-site and installed in the niche; it was carved as part of the existing rock wall.
.jpg?revision=1&size=bestfit&width=549&height=824)
.jpg?revision=1&size=bestfit&width=636&height=954)
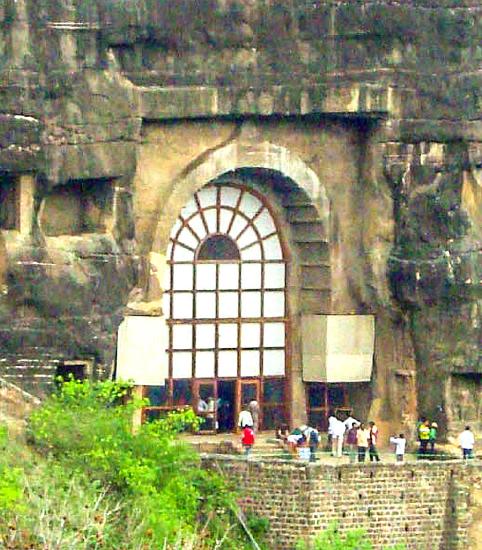
In 1819, when British Army Officer John Smith was hunting, he first saw the arch of Cave 10, leading to the discovery of the other caves. The locals had long known the caves were there, long ago abandoned. Local people were employed to help clear the trees and brush in front of the caves, opening to the more extensive discovery of multiple caves. Cave 10 was designed as a chaitya (x.x) like Cave 9 but with a more enormous hall. The cave (x.x) has thirty-nine pillars placed to allow a path for circumambulation. The opening of the cave's entrance is also made into an archway, the same as Cave 9. The carvings on Cave 10's opening were less elaborate than those on Cave 9; however, the window space was much larger, allowing more light into the cave. Inside Cave 10, most of the pillars and walls had paintings. The images were diverse and believed to be the work of multiple artists. The images of Buddha (x.x) on the pillars appear to use a different style than other images. Cave 10 has the oldest inscription, which states, "The gift of a cave-façade by Vasisthiputra Katahadi."[2] The cave has other inscriptions by different people indicating individual donations to support the caves.
"The extreme antiquity of Caves 9 and 10 is not disputed, though their exact dates remain elusive: from the paleographic evidence, they can be securely dated to between the 2nd century BCE and the 1st century CE, although most scholars--notably Vidya Dehejia and Walter Spink--believe that 90-70 BCE is the most likely period of construction. This makes the two caves--each of them a ribbed chaitya hall lined with tapering octagonal columns, ending in a rounded apse which encloses the perfect dome of a tall stone stupa--among the oldest rooms in the world, already 200 years old when Augustus started the rebuilding of Rome. Technically the paintings are slightly different from the later ones in other caves; they are painted on thin lime, not mud plaster and they use only local pigments--there is for example none of the blue lapis lazuli imported from Afghanistan which appears in the later images."[3]
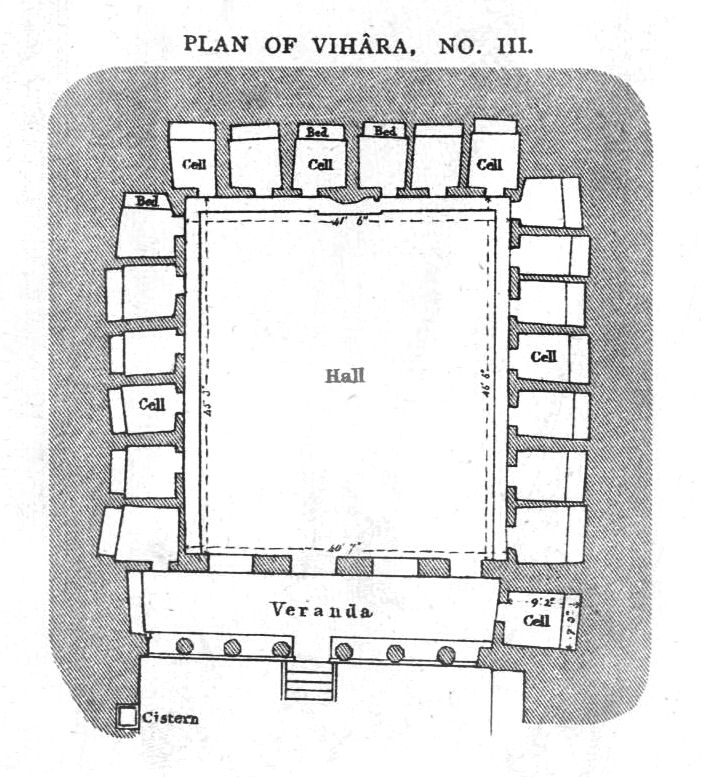
Unlike Caves 9 and 10, Cave 12 was constructed as a vihara or monastery. The cave was built as a square around a central room (x.x). Dormitory rooms or small rooms with two stone beds were carved into each small room. Usually, the monks traveled from place to place except during the monsoon season, when they generally remained at the caves, safe from the elements. By each of the openings, to the tiny rooms for beds, holes were found in the sills and lintels for hinges, a relic from when wooden doors covered the openings. In the central room, indentations formed niches with ogee-styled arches above the doors (x.x).

.jpg?revision=1&size=bestfit&width=831&height=554)
The caves frequently had multiple inscriptions about sponsors who donated funds to construct or decorate different caves, their names available forever. In Cave 10, one of the inscriptions read, "The gift of a cave-façade by Vasuthiputa Katahadi," and the inscription in Cave 12 stated, "The meritorious gift of a dwelling with cells and hall by the merchant Ghanamadada."[4]
Pandavleni Caves
Constructed from the 1st century BCE through the 3rd century CE, the Pandavleni caves provided Buddhist monks a place for solace and enlightenment. The caves were made from immense basalt rock and connected with ladders, which also caved into the rock. The caves feature statues of Buddha and icons of the Jain. Water tanks and a water management system were carved into the rock to supply the complex. Of all the caves, only Cave 18 was constructed as a chaitya; the rest were viharas for the monks' living and meditating spaces. The caves all faced towards the east, allowing the early morning sunlight to optimize the beauty of the images of the caves.
The most significant cave was number 3 (x.x), measuring twelve meters by fourteen meters with a bench constructed on three sides of the cave. The monks had eighteen cells carved in the wall, each with a stone bed. The cave is considered one of the more important caves because it was built and dedicated by the queen, the mother of a deceased Satavahana king. The cave contained many inscriptions, and the one dedicated to the queen stated: "whose face was lovely and radiant like the orb of the full moon; whose gait was beautiful like the gait of a choice elephant; whose arms were as muscular and rounded, broad and long as the folds of the lord of serpents;"[5] On the front of the cave was a veranda or porch (x.x) which was carved with geometric shapes and distinctive scenes. Along the front of the veranda are six octagonally shaped pillars. The pillars do not have bases; however, the tops of the columns are highly sculpted with bulls, elephants, horses, and other mythical animals carved into the top of the columns.
.jpg?revision=1&size=bestfit&width=816&height=544)
.jpg?revision=1&size=bestfit&width=833&height=556)
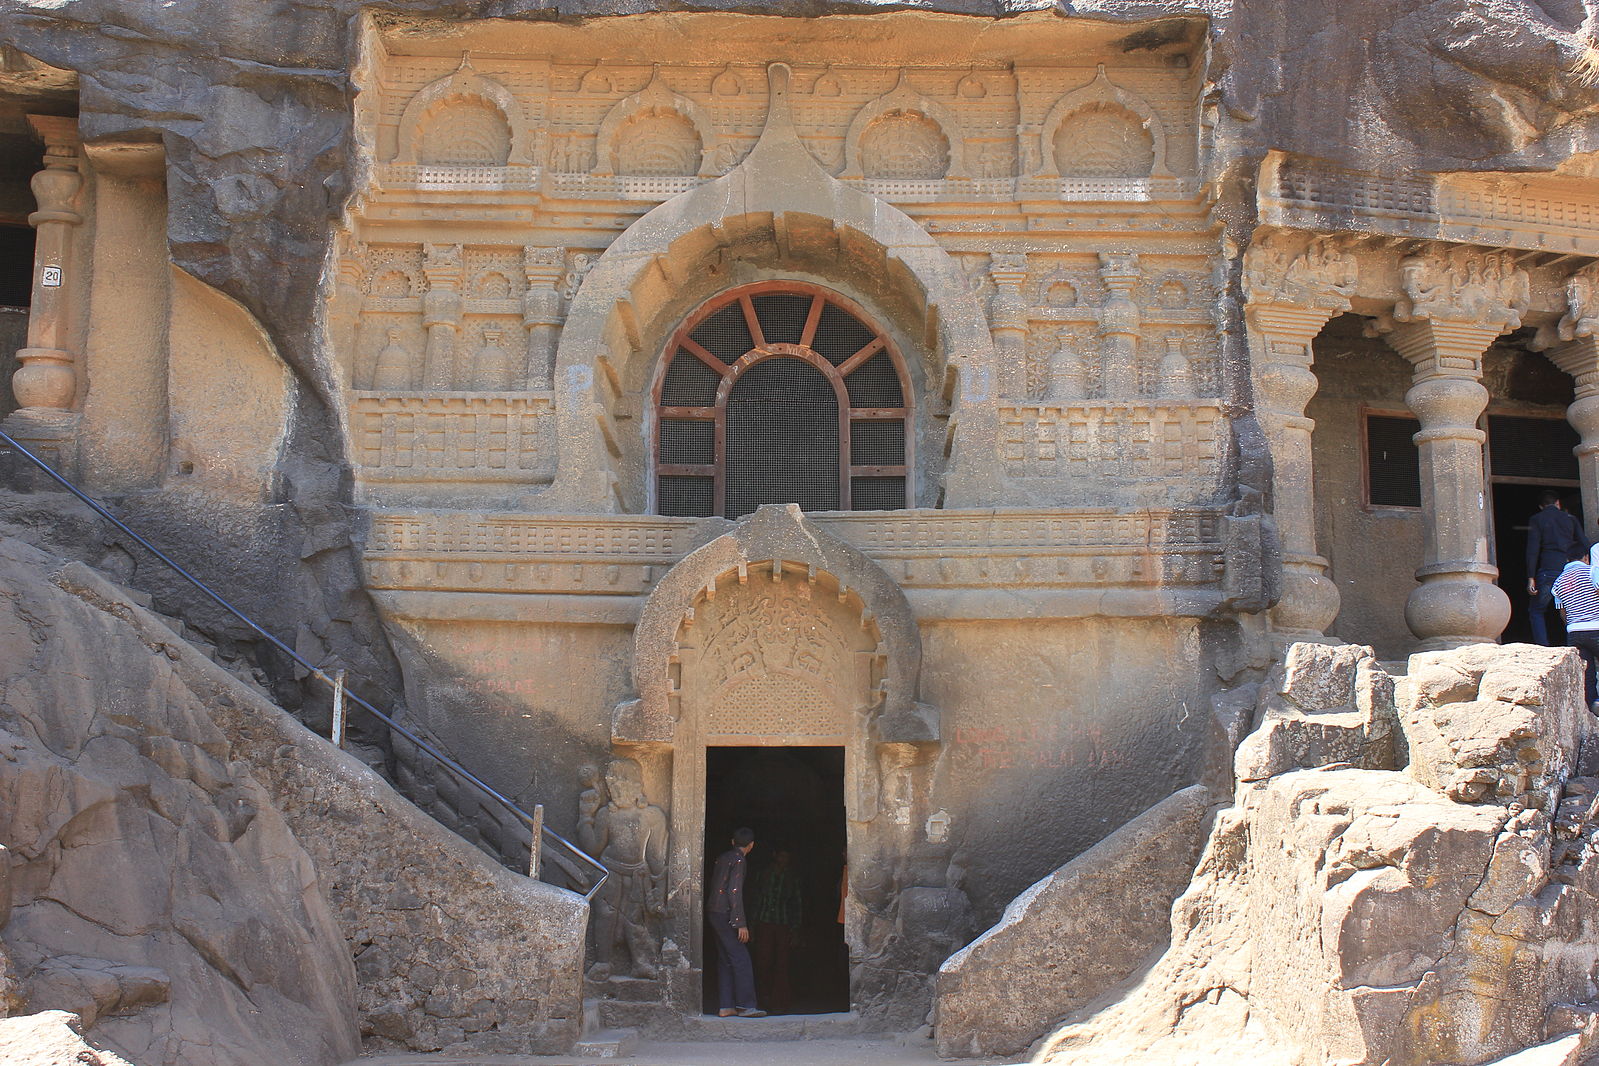
Cave 18 was the most eminent of the caves because it was the only chaitya (x.x) where devotees gathered. The inside is decorated with a set of stepped pedestals on the pillars. Some of the pillars are plain, and some are octagonal. Two of the front pillars help support the large arched window. The pillars (x.x) are laid out traditionally to provide a path for circumambulation around the outer edges and the stupa. The stupa was constructed higher than most and is topped by an inverted stepped pyramid shape. The caves on either side of 18 have access by linked staircases. The entrance (x.x) was lavishly caved with windows, railings, and columns, including a horseshoe-shaped arch decorated with emblems, shields, trisulas, and animals above the door. The carvings in the rock above the entrance are shaped to represent wooden trim. Several inscriptions record the support of the people in the village to maintain the chaitya.
.jpg?revision=1&size=bestfit&width=598&height=897)
Karla Caves
Although the Karla Caves are the smallest and oldest cave set, the most famous of all unique caves are located here. Karla Cave 8 is the largest in India and is called the Grand Chaitya (x.x). Of the sixteen different caves, Cave 8 was created during the Satavahanas and followed the standard plan for a chaitya. Inscriptions in the hall define the monks, a prince, merchants, and devotees who supported the construction of Cave 8. The hall (x.x) is 37.87 meters deep, 13.87 meters wide, and 14.02 meters high. The pillars (x.x) have eloquently decorated capitals of kneeling elephants and their riders (x.x). The seven pillars behind the stupa are plain and undecorated. The pillars in the nave support the immense semi-dome vaulted roof with curved ribs and longitudinal rafters. Because the stupa was the object of worship, it was raised and had an inverted pyramid on the top, along with a wooden chhatri.


.jpg?revision=1&size=bestfit&width=884&height=588)
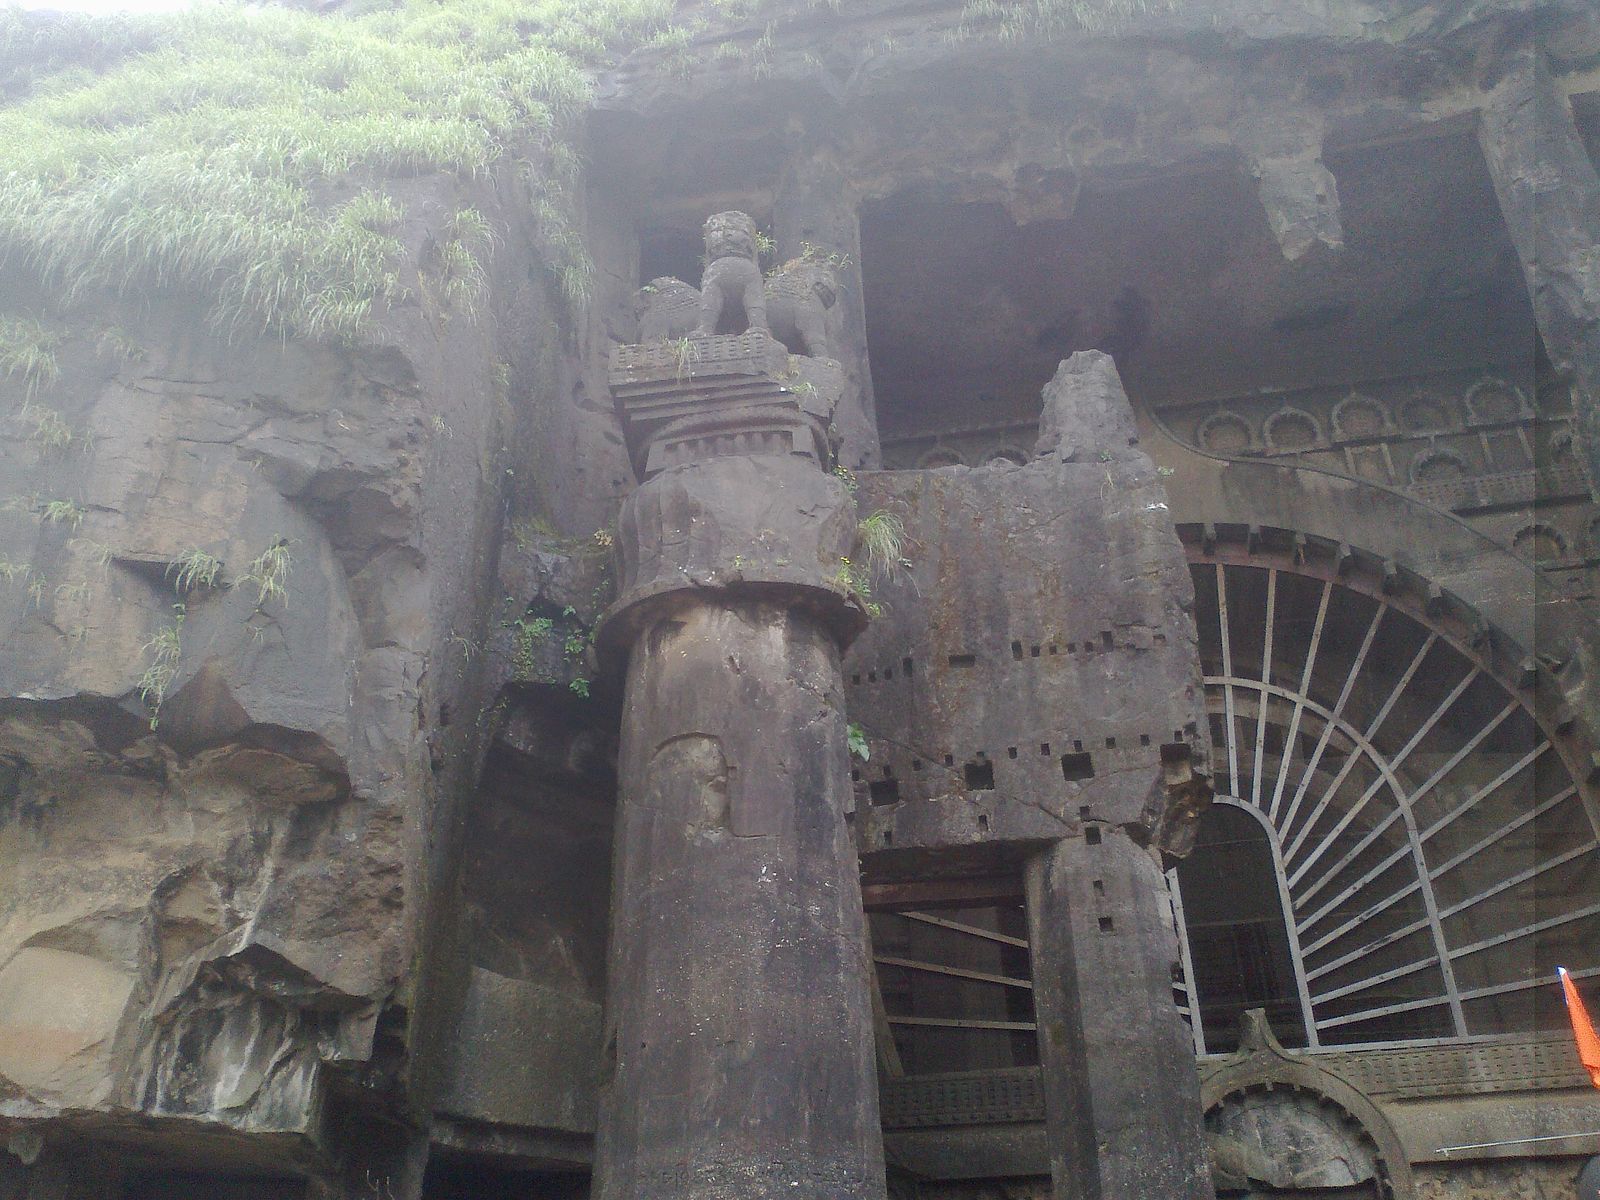
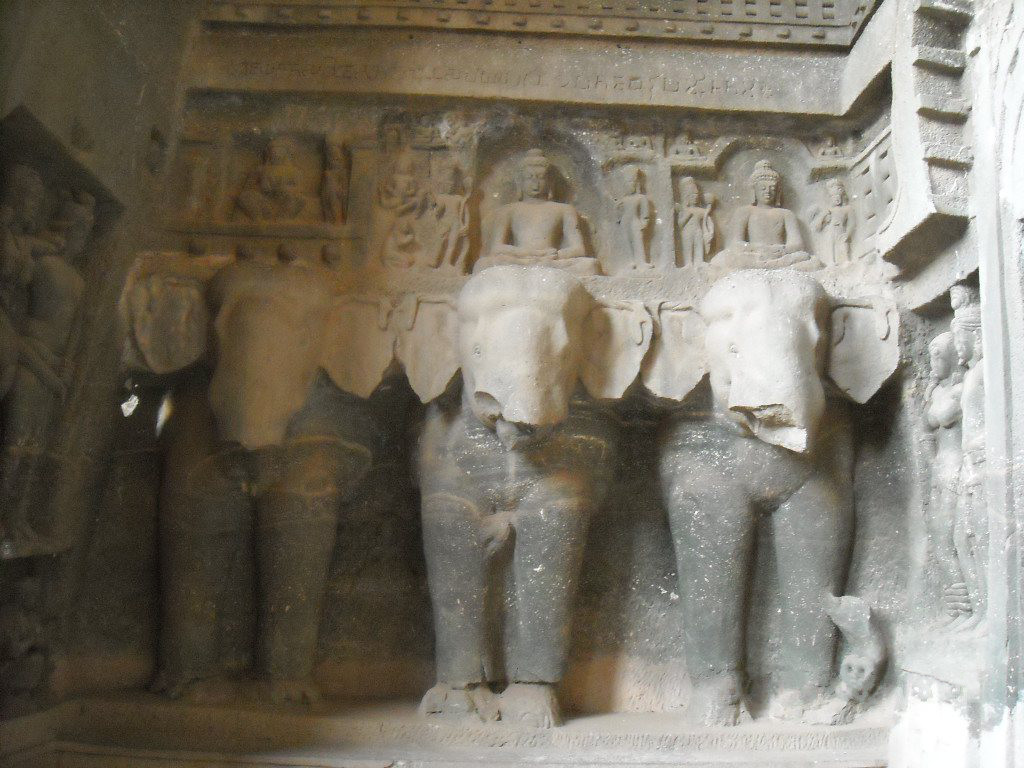
In the front of the veranda stands the immense column with four lions seated on the top of the capital (x.x). The column is shaped into sixteen flutes, greeting the devotees as they arrive. Historians believe a similar shape stood on the other side of the entrance and was removed or destroyed. The more expansive, oversized veranda also held actual life-sized images of elephants (x.x). Above each elephant are seated Buddhas appearing to be riding the elephants. Multiple symbolic images were also caved into the ornate veranda. The whole carvings and the cave were done by hand, without jackhammers or dynamite to make the work easier, only hand tools.
[1] Marshall, J., The Monuments of Sanchi, Vol. 1
[2] Burgess, J., (1881). Inscriptions from The Cave-Temples of Western India, Bhagwanlal Indraji Pandit, Government Central Press.
[3] Dairymple, W. (March 2015). Fragile Legacy: the Paintings of Ajanta Caves 9 and 10, A Magazine of the Arts, 66.3.
[4] Burgess, J., Indrājī, B., (1881). Inscriptions from the Cave-temples of Western India: With Descriptive Notes & Government Central Press.
[5] E. Hultzsch, E., (1905-06). Epigraphia Indica, Bombay: Education Societt’s Press.