
1.2: How a Camera Works
- Page ID
- 231805
\( \newcommand{\vecs}[1]{\overset { \scriptstyle \rightharpoonup} {\mathbf{#1}} } \)
\( \newcommand{\vecd}[1]{\overset{-\!-\!\rightharpoonup}{\vphantom{a}\smash {#1}}} \)
\( \newcommand{\dsum}{\displaystyle\sum\limits} \)
\( \newcommand{\dint}{\displaystyle\int\limits} \)
\( \newcommand{\dlim}{\displaystyle\lim\limits} \)
\( \newcommand{\id}{\mathrm{id}}\) \( \newcommand{\Span}{\mathrm{span}}\)
( \newcommand{\kernel}{\mathrm{null}\,}\) \( \newcommand{\range}{\mathrm{range}\,}\)
\( \newcommand{\RealPart}{\mathrm{Re}}\) \( \newcommand{\ImaginaryPart}{\mathrm{Im}}\)
\( \newcommand{\Argument}{\mathrm{Arg}}\) \( \newcommand{\norm}[1]{\| #1 \|}\)
\( \newcommand{\inner}[2]{\langle #1, #2 \rangle}\)
\( \newcommand{\Span}{\mathrm{span}}\)
\( \newcommand{\id}{\mathrm{id}}\)
\( \newcommand{\Span}{\mathrm{span}}\)
\( \newcommand{\kernel}{\mathrm{null}\,}\)
\( \newcommand{\range}{\mathrm{range}\,}\)
\( \newcommand{\RealPart}{\mathrm{Re}}\)
\( \newcommand{\ImaginaryPart}{\mathrm{Im}}\)
\( \newcommand{\Argument}{\mathrm{Arg}}\)
\( \newcommand{\norm}[1]{\| #1 \|}\)
\( \newcommand{\inner}[2]{\langle #1, #2 \rangle}\)
\( \newcommand{\Span}{\mathrm{span}}\) \( \newcommand{\AA}{\unicode[.8,0]{x212B}}\)
\( \newcommand{\vectorA}[1]{\vec{#1}} % arrow\)
\( \newcommand{\vectorAt}[1]{\vec{\text{#1}}} % arrow\)
\( \newcommand{\vectorB}[1]{\overset { \scriptstyle \rightharpoonup} {\mathbf{#1}} } \)
\( \newcommand{\vectorC}[1]{\textbf{#1}} \)
\( \newcommand{\vectorD}[1]{\overrightarrow{#1}} \)
\( \newcommand{\vectorDt}[1]{\overrightarrow{\text{#1}}} \)
\( \newcommand{\vectE}[1]{\overset{-\!-\!\rightharpoonup}{\vphantom{a}\smash{\mathbf {#1}}}} \)
\( \newcommand{\vecs}[1]{\overset { \scriptstyle \rightharpoonup} {\mathbf{#1}} } \)
\(\newcommand{\longvect}{\overrightarrow}\)
\( \newcommand{\vecd}[1]{\overset{-\!-\!\rightharpoonup}{\vphantom{a}\smash {#1}}} \)
\(\newcommand{\avec}{\mathbf a}\) \(\newcommand{\bvec}{\mathbf b}\) \(\newcommand{\cvec}{\mathbf c}\) \(\newcommand{\dvec}{\mathbf d}\) \(\newcommand{\dtil}{\widetilde{\mathbf d}}\) \(\newcommand{\evec}{\mathbf e}\) \(\newcommand{\fvec}{\mathbf f}\) \(\newcommand{\nvec}{\mathbf n}\) \(\newcommand{\pvec}{\mathbf p}\) \(\newcommand{\qvec}{\mathbf q}\) \(\newcommand{\svec}{\mathbf s}\) \(\newcommand{\tvec}{\mathbf t}\) \(\newcommand{\uvec}{\mathbf u}\) \(\newcommand{\vvec}{\mathbf v}\) \(\newcommand{\wvec}{\mathbf w}\) \(\newcommand{\xvec}{\mathbf x}\) \(\newcommand{\yvec}{\mathbf y}\) \(\newcommand{\zvec}{\mathbf z}\) \(\newcommand{\rvec}{\mathbf r}\) \(\newcommand{\mvec}{\mathbf m}\) \(\newcommand{\zerovec}{\mathbf 0}\) \(\newcommand{\onevec}{\mathbf 1}\) \(\newcommand{\real}{\mathbb R}\) \(\newcommand{\twovec}[2]{\left[\begin{array}{r}#1 \\ #2 \end{array}\right]}\) \(\newcommand{\ctwovec}[2]{\left[\begin{array}{c}#1 \\ #2 \end{array}\right]}\) \(\newcommand{\threevec}[3]{\left[\begin{array}{r}#1 \\ #2 \\ #3 \end{array}\right]}\) \(\newcommand{\cthreevec}[3]{\left[\begin{array}{c}#1 \\ #2 \\ #3 \end{array}\right]}\) \(\newcommand{\fourvec}[4]{\left[\begin{array}{r}#1 \\ #2 \\ #3 \\ #4 \end{array}\right]}\) \(\newcommand{\cfourvec}[4]{\left[\begin{array}{c}#1 \\ #2 \\ #3 \\ #4 \end{array}\right]}\) \(\newcommand{\fivevec}[5]{\left[\begin{array}{r}#1 \\ #2 \\ #3 \\ #4 \\ #5 \\ \end{array}\right]}\) \(\newcommand{\cfivevec}[5]{\left[\begin{array}{c}#1 \\ #2 \\ #3 \\ #4 \\ #5 \\ \end{array}\right]}\) \(\newcommand{\mattwo}[4]{\left[\begin{array}{rr}#1 \amp #2 \\ #3 \amp #4 \\ \end{array}\right]}\) \(\newcommand{\laspan}[1]{\text{Span}\{#1\}}\) \(\newcommand{\bcal}{\cal B}\) \(\newcommand{\ccal}{\cal C}\) \(\newcommand{\scal}{\cal S}\) \(\newcommand{\wcal}{\cal W}\) \(\newcommand{\ecal}{\cal E}\) \(\newcommand{\coords}[2]{\left\{#1\right\}_{#2}}\) \(\newcommand{\gray}[1]{\color{gray}{#1}}\) \(\newcommand{\lgray}[1]{\color{lightgray}{#1}}\) \(\newcommand{\rank}{\operatorname{rank}}\) \(\newcommand{\row}{\text{Row}}\) \(\newcommand{\col}{\text{Col}}\) \(\renewcommand{\row}{\text{Row}}\) \(\newcommand{\nul}{\text{Nul}}\) \(\newcommand{\var}{\text{Var}}\) \(\newcommand{\corr}{\text{corr}}\) \(\newcommand{\len}[1]{\left|#1\right|}\) \(\newcommand{\bbar}{\overline{\bvec}}\) \(\newcommand{\bhat}{\widehat{\bvec}}\) \(\newcommand{\bperp}{\bvec^\perp}\) \(\newcommand{\xhat}{\widehat{\xvec}}\) \(\newcommand{\vhat}{\widehat{\vvec}}\) \(\newcommand{\uhat}{\widehat{\uvec}}\) \(\newcommand{\what}{\widehat{\wvec}}\) \(\newcommand{\Sighat}{\widehat{\Sigma}}\) \(\newcommand{\lt}{<}\) \(\newcommand{\gt}{>}\) \(\newcommand{\amp}{&}\) \(\definecolor{fillinmathshade}{gray}{0.9}\)Cameras work by capturing light reflected off a scene or image and recording it on a medium. For analog cameras, the medium is film. For digital cameras, the medium is an image sensor. On digital single-lens reflex (DSLR) cameras, aperture settings control the amount of light that enters the camera and a shutter controls how long the light is allowed to enter the camera.
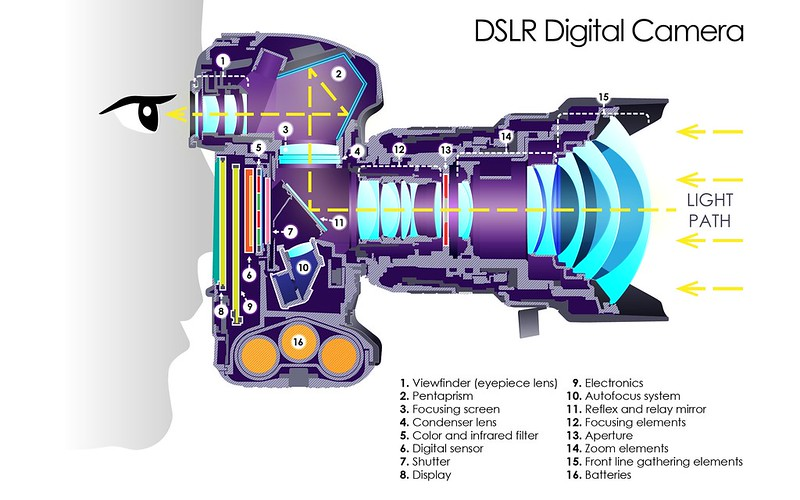
Image Description: A side view diagram of a DSLR digital camera held up to a person's eye, showing the various components and their positions inside the camera body. It includes labels for the viewfinder, pentaprism, autofocus system, digital sensor, shutter, display, and other elements and shows the light path through the camera to the eye.
The lens of the camera collects light from an object and focuses it through to the recording medium. The aperture, also known as “f-stop,” is the opening in the camera lens that allows light to be recorded on the image sensor. The aperture also controls depth of field, or the distance of focus or sharpness between the closest and farthest objects in a photograph. It is also the aperture that controls the intensity or amount of light that reaches the image sensor. A wide aperture (low f-stop) lets in more light, and a narrow aperture (high f-stop) restricts it.
Each lens has a focal length that describes its optical capabilities. The lens determines the angle of view (how much of the scene will be captured) and the magnification (how large individual elements will be). Focal length is represented in millimeters (mm) and is usually printed on the lens.
Focus refers to how sharp an image is. To sharpen the image, the camera lens allows for manual focus and autofocus. A photographer uses manual focus when they want control over what part of the image is in focus. Autofocus is when the camera sharpens the image automatically. However, even when using autofocus, the photographer can guide the focus of the image by pressing the shutter halfway down, which snaps the focus to the subject in the frame. Digital cameras generally focus very well, so as you are learning, it is a good idea to use autofocus. However, experiment with both techniques and use the one that better ensures your subject is properly focused.
The shutter is the mechanism that controls the length of time that the image sensor is exposed to light. Shutter speed is the time measured in fractions of a second that the shutter is opened, which determines the length of time the light hits the image sensor. A slow shutter speed (longer than 1/60th of a second) blurs motion. A fast shutter speed (shorter than 1/60th of a second) freezes motion.
ISO (International Standard Organization) refers to the numerical rating that describes the image sensor’s sensitivity to light, or how sensitive the camera is to the amount of light in the scene being photographed. The ISO determines how much light is needed for correct exposure. A low ISO (100 or lower) is less sensitive and requires more light or longer exposure times to have a correctly exposed image. A high ISO (400 or higher) is more sensitive and requires less light or a shorter exposure time to take a picture.
ISO is the first setting to adjust on your camera and should be set based on the amount of light available in a scene. For example, if you are working indoors where light is limited, you would adjust your camera to a high ISO. If you are photographing subjects outdoors on a sunny day, you would use a low ISO.
The ISO also affects image quality because it determines the amount of noise or grain (digital artifacts) within an image. For example, although you can take a picture without a flash in low light by using a high ISO setting and a faster shutter speed, noise will occur on the photo because a higher ISO causes more noise or grain than a lower setting. Therefore, ISO determines what combination of shutter speed and aperture settings should be used to produce a correctly exposed image. The lower the ISO number, the higher the image quality (free from grain or noise), but the more light is required to take the picture. ISO 100–400 is recommended for best image quality, especially if the intention is to print the image. Using an ISO above 400 can result in a grainy or noisy image, which will be visible in the final print.
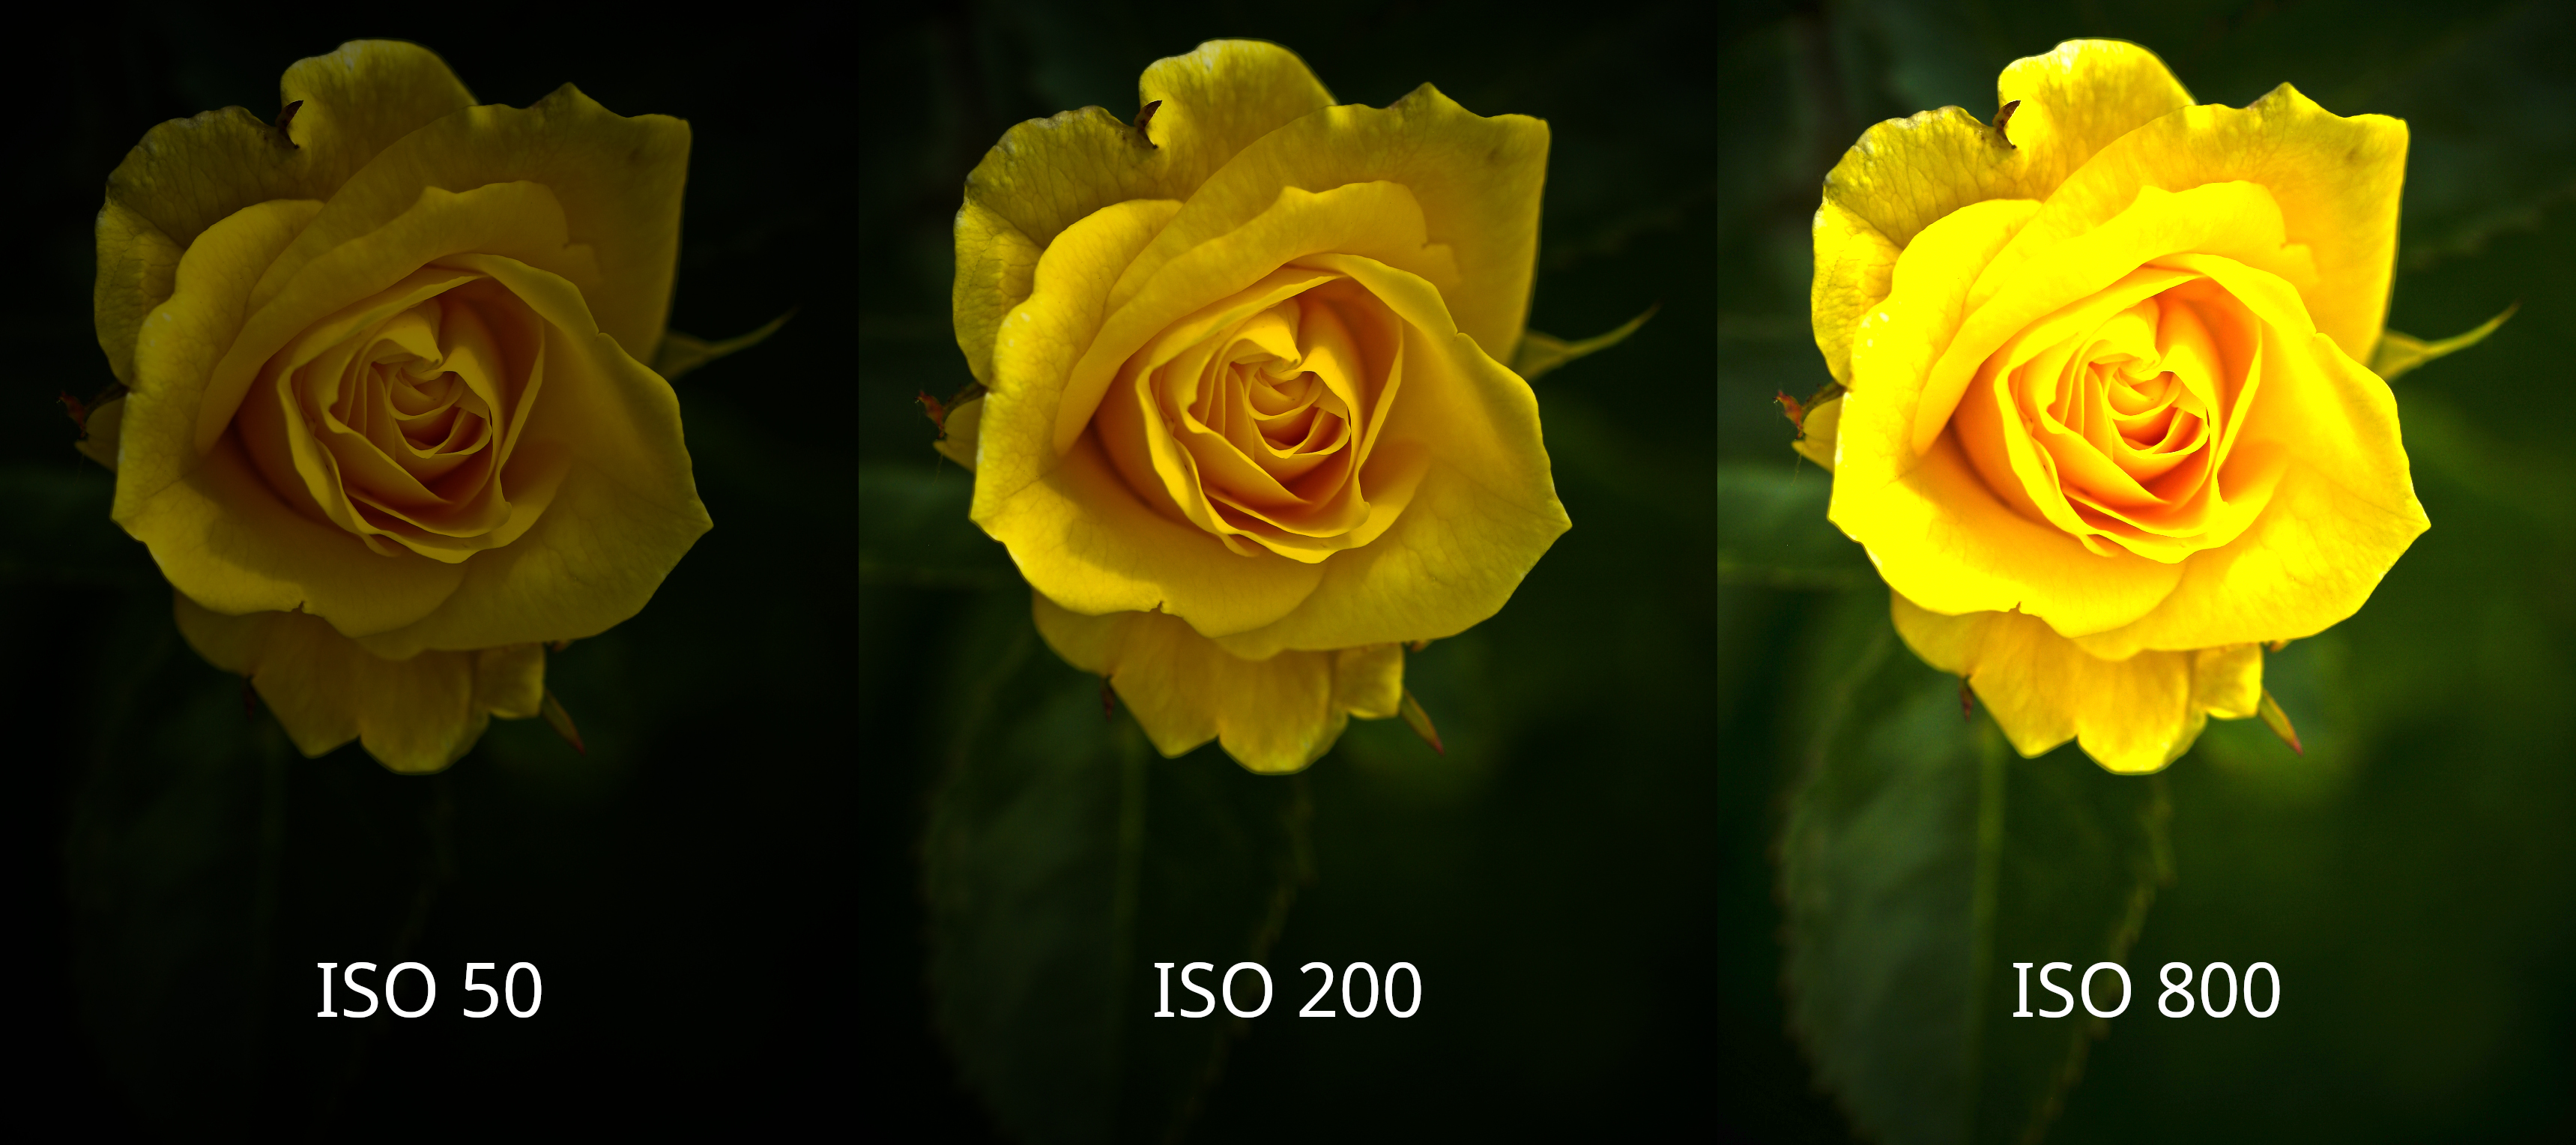
Image Description: A series of the same color photograph of a yellow rose at different ISO settings. ISO 50 is darker; ISO 200 has a medium exposure; ISO 800 shows the rose as very bright.
Exposure is the relationship between ISO, shutter speed, and aperture that produces the right balance of tones (or correct exposure) in an image. For any scene, there is a correct exposure determined by the amount of light available and the specific camera settings the photographer chooses. However, correct exposure is relative; you can adjust shutter speed, aperture, and ISO to capture the image you envision. When photographing with a DSLR camera, you most often use the reflected light meter readings inside the camera to determine exposure.
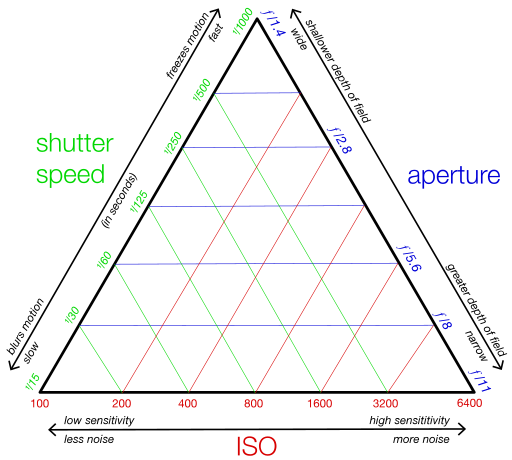
Image Description: An image of the exposure triangle showing the relationship between shutter speed, aperture, and ISO. Shutter speed is depicted on the left side of the triangle: the slower the shutter speed, the motion becomes blurry; the faster the shutter speed, the motion freezes. Aperture is depicted on the right side of the triangle: the wider the aperture, the shallower the depth of field; the narrower the aperture, the greater the depth of field. ISO is depicted on the bottom side of the triangle: the lower the ISO setting, the less noise in the photograph; the higher the ISO setting, the more noise in the photograph.
When the camera is pointed at a scene, the light meter will predict a correct exposure based on the camera’s ISO setting, aperture, and shutter speed. A correct exposure is determined by the light meter averaging out the lights and darks in the scene to create middle grey, or 18% grey. These settings are relational and interdependent; when you change one setting, your overall exposure changes.
For any scene, there is one correct exposure, but several setting combinations to get there.
In different conditions the temperature of light, or perceived color, varies. Therefore, white balance is the camera function that matches the temperature of light in a scene with the color recorded on the image sensor. Correct white balance produces a more accurate representation of color within an image. A grey card helps get a correct reflected exposure meter reading and can be used to set the white balance for a scene. Using a grey card gives you more control over the exposure and white balance settings to ensure a more accurate rendering of colors.
- Put the grey card in the area where you plan to photograph the subject.
- If using artificial light, make sure you light the grey card the same way you plan to light the subject.
- Find and select the “custom white balance” option in your camera. Note that some cameras make you take the picture and then select “custom white balance.”
- Fill the frame with the grey card.
- Note that it helps to do this process more than once to ensure the light is being registered correctly.
- Or take a picture with the correct exposure and see if the shift in white balance applied.
Each camera has a set megapixel or MP (1 million pixels = 1 megapixel), which is the camera’s resolution. Resolution is the level of detail in an image and is measured using pixels. Pixel dimensions are the number of pixels along an image’s width and height. To find out how many megapixels are in an image, view the image size in Photoshop and multiply the width times the height. The higher the resolution and more megapixels the camera has, the higher quality image the camera can produce. Many DSLR cameras have a resolution of 12–25 MP. When purchasing a camera, it is important to keep the relationship of MP and image quality in mind.
It is also important to have at least one memory card for your digital camera. Memory cards are small, removable hard drives that provide additional storage for the camera, and it is where the image file for each picture taken is saved. Memory cards come in various types (i.e., SD, miniSD, or CF), and they have different amounts of storage space. Their size is usually measured in GB, so a larger GB card will allow for more saved images before deleting to make space. Memory cards also have a speed associated with them. A higher speed card allows the camera to process and save images more quickly.
Before taking pictures, format the memory card to your camera’s operating system. It is also recommended that you reformat the SD card to delete the image files instead of using the trash can feature in the camera or on the computer. This way you delete the image files while preventing the card from getting corrupted. However, some photographers never reformat or delete images from their memory cards and choose instead to buy a new one each time the card is full.