
5.3: Mauryan Empire (322 BCE – 185 BCE)
- Page ID
- 219983

\( \newcommand{\vecs}[1]{\overset { \scriptstyle \rightharpoonup} {\mathbf{#1}} } \)
\( \newcommand{\vecd}[1]{\overset{-\!-\!\rightharpoonup}{\vphantom{a}\smash {#1}}} \)
\( \newcommand{\id}{\mathrm{id}}\) \( \newcommand{\Span}{\mathrm{span}}\)
( \newcommand{\kernel}{\mathrm{null}\,}\) \( \newcommand{\range}{\mathrm{range}\,}\)
\( \newcommand{\RealPart}{\mathrm{Re}}\) \( \newcommand{\ImaginaryPart}{\mathrm{Im}}\)
\( \newcommand{\Argument}{\mathrm{Arg}}\) \( \newcommand{\norm}[1]{\| #1 \|}\)
\( \newcommand{\inner}[2]{\langle #1, #2 \rangle}\)
\( \newcommand{\Span}{\mathrm{span}}\)
\( \newcommand{\id}{\mathrm{id}}\)
\( \newcommand{\Span}{\mathrm{span}}\)
\( \newcommand{\kernel}{\mathrm{null}\,}\)
\( \newcommand{\range}{\mathrm{range}\,}\)
\( \newcommand{\RealPart}{\mathrm{Re}}\)
\( \newcommand{\ImaginaryPart}{\mathrm{Im}}\)
\( \newcommand{\Argument}{\mathrm{Arg}}\)
\( \newcommand{\norm}[1]{\| #1 \|}\)
\( \newcommand{\inner}[2]{\langle #1, #2 \rangle}\)
\( \newcommand{\Span}{\mathrm{span}}\) \( \newcommand{\AA}{\unicode[.8,0]{x212B}}\)
\( \newcommand{\vectorA}[1]{\vec{#1}} % arrow\)
\( \newcommand{\vectorAt}[1]{\vec{\text{#1}}} % arrow\)
\( \newcommand{\vectorB}[1]{\overset { \scriptstyle \rightharpoonup} {\mathbf{#1}} } \)
\( \newcommand{\vectorC}[1]{\textbf{#1}} \)
\( \newcommand{\vectorD}[1]{\overrightarrow{#1}} \)
\( \newcommand{\vectorDt}[1]{\overrightarrow{\text{#1}}} \)
\( \newcommand{\vectE}[1]{\overset{-\!-\!\rightharpoonup}{\vphantom{a}\smash{\mathbf {#1}}}} \)
\( \newcommand{\vecs}[1]{\overset { \scriptstyle \rightharpoonup} {\mathbf{#1}} } \)
\( \newcommand{\vecd}[1]{\overset{-\!-\!\rightharpoonup}{\vphantom{a}\smash {#1}}} \)
\(\newcommand{\avec}{\mathbf a}\) \(\newcommand{\bvec}{\mathbf b}\) \(\newcommand{\cvec}{\mathbf c}\) \(\newcommand{\dvec}{\mathbf d}\) \(\newcommand{\dtil}{\widetilde{\mathbf d}}\) \(\newcommand{\evec}{\mathbf e}\) \(\newcommand{\fvec}{\mathbf f}\) \(\newcommand{\nvec}{\mathbf n}\) \(\newcommand{\pvec}{\mathbf p}\) \(\newcommand{\qvec}{\mathbf q}\) \(\newcommand{\svec}{\mathbf s}\) \(\newcommand{\tvec}{\mathbf t}\) \(\newcommand{\uvec}{\mathbf u}\) \(\newcommand{\vvec}{\mathbf v}\) \(\newcommand{\wvec}{\mathbf w}\) \(\newcommand{\xvec}{\mathbf x}\) \(\newcommand{\yvec}{\mathbf y}\) \(\newcommand{\zvec}{\mathbf z}\) \(\newcommand{\rvec}{\mathbf r}\) \(\newcommand{\mvec}{\mathbf m}\) \(\newcommand{\zerovec}{\mathbf 0}\) \(\newcommand{\onevec}{\mathbf 1}\) \(\newcommand{\real}{\mathbb R}\) \(\newcommand{\twovec}[2]{\left[\begin{array}{r}#1 \\ #2 \end{array}\right]}\) \(\newcommand{\ctwovec}[2]{\left[\begin{array}{c}#1 \\ #2 \end{array}\right]}\) \(\newcommand{\threevec}[3]{\left[\begin{array}{r}#1 \\ #2 \\ #3 \end{array}\right]}\) \(\newcommand{\cthreevec}[3]{\left[\begin{array}{c}#1 \\ #2 \\ #3 \end{array}\right]}\) \(\newcommand{\fourvec}[4]{\left[\begin{array}{r}#1 \\ #2 \\ #3 \\ #4 \end{array}\right]}\) \(\newcommand{\cfourvec}[4]{\left[\begin{array}{c}#1 \\ #2 \\ #3 \\ #4 \end{array}\right]}\) \(\newcommand{\fivevec}[5]{\left[\begin{array}{r}#1 \\ #2 \\ #3 \\ #4 \\ #5 \\ \end{array}\right]}\) \(\newcommand{\cfivevec}[5]{\left[\begin{array}{c}#1 \\ #2 \\ #3 \\ #4 \\ #5 \\ \end{array}\right]}\) \(\newcommand{\mattwo}[4]{\left[\begin{array}{rr}#1 \amp #2 \\ #3 \amp #4 \\ \end{array}\right]}\) \(\newcommand{\laspan}[1]{\text{Span}\{#1\}}\) \(\newcommand{\bcal}{\cal B}\) \(\newcommand{\ccal}{\cal C}\) \(\newcommand{\scal}{\cal S}\) \(\newcommand{\wcal}{\cal W}\) \(\newcommand{\ecal}{\cal E}\) \(\newcommand{\coords}[2]{\left\{#1\right\}_{#2}}\) \(\newcommand{\gray}[1]{\color{gray}{#1}}\) \(\newcommand{\lgray}[1]{\color{lightgray}{#1}}\) \(\newcommand{\rank}{\operatorname{rank}}\) \(\newcommand{\row}{\text{Row}}\) \(\newcommand{\col}{\text{Col}}\) \(\renewcommand{\row}{\text{Row}}\) \(\newcommand{\nul}{\text{Nul}}\) \(\newcommand{\var}{\text{Var}}\) \(\newcommand{\corr}{\text{corr}}\) \(\newcommand{\len}[1]{\left|#1\right|}\) \(\newcommand{\bbar}{\overline{\bvec}}\) \(\newcommand{\bhat}{\widehat{\bvec}}\) \(\newcommand{\bperp}{\bvec^\perp}\) \(\newcommand{\xhat}{\widehat{\xvec}}\) \(\newcommand{\vhat}{\widehat{\vvec}}\) \(\newcommand{\uhat}{\widehat{\uvec}}\) \(\newcommand{\what}{\widehat{\wvec}}\) \(\newcommand{\Sighat}{\widehat{\Sigma}}\) \(\newcommand{\lt}{<}\) \(\newcommand{\gt}{>}\) \(\newcommand{\amp}{&}\) \(\definecolor{fillinmathshade}{gray}{0.9}\)Mauryan Empire 322 BCE – 185 BCE
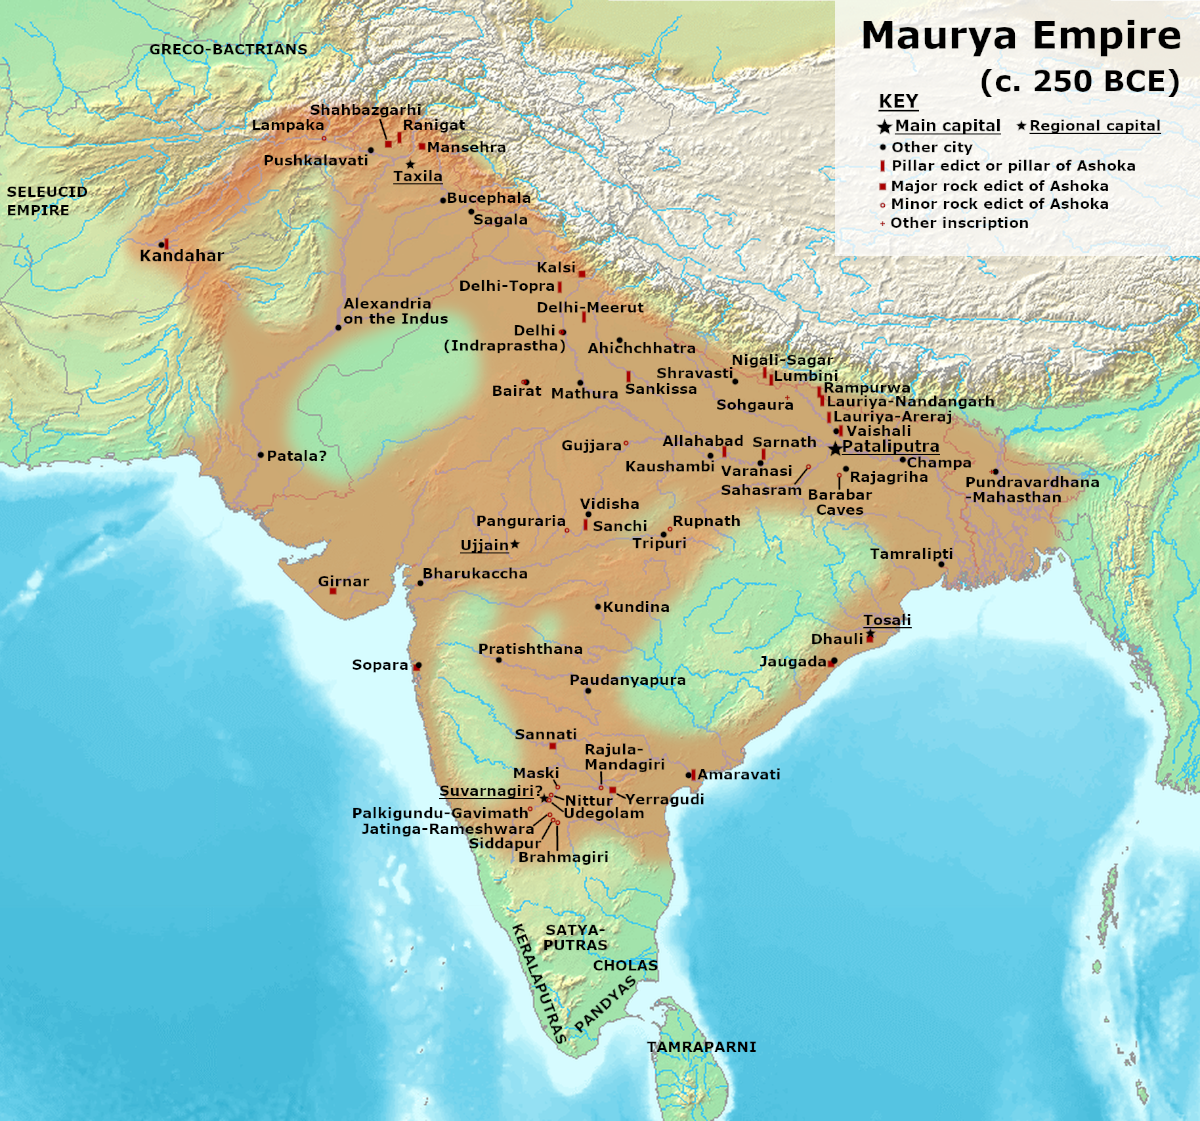
The region, now called India (5.3.1), was divided into multiple smaller territories, ruled by local chiefs and always subject to invasions by others. As Chandragupta Maurya became the leader of one region, he began to expand. The power of Alexander the Great was receding, and Chandragupta started to consolidate some areas. When Alexander died, Chandragupta took advantage, creating an army and capturing large swathes of land. He crowned himself king and started the Mauryan Empire, the largest empire in India's history. Chandragupta ruled from 324-297 BCE until his son, Bindusara, ruled from 297-272 BCE. After Bindusara died, his sons fought for the throne, and Ashoka defeated his brother to become the most powerful ruler of the Mauryan Empire.
At the time of Ashoka, historians believe the military might have included 600,000 foot soldiers, 30,000 cavalry, and 9,000 elephants used in battle. The empire also had an enormous spy network working inside and outside. A political strategy called the Arthashastra documented how the economy would be structured. Emperor Ashoka was known for instituting and supporting Buddhism, and he built religious buildings and supported the monks. Although Ashoka made Buddhism the main religion and exported it to other places, he allowed other religions to flourish.
Ashoka transformed building technology from wood to stone, erecting immense stone pillars and rocks inscribed with his ruling edicts. Part of Ashoka's embracement of Buddhism was the concept of peace and nonviolence. Many of his edicts were ideals of people living peacefully together, important Buddhist principles. Trade with others led to the construction of major roadways to support a vast trade network. In addition to roads, the government constructed canals, hospitals, waterways, and other infrastructure, all supported by a strict national taxation system. When Ashoka died, he was succeeded by weak rulers who did not control the vast empire. Without Ashoka's persona to manage the diverse economic and religious dynamics, the empire disintegrated into local provinces.
In the late 4th century, the Maurya Empire under Chandragupta conquers most of North India. His son Bindusara continues the conquest into the south. Bindusara's son Ashoka (Asoka) takes the empire to its furthest extent, but then turns to a life of Buddhism and nonviolence. He is considered one of the prime catalysts for the spread of Buddhism.
Pataliputra
The city of Pataliputra existed before the Mauryan Empire and was located at the intersection of the Ganga and Son rivers. Pataliputra became the capital and imperial city of the empire, almost twenty-six square kilometers, making it one of the biggest cities in the world at the time. "The city of Pataliputra has been described as the most beautiful city by many because of the numerous palaces, towers, and pavilions. According to Megasthenes, the city was encircled by a massive timber palisade, pierced by loopholes through which archers could shoot. It had sixty-four gates and 570 towers."[1]
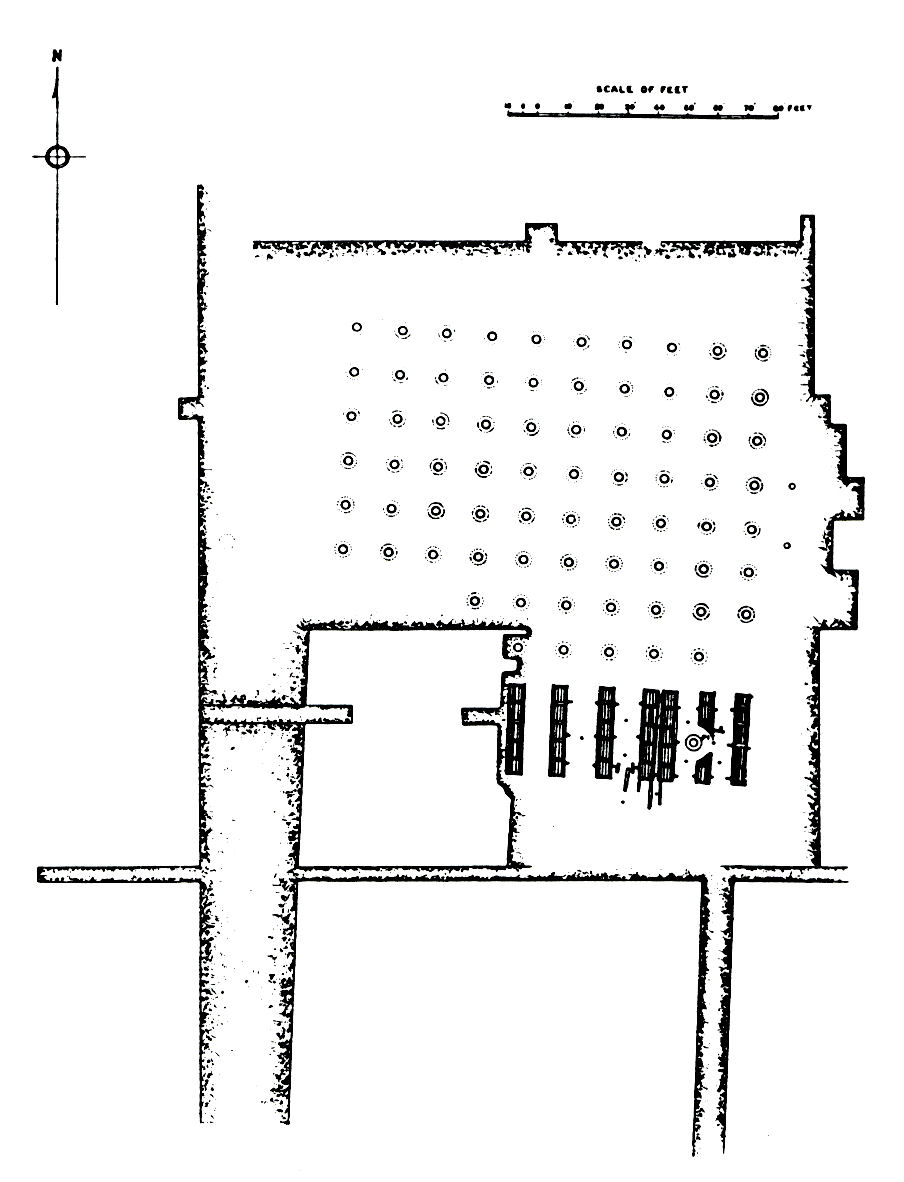
When the ancient city was excavated, archaeologists found the ruins of a significant hall. The hall's base was made with eighty columns standing on a base of stone. The remaining stone bases allowed researchers to determine the building's architecture (5.3.2). The bases (5.3.3) were created from polished gray sandstone and covered by a wooden platform and roof. The ruler Ashoka had buildings constructed from stone, and when the Achaemenid Empire collapsed, the skilled stonemasons went to Pataliputra to help hasten the transition from wood to stone. Unfortunately, it was too late for the old wood hall.

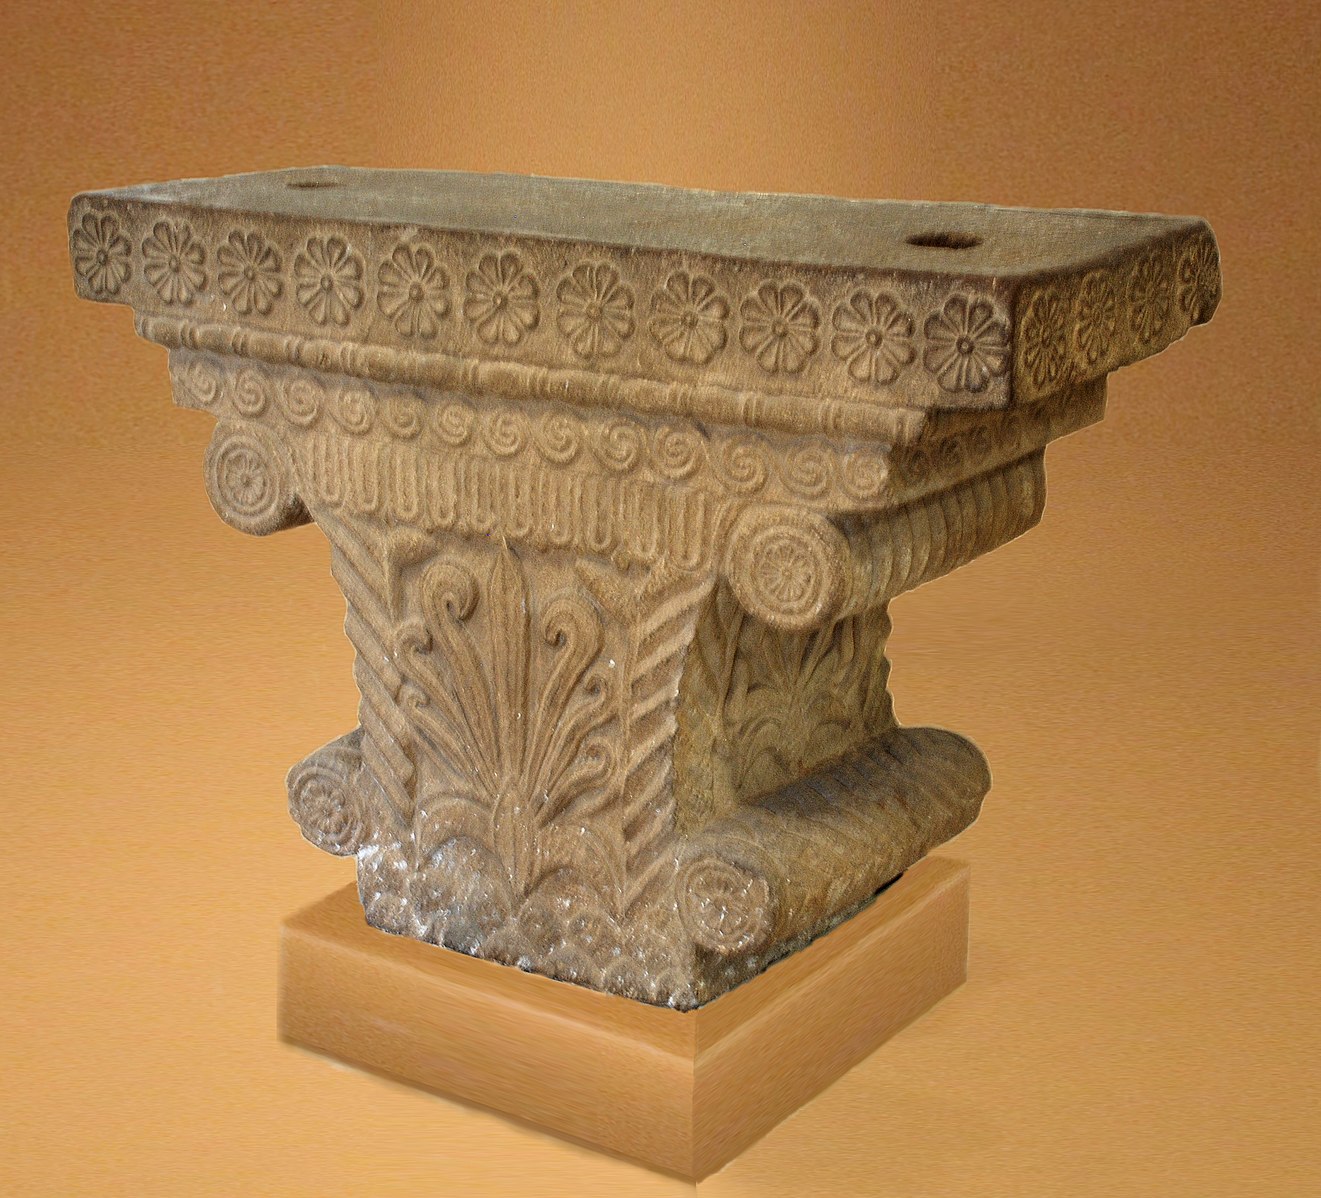
At the beginning of the Mauryan Empire, the sandstone pillars were small, and Greek styles influenced the capitals of the columns. At the palace site, the columns weighed about 900 kilograms, were 1.23 meters long, and 33.5 meters high. The excavated Pataliputra capital (5.3.4) was located at the palace. Fortunately, it was buried by a sturdy wall and was well preserved.[2] The capital has rosettes along the sides of the top and a palmette in the center, similar to Ionic Greek designs. Rows of beads, waves, and honeysuckles reflect the Achaemenid and Greek influences.
Barabar Hills
India is known for its history of rock caves, and the Barabar Hills caves created during the Mauryan period are the earliest known examples of unique rock-cut architecture. The construction of the caves at Barabar Hills became a significant influencer on the style of cave architecture. The caves appear quite plain; however, the caves are cut very precisely, and the walls are highly polished and incised with edicts from Emperor Ashoka. One visitor from China exclaimed, "These palaces are so beautiful and excellent that they appear to be the creation of God rather than of men."[3]
Lomas Rishi Cave is the most famous cave and is known for the façade on the entrance (5.3.5). The face of the rock is carved with the earliest known example of a chaitya arch formed in an ogee shape. The ogee is created with two curves connected and bowed inward. Artists of the future adopted the concept. The cave's granite interior (5.3.6) was shaped into a chaitya shape with a rounded roof. Of the two rooms, one room was a gathering hall for worshippers, and the other was a smaller, circular-shaped room with a domed stupa roof. Inscriptions from Ashoka were incised inside the cave.
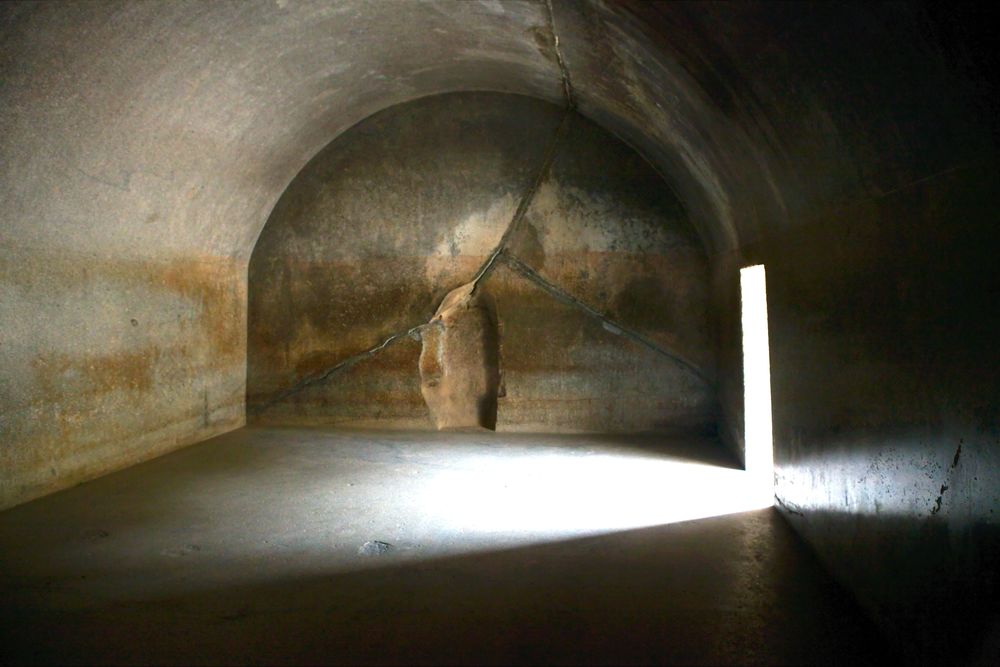
The Sudama cave (5.3.7) was also created from the part of the immense granite rock as the Lomas Rishi cave. For the Sudama cave, the door was plain as opposed to the ornate entrance in the Lomas Rishi cave. The cave also had a large, rectangular main room (5.3.8) with a vaulted ceiling and a stupa. The caves also had a common characteristic and used the effects of echoes to create the amplified sound of worshippers' songs.


Early Mauryan Stupas
When asked about the demise of his remains, the Buddha explained that his body should be wrapped in cloth, placed in two iron vessels, cremated, and placed in a stupa. Each vessel was placed in a stupa, as well as the relics. The relics were divided into eight parts and put in eight different stupas. When Ashoka came into power and adopted Buddhism, he built new stupas throughout the empire and distributed the relics among them, creating a structure still popular today.[4]
Burial mounds have been standard methods of accommodating the dead for centuries. In the Mauryan Empire, the early relics of deceased Buddhist monks were placed in a stupa. The stupa was also a place for prayer and meditation. Early stupas were made from wood and eroded over time, followed by brick and wood. A unique part of the stupa was a place for circumambulation or a circular path as part of Buddhist rituals for walking during prayer and meditation. Different civilizations and leaders have made more elaborate stupas; however, the same principle applies to each stupa.
Stupas, hemispherical mounds, are key in early Buddhism, representing Buddha's burial mound and housing relics. They're worship focal points in Buddhist sanctuaries like Ajanta and Ellora. The Great Stupa at Sanchi, India, is a prime example. Its gateways are adorned with carvings, including fertility deities. Buddha's presence is symbolized, not shown in human form. As Buddhism spread, stupa architecture evolved, with East Asia adding more levels. These continue to serve as relic chambers and Buddha symbols.
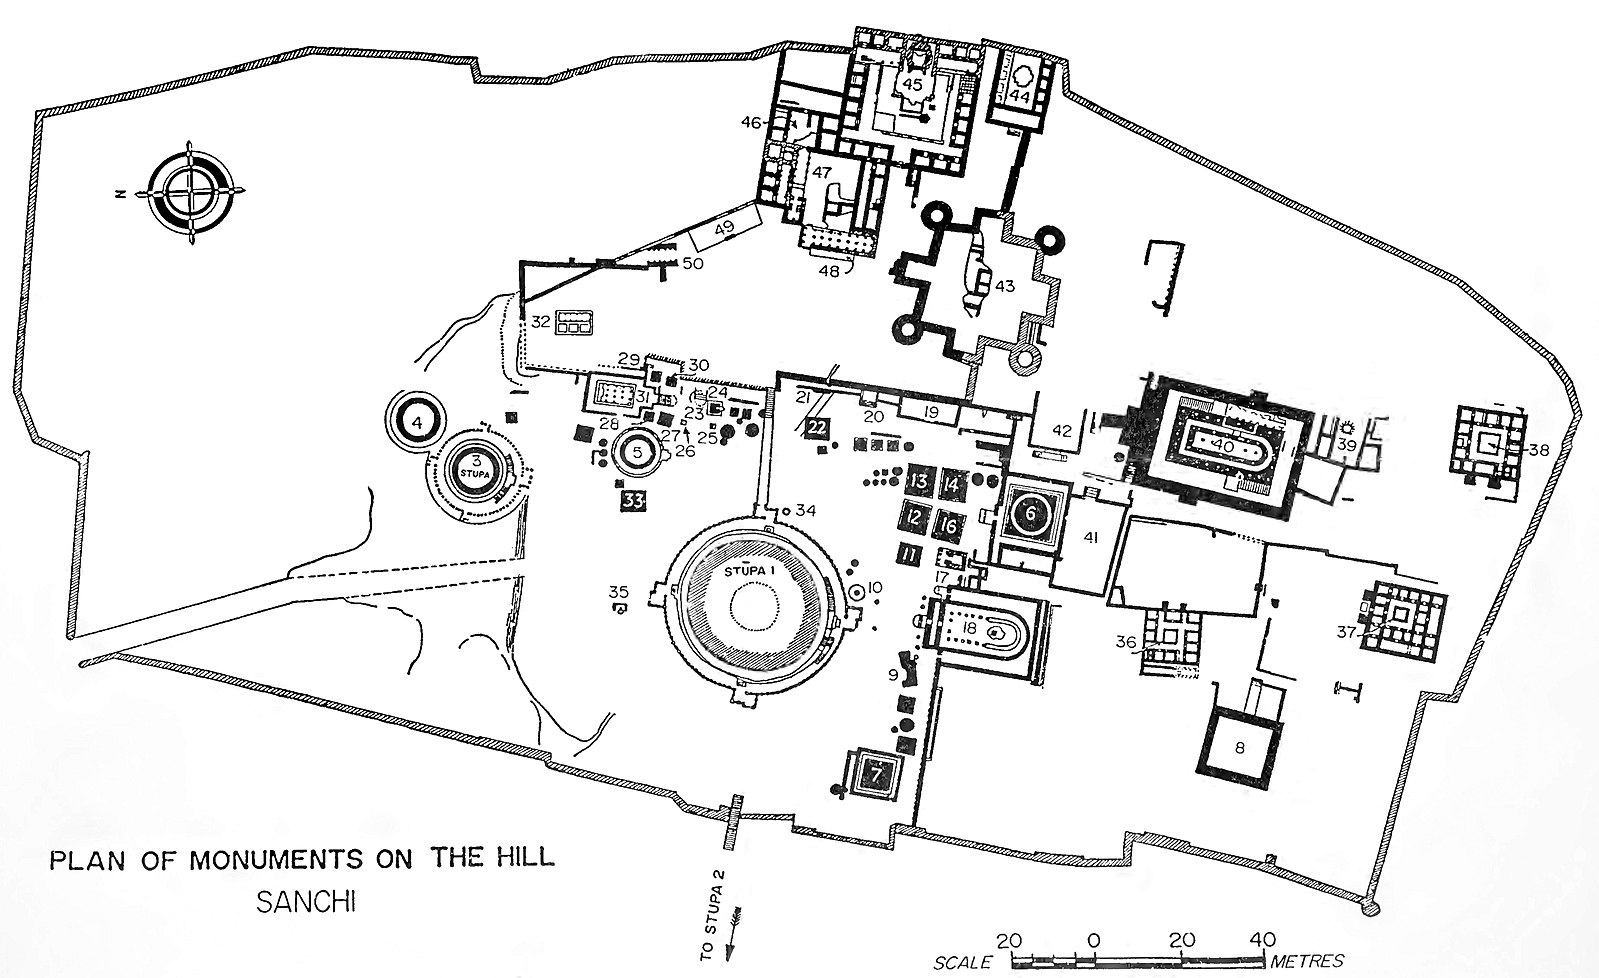
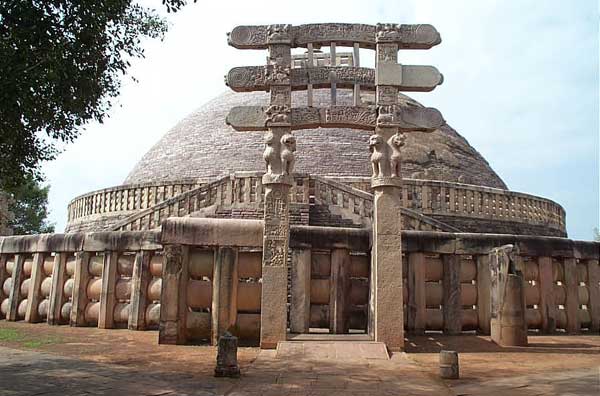
The Sanchi Stupa 1 (5.3.10) was commissioned in the 3rd century BCE by Emperor Ashoka, and the stupa is one of the oldest surviving stone structures in India. Construction was initially based on a plain mound-shaped building containing Buddha's relics. Installing the first stupa was the beginning of a designated sacred site with other stupas added to the site. The site map (5.3.9) details the places of the fifty stupas included in the location over several centuries. The stupa's domed shape represents a person's meditative state as they are seated. The importance of the stupa grew, and embellishments were made to the site. Stupas were specifically placed throughout the empire in places important to the Buddha. The Buddha was not represented in the carved gateways (torana) and railings added to the site. "Tradition prohibited the representation of the Enlightened One in anything but symbolic form. A riderless horse, an empty throne, footprints, the Wheel of the Law, a parasol, and the Bodhi Tree (Tree of Awakening) were all signs suggesting his presence 'by default.'"[5] "At the top of the stupa is a yasti, or spire, (5.3.11), which symbolizes the axis mundi (a line through the earth's center around which the universe is thought to revolve). The yasti is surrounded by a harmika, a gate or fence, and is topped by chattras (umbrella-like objects symbolizing royalty and protection)."[6] The Sanchi Stupa has been maintained and improved over the centuries and is still used today.
.jpg?revision=1&size=bestfit&width=685&height=456)
Ashoka Pillars
The emperor Ashoka also constructed the Pillars of Ashoka. "Unfortunately, few of the pillar capitals survive, and only seven complete specimens are known."[7] The pillars were made from stone and installed at different Buddhist monasteries throughout the empire. The pillars were inscribed with various edicts of the king, and the tops of the pillars were decorated with large, elaborate capitals. Historians believe earlier pillars existed; however, they were made from wood and deteriorated. Two types of stone were used for the pillars, including a beige sandstone from Chunar and a white sandstone with unusual red spots from Mathura. The capitals on top of the pillars were all carved in related styles, and historians think the artists and artisans who carved the pillars were from the same region and used the same techniques.
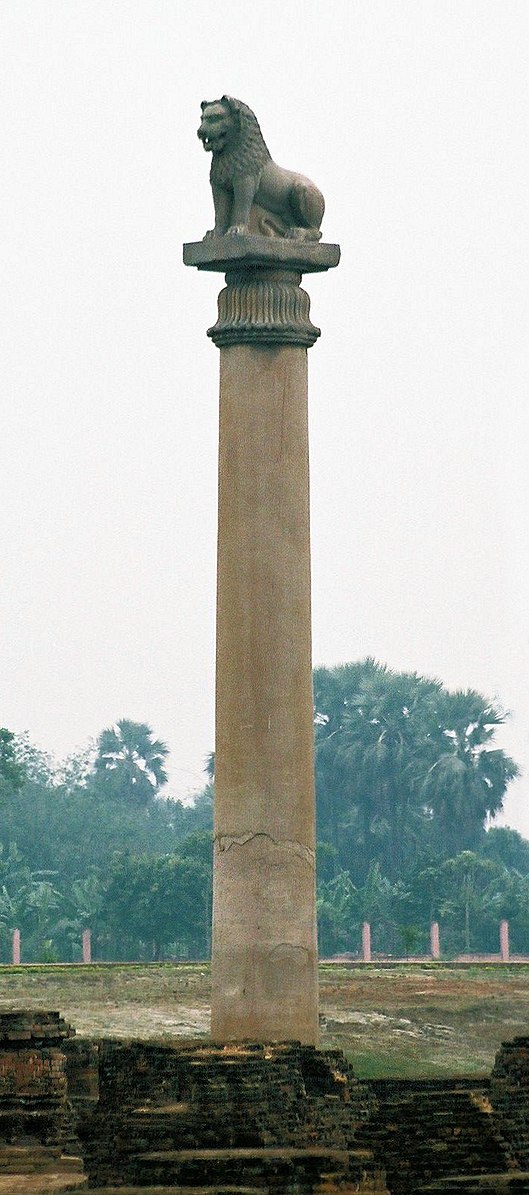
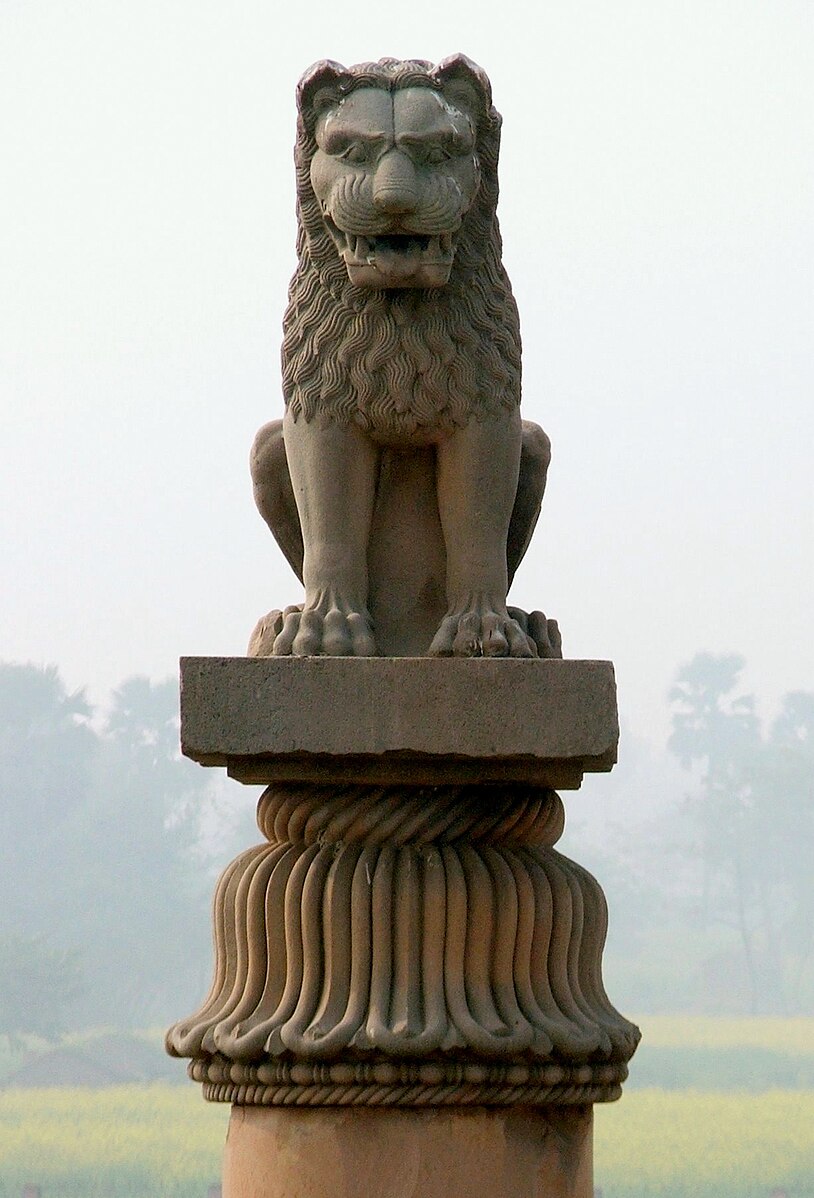
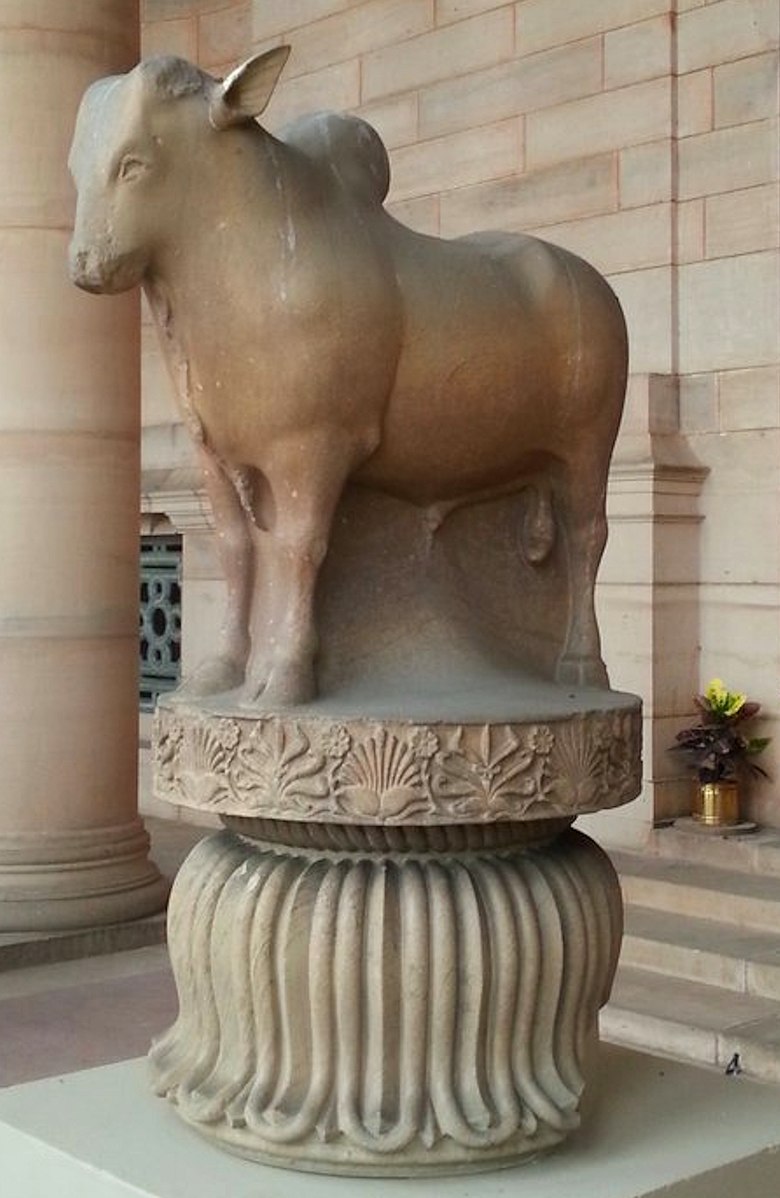
The pillar (5.3.12) was divided into two parts: the immense, tall, smooth shaft for the pillar itself and the decorative capital. The shaft was made from a single piece of stone, and the capital from another piece. The lower part of the capital appeared to resemble a bell made from lotus petals. The middle section or abacus was generally shaped in a square or circle and was decorated or left plain. The top or most spectacular section was the animal (5.3.13) on the top, usually a lion or bull. The lion, bull, or other animal was standing or sitting and always carved from a single stone. The single lion is sited facing north on this pillar based on Buddha's last travels. Today, many of the shaft parts of the pillars are still seen lying on the ground and broken into pieces, while the beautiful capitals have mostly disappeared.
The Sarnath capital is one of the most elaborate carvings. The four realistic lions are addorsed or back-to-back. The abacus of the capital (5.3.14) has four animals – a bull, lion, elephant, and horse – all separated by a wheel. "The four addorsed lions represent the cardinal directions, as we learn from a much later manuscript in which the lions are labeled as if they roar the message of the Buddha or the chakravartin, Ashoka in this case, to the four corners. Indeed, one Buddhist text, the Maha-Sihanada Sutta (Great Discourse on the Lion's Roar), explicitly links the wheel and lion with its refrain, '[the Buddha] roars his lion's roar in the assemblies, and sets rolling the Wheel of Brahma [wheel of the law].'"[8] The capital was made from sandstone and highly polished to produce an appearance resembling metal.
The Rampurva Bull, sandstone capital, dates back to the third century BCE and was once a part of the Ashokan Pillar uncovered in Bihar's Rampurva. Today, it stands as a proud centerpiece atop a pedestal, nestled between the central pillars at the Forecourt entrance of the Rashtrapati Bhavan. The Rampurva Bull sculpture is a stunning blend of Indian and Persian influences. The five-ton masterpiece captures the bull's soft flesh, alert ears, sensitive nostrils, and powerful legs. While the base features non-Indian motifs like the inverted lotus, rosette, palmette, and acanthus ornaments, the bull capital is a testament to remarkable Indian craftsmanship. Its velvety texture only adds to its allure.

Yaksha
Yaksha was believed to be spirits representing nature and could be mischievous, sexually aggressive, friendly, or generous depending on the form they appeared. The Yaksha (male) and yakshi (female) were documented in Hindu, Jain, and Buddhist art. The yakshas hid in the mountains, behind trees, or along isolated roadways where they might devour travelers. During the Mauryan Empire, enormous stone statues of Yashas were created, indicating the potential worship of nature during this period. The statues were the first monumental sculptures in India and stood almost two meters tall. The statues are usually incised with descriptions about their identification. Female Yaksinis were typically created as beautiful, happy women, and the male Yaksa looked like warriors or were short, stout, dwarf-like figures.
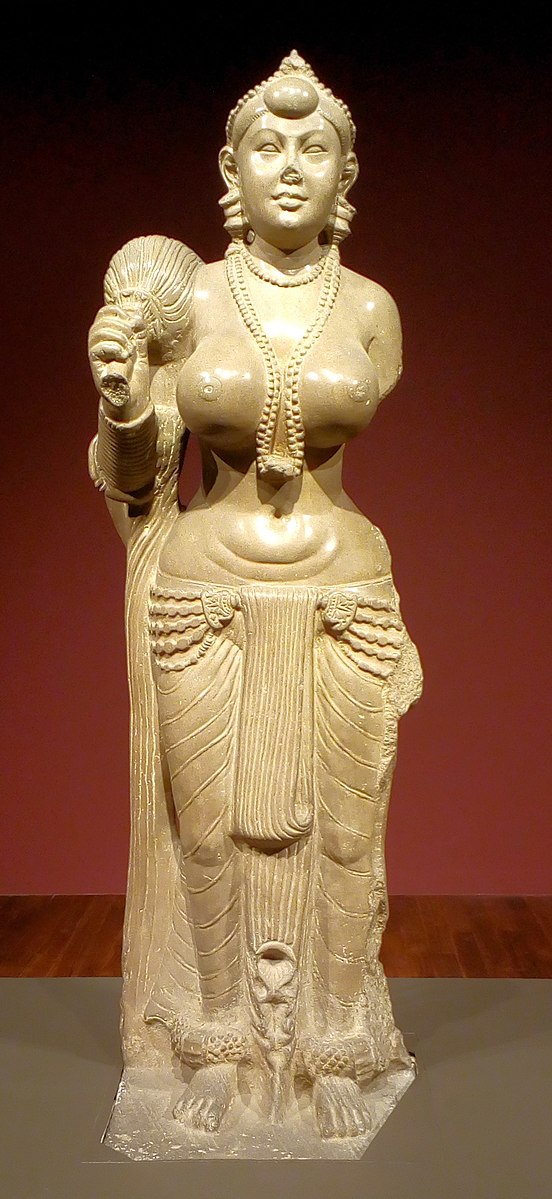
The female yakshi (5.3.16) is made from sandstone and highly polished. Like most yakshi, she is voluptuous with full breasts and a slender waist and is posed in a graceful position. Her lower torso is adorned with clothing and jewelry, while on her upper body, she only wears necklaces. Generally, a yakshi is standing by a tree or holding part of a tree, usually believed to represent the birth of Buddha under a tree. This statue's left arm was broken off, and what was in her hand is unknown. The yakshi holds a chauri (fly whisk) in her right hand.
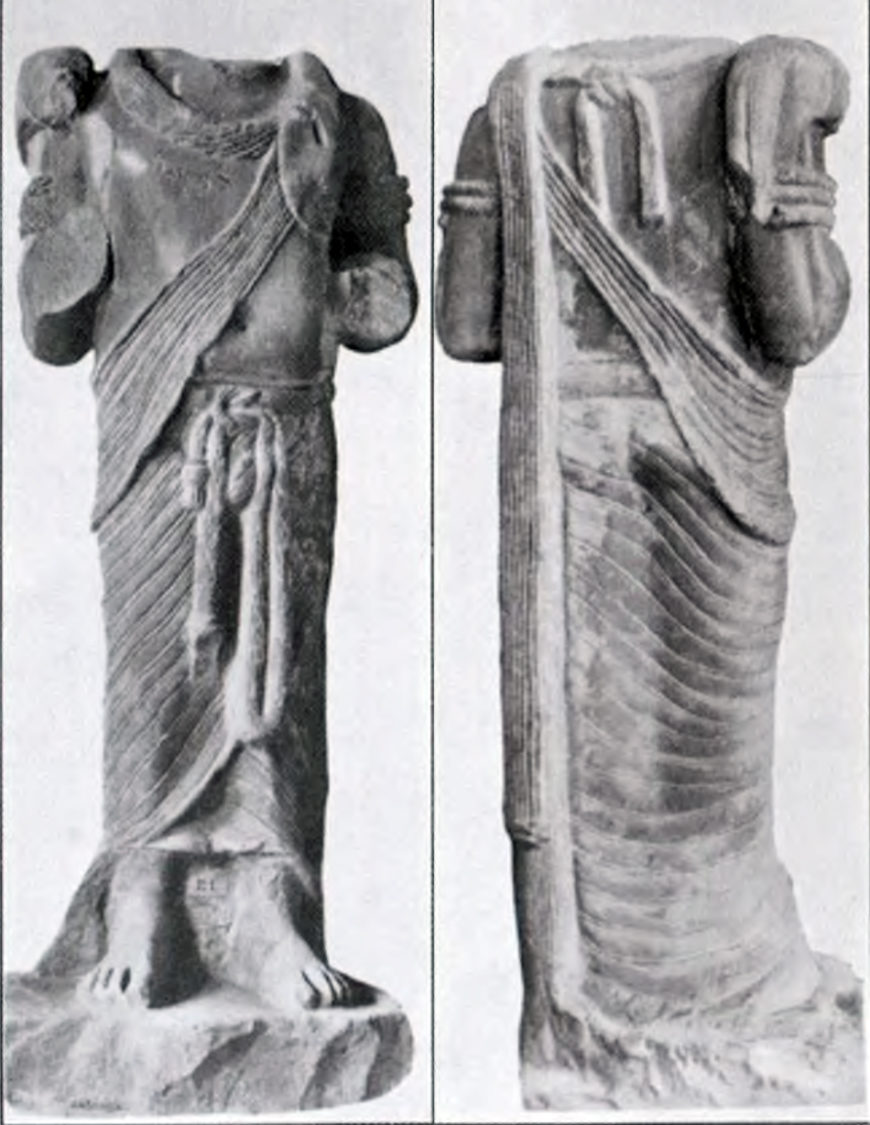
Unfortunately, the male Yaksha (5.3.17) is not as well preserved. The male was depicted with exceptionally well-carved and detailed clothing. Even though time has eroded the stone statue, the curves and decoration of his clothing are still evident. The Yaksha wore typical clothing, with exceptionally long ties tied at the waist in the lower part of his clothing. A long scarf is hung over the shoulder on the body's upper part. Because the arms are missing, it is unknown if the statue carried any identifying objects in his hands. The head is also missing; therefore, the statue does not convey any potential emotions.
[2] Report on the Excavations at Pataliputra Calcutta 1903
[4] Harvey, P., (1984). The Symbolism of the Early Stupa, The Journal of the International Association of Buddhist Studies, 7( 2).
[5] Geoffroy-Schneiter, B. (2002). Asian Art India China Japan, Assouline Publishers (16).
[6] Dr. Karen Shelby, "The Great Stupa at Sanchi," in Smarthistory, December 14, 2018, accessed December 4, 2023
[7] Himanshu P. R., (2014). The Return of the Buddha: Ancient Symbols for a New Nation, Routledge.
[8] Asher, Frederick. “On Maurya Art” A Companion to Asian Art and Architecture, by Rebecca M. Brown and Deborah S. Hutton, Blackwell, 2011, pp. 421–443.