6.1: Letters
- Page ID
- 151336
\( \newcommand{\vecs}[1]{\overset { \scriptstyle \rightharpoonup} {\mathbf{#1}} } \)
\( \newcommand{\vecd}[1]{\overset{-\!-\!\rightharpoonup}{\vphantom{a}\smash {#1}}} \)
\( \newcommand{\dsum}{\displaystyle\sum\limits} \)
\( \newcommand{\dint}{\displaystyle\int\limits} \)
\( \newcommand{\dlim}{\displaystyle\lim\limits} \)
\( \newcommand{\id}{\mathrm{id}}\) \( \newcommand{\Span}{\mathrm{span}}\)
( \newcommand{\kernel}{\mathrm{null}\,}\) \( \newcommand{\range}{\mathrm{range}\,}\)
\( \newcommand{\RealPart}{\mathrm{Re}}\) \( \newcommand{\ImaginaryPart}{\mathrm{Im}}\)
\( \newcommand{\Argument}{\mathrm{Arg}}\) \( \newcommand{\norm}[1]{\| #1 \|}\)
\( \newcommand{\inner}[2]{\langle #1, #2 \rangle}\)
\( \newcommand{\Span}{\mathrm{span}}\)
\( \newcommand{\id}{\mathrm{id}}\)
\( \newcommand{\Span}{\mathrm{span}}\)
\( \newcommand{\kernel}{\mathrm{null}\,}\)
\( \newcommand{\range}{\mathrm{range}\,}\)
\( \newcommand{\RealPart}{\mathrm{Re}}\)
\( \newcommand{\ImaginaryPart}{\mathrm{Im}}\)
\( \newcommand{\Argument}{\mathrm{Arg}}\)
\( \newcommand{\norm}[1]{\| #1 \|}\)
\( \newcommand{\inner}[2]{\langle #1, #2 \rangle}\)
\( \newcommand{\Span}{\mathrm{span}}\) \( \newcommand{\AA}{\unicode[.8,0]{x212B}}\)
\( \newcommand{\vectorA}[1]{\vec{#1}} % arrow\)
\( \newcommand{\vectorAt}[1]{\vec{\text{#1}}} % arrow\)
\( \newcommand{\vectorB}[1]{\overset { \scriptstyle \rightharpoonup} {\mathbf{#1}} } \)
\( \newcommand{\vectorC}[1]{\textbf{#1}} \)
\( \newcommand{\vectorD}[1]{\overrightarrow{#1}} \)
\( \newcommand{\vectorDt}[1]{\overrightarrow{\text{#1}}} \)
\( \newcommand{\vectE}[1]{\overset{-\!-\!\rightharpoonup}{\vphantom{a}\smash{\mathbf {#1}}}} \)
\( \newcommand{\vecs}[1]{\overset { \scriptstyle \rightharpoonup} {\mathbf{#1}} } \)
\(\newcommand{\longvect}{\overrightarrow}\)
\( \newcommand{\vecd}[1]{\overset{-\!-\!\rightharpoonup}{\vphantom{a}\smash {#1}}} \)
\(\newcommand{\avec}{\mathbf a}\) \(\newcommand{\bvec}{\mathbf b}\) \(\newcommand{\cvec}{\mathbf c}\) \(\newcommand{\dvec}{\mathbf d}\) \(\newcommand{\dtil}{\widetilde{\mathbf d}}\) \(\newcommand{\evec}{\mathbf e}\) \(\newcommand{\fvec}{\mathbf f}\) \(\newcommand{\nvec}{\mathbf n}\) \(\newcommand{\pvec}{\mathbf p}\) \(\newcommand{\qvec}{\mathbf q}\) \(\newcommand{\svec}{\mathbf s}\) \(\newcommand{\tvec}{\mathbf t}\) \(\newcommand{\uvec}{\mathbf u}\) \(\newcommand{\vvec}{\mathbf v}\) \(\newcommand{\wvec}{\mathbf w}\) \(\newcommand{\xvec}{\mathbf x}\) \(\newcommand{\yvec}{\mathbf y}\) \(\newcommand{\zvec}{\mathbf z}\) \(\newcommand{\rvec}{\mathbf r}\) \(\newcommand{\mvec}{\mathbf m}\) \(\newcommand{\zerovec}{\mathbf 0}\) \(\newcommand{\onevec}{\mathbf 1}\) \(\newcommand{\real}{\mathbb R}\) \(\newcommand{\twovec}[2]{\left[\begin{array}{r}#1 \\ #2 \end{array}\right]}\) \(\newcommand{\ctwovec}[2]{\left[\begin{array}{c}#1 \\ #2 \end{array}\right]}\) \(\newcommand{\threevec}[3]{\left[\begin{array}{r}#1 \\ #2 \\ #3 \end{array}\right]}\) \(\newcommand{\cthreevec}[3]{\left[\begin{array}{c}#1 \\ #2 \\ #3 \end{array}\right]}\) \(\newcommand{\fourvec}[4]{\left[\begin{array}{r}#1 \\ #2 \\ #3 \\ #4 \end{array}\right]}\) \(\newcommand{\cfourvec}[4]{\left[\begin{array}{c}#1 \\ #2 \\ #3 \\ #4 \end{array}\right]}\) \(\newcommand{\fivevec}[5]{\left[\begin{array}{r}#1 \\ #2 \\ #3 \\ #4 \\ #5 \\ \end{array}\right]}\) \(\newcommand{\cfivevec}[5]{\left[\begin{array}{c}#1 \\ #2 \\ #3 \\ #4 \\ #5 \\ \end{array}\right]}\) \(\newcommand{\mattwo}[4]{\left[\begin{array}{rr}#1 \amp #2 \\ #3 \amp #4 \\ \end{array}\right]}\) \(\newcommand{\laspan}[1]{\text{Span}\{#1\}}\) \(\newcommand{\bcal}{\cal B}\) \(\newcommand{\ccal}{\cal C}\) \(\newcommand{\scal}{\cal S}\) \(\newcommand{\wcal}{\cal W}\) \(\newcommand{\ecal}{\cal E}\) \(\newcommand{\coords}[2]{\left\{#1\right\}_{#2}}\) \(\newcommand{\gray}[1]{\color{gray}{#1}}\) \(\newcommand{\lgray}[1]{\color{lightgray}{#1}}\) \(\newcommand{\rank}{\operatorname{rank}}\) \(\newcommand{\row}{\text{Row}}\) \(\newcommand{\col}{\text{Col}}\) \(\renewcommand{\row}{\text{Row}}\) \(\newcommand{\nul}{\text{Nul}}\) \(\newcommand{\var}{\text{Var}}\) \(\newcommand{\corr}{\text{corr}}\) \(\newcommand{\len}[1]{\left|#1\right|}\) \(\newcommand{\bbar}{\overline{\bvec}}\) \(\newcommand{\bhat}{\widehat{\bvec}}\) \(\newcommand{\bperp}{\bvec^\perp}\) \(\newcommand{\xhat}{\widehat{\xvec}}\) \(\newcommand{\vhat}{\widehat{\vvec}}\) \(\newcommand{\uhat}{\widehat{\uvec}}\) \(\newcommand{\what}{\widehat{\wvec}}\) \(\newcommand{\Sighat}{\widehat{\Sigma}}\) \(\newcommand{\lt}{<}\) \(\newcommand{\gt}{>}\) \(\newcommand{\amp}{&}\) \(\definecolor{fillinmathshade}{gray}{0.9}\)In this section, you will be able to:
- Read, write, and type the letters ك ل م هـ in their different shapes.
- Pronounce the letters ك ل م هـ with short and long vowels.
| Letter Name اسم الحرف |
Letter shape شكل الحرف |
|---|---|
| Kaaf | ك |
| Laam | ل |
| Meem | م |
| Haa | هـ |
The Letter Kaaf ك
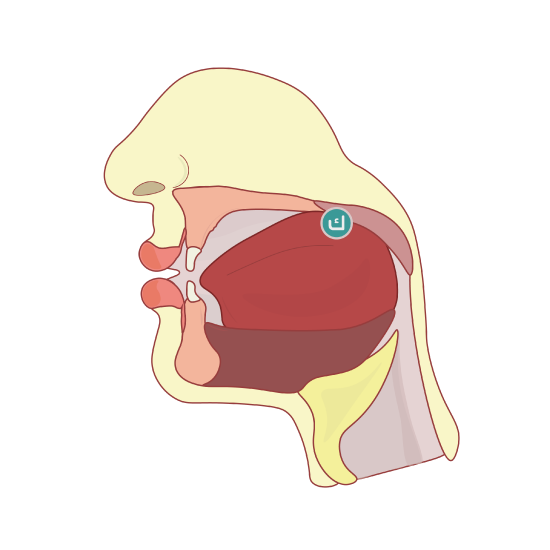
This letter corresponds to English “k”. ك represents a familiar sound that takes no extra effort on your part. The articulation place of the letter ك is the tongue.
The letter ك is articulated from the deepest part of the tongue and what lies opposite to it from the roof of the mouth in the area of the hard palate.
The letter ك is closer to the mouth and farther from the throat than the letter ق . Remember that ق is an emphatic letter that deepens the quality of surrounding vowels, whereas vowels surrounding ك are frontal. ك is often mispronounced at an articulation point further back in the mouth rather than the correct articulation point, resulting in a sound closer to the letter ق . (See Figure \(\PageIndex{1}\))

The tables below show the sound of the letter Khaa with short and long vowels.
| Sukoon | Dhama | Kasra | Fataha |
|---|---|---|---|
| كْ | كُ | كِ | كَ |
| The long vowel “و ” oo | The long vowel ‘’ي” ee | The long vowel “ا” aa |
|---|---|---|
| كو | كي | كا |
The letter ك is a connector letter. To write the independent ك, start above the line, draw straight down to the line, then curve and follow the line. Make a tiny hook at the end, then pick up the pen to draw a little “hamza” “”.
The shape of the initial كــ is different. When “ك” is connected to a letter it has a crossbar on the top. To write the initial كــ, begin as you do the independent form, drawing down to the line, then make a right angle and draw along it into a connecting segment.
Note that the body of the initial كــis not precisely perpendicular to the line on the paper; it may be slightly slanted or even curved, depending on individual style.
After you finish writing the skeleton of the word, go back and cross the كــ.
Medial ــكــ is written like the initial كــ, except that you must start from a connecting segment on the line and draw up, them trace the same line back down.
Final ــك is similar in shape to the independent ك, except that it is connected to the previous letter. (Watch the video)
| Final | Medial | Initial | Isolated |
|---|---|---|---|
| ــك | ــكـ | كــ |
ك |
Watch the video to learn how to write the letter kaaf
Which of the following Kaaf is in the Medial shape?
ــك - ك - كــ - ــكـ
- Answer
-
ــكـ
The letter Laam ل
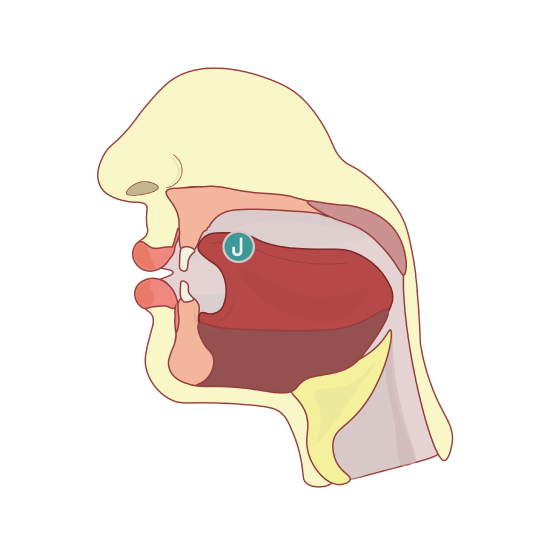
The articulation point of the letter “ل” is from the tongue. The letter “ل” is articulated from the tip of the tongue and what lies opposite to it of the gums of the upper front incisors. The articulation of the letter “ل” is in the shape of an arc - with both sides - until the tip of the tongue meets with the gums of the mentioned teeth. The articulation of the “ل” is an upward movement, not a forward movement like the English “L”. The letter ” ل” articulation point is from the nearest part of the sides of the tongue closer to the mouth, and the end of its tip and what lies opposite to it of the gums of the first upper premolars, the two upper canines, the two upper lateral incisors, and the two upper front incisors. Its articulation point is the front edges of the tongue. The letter “ل” represents the sound of the French and Spanish “L” with the tongue farther back and lower down in the mouth, resulting in a more emphatic sound with Arabic “ل”. (See figure \(\PageIndex{2}\))

The tables below show the sound of the letter Laam with short and long vowels.
| Sukoon | Dhama | Kasra | Fataha |
|---|---|---|---|
| لْ | لُ | لِ | لَ |
| The long vowel “و ” oo | The long vowel ‘’ي” ee | The long vowel “ا” aa |
|---|---|---|
| لو | لي | لا |
The letter “ل” is a connector letter. The shape of “ل” is similar to the shape of a hook. To write the independent “ل”, start at the top and draw straight down, continuing below the line and into the tail. The tail must come all the way back up above the line.
The initial “لــ” begins the same way, but once you reach the line, curve into the connecting segment along the line.
To write the medial “ــلــ”, start from the connecting segment, draw up, then trace back down to the line into the next connecting segment as shown.
When “ل” is followed by the letters “ج” “ح” “خ”, its shape is different in handwriting than what is normally seen in print. You begin writing from the same point but rather than go all the way down to the line, you stop at the height of the “حــ” and curve into it “ لحـ”.
To write the final “ــل”, drop the connecting segment and draw a big, rounded tail. Be sure to dip well below the line and finish the hook by returning the pen to the line again. (Watch the video)
Writing ( ل + ا = لا )
The combination of the letter “Laam” “ل” followed by “Alif” “ا” has two meanings: the linguistic definition, which means “no,” and the common usage to negate the present tense. There is a specific symbol that must be used to write these two letters whenever they occur in this order, both when written in a word or separately ( ل + ا = لا ). This shape varies slightly in print and handwriting styles.
This is the form "لا" you see in print. However, in handwriting, it has a different form - it has two separate strokes. When handwriting, start as you would write the initial connected “لــ”.
When you reach the line, extend it slightly, then make a slanted “Alif” stroke into the corner of “لــ” to get “لا”.
Remember that “Alif” does not connect to the following letters; therefore “لا” does not connect to following letters.
لا لا لا لا ل
| Final | Medial | Initial | Isolated |
|---|---|---|---|
| ــل | ــلـ | لــ |
ل |
Watch the video to learn how to write the letter Laam
The ‘’Dhama” on لُ is long or Short vowel?
- Answer
-
Short vowel
The letter Meem م
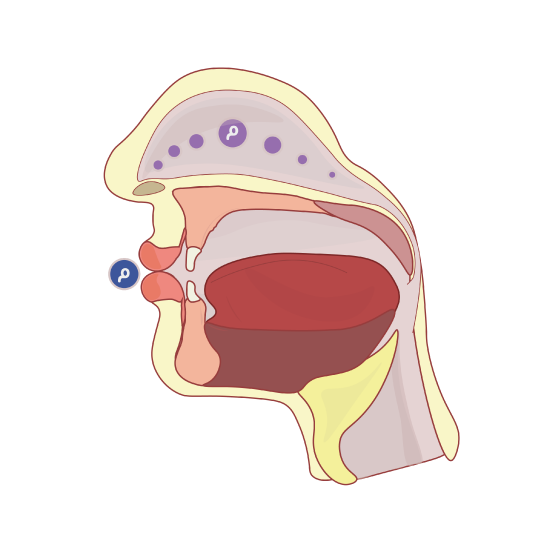
The articulation point of the letter م is the lips. The articulation point is the lips, like with the letters “ب” and “و”. However, the letter م is articulated by closing the two lips together and accentuated by the nasal passage. The letter corresponds to the English “M” as in “may”. م is pronounced “mm”. The letters “ب” and م emerge from pressing the lips together. However, the consonant “و” emerges by opening the lips slightly and bringing in the sides to form an “O” shape. (See figure 6.1.3)

The tables below show the sound of the letter Meem with short and long vowels.
| Sukoon | Dhama | Kasra | Fataha |
|---|---|---|---|
| مْ | مُ | مِ | مَ |
| The long vowel “و ” oo | The long vowel ‘’ي” ee | The long vowel “ا” aa |
|---|---|---|
| مو | مي | ما |
The letter م is a connecting letter. Therefore, to write an independent م, begin on the line and draw a small, round loop over and around to the right, continue along the line a short distance, then make a curve and draw the tail straight down, well below the line.
There are two common styles of writing the initial “مــ”. It may be looped up and over, like the independent م, or looped from underneath in the opposite direction. Once you have closed the loop, continue on into a connecting segment.
When writing the initial “مــ” followed by the letters “ج”, “ح”, or “خ”, remember to draw the loop well above the line so that you can continue directly into the following letter, like the word مجد.
The medial “ــمــ” should always loop down from the connecting segment so that it looks different than the loop of the letter “ــفــ”. The connecting segment often rests slightly above the line when it precede by ج, ح, or خ.
The final “ــم” must be looped down from the top. Starting from the connecting segment, continuing into the loop, then circling down and around to the right, making a full loop, and finally continuing into the tail. (Watch the video)
| Final | Medial | Initial | Isolated |
|---|---|---|---|
| ــم | ــمـ | مــ |
م |
Watch the video to learn how to write the letter Meem
True or Falls
The letter م is one of the two way connectors.
- Answer
-
True
The letter Haa هـ
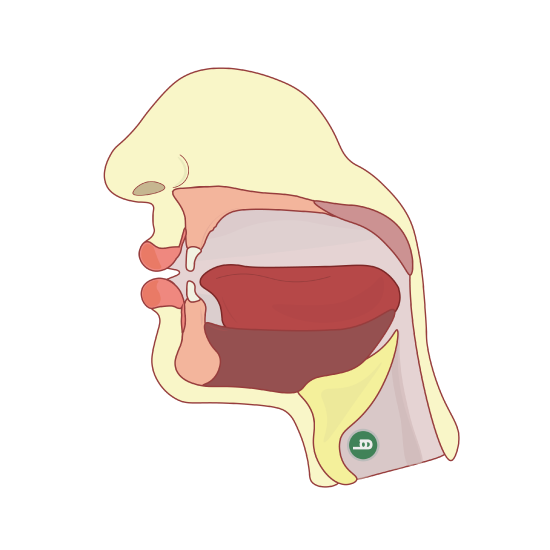
The letter Haa “هـ” presents the English sound “h”, as in house. The articulation point of the letter “هـ” is the deepest part of the throat and the furthest away from the mouth (closest to the chest). You should remember that “هـ” is a different than “ح”. The sound of “هـ” does not require the use of the throat muscles, whereas “ح” is pronounced deep in the throat and has a light, raspy sound, and involves the usage of the throat muscles. (See figure 6.1.4)

The tables below show the sound of the letter Haa with short and long vowels.
| Sukoon | Dhama | Kasra | Fataha |
|---|---|---|---|
| ْهـ | ُهـ | ِهـ | َهـ |
| The long vowel “و ” oo | The long vowel ‘’ي” ee | The long vowel “ا” aa |
|---|---|---|
| هـو | هـي | هـا |
The letter “هـ” is a connecting letter. The shape of the letter “هـ” is both its independent and initial form. You begin slightly above the line and draw a large loop, first upward and then down to your right and back up. The outer loop should be larger than the inside one. The exact shape of the letter “هـ” can vary according to individual style and print type, from printed to a rounded oval.
When you reach the beginning of the loop, continue down to the line and into the connecting segment, ensuring that the big loop is closed. The middle position “هـ” has two main variations. The first is more common in print,” ـهـ”, consisting of two vertical loops, one above and one below the line. The second is more commonly found in handwriting and is written in one stroke as a sharp dip below the line “ــهـ”. To write the final “ــه” connected with a preceding letter, start from the connecting segment and draw a short line up, and then loop around into a flat oval.
| Final | Medial | Initial | Isolated |
|---|---|---|---|
|
ــه ه |
ــهــ | هــ | هـ |
Watch the video to learn how to write the letter Haa
The Haa in the shape ـه is in medial or final?
- Answer
-
Final

