5.5: Reading- Printmaking
- Page ID
- 28305
\( \newcommand{\vecs}[1]{\overset { \scriptstyle \rightharpoonup} {\mathbf{#1}} } \)
\( \newcommand{\vecd}[1]{\overset{-\!-\!\rightharpoonup}{\vphantom{a}\smash {#1}}} \)
\( \newcommand{\dsum}{\displaystyle\sum\limits} \)
\( \newcommand{\dint}{\displaystyle\int\limits} \)
\( \newcommand{\dlim}{\displaystyle\lim\limits} \)
\( \newcommand{\id}{\mathrm{id}}\) \( \newcommand{\Span}{\mathrm{span}}\)
( \newcommand{\kernel}{\mathrm{null}\,}\) \( \newcommand{\range}{\mathrm{range}\,}\)
\( \newcommand{\RealPart}{\mathrm{Re}}\) \( \newcommand{\ImaginaryPart}{\mathrm{Im}}\)
\( \newcommand{\Argument}{\mathrm{Arg}}\) \( \newcommand{\norm}[1]{\| #1 \|}\)
\( \newcommand{\inner}[2]{\langle #1, #2 \rangle}\)
\( \newcommand{\Span}{\mathrm{span}}\)
\( \newcommand{\id}{\mathrm{id}}\)
\( \newcommand{\Span}{\mathrm{span}}\)
\( \newcommand{\kernel}{\mathrm{null}\,}\)
\( \newcommand{\range}{\mathrm{range}\,}\)
\( \newcommand{\RealPart}{\mathrm{Re}}\)
\( \newcommand{\ImaginaryPart}{\mathrm{Im}}\)
\( \newcommand{\Argument}{\mathrm{Arg}}\)
\( \newcommand{\norm}[1]{\| #1 \|}\)
\( \newcommand{\inner}[2]{\langle #1, #2 \rangle}\)
\( \newcommand{\Span}{\mathrm{span}}\) \( \newcommand{\AA}{\unicode[.8,0]{x212B}}\)
\( \newcommand{\vectorA}[1]{\vec{#1}} % arrow\)
\( \newcommand{\vectorAt}[1]{\vec{\text{#1}}} % arrow\)
\( \newcommand{\vectorB}[1]{\overset { \scriptstyle \rightharpoonup} {\mathbf{#1}} } \)
\( \newcommand{\vectorC}[1]{\textbf{#1}} \)
\( \newcommand{\vectorD}[1]{\overrightarrow{#1}} \)
\( \newcommand{\vectorDt}[1]{\overrightarrow{\text{#1}}} \)
\( \newcommand{\vectE}[1]{\overset{-\!-\!\rightharpoonup}{\vphantom{a}\smash{\mathbf {#1}}}} \)
\( \newcommand{\vecs}[1]{\overset { \scriptstyle \rightharpoonup} {\mathbf{#1}} } \)
\(\newcommand{\longvect}{\overrightarrow}\)
\( \newcommand{\vecd}[1]{\overset{-\!-\!\rightharpoonup}{\vphantom{a}\smash {#1}}} \)
\(\newcommand{\avec}{\mathbf a}\) \(\newcommand{\bvec}{\mathbf b}\) \(\newcommand{\cvec}{\mathbf c}\) \(\newcommand{\dvec}{\mathbf d}\) \(\newcommand{\dtil}{\widetilde{\mathbf d}}\) \(\newcommand{\evec}{\mathbf e}\) \(\newcommand{\fvec}{\mathbf f}\) \(\newcommand{\nvec}{\mathbf n}\) \(\newcommand{\pvec}{\mathbf p}\) \(\newcommand{\qvec}{\mathbf q}\) \(\newcommand{\svec}{\mathbf s}\) \(\newcommand{\tvec}{\mathbf t}\) \(\newcommand{\uvec}{\mathbf u}\) \(\newcommand{\vvec}{\mathbf v}\) \(\newcommand{\wvec}{\mathbf w}\) \(\newcommand{\xvec}{\mathbf x}\) \(\newcommand{\yvec}{\mathbf y}\) \(\newcommand{\zvec}{\mathbf z}\) \(\newcommand{\rvec}{\mathbf r}\) \(\newcommand{\mvec}{\mathbf m}\) \(\newcommand{\zerovec}{\mathbf 0}\) \(\newcommand{\onevec}{\mathbf 1}\) \(\newcommand{\real}{\mathbb R}\) \(\newcommand{\twovec}[2]{\left[\begin{array}{r}#1 \\ #2 \end{array}\right]}\) \(\newcommand{\ctwovec}[2]{\left[\begin{array}{c}#1 \\ #2 \end{array}\right]}\) \(\newcommand{\threevec}[3]{\left[\begin{array}{r}#1 \\ #2 \\ #3 \end{array}\right]}\) \(\newcommand{\cthreevec}[3]{\left[\begin{array}{c}#1 \\ #2 \\ #3 \end{array}\right]}\) \(\newcommand{\fourvec}[4]{\left[\begin{array}{r}#1 \\ #2 \\ #3 \\ #4 \end{array}\right]}\) \(\newcommand{\cfourvec}[4]{\left[\begin{array}{c}#1 \\ #2 \\ #3 \\ #4 \end{array}\right]}\) \(\newcommand{\fivevec}[5]{\left[\begin{array}{r}#1 \\ #2 \\ #3 \\ #4 \\ #5 \\ \end{array}\right]}\) \(\newcommand{\cfivevec}[5]{\left[\begin{array}{c}#1 \\ #2 \\ #3 \\ #4 \\ #5 \\ \end{array}\right]}\) \(\newcommand{\mattwo}[4]{\left[\begin{array}{rr}#1 \amp #2 \\ #3 \amp #4 \\ \end{array}\right]}\) \(\newcommand{\laspan}[1]{\text{Span}\{#1\}}\) \(\newcommand{\bcal}{\cal B}\) \(\newcommand{\ccal}{\cal C}\) \(\newcommand{\scal}{\cal S}\) \(\newcommand{\wcal}{\cal W}\) \(\newcommand{\ecal}{\cal E}\) \(\newcommand{\coords}[2]{\left\{#1\right\}_{#2}}\) \(\newcommand{\gray}[1]{\color{gray}{#1}}\) \(\newcommand{\lgray}[1]{\color{lightgray}{#1}}\) \(\newcommand{\rank}{\operatorname{rank}}\) \(\newcommand{\row}{\text{Row}}\) \(\newcommand{\col}{\text{Col}}\) \(\renewcommand{\row}{\text{Row}}\) \(\newcommand{\nul}{\text{Nul}}\) \(\newcommand{\var}{\text{Var}}\) \(\newcommand{\corr}{\text{corr}}\) \(\newcommand{\len}[1]{\left|#1\right|}\) \(\newcommand{\bbar}{\overline{\bvec}}\) \(\newcommand{\bhat}{\widehat{\bvec}}\) \(\newcommand{\bperp}{\bvec^\perp}\) \(\newcommand{\xhat}{\widehat{\xvec}}\) \(\newcommand{\vhat}{\widehat{\vvec}}\) \(\newcommand{\uhat}{\widehat{\uvec}}\) \(\newcommand{\what}{\widehat{\wvec}}\) \(\newcommand{\Sighat}{\widehat{\Sigma}}\) \(\newcommand{\lt}{<}\) \(\newcommand{\gt}{>}\) \(\newcommand{\amp}{&}\) \(\definecolor{fillinmathshade}{gray}{0.9}\)Printmaking uses a transfer process to make multiples from an original image or template. The multiple images are printed in an edition, with each print signed and numbered by the artist. All printmaking media result in images reversed from the original. Print results depend on how the template (or matrix) is prepared. There are three basic techniques of printmaking: relief, intaglio and planar. You can get an idea of how they differ from the cross-section images below, and view how each technique works from this site at the Museum of Modern Art in New York.
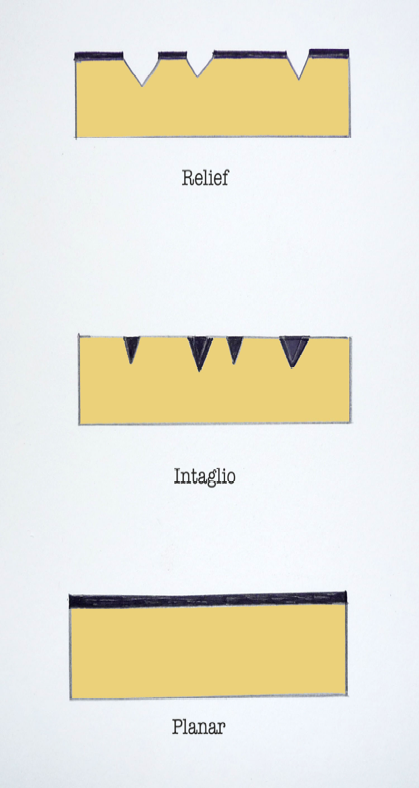
The black areas indicate the inked surface.
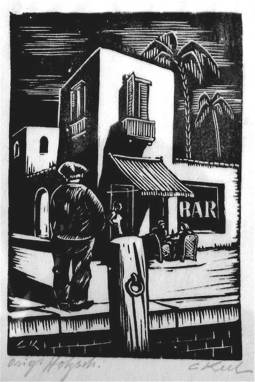
A relief print, such as a woodcut or linoleum cut, is created when the areas of the matrix (plate or block) that are to show the printed image are on the original surface; the parts of the matrix that are to be ink-free having been cut away, or otherwise removed. The printed surface is in relief from the cut away sections of the plate. Once the area around the image is cut away, the surface of the plate is rolled up with ink. Paper is laid over the matrix, and both are run through a press, transferring the ink from the surface of the matrix to the paper. The nature of the relief process doesn’t allow for lots of detail, but does result in graphic images with strong contrasts. Carl Eugene Keel’s Bar shows the effects of a woodcut printed in black ink.
Block printing developed in China hundreds of years ago and was common throughout East Asia. The Japanese woodblock print below shows dynamic effects of implied motion and the contrasts created using only one color and black. Ukiyo-e or “floating world” prints became popular in the nineteenth century, even influencing European artists during the Industrial Revolution.
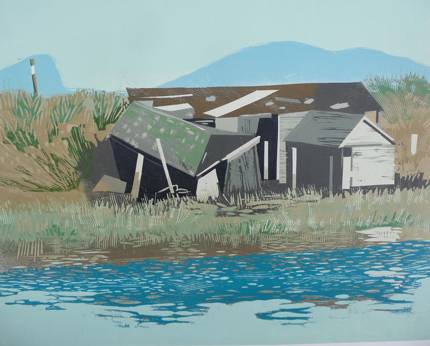
Relief printmakers can use a separate block or matrix for each color printed or, in reductionprints a single block is used, cutting away areas of color as the print develops. This method can result in a print with many colors.
Intaglio prints such as etchings, are made by incising channels into a copper or metal plate with a sharp instrument called a burin to create the image, inking the entire plate, then wiping the ink from the surface of the plate, leaving ink only in the incised channels below the surface. Paper is laid over the plate and put through a press under high pressure, forcing the ink to be transferred to the paper.
Examples of the intaglio process include etching and dry point: In dry point, the artist creates an image by scratching the burin directly into a metal plate (usually copper) before inking and printing. Today artists also use plexiglass, a hard clear plastic, as plates. Characteristically these prints have strong line quality and exhibit a slightly blurred edge to the line as the result of burrs created in the process of incising the plate, similar to clumps of soil laid to the edge of a furrowed trench. A fine example of dry point is seen in Rembrandt’s Clump of Trees with a Vista. The velvety darks are created by the effect of the burred-edged lines.
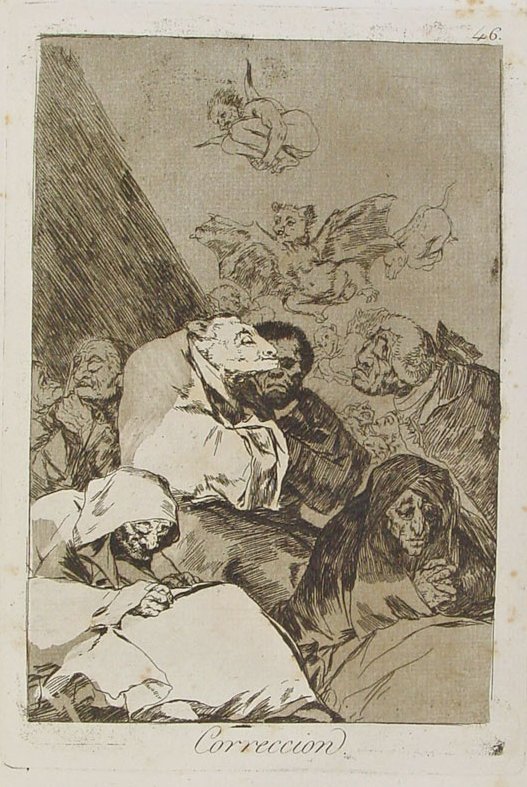
Etching begins by first applying a protective wax-based coating to a thin metal plate. The artist then scratches an image with a burin through the protective coating into the surface of the metal. The plate is then submersed in a strong acid bath, etching the exposed lines. The plate is removed from the acid and the protective coating is removed from the plate. Now the bare plate is inked, wiped and printed. The image is created from the ink in the etched channels. The amount of time a plate is kept in the acid bath determines the quality of tones in the resulting print: the longer it is etched the darker the tones will be. Correccion by the Spanish master Francisco Goya shows the clear linear quality etching can produce. The acid bath removes any burrs created by the initial dry point work, leaving details and value contrasts consistent with the amount of lines and the distance between them. Goya presents a fantastic image of people, animals and strange winged creatures. His work often involved biting social commentary. Correccion is a contrast between the pious and the absurd.
There are many different techniques associated with intaglio, including aquatint, scraping and burnishing.
Planar prints like monoprints are created on the surface of the matrix without any cutting or incising. In this technique the surface of the matrix (usually a thin metal plate or Plexiglass) is completely covered with ink, then areas are partially removed by wiping, scratching away or otherwise removed to form the image. Paper is laid over the matrix, then run through a press to transfer the image to the paper. Monoprints (also monotypes) are the simplest and painterly of the printing media. By definition monotypes and monoprints cannot be reproduced in editions. Kathryn Trigg’s monotypes show how close this print medium is related to painting and drawing.
Lithography is another example of planar printmaking, developed in Germany in the late eighteenth century. “Litho” means “stone” and “graph” means “to draw.” The traditional matrix for lithography is the smooth surface of a limestone block.
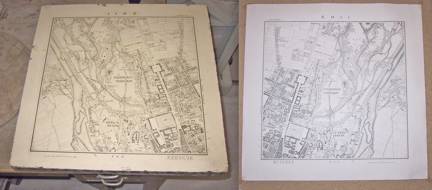
While this matrix is still used extensively, thin zinc plates have also been introduced to the medium. They eliminate the bulk and weight of the limestone block but provide the same surface texture and characteristics. The lithographic process is based on the fact that grease repels water. In traditional lithography, an image is created on the surface of the stone or plate using grease pencils or wax crayons or a grease-based liquid medium called tusche. The finished image is covered in a thin layer of gum arabic that includes a weak solution of nitric acid as an etching agent. The resulting chemical reaction divides the surface into two areas: the positive areas containing the image and that will repel water, and the negative areas surrounding the image that will be water receptive. In printing a lithograph, the gum arabic film is removed and the stone or metal surface is kept moist with water so when it’s rolled up with an oil based ink the ink adheres to the positive (image) areas but not to the negative (wet) areas.
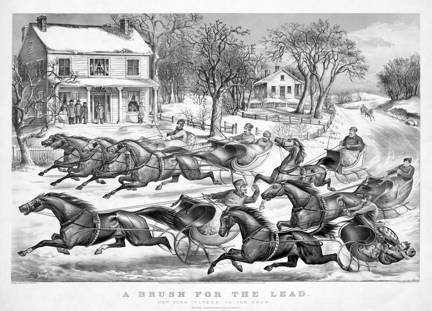
Because of the media used to create the imagery, lithographic images show characteristics much like drawings or paintings. In A Brush for the Lead by Currier and Ives (below), a full range of shading and more linear details of description combine to illustrate a winter’s race down the town’s main road.
Serigraphy, also known as screen printing, is a third type of planar printing medium. Screen printing is a printing technique that uses a woven mesh to support an ink-blocking stencil. The attached stencil forms open areas of mesh that transfer ink or other printable materials that can be pressed through the mesh as a sharp-edged image onto a substrate such as paper or fabric. A roller or squeegee is moved across the screen stencil, forcing or pumping ink past the threads of the woven mesh in the open areas. The image below shows how a stencil’s positive (image) areas are isolated from the negative (non-image) areas.
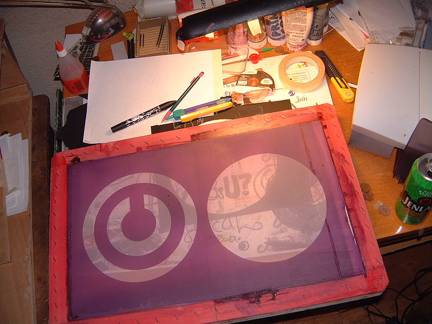
In serigraphy, each color needs a separate stencil. You can watch how this process develops in the accompanying video. Screen printing is an efficient way to print posters, announcements, and other kinds of popular culture images. Andy Warhol’s silk screens use images and iconography from popular culture.


