3.1: Introduction to Studio Lighting
- Page ID
- 233321
\( \newcommand{\vecs}[1]{\overset { \scriptstyle \rightharpoonup} {\mathbf{#1}} } \)
\( \newcommand{\vecd}[1]{\overset{-\!-\!\rightharpoonup}{\vphantom{a}\smash {#1}}} \)
\( \newcommand{\dsum}{\displaystyle\sum\limits} \)
\( \newcommand{\dint}{\displaystyle\int\limits} \)
\( \newcommand{\dlim}{\displaystyle\lim\limits} \)
\( \newcommand{\id}{\mathrm{id}}\) \( \newcommand{\Span}{\mathrm{span}}\)
( \newcommand{\kernel}{\mathrm{null}\,}\) \( \newcommand{\range}{\mathrm{range}\,}\)
\( \newcommand{\RealPart}{\mathrm{Re}}\) \( \newcommand{\ImaginaryPart}{\mathrm{Im}}\)
\( \newcommand{\Argument}{\mathrm{Arg}}\) \( \newcommand{\norm}[1]{\| #1 \|}\)
\( \newcommand{\inner}[2]{\langle #1, #2 \rangle}\)
\( \newcommand{\Span}{\mathrm{span}}\)
\( \newcommand{\id}{\mathrm{id}}\)
\( \newcommand{\Span}{\mathrm{span}}\)
\( \newcommand{\kernel}{\mathrm{null}\,}\)
\( \newcommand{\range}{\mathrm{range}\,}\)
\( \newcommand{\RealPart}{\mathrm{Re}}\)
\( \newcommand{\ImaginaryPart}{\mathrm{Im}}\)
\( \newcommand{\Argument}{\mathrm{Arg}}\)
\( \newcommand{\norm}[1]{\| #1 \|}\)
\( \newcommand{\inner}[2]{\langle #1, #2 \rangle}\)
\( \newcommand{\Span}{\mathrm{span}}\) \( \newcommand{\AA}{\unicode[.8,0]{x212B}}\)
\( \newcommand{\vectorA}[1]{\vec{#1}} % arrow\)
\( \newcommand{\vectorAt}[1]{\vec{\text{#1}}} % arrow\)
\( \newcommand{\vectorB}[1]{\overset { \scriptstyle \rightharpoonup} {\mathbf{#1}} } \)
\( \newcommand{\vectorC}[1]{\textbf{#1}} \)
\( \newcommand{\vectorD}[1]{\overrightarrow{#1}} \)
\( \newcommand{\vectorDt}[1]{\overrightarrow{\text{#1}}} \)
\( \newcommand{\vectE}[1]{\overset{-\!-\!\rightharpoonup}{\vphantom{a}\smash{\mathbf {#1}}}} \)
\( \newcommand{\vecs}[1]{\overset { \scriptstyle \rightharpoonup} {\mathbf{#1}} } \)
\(\newcommand{\longvect}{\overrightarrow}\)
\( \newcommand{\vecd}[1]{\overset{-\!-\!\rightharpoonup}{\vphantom{a}\smash {#1}}} \)
\(\newcommand{\avec}{\mathbf a}\) \(\newcommand{\bvec}{\mathbf b}\) \(\newcommand{\cvec}{\mathbf c}\) \(\newcommand{\dvec}{\mathbf d}\) \(\newcommand{\dtil}{\widetilde{\mathbf d}}\) \(\newcommand{\evec}{\mathbf e}\) \(\newcommand{\fvec}{\mathbf f}\) \(\newcommand{\nvec}{\mathbf n}\) \(\newcommand{\pvec}{\mathbf p}\) \(\newcommand{\qvec}{\mathbf q}\) \(\newcommand{\svec}{\mathbf s}\) \(\newcommand{\tvec}{\mathbf t}\) \(\newcommand{\uvec}{\mathbf u}\) \(\newcommand{\vvec}{\mathbf v}\) \(\newcommand{\wvec}{\mathbf w}\) \(\newcommand{\xvec}{\mathbf x}\) \(\newcommand{\yvec}{\mathbf y}\) \(\newcommand{\zvec}{\mathbf z}\) \(\newcommand{\rvec}{\mathbf r}\) \(\newcommand{\mvec}{\mathbf m}\) \(\newcommand{\zerovec}{\mathbf 0}\) \(\newcommand{\onevec}{\mathbf 1}\) \(\newcommand{\real}{\mathbb R}\) \(\newcommand{\twovec}[2]{\left[\begin{array}{r}#1 \\ #2 \end{array}\right]}\) \(\newcommand{\ctwovec}[2]{\left[\begin{array}{c}#1 \\ #2 \end{array}\right]}\) \(\newcommand{\threevec}[3]{\left[\begin{array}{r}#1 \\ #2 \\ #3 \end{array}\right]}\) \(\newcommand{\cthreevec}[3]{\left[\begin{array}{c}#1 \\ #2 \\ #3 \end{array}\right]}\) \(\newcommand{\fourvec}[4]{\left[\begin{array}{r}#1 \\ #2 \\ #3 \\ #4 \end{array}\right]}\) \(\newcommand{\cfourvec}[4]{\left[\begin{array}{c}#1 \\ #2 \\ #3 \\ #4 \end{array}\right]}\) \(\newcommand{\fivevec}[5]{\left[\begin{array}{r}#1 \\ #2 \\ #3 \\ #4 \\ #5 \\ \end{array}\right]}\) \(\newcommand{\cfivevec}[5]{\left[\begin{array}{c}#1 \\ #2 \\ #3 \\ #4 \\ #5 \\ \end{array}\right]}\) \(\newcommand{\mattwo}[4]{\left[\begin{array}{rr}#1 \amp #2 \\ #3 \amp #4 \\ \end{array}\right]}\) \(\newcommand{\laspan}[1]{\text{Span}\{#1\}}\) \(\newcommand{\bcal}{\cal B}\) \(\newcommand{\ccal}{\cal C}\) \(\newcommand{\scal}{\cal S}\) \(\newcommand{\wcal}{\cal W}\) \(\newcommand{\ecal}{\cal E}\) \(\newcommand{\coords}[2]{\left\{#1\right\}_{#2}}\) \(\newcommand{\gray}[1]{\color{gray}{#1}}\) \(\newcommand{\lgray}[1]{\color{lightgray}{#1}}\) \(\newcommand{\rank}{\operatorname{rank}}\) \(\newcommand{\row}{\text{Row}}\) \(\newcommand{\col}{\text{Col}}\) \(\renewcommand{\row}{\text{Row}}\) \(\newcommand{\nul}{\text{Nul}}\) \(\newcommand{\var}{\text{Var}}\) \(\newcommand{\corr}{\text{corr}}\) \(\newcommand{\len}[1]{\left|#1\right|}\) \(\newcommand{\bbar}{\overline{\bvec}}\) \(\newcommand{\bhat}{\widehat{\bvec}}\) \(\newcommand{\bperp}{\bvec^\perp}\) \(\newcommand{\xhat}{\widehat{\xvec}}\) \(\newcommand{\vhat}{\widehat{\vvec}}\) \(\newcommand{\uhat}{\widehat{\uvec}}\) \(\newcommand{\what}{\widehat{\wvec}}\) \(\newcommand{\Sighat}{\widehat{\Sigma}}\) \(\newcommand{\lt}{<}\) \(\newcommand{\gt}{>}\) \(\newcommand{\amp}{&}\) \(\definecolor{fillinmathshade}{gray}{0.9}\)Light is an essential component for capturing images. There are two types of light: natural light, which is produced by the sun and varies depending on the time of day and the season, and artificial light (lamps, streetlights, candles, etc.), which is the light that comes from artificial sources.
It is also important to understand the distinction between lights and lighting. Lights are the physical objects that emit light into the world. Lighting refers to the intensity or quality of light, the effect lights have on a particular scene. Lighting can control the way a viewer’s eye moves through an image, allowing you to tell a story by the way you illuminate different parts of the image.

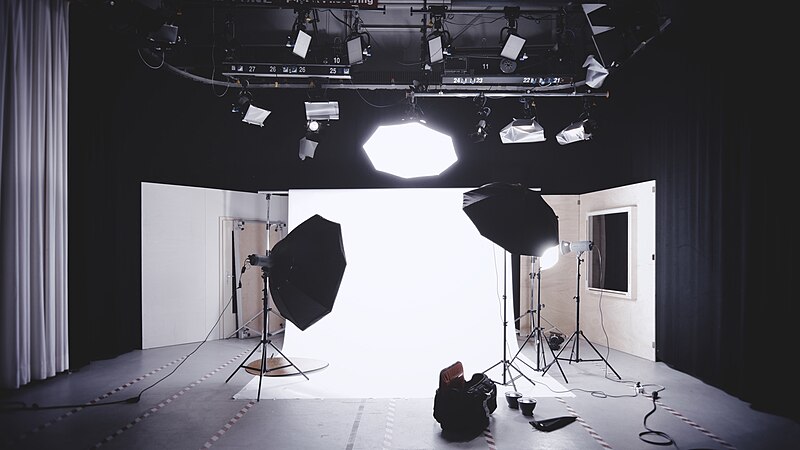
Image description: A photograph of a lighting studio setup with a backdrop, lights, and softboxes in a larger room with curtains on the walls.
When it comes to artificial or studio lighting, photographers use either continuous lighting or strobe lighting. Each type of lighting has its own visual effects and benefits (discussed below).
Strobe lights create short bursts of light. A strobe light, or flash, is a bulb that emits short bursts of bright light. Strobes are the most powerful lights with bright intensity that most accurately replicate daylight in color temperature. However, when photographing using strobe lights, it is necessary to view the image in the camera or on a computer screen to see the effect because the light flashes so quickly.
Continuous lights, also known as constant lights, stay on during the session. When learning, continuous lights are the easiest to work with because you can see the effect of the light and the shadows produced in real time without having to take a test exposure. Most continuous lights are LED so they are affordable, easy to work with, and don’t get hot. In addition, the LED lights used in the campus photo studio have a color temperature light control to shift from warmer light to cooler light. For the most accurate color, use a middle setting between warm and cool. However, no matter what the color temperature light, it is necessary to white balance for it.
In the real world, some kind of light is almost always available, called ambient light. An ambient light source can be natural or artificial. When taking photographs, it is important to be as efficient as possible. First, assess the ambient lighting of the scene; next, set the exposure in the camera based on this light; then, take a test exposure. Add additional lights as needed based on the test exposure. The goal is to balance the ambient lighting and the added light so that you have the level of desired detail. Therefore, it may be necessary to go back and forth between balancing the overall exposure of the scene and the added light. Where more light is needed within the image will determine the role of the added light in the scene.
To modify the ambient lighting, or overall brightness of a scene, adjust the exposure with the camera settings. Aperture or shutter speed controls the effect of ambient lighting within the image. To modify the overall brightness of the added light, increase the intensity of the light or move it closer to the subject; decrease the intensity or move the light further away from the subject.
When determining the lighting you want for your photo shoot, there are several factors to keep in mind. Consider the light direction, or the relationship between the camera, the subject, and the light, which will impact where you add lights and can be determined by the highlights and shadows present. For example, when shooting a professional studio portrait, the main light is positioned at a 45-degree angle to create a natural triangle of shadow beneath the eye from the nose. If the angle is more than 45 degrees, the triangle will be too low, and the subject will look like they have raccoon eyes. If the angle is less, the triangle will be too narrow, and the light will be too far to the side of the subject.
Also, think about the quality of lighting. Quality of lighting is determined by the light source and whether or not it is modified. You describe the quality of light by observing the highlights and shadows within a scene. Lighting can be hard and high contrast, which produces strong highlights and shadows with clearly defined edges. To create this effect, use a bright, unmodified light source. To create soft and low contrast lighting that results in shadows with subtle definition and less intense highlights, the light source must be modified. You can use a softbox or umbrella to create this effect.
The color temperature of a light source contributes to the aesthetics of an image. Because all light has color, you can choose how to use white balance and the existing color of light to generate effects. Photographers, cameras, and software all use the Kelvin scale to address the color temperature of a light source.

Image description: A horizontal color gradient image that transitions from a deep red on the far left to a light, almost white-blue on the far right. The middle portion of the image shows a spectrum of progressively lighter orange, peach, and beige shades. A numerical scale is marked along the bottom of the image, ranging from roughly 1,000 to 12,000.
The Kelvin scale measures color temperature, indicating whether a light source appears warm or cool.
- Lower Kelvin values (e.g., 2,700 K) produce warm, yellowish light, like that from incandescent bulbs commonly used in homes.
- Higher Kelvin values (e.g., 5,500 K) emit cool, bluish light, similar to natural daylight.
You can also add colored gels to your lights to create unusual tones. The choices the photographers make about lighting contribute to the overall concept and aesthetics of the image.
All light sources on a photo set are either key lights or fill lights. The key light is the main light on a subject and the most powerful light in the scene. Fill lights are the supporting light sources. The photographer’s decision about the style of the image will determine the positions of the key light and fill lights to achieve the desired effect.
How the light is arranged determines the mood of the image. For example, high key lighting creates large white areas that are light and bright with white and grey tones that can translate to upbeat, youthful, or happy feelings. Low key lighting produces large dark areas that can express somber, serious, or more formal tones.
A one-light setup is typically used to create a dramatic portrait or still life and is usually a low-key lighting situation. However, if the shadow is too dramatic in this setup, you can use a reflector, a tool to redirect light on a subject, to create fill light or produce more detail in the shadows.
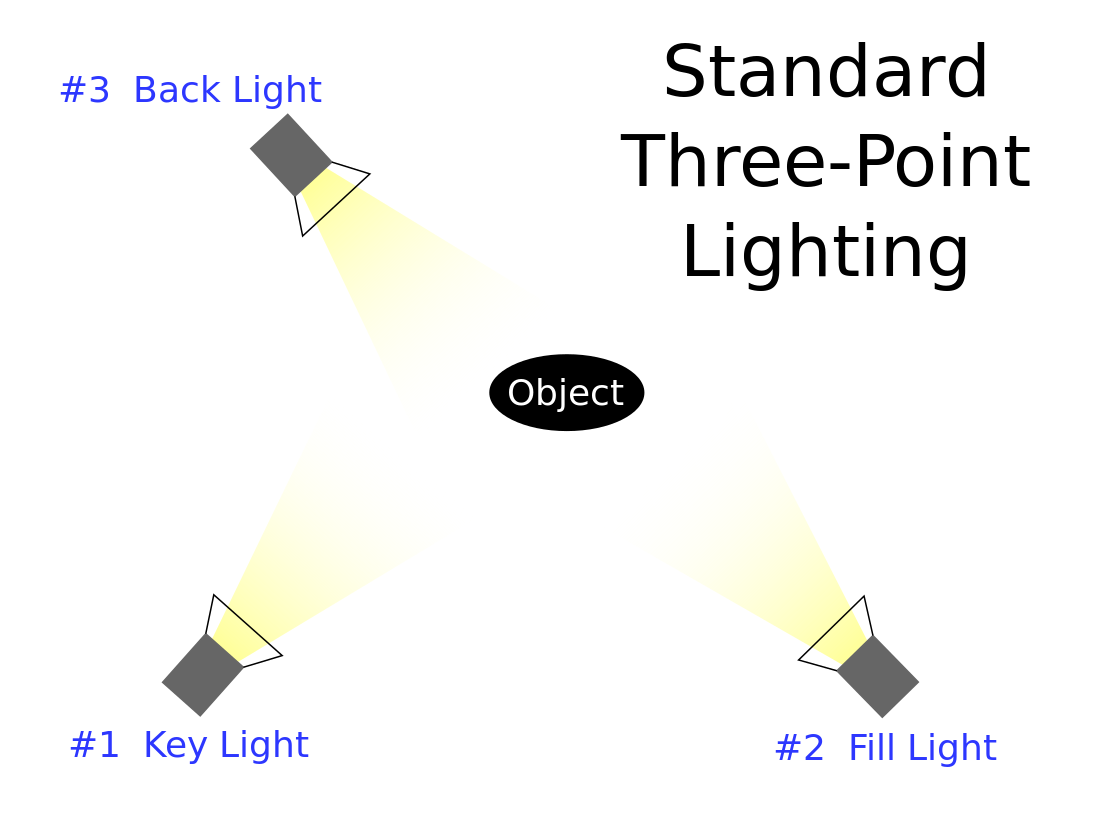
A three-light setup consists of a key light, a fill light, and one additional light and is best used to create a more balanced image with more light. In the traditional three-light setup, the key light should be a large source and placed where it lights the main subject, usually from a 45-degree angle. The fill light, or secondary light, is typically positioned opposite the key light with half the intensity.

Image description: Illustration of a standard three-point light setup that consists of a key light, fill light, and a back light, all focused on the object.
The third light in a three-light setup is often either a hair light or back light. A hair light separates the subject from background, adding dimension to the image. For example, if taking the portrait of a subject with dark hair against a dark background, a hair light makes the dark hair distinct from the dark background. A back light separates the tones and subject from the background by adding depth and creating a pleasing glow or halo around the figure.
- If possible, use the natural light from windows.
- Using a lamp with a shade will give your image soft and low-contrast lighting.
- Removing the shade from a lamp will give you hard and high-contrast lighting.
- You can purchase inexpensive lights from the hardware store (i.e., puck lights, handheld LED constants, clamp lights).

