4.2: Midterm Project
- Page ID
- 177192
\( \newcommand{\vecs}[1]{\overset { \scriptstyle \rightharpoonup} {\mathbf{#1}} } \)
\( \newcommand{\vecd}[1]{\overset{-\!-\!\rightharpoonup}{\vphantom{a}\smash {#1}}} \)
\( \newcommand{\id}{\mathrm{id}}\) \( \newcommand{\Span}{\mathrm{span}}\)
( \newcommand{\kernel}{\mathrm{null}\,}\) \( \newcommand{\range}{\mathrm{range}\,}\)
\( \newcommand{\RealPart}{\mathrm{Re}}\) \( \newcommand{\ImaginaryPart}{\mathrm{Im}}\)
\( \newcommand{\Argument}{\mathrm{Arg}}\) \( \newcommand{\norm}[1]{\| #1 \|}\)
\( \newcommand{\inner}[2]{\langle #1, #2 \rangle}\)
\( \newcommand{\Span}{\mathrm{span}}\)
\( \newcommand{\id}{\mathrm{id}}\)
\( \newcommand{\Span}{\mathrm{span}}\)
\( \newcommand{\kernel}{\mathrm{null}\,}\)
\( \newcommand{\range}{\mathrm{range}\,}\)
\( \newcommand{\RealPart}{\mathrm{Re}}\)
\( \newcommand{\ImaginaryPart}{\mathrm{Im}}\)
\( \newcommand{\Argument}{\mathrm{Arg}}\)
\( \newcommand{\norm}[1]{\| #1 \|}\)
\( \newcommand{\inner}[2]{\langle #1, #2 \rangle}\)
\( \newcommand{\Span}{\mathrm{span}}\) \( \newcommand{\AA}{\unicode[.8,0]{x212B}}\)
\( \newcommand{\vectorA}[1]{\vec{#1}} % arrow\)
\( \newcommand{\vectorAt}[1]{\vec{\text{#1}}} % arrow\)
\( \newcommand{\vectorB}[1]{\overset { \scriptstyle \rightharpoonup} {\mathbf{#1}} } \)
\( \newcommand{\vectorC}[1]{\textbf{#1}} \)
\( \newcommand{\vectorD}[1]{\overrightarrow{#1}} \)
\( \newcommand{\vectorDt}[1]{\overrightarrow{\text{#1}}} \)
\( \newcommand{\vectE}[1]{\overset{-\!-\!\rightharpoonup}{\vphantom{a}\smash{\mathbf {#1}}}} \)
\( \newcommand{\vecs}[1]{\overset { \scriptstyle \rightharpoonup} {\mathbf{#1}} } \)
\( \newcommand{\vecd}[1]{\overset{-\!-\!\rightharpoonup}{\vphantom{a}\smash {#1}}} \)
Materials
- Newspaper or magazine color photos
- X-acto knife for trimming photos
- Glue stick for mounting
- Sketchbook
- 14 x 17 inch Bristol board
- 1 sheet (16 x 20 inch, cut to 16 x 19 inches) Canson Presentation Board, pearl (tan) color
- non-photo blue pencil
- Ruler
- Masking tape
- All required colors and paint supplies – you will set up a full palette for the project
Guidelines
- Preliminary studies for mounted midterm project in your sketchbook:
- Three cropped photos, enlarged so that objects are not easily recognized – no whole objects!
- Choose photo sections with a variety of color and value.
- Use your viewer to crop photo to the same shape proportions as your 14 x 17 inch Bristol board.
- Glue the three cropped photos in a vertical row, leaving space under each one for your color swatches.
- Paint color swatches matching the colors of your photo directly under each proposed composition. Find as many colors as you can.
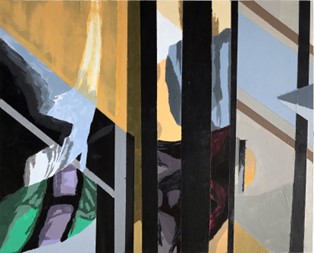
- Choose one of your three cropped photos for midterm project (instructor approval required). Draw a cross in the center of your image to assist in scaling up to a full sheet size. See Photo Project samples on Canvas.
- Tape a clean, even ¼ inch margin on all four sides. This must stay clean for mounting. It will not be cut off.
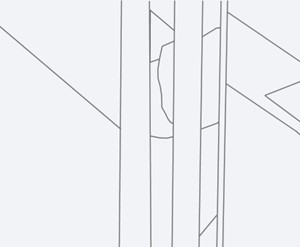
- Draw a cross in the center of your full sheet of Bristol board to divide your drawing into four parts for easier scaling. This will correspond to the cross in your image, so attention to correct proportion of your cropped image is essential.
- Draw the basic shapes of your image one quarter of the image at a time. It is easier to establish correct proportion by measuring where the placement of objects are on your page in relationship to the edges of your four grid marks. This is a contour line drawing, no shading, since it will be painted.
- Match your colors exactly as possible to the newspaper image colors.
- Painting must be clean with no paper showing.
- Allow painting to dry overnight before mounting cleanly on your 16 x 20 inch presentation board. Cut your board to 19 inches before mounting to make a one inch even border around your project. Glue securely, no lifting edges.
Four Painting Stages
- Drawing: Simplify for underpainting.
- Underpainting: Simplify color and shapes. Make sure there is no paper showing.

- Second Layer: Add more detail.

- Final Painting: All details added.