
10.2: The Process of Writing a Research Paper
- Page ID
- 30264
Process of Writing a Research Paper
The process of writing a research paper can be a journey, one that can be difficult at times and perhaps overwhelming. But breaking down the process into parts can make it feel manageable. The process of integrated reading and writing discussed earlier in this book is amplified in a research paper. The recursiveness of the reading-writing process is also amplified, meaning that you may have to go back and forth more between reading and writing, and the order in which you do your work may be even less linear. This, combined with the generally larger scope of the research paper, is what can make research papers feel a little overwhelming. Below, you will find a general order in which the process of the research paper occurs along with some strategies to help you. The main piece of advice any instructor can give you is: Do not put off the work. The sooner you begin your exploration, research, and writing, the better. The next three general pieces of advice are to:
- Create a research question that begins with the word "why" or "how" to guide you.
- Avoid getting bogged down in the research or working with sources that don't really relate to your question.
- Annotate while you read, and as soon as you begin writing down ideas from others in a document, be sure to also write down where the thought, idea, or quote came from.
The General Process
Determine your General Topic and Evaluate What You Know about It
As you may recall, to narrow the focus of your topic, you may try free writing exercises, such as brainstorming. You may also need to ask a specific research question—a broad, open-ended question that will guide your research. You may use your research question to create a research proposal (some instructors require this). See the next session to learn more about research proposals.
Plan and Schedule
Before you start researching your topic, take time to plan your research and writing schedule. Research projects can take days, weeks, or even months to complete. Creating a schedule is a good way to ensure that you do not end up being overwhelmed by all the work you have to do as the deadline approaches.
Each step of a research project requires time and attention. Careful planning helps ensure that you will keep your project running smoothly and produce your best work. Set up a project schedule that shows when you will complete each step. Think about how you will complete each step and what project resources you will use. Resources may include anything from library databases and word-processing software to interview subjects and writing tutors.
To develop your schedule, use a calendar and work backward from the date your final draft is due. Generally, it is wise to divide half of the available time on the research phase of the project and half on the writing phase. For example, if you have a month to work, plan for two weeks for each phase. If you have a full semester, plan to begin research early and to start writing by the middle of the term. You might think that no one really works that far ahead, but try it. You will probably be pleased with the quality of your work and with the reduction in your stress level.
As you plan, break down major steps into smaller tasks if necessary. For example, conducting research involves locating potential sources, evaluating their usefulness and reliability, reading, and taking notes. Defining these smaller tasks makes the project more manageable by giving you concrete goals to achieve.
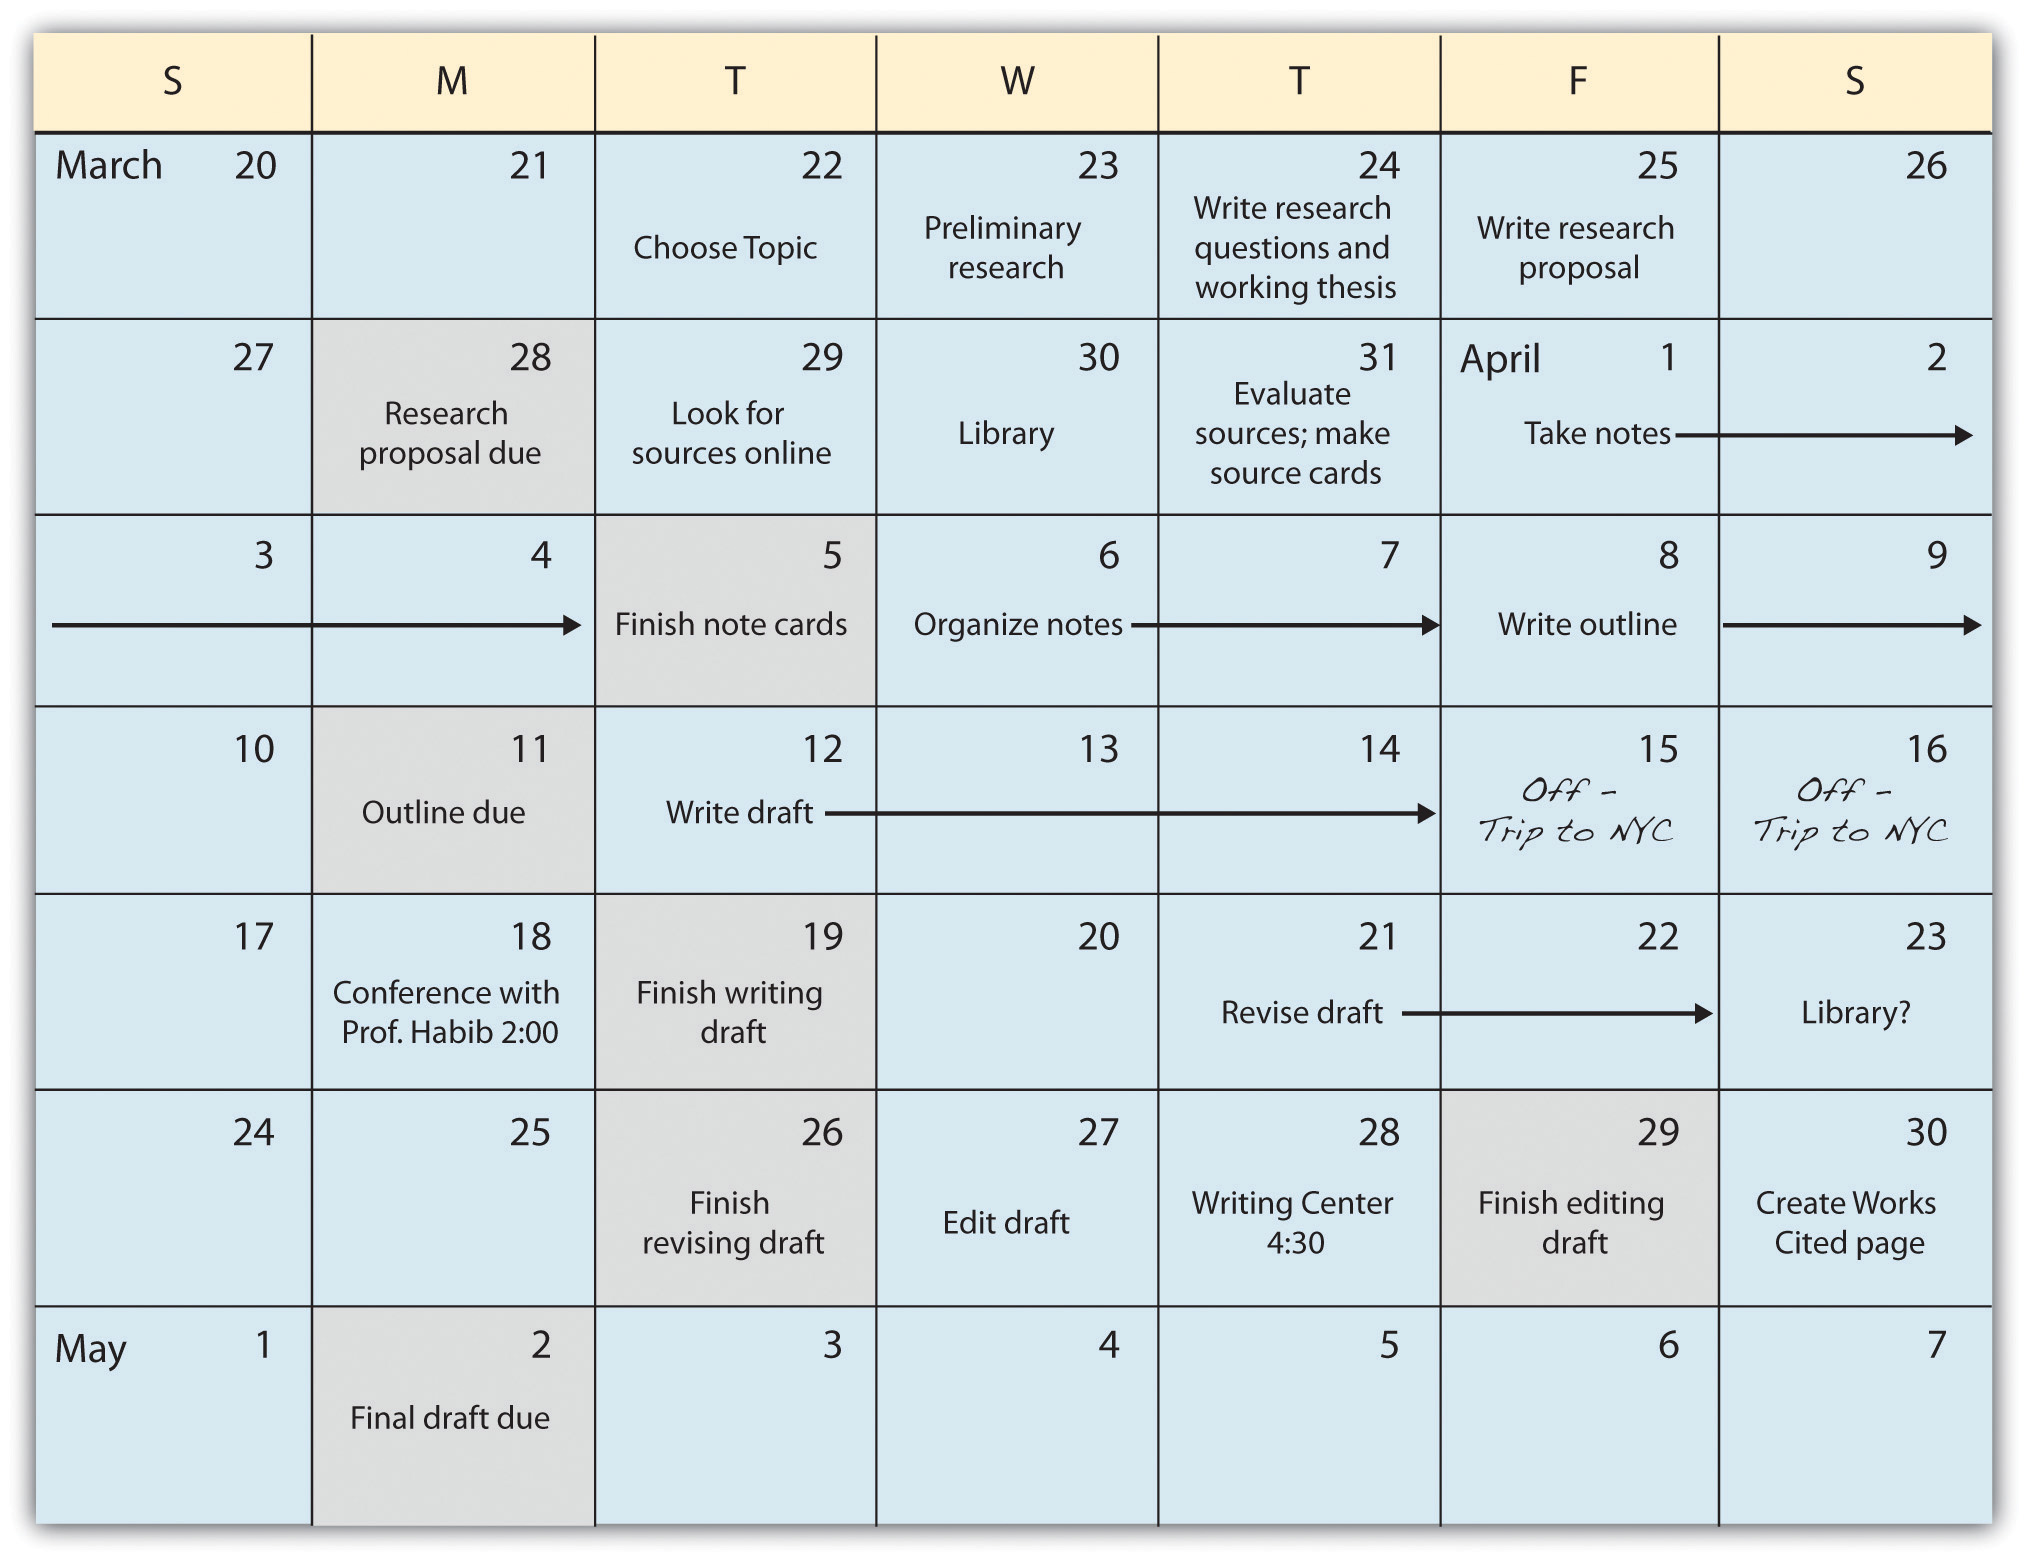
In this chapter, we will follow a student named Miguel, who is studying health care administration, as he prepares a research paper. While observing Miguel's process, you will also plan, research, and draft your own research paper. As an example of creating a plan, Miguel had six weeks to complete his research project. Working backward from a due date of May 2, he mapped out a schedule for completing his research by early April so that he would have ample time to write. Miguel chose to write his schedule in his weekly planner to help keep himself on track.
During this step of the process, it is also a good idea to plan the resources and organizational tools you will use to keep yourself on track throughout the project. Flowcharts, calendars, and checklists can all help you stick to your schedule. Always start from the time your project is due. If you have a smart phone with a task list in which you can add calendar deadlines and alarms, use that too! Decide how much time each part of the process is likely to take (and maybe multiply that amount of time by 1.5 or 2 times to get a realistic amount of time). Then schedule a deadline based on that amount of time on your calendar for each task, working backward from the due date.
Review Miguel's schedule. Key target dates are shaded. Note that Miguel planned times to use available resources by visiting the library and writing center and by meeting with his instructor.
Miguel's Research Schedule
Exercise 1
Create your own research schedule -- just as Miguel has -- but base it on your own deadlines and what you need to do.
Writing at Work
When you create a project schedule at work, you set target dates for completing certain tasks and identify the resources you plan to use on the project. It is important to build in some flexibility. Materials may not be received on time because of a shipping delay. An employee on your team may be called away to work on a higher-priority project. Essential equipment may malfunction. You should always plan for the unexpected.
Stay Organized
Although setting up a schedule is easy, sticking to one is challenging. Even if you are the rare person who never procrastinates, unforeseen events may interfere with your ability to complete tasks on time. A self-imposed deadline may slip your mind despite your best intentions. Organizational tools—calendars, checklists, note cards, software, and so forth—can help you stay on track.
Throughout your project, organize both your time and your resources systematically. Review your schedule frequently and check your progress. It helps to post your schedule in a place where you will see it every day. Both personal and workplace e-mail systems usually include a calendar feature where you can record tasks, arrange to receive daily reminders, and check off completed tasks. Electronic devices such as smartphones have similar features.
Organize project documents in a binder or electronic folder, and label project documents and folders clearly. Use note cards or an electronic document to record bibliographical information for each source you plan to use in your paper. Tracking this information throughout the research process can save you hours of time when you create your references page.
Exercise 2
Revisit the schedule created in Exercise 1. Transfer it into a format that will help you stay on track from day to day. You may wish to input it into your smartphone, write it in a weekly planner, post it by your desk, or have you email account send you daily reminders. Consider setting up a buddy system with a classmate that will help you both stay on track.
Identify Challenges
Do any of these scenarios sound familiar? You have identified a book that would be a great resource for your project, but it is currently checked out of the library. You planned to interview a subject matter expert on your topic, but she calls to reschedule your meeting. You have begun writing your draft, but now you realize that you will need to modify your thesis and conduct additional research. Or you have finally completed your draft when your computer crashes, and days of hard work disappear in an instant.
These troubling situations are all too common. No matter how carefully you plan your schedule, you may encounter a glitch or setback. Managing your project effectively means anticipating potential problems, taking steps to minimize them where possible, and allowing time in your schedule to handle any setbacks.
Many times a situation becomes a problem due only to lack of planning. For example, if a book is checked out of your local library, it might be available through interlibrary loan, which usually takes a few days for the library staff to process. Alternatively, you might locate another, equally useful source. If you have allowed enough time for research, a brief delay will not become a major setback.
You can manage other potential problems by staying organized and maintaining a take-charge attitude. Take a minute each day to save a backup copy of your work on a portable hard drive. Maintain detailed note cards and source cards as you conduct research—doing so will make citing sources in your draft infinitely easier. If you run into difficulties with your research or your writing, ask your instructor for help, or make an appointment with a writing tutor.
Exercise 3
Identify five potential problems you might encounter in the process of researching and writing your paper. Write them on a separate sheet of paper. For each problem, write at least one strategy for solving the problem or minimizing its effect on your project.
Writing at Work
In the workplace, documents prepared at the beginning of a project often include a detailed plan for risk management. When you manage a project, it makes sense to anticipate and prepare for potential setbacks. For example, to roll out a new product line, a software development company must strive to complete tasks on a schedule in order to meet the new product release date. The project manager may need to adjust the project plan if one or more tasks fall behind schedule.
Conduct Research
When going about your research, you will likely use a variety of sources—anything from books and periodicals to video presentations and in-person interviews.Your sources will include both primary sources and secondary sources. Primary sources provide firsthand information or raw data. For example, surveys, in-person interviews, and historical documents are primary sources. Secondary sources, such as biographies, literary reviews, or journal articles, include some analysis or interpretation of the information presented. As you conduct research, you will take detailed, careful notes about your discoveries. You will also evaluate the reliability of each source you find. See more about conducting research in "Evaluating and Working with Sources."
Using appropriate key words, start searching academic databases for scholarly articles about your topic. Try to look for sources from multiple perspectives, source types, and cultures. Print out or keep in a special electronic folder all of the articles you are considering.
Some Exercises or Tips to Follow while You Read
Read and annotate your articles, one at a time. At this time, also do the following for each of your readings:
- As themes or categories appear in what you are reading, assign a colored sticky note to each theme/category. As you read each article, use that color of sticky note to identify the theme wherever it appears in your reading. Note that each theme or category may not appear in all of your articles. However, each article may cover more than one theme. Annotate each article while you read with your thoughts, ideas, and reactions. Also annotate for understanding and main ideas.
- Begin your annotated bibliography if your instructor requires you to write one. Even if your instructor doesn't, creating an annotated bibliography can be a useful step for you to start to organize what you are reading in your mind. For each source, write down the complete MLA citation (in correct format), summarize the article in your own words, critique it (is the article good or not – why?), and explain how you could use it in your research paper. Writing an annotated bibliography takes time, but it is the first step in synthesizing and really thinking about how your sources work together.
- As you read through your articles, you may find that what you read raises more questions for you. This means you may go out and find some more articles, even some that weren’t on your initial annotated bibliography. You may find that what you are reading doesn’t seem relevant after all (although reading abstracts can help avoid this problem) so you may end up not including some articles you initially thought you would. Sometimes you may find that you need more information in some area or you may want to see if others agree with the original author. Or you may want to find out more about something the author wrote about. This is the time to check the list of citations at the end of the article. You can generally find more to read about the topic in that list although keep in mind those sources will be older than what you originally read.
Organize your Research and Ideas
When your research is complete, you will organize your findings and decide which sources to cite in your paper. You will also have an opportunity to evaluate the evidence you have collected and determine whether it helps to answer your research question. You may decide to conduct additional research to ensure that your question is answered thoroughly.
To help organize all of these ideas, begin a word processing document with a section for each theme/category you identified while you were reading. In each theme/section, start writing down your significant annotations you wrote down while reading. Also, be sure to write down the last name of the author and page number of the source you are working with as you do this. Thinking about PIE paragraph development (see "Strategies for Paragraph Development"), you are beginning to write down some of the E(xplanation) and I(nformation) for your research paper.
Exercise 4 \(\PageIndex{1}\)
You may have created a mind map when brainstorming your research paper. If you did, return to that mind map and edit it by adding any new themes or topics you read about that you didn't think of before. Rearrange the mind map so that the connections represent how the topics relate to each other.
If you didn't create a mind map before -- and you are a visual thinker -- create one now. Write down each theme and think about how they relate to each other. Keep subtopic that relate close together on the mind map and keep those ideas that are less closely related farther apart. Then, you might write down the authors of each article underneath the topic(s)/theme(s) they discuss in their work. This way, each section of your research paper can be visually grouped before you write about one section (or mind map bubble) at a time. Topics/themes that are close together in your mind map can appear in close proximity in your paper also.
Draft Your Paper
Now that you've done some initial organizing, you are ready to combine your research findings with your critical analysis of the results in a rough draft. You will incorporate source materials into your paper and discuss each source thoughtfully in relation to your research question. See "Creating a Rough Draft of a Research Paper" to see an explanation of the form and structure of a literature review research paper.
When you cite your reference sources, it is important to both paraphrase well (see "Working with Sources Part 1") and pay close attention to standard conventions for citing sources in order to avoid plagiarism, or the practice of using someone else’s words without acknowledging the source. You must cite your source even when you paraphrase. In fact, much higher level research writing in fields other than the humanities involves mostly paraphrasing, not incorporating quotations, so learning to paraphrase well is an invaluable skill that you should try to master. Later in this chapter, you will learn how to incorporate sources in your paper and avoid some of the most common pitfalls of attributing information.
Once you have finished your reading and note taking, go to your document in which you started to organize your notes. Go through each section, re-read your notes, and start coming up with some main ideas for each section and or paragraph that help lead to an answer to your research question. Then make sure each paragraph and section has a point, supporting information, and explanation/analysis (see PIE in "Strategies for Paragraph Development"). Try to work with one section at a time. You can develop your explanation by comparing different points of view on a subtopic (although x shows this, the results from x’s study show this….), examining the nuances about a topic (i.e., this is similar, except…), discussing the implications of the ideas (looking at it from this perspective can mean…., this can help us by….), and/or critiquing the strength or weakness of some research over others (see sentence stems). Decide where you need more support and see if you can find it. But be sure to connect your research to an overall answer to your research question (what your thesis will eventually be). See what you can add to the analysis in each paragraph. At this point, you should have a general answer to your research question. This general answer is your thesis. Congratulations! You are now most of the way through your journey. See "Structure of the Research Paper" in "Creating a Rough Draft of a Research Paper" to see where to include your thesis.
Hint:
When you can’t think of a word, think of the best word you can and then put question marks around it so you can revisit it later. Don't let not being able to think of the write word keep you form getting your other thoughts down.
Revise and Edit

Revising and polishing your paper is a multi-step process involving obtaining feedback and figuring out areas that might have holes or how to expand your explanation and possibly reorganizing some of your information. These are higher order concerns (HOCS), and they should be dealt with before you turn your attention to lower order concerns (LOCS) involving words choice, phrasing, checking your citations, and proofreading. When dealing with HOCS, you might reorganize your paper’s structure or revise for unity and cohesion, ensuring that each element in your paper flows into the next logically and naturally. You will also make sure that your paper uses an appropriate and consistent tone. Pay special attention to this where you incorporate quotations and discuss other people's writing (see "Evaluating and Working with Sources," later in this chapter).
You may have already draft an introduction to get yourself writing, or you may have put that off. Either way, it's time to think about your research question and your audience. Think about what your audience will already know about your topic and provide context accordingly for your audience, in your thesis, ending at your research question. This may require to revise your introduction if you've already drafted one. Remember from the beginning of the chapter that research is a conversation, and since someone else reading your paper would feel like they would be entering a conversation without any context if you jump right into your topic, you need to provide the context for them to enter the conversation with you. That is the purpose of the introduction.
Once you feel confident in the strength of your writing, you will edit your paper for proper spelling, grammar, punctuation, mechanics, and formatting. If you used the question mark trick to mark places where you wanted to review your word choice, now is the time to go back and search for those question marks. Read your essay from the end to the beginning (looking for those question marks), or use the "search" or "find" key in your word processing program, and make any changes needed in word choice and sentence structure. Then proofread according to the tips in Section 7.5, "Proofreading." Do be careful to check all quotes against the original to make sure they are accurate (don't skip over them when proofreading), and make sure no citations are missing. Finally, make sure your final Works Cited page reflects the sources you actually used in your paper. If you got rid of some during the research process, remove them from the Works Cited list. Conversely, if you added some, add them to your Works Cited page. When you complete this final step -- hopefully not at 3 a.m. the morning before your paper is due -- you will have transformed a simple idea or question into a thoroughly researched and well-written paper you can be proud of!
Contributors
- Adapted from Writing for Success. Provided by: The Saylor Foundation. License: CC-NC-SA 3.0.
This page most recently updated on June 6, 2020.