6.8: Expansion of the Maurya Empire
- Page ID
- 72218
Learning Objective
- Understand the expansion of the Maurya Empire
Key Points
- The Seleucid Empire tried and failed to reconquer the northwestern part of the Maurya Empire during the Seleucid-Mauryan war, from 305-303 BCE.
- As part of the peace offering, the Maurya Empire gained five territories in exchange for 500 war elephants.
- Several Greeks remained at the Mauryan court as ambassadors to the Hellenistic world.
- Chandragupta Maurya was succeed by his son, Bindusara, in 298 BCE, and then by Bindusara’s son, Ashoka the Great, in 272 BCE.
- Under Ashoka the Great, the Maurya Empire expanded into the southern part of the Indian subcontinent.
- Ashoka erected the Edicts of Ashoka, which state his policies and accomplishments, and which were written in both Greek and Sanskrit.
Terms
satrapies
The governors of the provinces of the ancient Median and Achaemenid (Persian) Empires, and several of their successors, such as the Sasanian Empire and the Hellenistic empires.
Edicts of Ashoka
Stone edicts that depicted the policies and accomplishments of Ashoka the Great, and were written in both Greek and Sanskrit.
Ashoka the Great
Lived 304-232 BCE. As the king of the Maurya Empire, he conquered the Indian subcontinent.
Seleucus
The king of the Seleucid Empire who tried to reconquer northwestern Indian, but lost the Selecucid-Mauryan War.
The Seleucid-Mauryan War
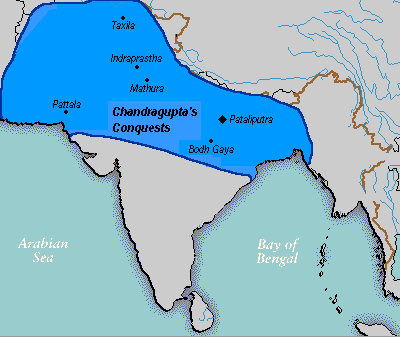
In 305 BCE, Emperor Chandragupta Maurya led a series of campaigns to retake the satrapies left behind by Alexander the Great when he returned westward. Seleucus I fought to defend these territories, but both sides made peace in 303 BCE.
Seleucus, one of Alexander’s generals, received Babylonia and, from there, expanded his dominions to include much of Alexander’s near eastern territories. Seleucus established himself in Babylon in 312 BC, the year used as the foundation date of the Seleucid Empire. He ruled not only Babylonia, but the entire enormous eastern part of Alexander’s empire. The Seleucid Empire was a major center of Hellenistic culture. In the areas where a Greek-Macedonian political elite dominated (mostly urban), it maintained the preeminence of Greek customs.
In 305 BCE, Seleucus I tried to reconquer the northwestern parts of India in order to claim them for the growing Seleucid Empire. Little is known of the campaign in which Chandragupta fought with Seleucus over the Indus Valley and the region of Gandhara—a very wealthy kingdom that had submitted decades earlier to Alexander the Great.
Seleucus lost the Seleucid-Mauryan War, and the two rulers reconciled with a peace treaty. The Greeks offered a Macedonian princess for marriage to Chandragupta, and several territories, including the satrapies of Paropamisade (modern-day Kamboja and Gandhara), Arachosia (modern-day Kandhahar), and Gedrosia (modern-day Balochistan). In return, Chandragupta sent 500 war elephants, a military asset which would play a decisive role in Seleucus’ victory against western Hellenistic kings at the Battle of Ipsus in 301 BCE.

In addition to this treaty, Seleucus dispatched two Greek ambassadors, Megasthenes and, later, Deimakos, to the Mauryan court at Pataliputra. Later, Ptolemy II Philadelphus, the ruler of Ptolemaic Egypt, sent an ambassador named Dionysius to the Mauryan court. Thus, continuing ties between the Hellenistic world and the Mauryan Empire.
Expansion Under Bindusara
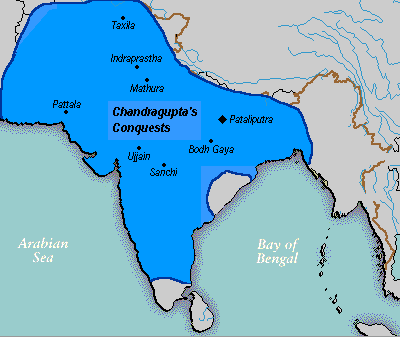
Chandragupta Maurya ruled from 322 BCE until his voluntary retirement and abdication, in favor of his son, Bindusara, in 298 BCE. Bindusara (320-272 BCE) was the son of Maurya and his queen, Durdhara. During his reign, Bindusara expanded the Maurya Empire southward, with Chanakya as his advisor. He brought 16 states under the Maurya Empire and thus conquered almost all of the Indian peninsula. Bindusara ignored the friendly Dravidian kingdoms of the Cholas, ruled by King Ilamcetcenni, the Pandyas, and Cheras. Apart from these southern states, Kalinga (modern-day Odisha) was the only kingdom in India independent from Bindusara’s empire.

Ashoka the Great
Bindusara died in 272 BCE, and was succeeded by his son, Ashoka the Great (304-232 BCE). As a young prince, Ashoka (r. 272-232 BCE) was a brilliant commander who crushed revolts in Ujjain and Taxila. As monarch, he was ambitious and aggressive, reasserting the Empire’s superiority in southern and western India. But it was his conquest of Kalinga (262-261 BCE) that proved to be the pivotal event of his life. Although Ashoka’s army succeeded in overwhelming Kalinga forces of royal soldiers and civilian units, an estimated 100,000 soldiers and civilians were killed in the furious warfare, including over 10,000 of Ashoka’s own men. Hundreds of thousands of people were adversely affected by the destruction and fallout of war. When he personally witnessed the devastation, Ashoka began feeling remorse. Although the annexation of Kalinga was completed, Ashoka embraced the teachings of Buddhism, and renounced war and violence. He sent out missionaries to travel around Asia and spread Buddhism to other countries.

As ruler, Ashoka implemented principles of ahimsa (the principle of “to not injure”) by banning hunting and violent sports activities, and ending indentured and forced labor (many thousands of people in war-ravaged Kalinga had been forced into hard labor and servitude). While he maintained a large and powerful army to keep the peace, Ashoka expanded friendly relations with states across Asia and Europe, and sponsored Buddhist missions. He undertook a massive public works building campaign across the country. Among these works were the construction of stupas, or Buddhist religious structures, containing relics. One notable stupas created during the reign of Ashoka was The Great Stupa, which stands in Sanchi, India. Over 40 years of peace, harmony, and prosperity made Ashoka one of the most successful and famous monarchs in Indian history. He remains an idealized figure of inspiration in modern India.
The Edicts of Ashoka
Perhaps one of the greatest-known accomplishments of Ashoka was his creation of his edicts, which were erected between 269 BCE and 232 BCE. The Edicts of Ashoka, set in stone, are found throughout the Subcontinent. Ranging from as far west as Afghanistan, and as far south as Andhra (Nellore District), Ashoka’s edicts state his policies and accomplishments. Although predominantly written in Prakrit, two of them were written in Greek, and one in both Greek and Aramaic. Ashoka’s edicts refer to the Greeks, Kambojas, and Gandharas as peoples forming a frontier region of his empire. They also attest to Ashoka’s envoys’ travels to the Greek rulers in the west as far as the Mediterranean. Ashoka’s edicts also mentioned social and cultural attributes of his empire, emphasizing Buddhism, though not condemning other religions. For this, the Edicts of Ashoka are known as an early document that promoted religious tolerance.

Sources
- Boundless World History. Authored by: Boundless. Located at: https://www.boundless.com/world-history/textbooks/boundless-world-history-textbook/. License: CC BY-SA: Attribution-ShareAlike

