8.3.13: Hunefer’s Judgement in the presence of Osiris
- Page ID
- 163350

\( \newcommand{\vecs}[1]{\overset { \scriptstyle \rightharpoonup} {\mathbf{#1}} } \)
\( \newcommand{\vecd}[1]{\overset{-\!-\!\rightharpoonup}{\vphantom{a}\smash {#1}}} \)
\( \newcommand{\dsum}{\displaystyle\sum\limits} \)
\( \newcommand{\dint}{\displaystyle\int\limits} \)
\( \newcommand{\dlim}{\displaystyle\lim\limits} \)
\( \newcommand{\id}{\mathrm{id}}\) \( \newcommand{\Span}{\mathrm{span}}\)
( \newcommand{\kernel}{\mathrm{null}\,}\) \( \newcommand{\range}{\mathrm{range}\,}\)
\( \newcommand{\RealPart}{\mathrm{Re}}\) \( \newcommand{\ImaginaryPart}{\mathrm{Im}}\)
\( \newcommand{\Argument}{\mathrm{Arg}}\) \( \newcommand{\norm}[1]{\| #1 \|}\)
\( \newcommand{\inner}[2]{\langle #1, #2 \rangle}\)
\( \newcommand{\Span}{\mathrm{span}}\)
\( \newcommand{\id}{\mathrm{id}}\)
\( \newcommand{\Span}{\mathrm{span}}\)
\( \newcommand{\kernel}{\mathrm{null}\,}\)
\( \newcommand{\range}{\mathrm{range}\,}\)
\( \newcommand{\RealPart}{\mathrm{Re}}\)
\( \newcommand{\ImaginaryPart}{\mathrm{Im}}\)
\( \newcommand{\Argument}{\mathrm{Arg}}\)
\( \newcommand{\norm}[1]{\| #1 \|}\)
\( \newcommand{\inner}[2]{\langle #1, #2 \rangle}\)
\( \newcommand{\Span}{\mathrm{span}}\) \( \newcommand{\AA}{\unicode[.8,0]{x212B}}\)
\( \newcommand{\vectorA}[1]{\vec{#1}} % arrow\)
\( \newcommand{\vectorAt}[1]{\vec{\text{#1}}} % arrow\)
\( \newcommand{\vectorB}[1]{\overset { \scriptstyle \rightharpoonup} {\mathbf{#1}} } \)
\( \newcommand{\vectorC}[1]{\textbf{#1}} \)
\( \newcommand{\vectorD}[1]{\overrightarrow{#1}} \)
\( \newcommand{\vectorDt}[1]{\overrightarrow{\text{#1}}} \)
\( \newcommand{\vectE}[1]{\overset{-\!-\!\rightharpoonup}{\vphantom{a}\smash{\mathbf {#1}}}} \)
\( \newcommand{\vecs}[1]{\overset { \scriptstyle \rightharpoonup} {\mathbf{#1}} } \)
\(\newcommand{\longvect}{\overrightarrow}\)
\( \newcommand{\vecd}[1]{\overset{-\!-\!\rightharpoonup}{\vphantom{a}\smash {#1}}} \)
\(\newcommand{\avec}{\mathbf a}\) \(\newcommand{\bvec}{\mathbf b}\) \(\newcommand{\cvec}{\mathbf c}\) \(\newcommand{\dvec}{\mathbf d}\) \(\newcommand{\dtil}{\widetilde{\mathbf d}}\) \(\newcommand{\evec}{\mathbf e}\) \(\newcommand{\fvec}{\mathbf f}\) \(\newcommand{\nvec}{\mathbf n}\) \(\newcommand{\pvec}{\mathbf p}\) \(\newcommand{\qvec}{\mathbf q}\) \(\newcommand{\svec}{\mathbf s}\) \(\newcommand{\tvec}{\mathbf t}\) \(\newcommand{\uvec}{\mathbf u}\) \(\newcommand{\vvec}{\mathbf v}\) \(\newcommand{\wvec}{\mathbf w}\) \(\newcommand{\xvec}{\mathbf x}\) \(\newcommand{\yvec}{\mathbf y}\) \(\newcommand{\zvec}{\mathbf z}\) \(\newcommand{\rvec}{\mathbf r}\) \(\newcommand{\mvec}{\mathbf m}\) \(\newcommand{\zerovec}{\mathbf 0}\) \(\newcommand{\onevec}{\mathbf 1}\) \(\newcommand{\real}{\mathbb R}\) \(\newcommand{\twovec}[2]{\left[\begin{array}{r}#1 \\ #2 \end{array}\right]}\) \(\newcommand{\ctwovec}[2]{\left[\begin{array}{c}#1 \\ #2 \end{array}\right]}\) \(\newcommand{\threevec}[3]{\left[\begin{array}{r}#1 \\ #2 \\ #3 \end{array}\right]}\) \(\newcommand{\cthreevec}[3]{\left[\begin{array}{c}#1 \\ #2 \\ #3 \end{array}\right]}\) \(\newcommand{\fourvec}[4]{\left[\begin{array}{r}#1 \\ #2 \\ #3 \\ #4 \end{array}\right]}\) \(\newcommand{\cfourvec}[4]{\left[\begin{array}{c}#1 \\ #2 \\ #3 \\ #4 \end{array}\right]}\) \(\newcommand{\fivevec}[5]{\left[\begin{array}{r}#1 \\ #2 \\ #3 \\ #4 \\ #5 \\ \end{array}\right]}\) \(\newcommand{\cfivevec}[5]{\left[\begin{array}{c}#1 \\ #2 \\ #3 \\ #4 \\ #5 \\ \end{array}\right]}\) \(\newcommand{\mattwo}[4]{\left[\begin{array}{rr}#1 \amp #2 \\ #3 \amp #4 \\ \end{array}\right]}\) \(\newcommand{\laspan}[1]{\text{Span}\{#1\}}\) \(\newcommand{\bcal}{\cal B}\) \(\newcommand{\ccal}{\cal C}\) \(\newcommand{\scal}{\cal S}\) \(\newcommand{\wcal}{\cal W}\) \(\newcommand{\ecal}{\cal E}\) \(\newcommand{\coords}[2]{\left\{#1\right\}_{#2}}\) \(\newcommand{\gray}[1]{\color{gray}{#1}}\) \(\newcommand{\lgray}[1]{\color{lightgray}{#1}}\) \(\newcommand{\rank}{\operatorname{rank}}\) \(\newcommand{\row}{\text{Row}}\) \(\newcommand{\col}{\text{Col}}\) \(\renewcommand{\row}{\text{Row}}\) \(\newcommand{\nul}{\text{Nul}}\) \(\newcommand{\var}{\text{Var}}\) \(\newcommand{\corr}{\text{corr}}\) \(\newcommand{\len}[1]{\left|#1\right|}\) \(\newcommand{\bbar}{\overline{\bvec}}\) \(\newcommand{\bhat}{\widehat{\bvec}}\) \(\newcommand{\bperp}{\bvec^\perp}\) \(\newcommand{\xhat}{\widehat{\xvec}}\) \(\newcommand{\vhat}{\widehat{\vvec}}\) \(\newcommand{\uhat}{\widehat{\uvec}}\) \(\newcommand{\what}{\widehat{\wvec}}\) \(\newcommand{\Sighat}{\widehat{\Sigma}}\) \(\newcommand{\lt}{<}\) \(\newcommand{\gt}{>}\) \(\newcommand{\amp}{&}\) \(\definecolor{fillinmathshade}{gray}{0.9}\)Video \(\PageIndex{1}\): Hunefer’s Judgement in the presence of Osiris, Book of the Dead of Hunefer, 19th Dynasty, New Kingdom, c. 1275 B.C.E., papyrus, Thebes, Egypt (British Museum). Speakers: Dr. Beth Harris and Dr. Steven Zucker
Erratum: near the end of the video we say that Nephthys and Anubis are siblings; this is not correct.
Hunefer: An ancient Egyptian official
Hunefer and his wife Nasha lived during the Nineteenth Dynasty, in around 1310 B.C.E.. He was a “Royal Scribe” and “Scribe of Divine Offerings.” He was also “Overseer of Royal Cattle,” and the steward of King Sety I. These titles indicate that he held prominent administrative offices and would have been close to the king. The location of his tomb is not known, but he may have been buried at Memphis.
Hunefer’s high status is reflected in the fine quality of his Book of the Dead, which was specially produced for him. This, and a Ptah-Sokar-Osiris figure, inside which the papyrus was found, are the only objects which can be ascribed to Hunefer. The papyrus of Hunefer is characterized by its good state of preservation and the large, and clear vignettes (illustrations) are beautifully drawn and painted. The vignette illustrating the “Opening of the Mouth” ritual is one of the most famous pieces of papyrus in The British Museum collection, and gives a great deal of information about this part of the funeral.
Page from the Book of the Dead of Hunefer
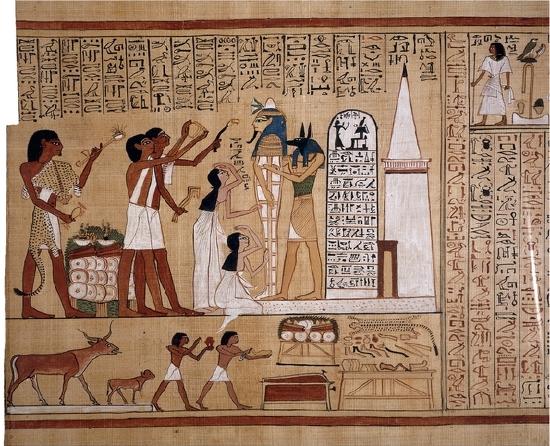
The centerpiece of the upper scene is the mummy of Hunefer, shown supported by the god Anubis (or a priest wearing a jackal mask). Hunefer’s wife and daughter mourn, and three priests perform rituals. The two priests with white sashes are carrying out the Opening of the Mouth ritual. The white building at the right is a representation of the tomb, complete with portal doorway and small pyramid. Both these features can be seen in real tombs of this date from Thebes. To the left of the tomb is a picture of the stela which would have stood to one side of the tomb entrance. Following the normal conventions of Egyptian art, it is shown much larger than normal size, in order that its content (the deceased worshipping Osiris, together with a standard offering formula) is absolutely legible.
At the right of the lower scene is a table bearing the various implements needed for the Opening of the Mouth ritual. At the left is shown a ritual, where the foreleg of a calf, cut off while the animal is alive, is offered. The animal was then sacrificed. The calf is shown together with its mother, who might be interpreted as showing signs of distress.
Page from the Book of the Dead of Ani

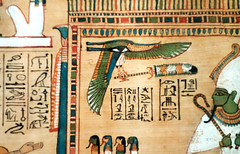
The scene reads from left to right. To the left, Anubis brings Hunefer into the judgement area. Anubis is also shown supervizing the judgement scales. Hunefer’s heart, represented as a pot, is being weighed against a feather, the symbol of Maat, the established order of things, in this context meaning ‘what is right’. The ancient Egyptians believed that the heart was the seat of the emotions, the intellect and the character, and thus represented the good or bad aspects of a person’s life. If the heart did not balance with the feather, then the dead person was condemned to non-existence, and consumption by the ferocious “devourer,” the strange beast shown here which is part-crocodile, part-lion, and part-hippopotamus.
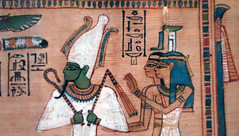
However, as a papyrus devoted to ensuring Hunefer’s continued existence in the Afterlife is not likely to depict this outcome, he is shown to the right, brought into the presence of Osiris by his son Horus, having become “true of voice” or “justified.” This was a standard epithet applied to dead individuals in their texts. Osiris is shown seated under a canopy, with his sisters Isis and Nephthys. At the top, Hunefer is shown adoring a row of deities who supervise the judgement.
Suggested readings:
R.O. Faulkner, The Ancient Egyptian Book of the Dead (revised ed. C. A. R. Andrews) (London, The British Museum Press, 1985).
R.B. Parkinson and S. Quirke, Papyrus (Egyptian Bookshelf) (London, The British Museum Press, 1995).
S. Quirke and A.J. Spencer, The British Museum book of ancient Egypt (London, The British Museum Press, 1992).
This work at The British Museum
© Trustees of the British Museum
SmartHistory images for teaching and learning: