2.9: Tomb of the Reliefs
- Page ID
- 163465
All signs point to a party: cushions, drinking equipment, and armor hung on the wall … but a party in a tomb?

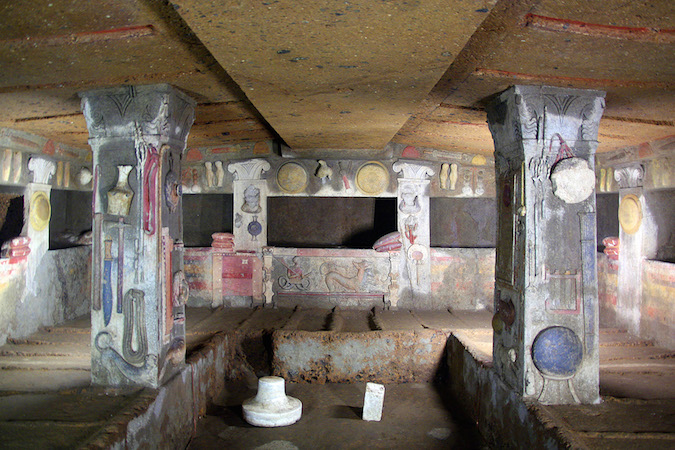
The banquet is over, the dining equipment is stowed, and the warriors sleep on in this Etruscan dining room, yet the evocative signs of a lively scene draw the viewer into the ancient world. These evocations of an Etruscan banquet—from the cushions to the drinking equipment to the armor hung on pegs on the walls—are situated firmly in the funereal sphere, one that is replete with reminders not only of life but also of death. In tomb interiors we find some of our most important and compelling evidence for an understanding of the first millennium B.C.E. world of the Etruscans.

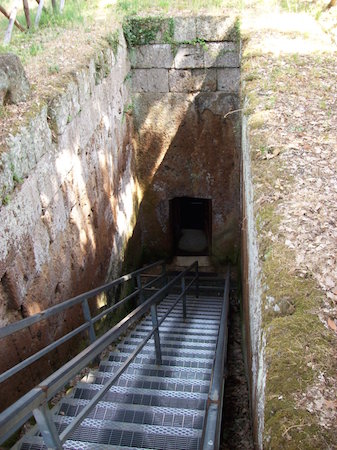
The Tomb of the Reliefs (Italian: Tomba dei Rilievi) is a late fourth or early third century B.C.E. rock-cut tomb (hypogeum) located in the Banditaccia necropolis of the ancient Etruscan city-state of Caere (now Cerveteri) in Italy (a necropolis is a large, ancient cemetery). The tomb takes its name from a series of painted stucco reliefs that cover the walls and piers of the tomb chamber itself. Unlike some of its neighbors that are covered mounds of earth (tumulus-type tombs), the Tomb of the Reliefs is of the rock-cut type and was excavated at a considerable depth in the bedrock, approached by a steep dromos (entranceway). This elite tomb once accommodated several dozen burials and is located, likely not by accident, close to an important tumulus-type tomb from the earlier Orientalizing period.
Inside the tomb
The plan of the tomb is roughly quadrangular. The entire tomb and all of its features have been carved from the bedrock (a type of volcanic mudstone known as tufa). The central block of the room, supported by two piers, is flanked by a series of niches for burials that have been styled to resemble the dining couches (klinai) of the ancient world. Decorative pilasters with volute (scroll-shaped) capitals separate the niches one from the other (see image below).
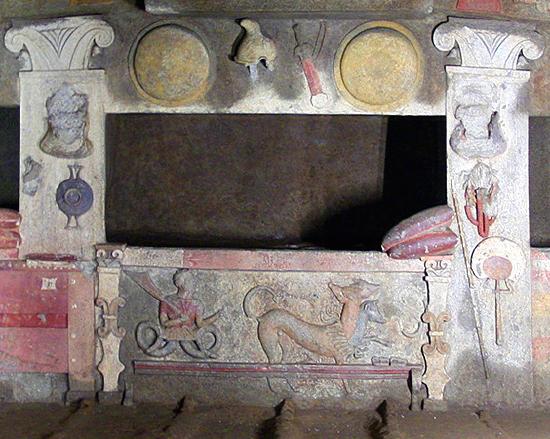
The tomb’s bas relief (low relief) decoration consists of carved bedrock features that have been stuccoed and painted. The decorative schema evokes the interior of an aristocratic house that is prepared to host a banquet or drinking party. The provisions for banqueters include cups and strainers hanging from pegs. The soldiers’ armor—shields, helmets, greaves (protective armor for the lower leg)—has been stowed by hanging it from pegs. The pilasters are also decorated, with the items depicted including a range of tools and implements as well as the depiction of a small carnivore, perhaps a weasel.

Beneath the central niche of the rear wall we find an allusion to the afterlife. There, under the side table we find, in relief, the hellhound Cerberus and an anguiped (serpents for legs) demon—perhaps the Etruscan god Charun who conducted the souls of the departed to the afterlife? This central niche, equipped with footstool, may have been intended for the male and female heads of the family.
The Matunas family is identified as the owner by way of an inscribed cippus (a small pillar). The inscription reads “Vel Metunas, (son) of Laris, who this tomb built.” A locked strongbox included in the relief may be meant to represent the container for storing the records of the family’s deeds (res gestae).
Video \(\PageIndex{1}\): More information about this video and a related panoramic tour can be found here.
Interpretation
The Tomb of the Reliefs is unusual in the corpus of Etruscan tombs, both for its richness and for its decorative scheme. The Matunas family, among the elite of Caere, make a fairly strong statement, by means of funerary display, about their familial status and accomplishments, even at a time when the cultural autonomy of the Etruscans—and of Caere itself—had already begun to wane. The funeral banquet remains an important and vibrant theme for Etruscan funerary art throughout the course of the Etruscan civilization. This convivial and festive rendering demonstrates to us that the funeral banquet not only sent the deceased off to the afterlife but also reinforced ties and status reminders among the community of the living.
Etruscan tombs at Cerveteri:
Additional resources:
Tomb of the Reliefs (from Archaeological Heritage in Southern Etruria)
Etruscan Tombs from the Toledo Museum of Art
H. Blanck and G. Proietti, La Tomba dei Rilievi di Cerveteri (Rome: De Luca, 1986).
O. J. Brendel, Etruscan Art. 2nd ed. (New Haven: Yale University Press, 1995)
M. Cristofani, “Le iscrizioni della tomba dei Rilievi di Cerveteri,” Studi etruschi 2 (1966), vol. 34, 221-238.
M. Cristofani, “I leoni funerari della tomba dei rilievi di Cerveteri,” Archeologia classica 20 (1968) 321-323.
S. Haynes, Etruscan Civilization: a Cultural History (Los Angeles, California: Getty Publications, 2000).
F. Prayon, Frühetruskische Grab- und Hausarchitektur (Heidelberg : F.H. Kerle, 1975).
S. Steingräber, Abundance of Life: Etruscan Wall Painting (Los Angeles, California: Getty Publications, 2006).
J. M. Turfa, ed. The Etruscan World (London: Routledge, 2013).


