
6.7: Early Medieval
- Page ID
- 73463

\( \newcommand{\vecs}[1]{\overset { \scriptstyle \rightharpoonup} {\mathbf{#1}} } \)
\( \newcommand{\vecd}[1]{\overset{-\!-\!\rightharpoonup}{\vphantom{a}\smash {#1}}} \)
\( \newcommand{\dsum}{\displaystyle\sum\limits} \)
\( \newcommand{\dint}{\displaystyle\int\limits} \)
\( \newcommand{\dlim}{\displaystyle\lim\limits} \)
\( \newcommand{\id}{\mathrm{id}}\) \( \newcommand{\Span}{\mathrm{span}}\)
( \newcommand{\kernel}{\mathrm{null}\,}\) \( \newcommand{\range}{\mathrm{range}\,}\)
\( \newcommand{\RealPart}{\mathrm{Re}}\) \( \newcommand{\ImaginaryPart}{\mathrm{Im}}\)
\( \newcommand{\Argument}{\mathrm{Arg}}\) \( \newcommand{\norm}[1]{\| #1 \|}\)
\( \newcommand{\inner}[2]{\langle #1, #2 \rangle}\)
\( \newcommand{\Span}{\mathrm{span}}\)
\( \newcommand{\id}{\mathrm{id}}\)
\( \newcommand{\Span}{\mathrm{span}}\)
\( \newcommand{\kernel}{\mathrm{null}\,}\)
\( \newcommand{\range}{\mathrm{range}\,}\)
\( \newcommand{\RealPart}{\mathrm{Re}}\)
\( \newcommand{\ImaginaryPart}{\mathrm{Im}}\)
\( \newcommand{\Argument}{\mathrm{Arg}}\)
\( \newcommand{\norm}[1]{\| #1 \|}\)
\( \newcommand{\inner}[2]{\langle #1, #2 \rangle}\)
\( \newcommand{\Span}{\mathrm{span}}\) \( \newcommand{\AA}{\unicode[.8,0]{x212B}}\)
\( \newcommand{\vectorA}[1]{\vec{#1}} % arrow\)
\( \newcommand{\vectorAt}[1]{\vec{\text{#1}}} % arrow\)
\( \newcommand{\vectorB}[1]{\overset { \scriptstyle \rightharpoonup} {\mathbf{#1}} } \)
\( \newcommand{\vectorC}[1]{\textbf{#1}} \)
\( \newcommand{\vectorD}[1]{\overrightarrow{#1}} \)
\( \newcommand{\vectorDt}[1]{\overrightarrow{\text{#1}}} \)
\( \newcommand{\vectE}[1]{\overset{-\!-\!\rightharpoonup}{\vphantom{a}\smash{\mathbf {#1}}}} \)
\( \newcommand{\vecs}[1]{\overset { \scriptstyle \rightharpoonup} {\mathbf{#1}} } \)
\(\newcommand{\longvect}{\overrightarrow}\)
\( \newcommand{\vecd}[1]{\overset{-\!-\!\rightharpoonup}{\vphantom{a}\smash {#1}}} \)
\(\newcommand{\avec}{\mathbf a}\) \(\newcommand{\bvec}{\mathbf b}\) \(\newcommand{\cvec}{\mathbf c}\) \(\newcommand{\dvec}{\mathbf d}\) \(\newcommand{\dtil}{\widetilde{\mathbf d}}\) \(\newcommand{\evec}{\mathbf e}\) \(\newcommand{\fvec}{\mathbf f}\) \(\newcommand{\nvec}{\mathbf n}\) \(\newcommand{\pvec}{\mathbf p}\) \(\newcommand{\qvec}{\mathbf q}\) \(\newcommand{\svec}{\mathbf s}\) \(\newcommand{\tvec}{\mathbf t}\) \(\newcommand{\uvec}{\mathbf u}\) \(\newcommand{\vvec}{\mathbf v}\) \(\newcommand{\wvec}{\mathbf w}\) \(\newcommand{\xvec}{\mathbf x}\) \(\newcommand{\yvec}{\mathbf y}\) \(\newcommand{\zvec}{\mathbf z}\) \(\newcommand{\rvec}{\mathbf r}\) \(\newcommand{\mvec}{\mathbf m}\) \(\newcommand{\zerovec}{\mathbf 0}\) \(\newcommand{\onevec}{\mathbf 1}\) \(\newcommand{\real}{\mathbb R}\) \(\newcommand{\twovec}[2]{\left[\begin{array}{r}#1 \\ #2 \end{array}\right]}\) \(\newcommand{\ctwovec}[2]{\left[\begin{array}{c}#1 \\ #2 \end{array}\right]}\) \(\newcommand{\threevec}[3]{\left[\begin{array}{r}#1 \\ #2 \\ #3 \end{array}\right]}\) \(\newcommand{\cthreevec}[3]{\left[\begin{array}{c}#1 \\ #2 \\ #3 \end{array}\right]}\) \(\newcommand{\fourvec}[4]{\left[\begin{array}{r}#1 \\ #2 \\ #3 \\ #4 \end{array}\right]}\) \(\newcommand{\cfourvec}[4]{\left[\begin{array}{c}#1 \\ #2 \\ #3 \\ #4 \end{array}\right]}\) \(\newcommand{\fivevec}[5]{\left[\begin{array}{r}#1 \\ #2 \\ #3 \\ #4 \\ #5 \\ \end{array}\right]}\) \(\newcommand{\cfivevec}[5]{\left[\begin{array}{c}#1 \\ #2 \\ #3 \\ #4 \\ #5 \\ \end{array}\right]}\) \(\newcommand{\mattwo}[4]{\left[\begin{array}{rr}#1 \amp #2 \\ #3 \amp #4 \\ \end{array}\right]}\) \(\newcommand{\laspan}[1]{\text{Span}\{#1\}}\) \(\newcommand{\bcal}{\cal B}\) \(\newcommand{\ccal}{\cal C}\) \(\newcommand{\scal}{\cal S}\) \(\newcommand{\wcal}{\cal W}\) \(\newcommand{\ecal}{\cal E}\) \(\newcommand{\coords}[2]{\left\{#1\right\}_{#2}}\) \(\newcommand{\gray}[1]{\color{gray}{#1}}\) \(\newcommand{\lgray}[1]{\color{lightgray}{#1}}\) \(\newcommand{\rank}{\operatorname{rank}}\) \(\newcommand{\row}{\text{Row}}\) \(\newcommand{\col}{\text{Col}}\) \(\renewcommand{\row}{\text{Row}}\) \(\newcommand{\nul}{\text{Nul}}\) \(\newcommand{\var}{\text{Var}}\) \(\newcommand{\corr}{\text{corr}}\) \(\newcommand{\len}[1]{\left|#1\right|}\) \(\newcommand{\bbar}{\overline{\bvec}}\) \(\newcommand{\bhat}{\widehat{\bvec}}\) \(\newcommand{\bperp}{\bvec^\perp}\) \(\newcommand{\xhat}{\widehat{\xvec}}\) \(\newcommand{\vhat}{\widehat{\vvec}}\) \(\newcommand{\uhat}{\widehat{\uvec}}\) \(\newcommand{\what}{\widehat{\wvec}}\) \(\newcommand{\Sighat}{\widehat{\Sigma}}\) \(\newcommand{\lt}{<}\) \(\newcommand{\gt}{>}\) \(\newcommand{\amp}{&}\) \(\definecolor{fillinmathshade}{gray}{0.9}\)Early medieval art
Christianity flourished in the early middle ages and this shift dramatically affected the art that was created across Europe.
c. 500 - 800 C.E.
Anglo-Saxon England
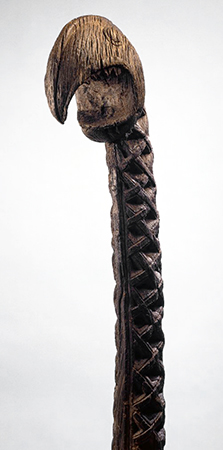
In the fifth century C.E., people from tribes called Angles, Saxons, and Jutes left their homelands in northern Europe to look for a new home. They knew that the Romans had recently left the green land of Britain unguarded, so they sailed across the channel in small wooden boats. This warlike dragon figurehead is from a ship of that time.
The Britons did not give in without a fight, but after many years the invaders managed to overcome them, driving them to the west of the country. The Anglo-Saxons were to rule for over 500 years.
Some objects were left behind by the Anglo-Saxons which have given us clues about how they lived. The British Museum is home to the largest and finest Anglo-Saxon collection in the world.
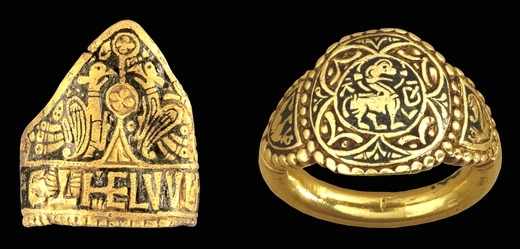

Anglo-Saxon England was divided into the five main kingdoms of Wessex, East Anglia, Mercia, Northumbria and Kent, each with its own king. Kings often died early and violent deaths. As well as fighting against each other for power, they had to keep their own nobles happy, or they might rise up against them. One way that they did this was to give them expensive presents.
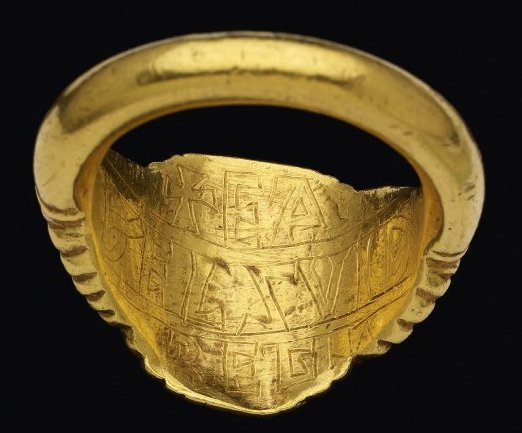
The ring on the left was perhaps given to a noble by King Æthelwulf of Wessex. The other ring has AD on it which stands for “Agnus Dei” meaning “Lamb of God” in Latin. On the back the name Æthelswith has been cut. She was Æthelwulf’s daughter and the ring might have been a gift she gave to show her favour.
© Trustees of the British Museum
Decoding Anglo-Saxon art
One of the most enjoyable things about working with the British Museum’s Anglo-Saxon collection is having the opportunity to study the intricate designs of the many brooches, buckles, and other pieces of decorative metalwork. This is because in Anglo-Saxon art there is always more than meets the eye.
A love of riddles
The objects invite careful contemplation, and you can find yourself spending hours puzzling over their designs, finding new beasts and images. The dense animal patterns that cover many Anglo-Saxon objects are not just pretty decoration; they have multi-layered symbolic meanings and tell stories. Anglo-Saxons, who had a love of riddles and puzzles of all kinds, would have been able to ‘read’ the stories embedded in the decoration. But for us it is trickier as we are not fluent in the language of Anglo-Saxon art.
Style I
Anglo-Saxon art went through many changes between the 5th and 11th centuries, but puzzles and story-telling remained central. The early art style of the Anglo-Saxon period is known as Style I and was popular in the late 5th and 6th centuries. It is characterized by what seems to be a dizzying jumble of animal limbs and face masks, which has led some scholars to describe the style as an “animal salad.” Close scrutiny shows that Style I is not as abstract as first appears, and through carefully following the decoration in stages we can unpick the details and begin to get a sense for what the design might mean.
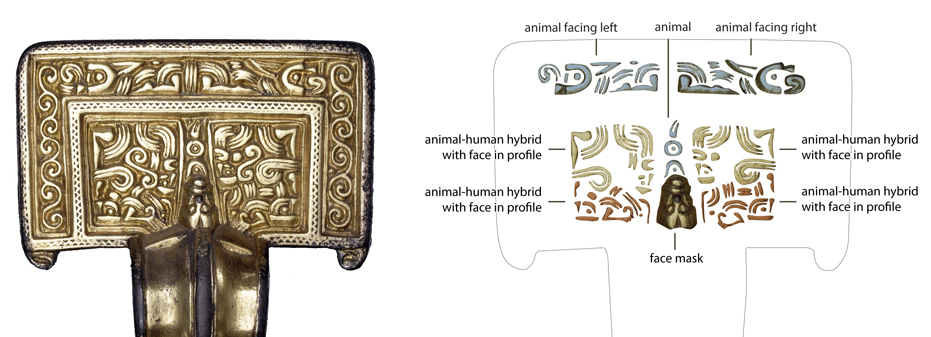
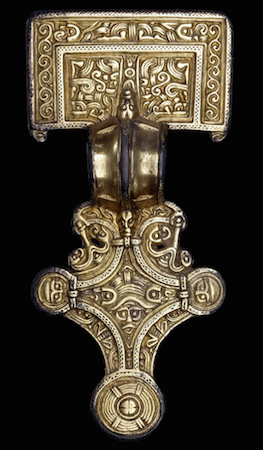
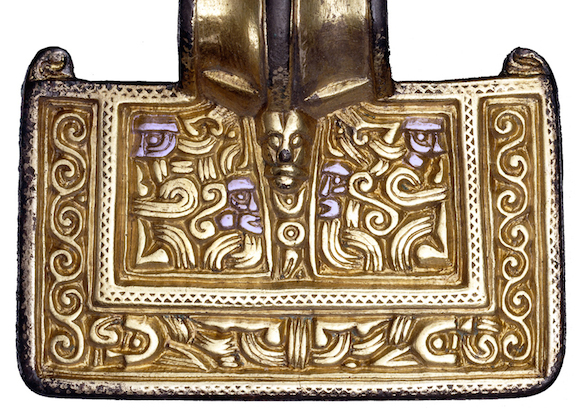
One of the most exquisite examples of Style I animal art is a silver-gilt square-headed brooch from a female grave on the Isle of Wight. Its surface is covered with at least 24 different beasts: a mix of birds’ heads, human masks, animals and hybrids. Some of them are quite clear, like the faces in the circular lobes projecting from the bottom of the brooch. Others are harder to spot, such as the faces in profile that only emerge when the brooch is turned upside-down. Some of the images can be read in multiple ways, and this ambiguity is central to Style I art.
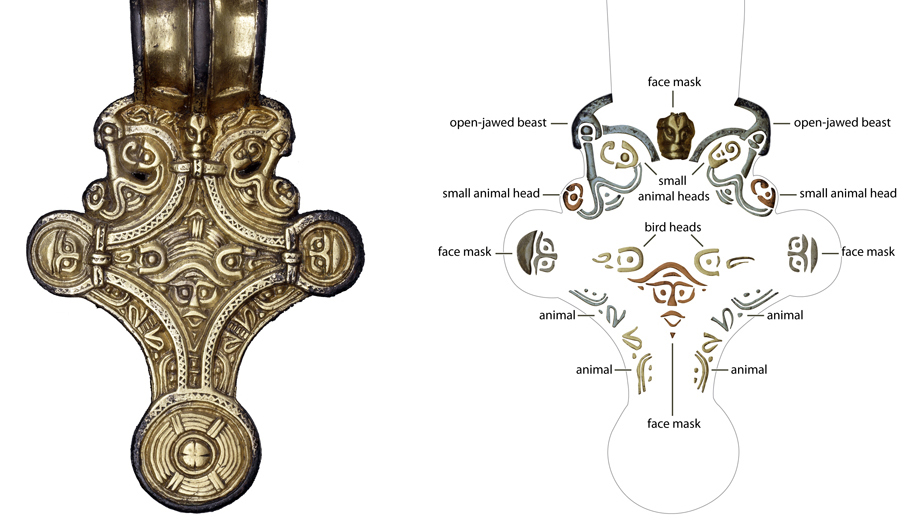
Once we have identified the creatures on the brooch, we can begin to decode its meaning. In the lozenge-shaped field at the foot of the brooch is a bearded face with a helmet underneath two birds that may represent the Germanic god Woden/Odin with his two companion ravens. The image of a god alongside other powerful animals may have offered symbolic protection to the wearer like a talisman or amulet.
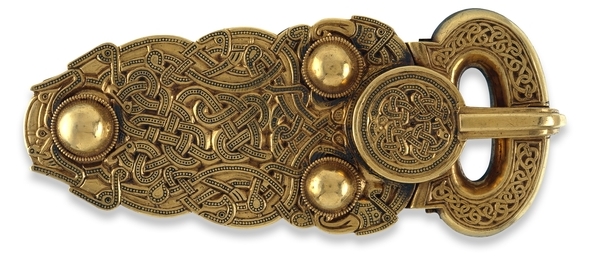
Style II
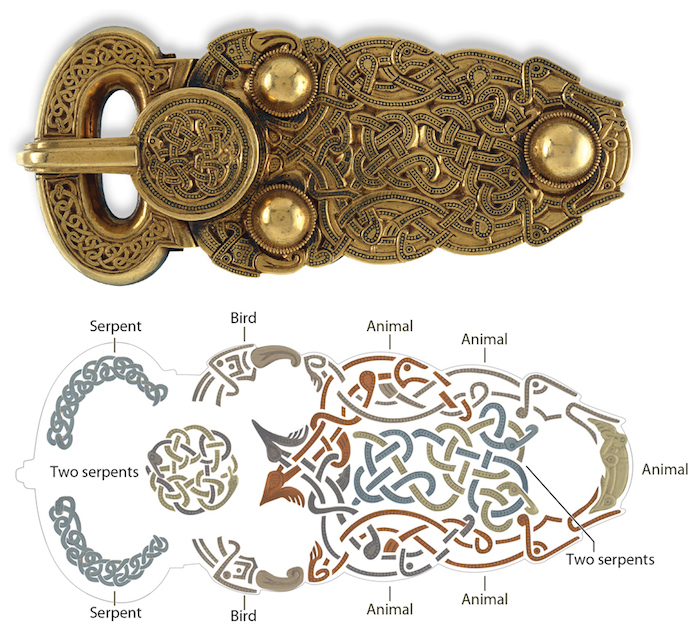
Style I was superseded by Style II in the late 6th century. This later style has more fluid and graceful animals, but these still writhe and interlace together and require patient untangling. The great gold buckle from Sutton Hoo is decorated in this style. From the thicket of interlace that fills the buckle’s surface 13 different animals emerge (above). These animals are easier to spot: the ring-and-dot eyes, the birds’ hooked beaks, and the four-toed feet of the animals are good starting points. At the tip of the buckle, two animals grip a small dog-like creature in their jaws and on the circular plate, two snakes intertwine and bite their own bodies. Such designs reveal the importance of the natural world, and it is likely that different animals were thought to hold different properties and characteristics that could be transferred to the objects they decorated. The fearsome snakes, with their shape-shifting qualities, demand respect and confer authority, and were suitable symbols for a buckle that adorned a high-status man, or even an Anglo-Saxon king.
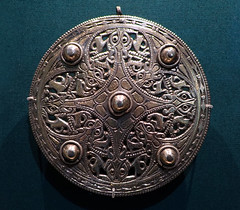
Further transformations
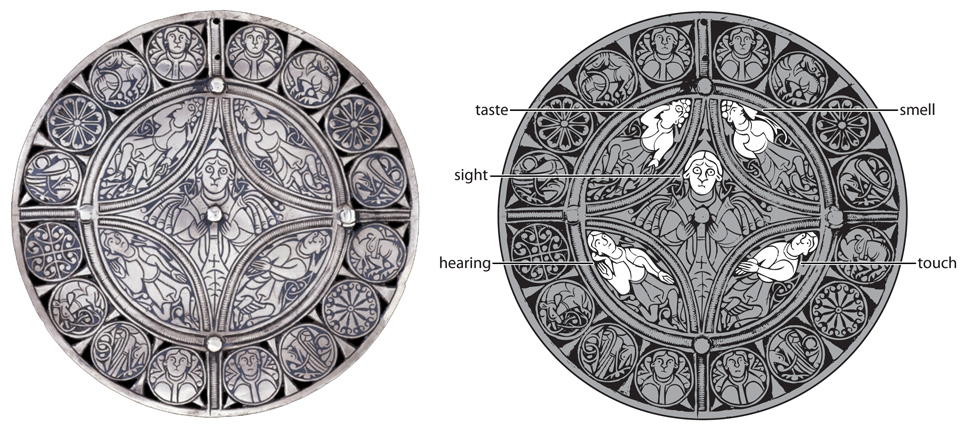
Animal art continued to be popular on Anglo-Saxon metalwork throughout the later period, when it went through further transformations into the Mercian Style (defined by sinuous animal interlace) in the 8th century and then into the lively Trewhiddle Style in the 9th century. Trewhiddle-style animals feature in the roundels of the Fuller Brooch (above), but all other aspects of its decoration are unique within Anglo-Saxon art. Again, through a careful unpicking of its complex imagery we can understand its visual messages. At the centre is a man with staring eyes holding two plants. Around him are four other men striking poses: one, with his hands behind his back, sniffs a leaf; another rubs his two hands together; the third holds his hand up to his ear; and the final one has his whole hand inserted into his mouth. Together these strange poses form the earliest personification of the five senses: Sight, Smell, Touch, Hearing, and Taste. Surrounding these central motifs are roundels depicting animals, humans, and plants that perhaps represent God’s Creation.
Sight and wisdom
This iconography can best be understood in the context of the scholarly writings of King Alfred the Great (died 899), which emphasized sight and the “mind’s eye” as the principal way in which wisdom was acquired along with the other senses. Given this connection, perhaps it was made at Alfred the Great’s court workshop and designed to be worn by one of his courtiers?
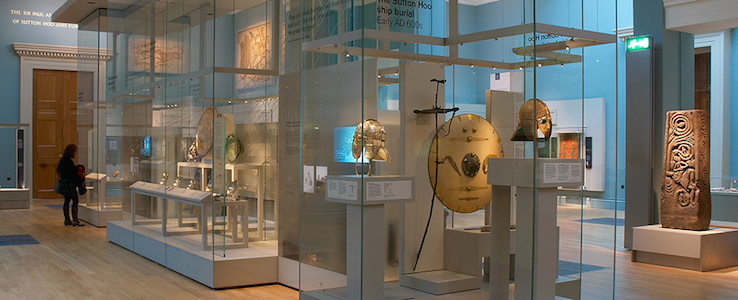
Throughout the period, the Anglo-Saxons expressed a love of riddles and puzzles in their metalwork. Behind the non-reflective glass in the newly opened Sir Paul and Lady Ruddock Gallery of Sutton Hoo and Europe 300-1100, you can do like the Anglo-Saxons and get up close to these and many other objects to decode the messages yourself.
Rosie Weetch, curator and Craig Williams, illustrator, British Museum
Originally published on The British Museum Blog
© Trustees of the British Museum
Brooch from Chessell Down
Because buttons and zippers hadn’t been invented yet, clothes in Anglo-Saxon England were fastened with pins or brooches.
This fine silver-gilt and niello brooch is perhaps the most beautiful of all surviving great square-headed brooches. The casting reveals an artist in complete mastery of his material and current art styles. The brooch was found by George Hillier in 1855 in a woman’s grave, together with two stamped pendants, a pair of tweezers, and iron knife and a waist buckle. It was probably made in the first quarter of the sixth century.
The brooch is the best example of a small group of brooches that reflect southern Scandinavian influence. Like its Scandinavian predecessors, it was cast in silver and then gilt on its front surface. The piece has close stylistic parallels with objects found in Kent, although large square-headed brooches are not typical Kentish types.
The outer border of the head-plate is decorated with scrolls on the sides and two Style I quadrupeds with long ears and humanoid feet at the centre. Scrolls and disembodied Style I body parts fill the rest of the headplate field within borders of stamped and nielloed triangles. The bow is plain. The footplate below the bow is decorated with face masks in the side lobes and another larger face mask in the centre below two Style I heads.
Suggested readings:
C.J. Arnold, The Anglo-Saxon cemeteries on the Isle of Wight (London, The British Museum Press, 1982).
E.T. Leeds, A corpus of early Anglo-Saxon (Oxford, Clarendon Press, 1949).
J. Hines, A new corpus of Anglo-Saxon Great Square-Headed Brooches (Woodbridge, Boydell for the Society of Antiquaries of London, 1997).
R.A. Smith, A guide to the Anglo-Saxon and Foreign Teutonic Antiquities (London, British Museum, 1923).
© Trustees of the British Museum
Fibulae
by REBECCA MIR
Medieval jewelry
Fibulae (singular: fibula) are brooches that were made popular by Roman soldiers, who wore them to hold a cloak or cape in place. Bow fibulae all consist of a body, a pin, and a catch — like safety pins. As a historian of the medieval period writes,
A German archaeologist, Herbert Kuhn, first called the bow fibula an early medieval artifact par excellence. Textbooks and art history studies use it to illustrate sections dedicated to the Dark Ages. There are probably thousands and hundreds of thousands of bow fibulae in European museum collections. A still greater number of specimens come out of archaeological excavations and their incredible diversity defies any attempts to establish unequivocal typologies. [1]
Ornate fibulae became all the rage in the early middle ages (c. 500 – 800 C.E.), and are one of the most commonly found objects in barbarian grave sites. The word “barbarian” comes from the Greek word barbaros, meaning “foreign,” so it is often used as a blanket term for the non-Roman groups who migrated into western Europe in the early middle ages (such as the Ostrogoths, Visigoths, Franks, and Lombards). This was the time when Europe was becoming Christianized and the Roman Empire split apart. The Roman Empire ceased to exist in the west, but continued in the east as the Byzantine Empire, with its capital at Constantinople (modern-day Istanbul).
This period is also sometimes referred to as the Migration Period. Sparse written documentation of these people survives, so grave goods like fibulae provide the most concrete cultural information available.
Byzantine fibula
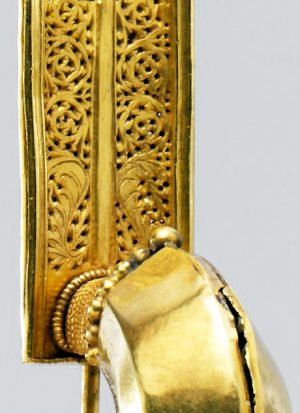
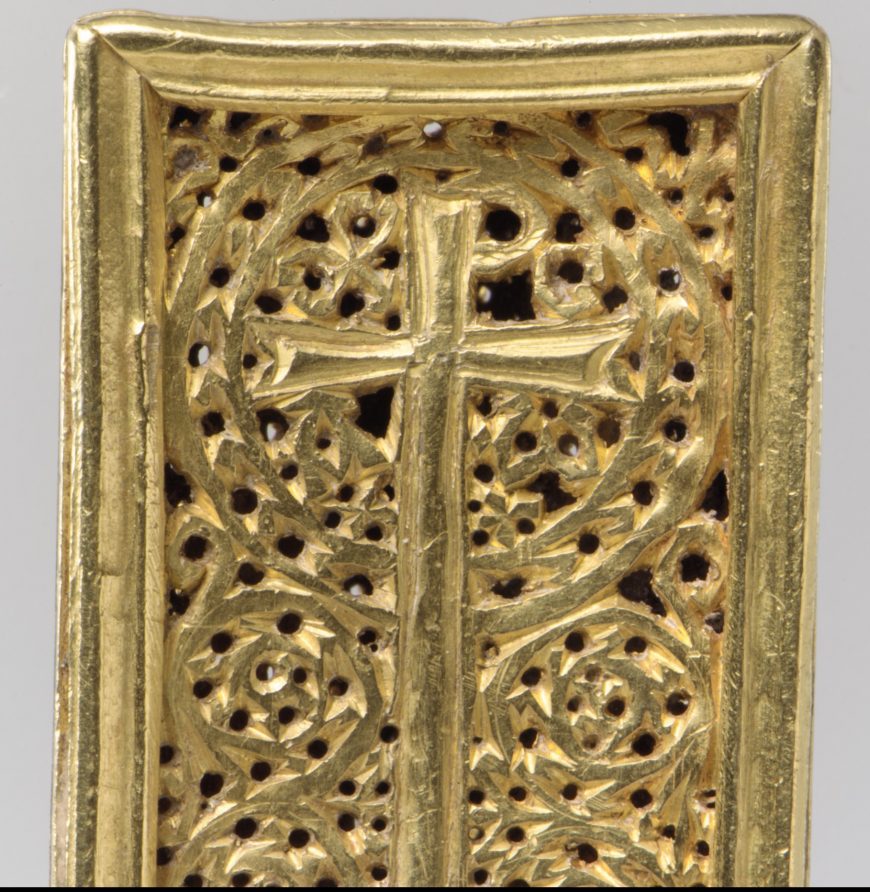
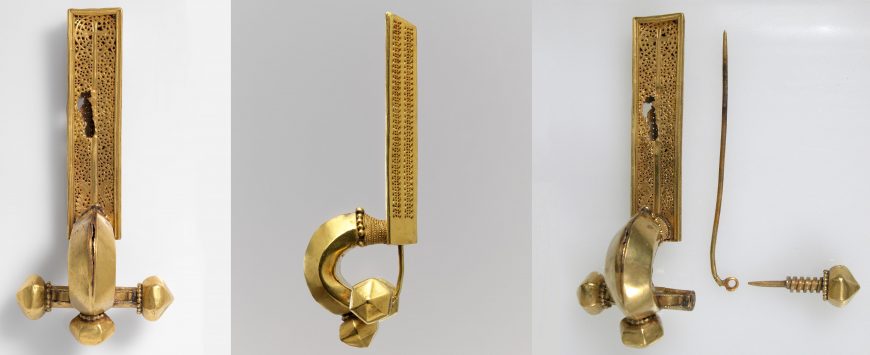
This gold fibula was made in Rome or Constantinople in the 5th century and is called a crossbow fibula because of its resemblance to the weapon. Unscrewing the left knob at the end of this “crossbow” would release the pin.
This intricate object is typical of the Byzantine/Roman fibulae style. The detailed incising on the body is called pierced openwork. At the top we see a cross, and below that, on either side, floral scrolls that appear to grow out of acanthus leaves and may symbolize paradise and the promise of salvation. In addition, the circular form around the cross is a victory wreath, which, in the Christian tradition, symbolizes victory over death (resurrection). One art historian has remarked that the brooch “evokes one of the most interesting epochs in antiquity, a period marked by the subtle, often elusive transition from Late Roman to Early Byzantine art.”[2]
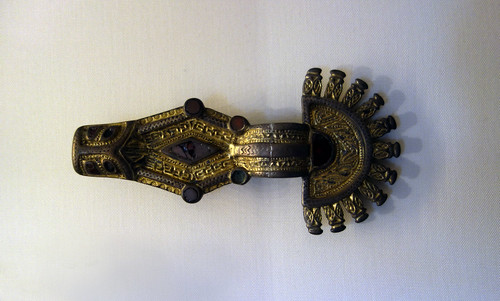
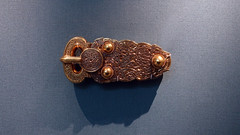
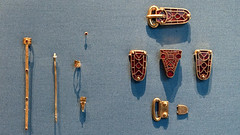
Lombardic Fibula
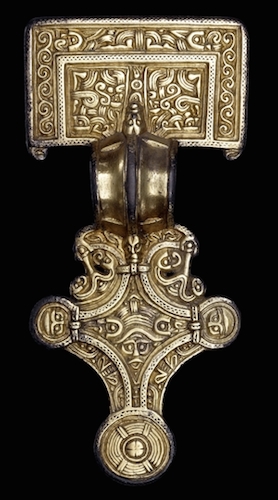
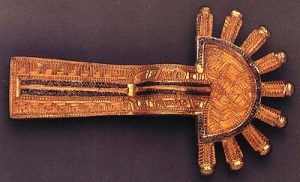
This Lombardic fibula found in Kranj (modern day Slovenia) provides a good comparison, because it is a stylized variation of the crossbow fibula. It features at one end a semi-circle from which radiate nine rectangular incised forms topped with spheres (this type of fibula is called “radiate-headed” or “digitated”). It is gilded and inlaid with niello, a black metal alloy. The incisions are hatched lines—a popular decoration technique in Lombardic fibulae.
The Lombards (or Langobards, from the Latin Langobardi) are thought to be of Germanic origin, although their background is still contested. They established their kingdom in Italy in 558 and were defeated by Charlemagne, king of the Franks, in 774.
Over the centuries the Lombards assimilated into Roman culture, adopting Christianity, and left their own administrative legal procedures behind. This piece shows the adoption of the crossbow fibula style, but with a small Lombardic “twist.” According to one historian, “everything points to the conclusion that ‘Slavic’ bow fibulae were not simply symbols of social status or gender, but badges of power. This was the power of those able to establish long-distance relations and thus to yield influence.” [3]
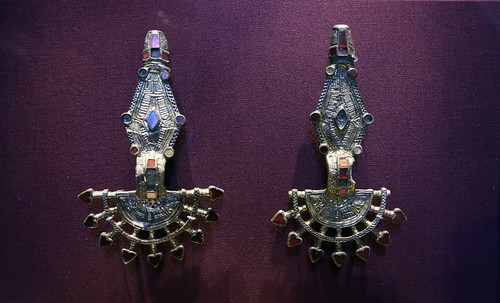
Frankish fibulae
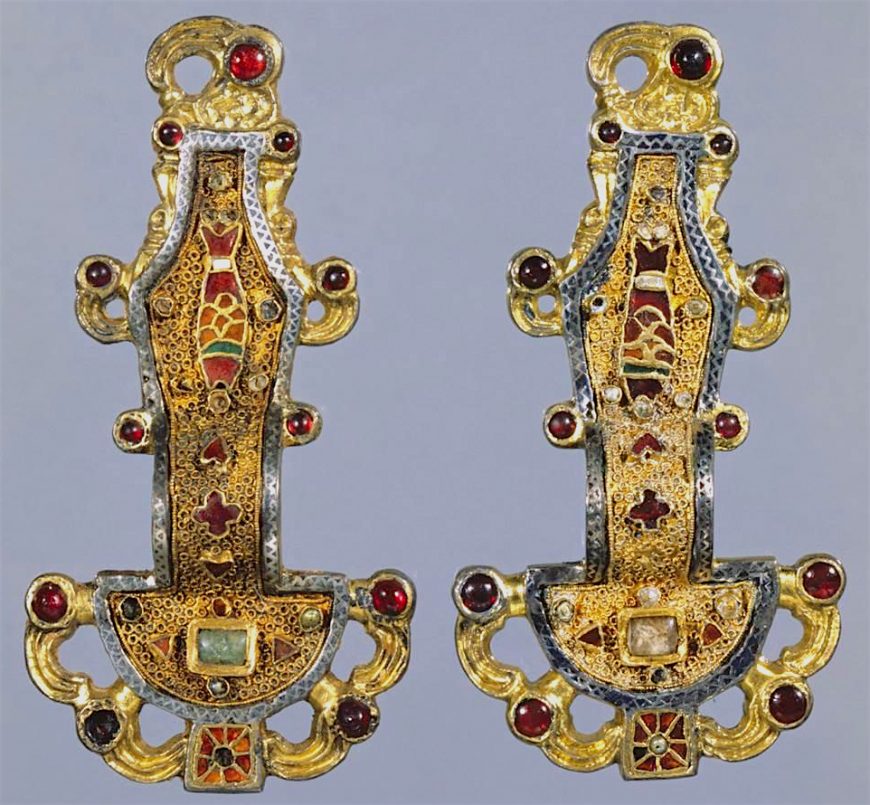
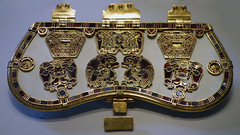
This pair of Merovingian fibulae is a good example of cloisonné, a technique that was popular in barbarian art. This technique is characterized by inlaid semi-precious stones. The word cloisonné literally means “partitioned” in French. The artisan would solder wires onto a metal base and fill the areas created with polished stones (this is different from cloisonné enamel, which has colored enamel baked within these partitions).
This example also shows a popular motif in barbarian art of the middle ages—eagles. The eagle was a symbol of the Roman empire and was adopted at this time because it still carried connotations of status and power. The top end of these fibulae are in the shape of eagle heads and a series of similarly stylized eagle heads can be seen creating the loops on the opposite end of each pin and on the sides. A small fish decorates the main body of each of the brooches. Garnets were used for the eyes of the eagles, and a wide range of gems were used in the rest of the fibulae. These stunning objects demonstrate the remarkable skill of barbarian metal workers during the early middle ages.
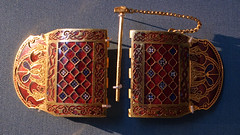
Visigothic fibulae
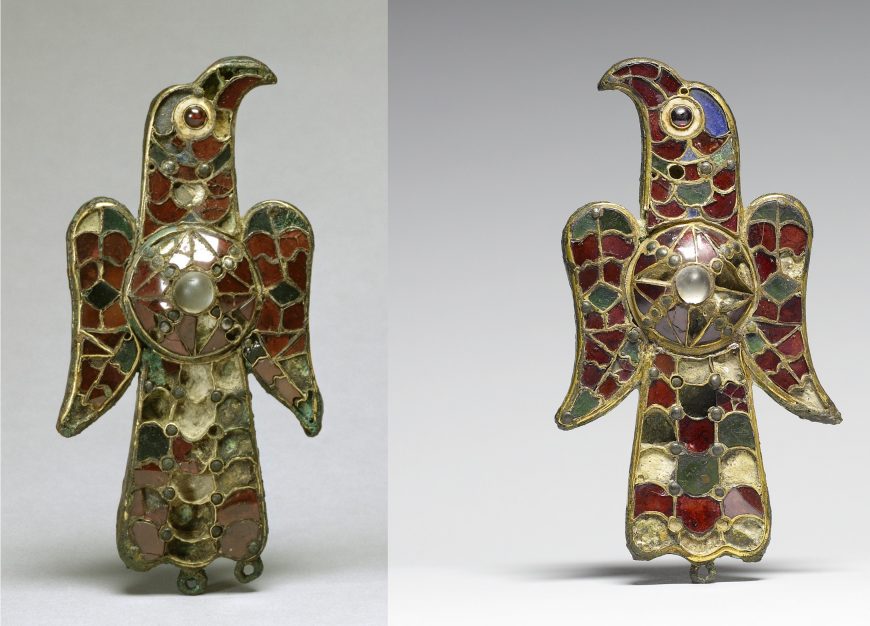
This pair of Visigothic fibulae in the form of eagles provide another good example of barbarian metalwork and cloisonné. They are decorated with garnets, amethyst, and colored glass and were found at a Visigothic grave site in Spain. They likely would have fastened a cloak at the shoulders and pendants may have hung from the loops at the bottom.
[1] Florin Curta, The Making of the Slavs: History and Archaeology of the Lower Danube Region, c. 500-700 (Cambridge University Press, reissue edition, 2007), p. 247.
[3] Florin Curta, The Making of the Slavs: History and Archaeology of the Lower Danube Region, c. 500-700 (Cambridge University Press, reissue edition, 2007), p. 274.
Additional resources:
Florin Curta, The Making of the Slavs: History and Archaeology of the Lower Danube Region, c. 500-700 (Cambridge University Press, reissue edition, 2007).
Smarthistory images for teaching and learning:
Sutton Hoo Ship Burial
The most famous Anglo-Saxon treasures in the Museum come from the Sutton Hoo burial site in Suffolk. Here mysterious grassy mounds covered a number of ancient graves. In one particular grave, belonging to an important Anglo-Saxon warrior, some astonishing objects were buried, but there is little in the grave to make it clear who was buried there.
Sutton Hoo
On a small hill above the river Deben in Suffolk is a strange-looking field, covered with grassy mounds of different sizes. For several hundred years what lay under them was a mystery.
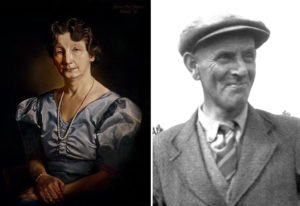
In 1939 Mrs Edith Pretty, a landowner at Sutton Hoo, Suffolk, asked archaeologist Basil Brown to investigate the largest of several Anglo-Saxon burial mounds on her property. Inside, he made one of the most spectacular archaeological discoveries of all time. Brown started digging under mounds 2, 3 and 4, where he found a few, mostly broken, Anglo-Saxon objects which had been buried alongside their owner’s bodies. Sadly, grave robbers had taken most of what was there. With a little more hope he started on the biggest mound, Mound 1. He did not know that the treasures under Mound 1 would turn out to be the most amazing set of Anglo-Saxon objects ever found.

Beneath the mound was the imprint of a 27-metre-long ship. At its centre was a ruined burial chamber packed with treasures: Byzantine silverware, sumptuous gold jewelry, a lavish feasting set, and most famously, an ornate iron helmet. Dating to the early 600s, this outstanding burial clearly commemorated a leading figure of East Anglia, the local Anglo-Saxon kingdom. It may even have belonged to a king.
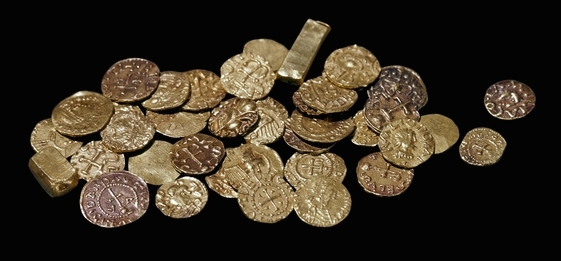
The burial can only be dated on the basis of the coins that were found there. There was a purse among the burial goods, which contained 37 gold coins, 3 coin-shaped blanks, and 2 small gold ingots. The presence of the coin-shaped blanks suggests that the number of coins was deliberately rounded up to 40. The coins cannot be dated closely, but seem to have been deposited at some point between around 610-635. They all come from the kingdom of the Merovingian Franks on the Continent, rather than any English kingdom, although coin production had started in Kent by this time. Sutton Hoo was in the kingdom of East Anglia and the coin dates suggest that it may be the burial of King Raedwald, who died around 625.
The Sutton Hoo ship burial provides remarkable insights into early Anglo-Saxon England. It reveals a place of exquisite craftsmanship and extensive international connections, spanning Europe and beyond. It also shows that the world of great halls, glittering treasures and formidable warriors described in Anglo-Saxon poetry was not a myth.
Mrs Edith Pretty donated the finds to the British Museum in 1939.
Video \(\PageIndex{1}\)
© Trustees of the British Museum
Smarthistory images for teaching and learning:


Sutton Hoo Ship Burial (video)
by DR. BETH HARRIS and DR. STEVEN ZUCKER
Video \(\PageIndex{2}\): The Sutton Hoo Ship Burial (early Anglo-Saxon) at The British Museum including: Buckles and assorted pieces, Sword belt, Helmet, Great Gold Buckle, Purse Lid, Shoulder-clasps, early 7th century, gold, millefiori, and garnet as well as Bowl and spoons (Byzantine), c. 500-650, Coins (Merovingian Frank), n.d., gold, Drinking-horns, early 7th century, and the Anastasius Platter (Byzantine), c. 491-518, silver. found in Suffolk, England.
Smarthistory images for teaching and learning:
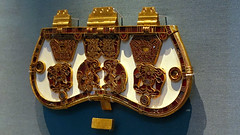
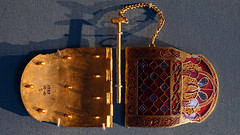
The Sutton Hoo purse lid
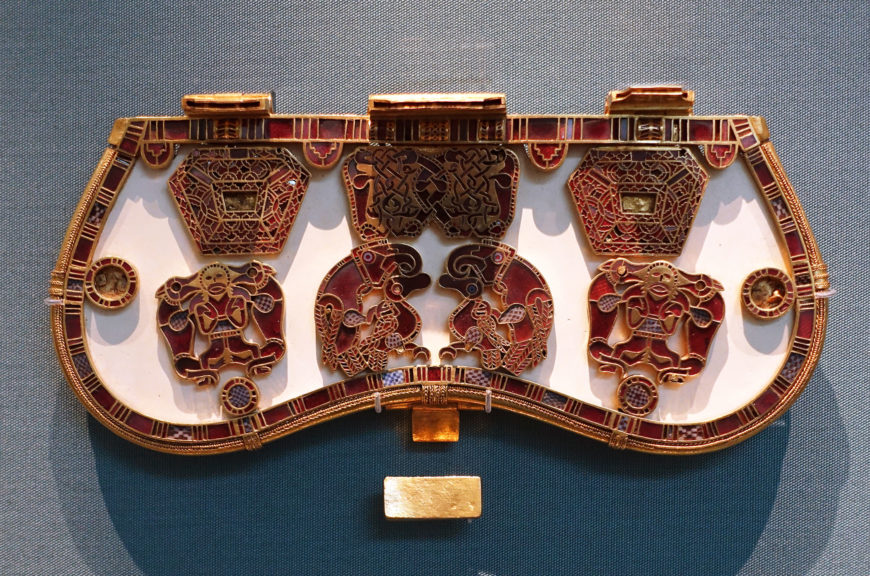
Purse lid from the Sutton Hoo ship burial
Wealth, and its public display, was probably used to establish status in early Anglo-Saxon society much as it is today. The purse lid from Sutton Hoo is the richest of its kind yet found.
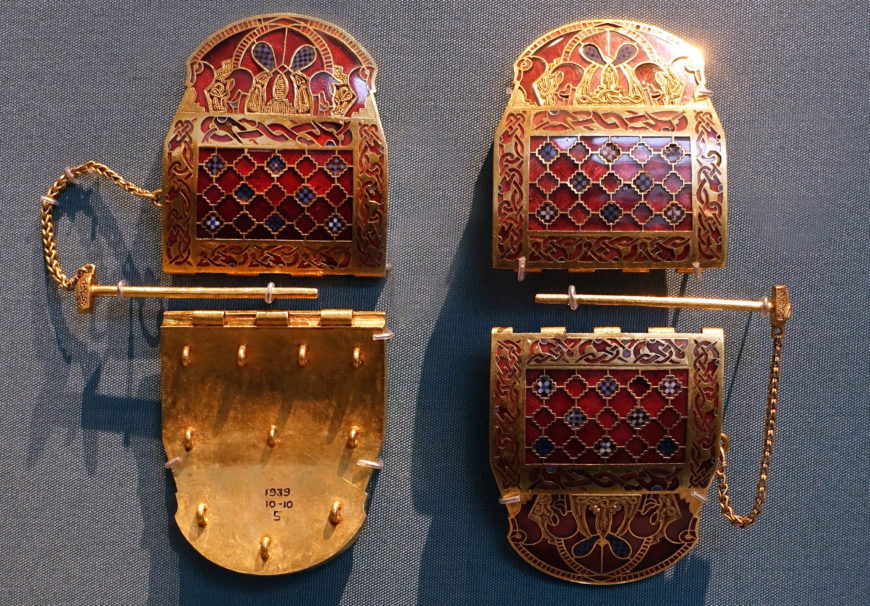
The lid was made to cover a leather pouch containing gold coins. It hung by three hinged straps from the waist belt, and was fastened by a gold buckle. The lid had totally decayed but was probably made of whalebone—a precious material in early Anglo-Saxon England. Seven gold, garnet cloisonné and millefiori glass plaques were set into it. These are made with a combination of very large garnets and small ones, deliberately used to pick out details of the imagery. This combination could link the purse-lid and the fine shoulder clasps, which were also found in the ship burial, to the workshop of a single master-craftsman. It is possible that he made the entire suite of gold and garnet fittings discovered in Mound 1 as a single commission.
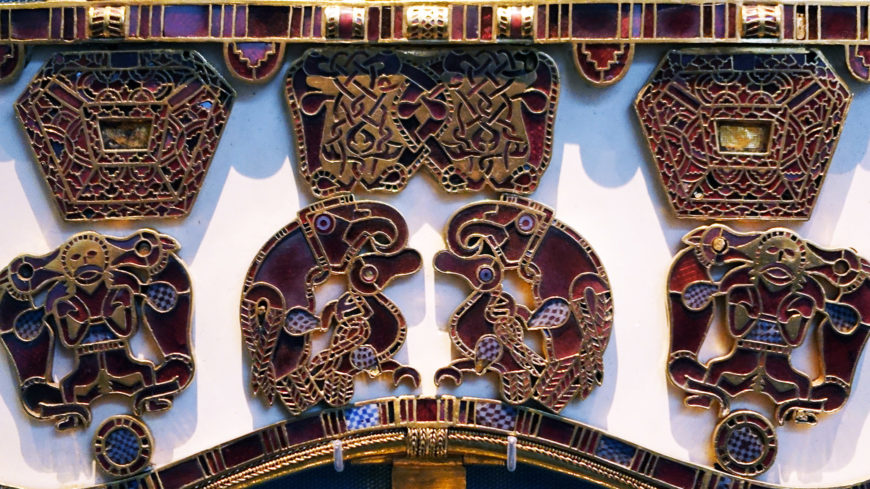
The plaques include twinned images of a bird-of-prey swooping on a duck-like bird and a man standing heroically between two beasts. These images must have had deep significance for the Anglo-Saxons, but it is impossible for us to interpret them. The fierce creatures are perhaps a powerful evocation of strength and courage, qualities that a successful leader of men must possess. Strikingly similar images of a man between beasts are known from Scandinavia.
Suggested readings:
G. Williams, Treasures from Sutton Hoo, (London, British Museum Press, 2011).
A.C. Evans, The Sutton Hoo ship burial, revised edition (London, The British Museum Press, 1994).
R.L.S. Bruce-Mitford, The Sutton Hoo ship burial, vol. 2: arms, armour and regalia (London, The British Museum Press, 1978).
© Trustees of the British Museum
Smarthistory images for teaching and learning:

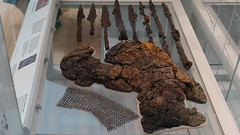
The Sutton Hoo helmet
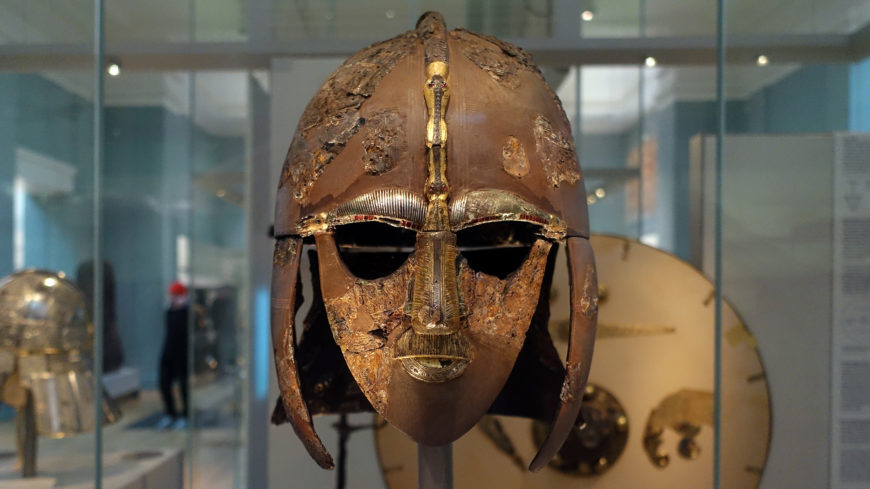
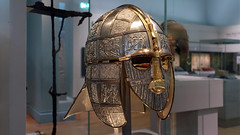
This extraordinary helmet is very rare. Only four complete helmets are known from Anglo-Saxon England: at Sutton Hoo, Benty Grange, Wollaston and York.
Archaeologists discovered this helmet lying in the tomb. It was an amazing, rare find. It was also very unusual because it had a face-mask. Look at the nose, eyebrows and holes for the warrior’s eyes. Can you see a dragon with outstretched wings, made up by the two bushy eyebrows, nose and mustache?
A reconstruction
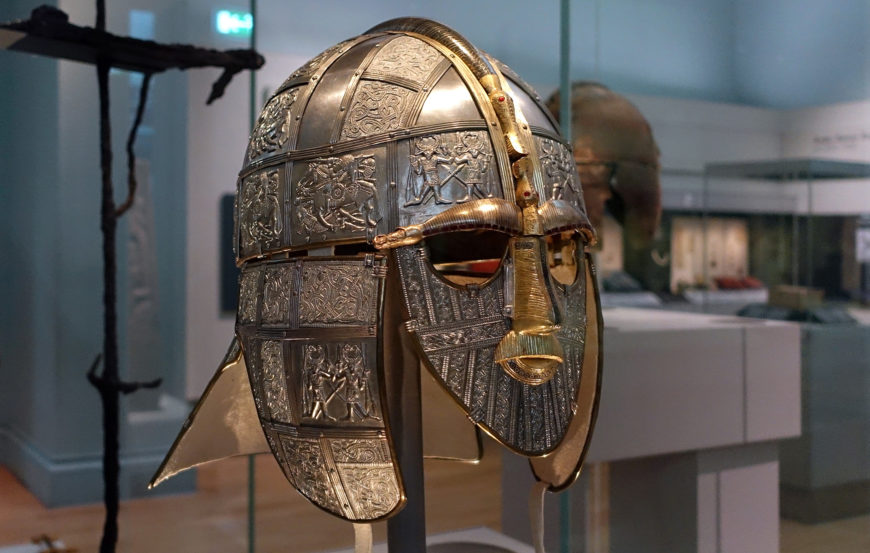
When found, the magnificent helmet from the Anglo-Saxon grave at Sutton Hoo, Suffolk, was in hundreds of pieces. The burial chamber had collapsed and reduced the helmet to a pile of fragments. Pieces of rusted iron were mixed up with pieces of tinned bronze, all so corroded as to be barely recognizable. By precisely locating the remaining fragments and assembling them as if in a three-dimensional jigsaw puzzle, conservators have reconstructed the helmet. A complete replica made by the Royal Armories shows how the original would have looked.
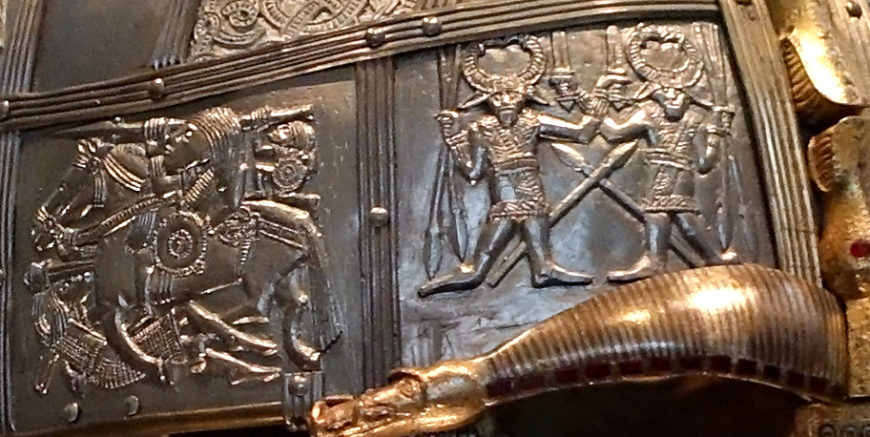
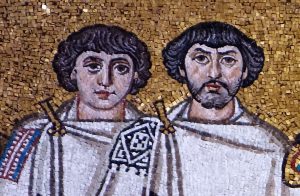
The helmet comprised an iron cap, neck guard, cheek pieces and face mask. Its form derives from Late Roman cavalry helmets. The helmet’s surfaces were covered with tinned copper alloy panels that gave it a bright, silvery appearance. Many of these panels were decorated with interlacing animal ornament (“Style II”) and heroic scenes of warriors. One scene shows two men wearing horned head-gear, holding swords and spears. The other shows a mounted warrior trampling a fallen enemy, who in turn stabs the horse. The rider carries a spear which is supported by a curious small figure, standing on the rump of his horse – perhaps a supernatural helper. Similar scenes were popular in the Germanic world at this time.
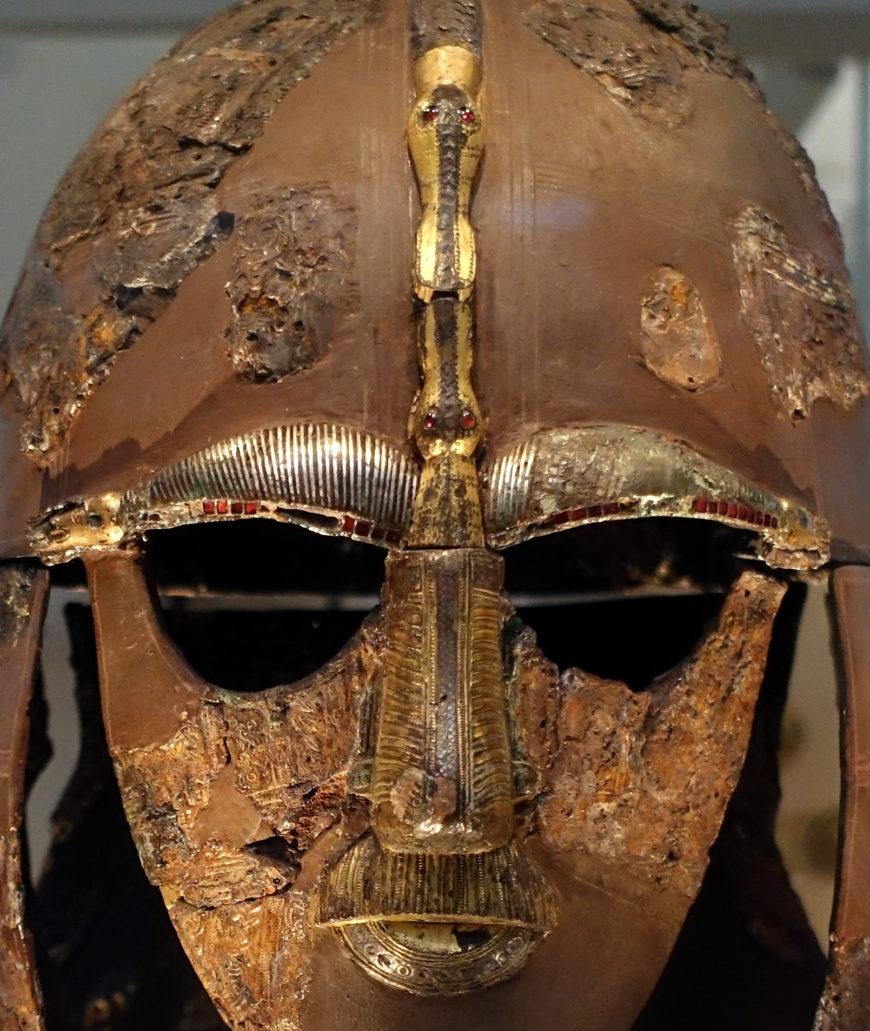
The face-mask is the helmet’s most remarkable feature. It works as a visual puzzle, with two possible “solutions.” The first is of a human face, comprising eye-sockets, eyebrows, mustache, mouth and a nose with two small holes so that the wearer could breathe. The copper alloy eyebrows are inlaid with silver wire and tiny garnets. Each ends in a gilded boar’s head – a symbol of strength and courage appropriate for a warrior. The second “solution” is of a bird or dragon flying upwards. Its tail is formed by the mustache, its body by the nose, and its wings by the eyebrows. Its head extends from between the wings, and lays nose-to-nose with another animal head at the end of a low iron crest that runs over the helmet’s cap.
An earlier restoration
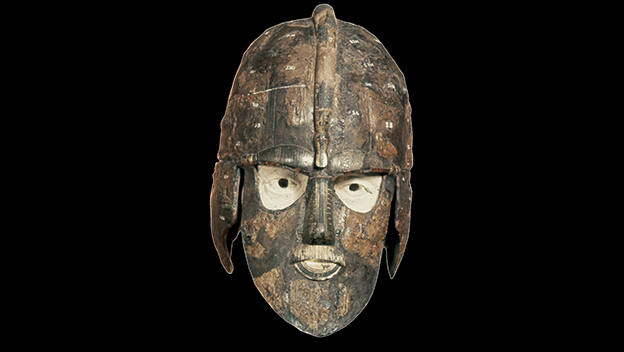
The first restoration of the helmet (above) was completed by 1947, but continuing research showed it to be inaccurate and it was dismantled in 1968. The new restoration relied entirely on the evidence of the fragments themselves and not on preconceived ideas – the aim of all modern archaeological conservation. It took the conservator a year of painstaking study and experimentation with more than 500 fragments.
The pieces had to be identified and matched by their thickness, texture and traces of the design in the corrosion. As months passed, vital discoveries were made about the helmet’s structure. The cap size and shape were established by joining fragments from the top and one of the sides; a small riveted plate on one piece provided evidence for the attachment of the ear-flaps. The discovery of the position of a third dragon’s head completed the dramatic face mask.
A temporary support was made (a plaster dome covered with modeling clay) on which the fragments were held with long pins while they were joined. The missing areas were filled with jute textile, stiffened with adhesive and skimmed with plaster. These infills were colored brown to match the iron.
Though rusted now, the helmet would originally have been a bright silvery color. The tinned bronze panels, the gilding and the garnets would have given it original, the striking appearance we see in the reconstruction.
A precious survival, the Sutton Hoo helmet has become an icon of the early medieval period.
Video \(\PageIndex{3}\)
Suggested readings:
G. Williams, Treasures from Sutton Hoo, (London, British Museum Press, 2011).
A.C. Evans, The Sutton Hoo ship burial, revised edition (London, The British Museum Press, 1994).
R.L.S. Bruce-Mitford, The Sutton Hoo ship burial, vol. 2: arms, armor and regalia (London, The British Museum Press, 1978).
Sutton Hoo: Anglo-Saxon ship-burial on the Google Cultural Institute
Sutton Hoo at the British Museum
© Trustees of the British Museum
Smarthistory images for teaching and learning:
The Lindisfarne Gospels
by DR. KATHLEEN DOYLE AT THE BRITISH LIBRARY and LOUISA WOODVILLE
Video \(\PageIndex{4}\): The Lindisfarne Gospels, c. 700 (Northumbria), 340 x 250 mm (British Library, Cotton MS Nero D IV) © 2019 British Library, used by permission Speakers: Dr. Kathleen Doyle, Lead Curator, Illuminated manuscripts, British Library and Dr. Steven Zucker
A medieval monk takes up a quill pen, fashioned from a goose feather, and dips it into a rich, black ink made from soot. Seated on a wooden chair in the scriptorium of Lindisfarne, an island off the coast of Northumberland in England, he stares hard at the words from a manuscript made in Italy. This book is his exemplar, the codex (a bound book, made from sheets of paper or parchment) from which he is to copy the Gospels of Matthew, Mark, Luke and John.
For about the next six years, he will copy this Latin. He will illuminate the gospel text with a weave of fantastic images— snakes that twist themselves into knots or birds, their curvaceous and overlapping forms creating the illusion of a third dimension into which a viewer can lose him or herself in meditative contemplation.
The book is a spectacular example of Insular or Hiberno-Saxon art—works produced in the British Isles between 500-900 C.E., a time of devastating invasions and political upheavals. Monks read from it during rituals at their Lindisfarne Priory on Holy Island, a Christian community that safeguarded the shrine of St Cuthbert, a bishop who died in 687 and whose relics were thought to have curative and miracle-working powers.
A Northumbrian monk, very likely the bishop Eadfrith, illuminated the codex in the early 8th century. Two-hundred and fifty-nine written and recorded leaves include full-page portraits of each evangelist; highly ornamental “cross-carpet” pages, each of which features a large cross set against a background of ordered and yet teeming ornamentation; and the Gospels themselves, each introduced by an historiated initial. The codex also includes sixteen pages of canon tables set in arcades. Here correlating passages from each evangelist are set side-by-side, enabling a reader to compare narrations.
In 635 C.E. Christian monks from the Scottish island of Iona built a priory in Lindisfarne. More than a hundred and fifty years later, in 793, Vikings from the north attacked and pillaged the monastery, but survivors managed to transport the Gospels safely to Durham, a town on the Northumbrian coast about 75 miles west of its original location.
We glean this information from the manuscript itself, thanks to Aldred, a 10th-century priest from a priory at Durham. Aldred’s colophon—an inscription that relays information about the book’s production—informs us that Eadfrith, a bishop of Lindisfarne in 698 who died in 721, created the manuscript to honor God and St. Cuthbert. Aldred also inscribed a vernacular translation between the lines of the Latin text, creating the earliest known Gospels written in a form of English.
Matthew’s cross-carpet page exemplifies Eadfrith’s exuberance and genius. A mesmerizing series of repetitive knots and spirals is dominated by a centrally-located cross. One can imagine devout monks losing themselves in the swirls and eddies of color during meditative contemplation of its patterns.
Compositionally, Eadfrith stacked wine-glass shapes horizontally and vertically against his intricate weave of knots. On closer inspection many of these knots reveal themselves as snake-like creatures curling in and around tubular forms, mouths clamping down on their bodies. Chameleon-like, their bodies change colors: sapphire blue here, verdigris green there, and sandy gold in between. The sanctity of the cross, outlined in red with arms outstretched and pressing against the page edges, stabilizes the background’s gyrating activity and turns the repetitive energy into a meditative force.
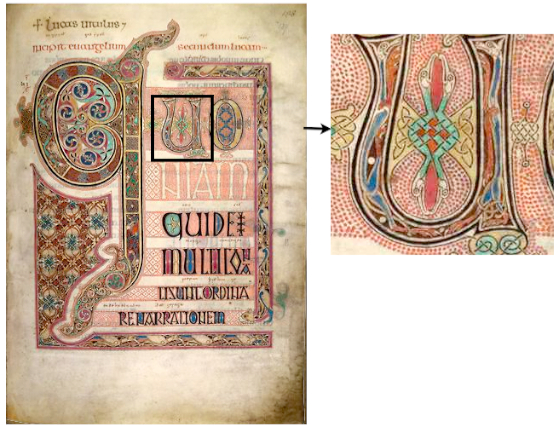
Likewise, Luke’s incipit (incipit: it begins) page teems with animal life, spiraled forms, and swirling vortexes. In many cases Eadfrith’s characteristic knots reveal themselves as snakes that move stealthily along the confines of a letter’s boundaries.
Blue pin-wheeled shapes rotate in repetitive circles, caught in the vortex of a large Q that forms Luke’s opening sentence—Quoniam quidem multi conati sunt ordinare narrationem. (Translation: As many have taken it in hand to set forth in order.)

Birds also abound. One knot enclosed in a tall rectangle on the far right unravels into a blue heron’s chest shaped like a large comma. Eadfrith repeats this shape vertically down the column, cleverly twisting the comma into a cat’s forepaw at the bottom. The feline, who has just consumed the eight birds that stretch vertically up from its head, presses off this appendage acrobatically to turn its body 90 degrees; it ends up staring at the words RENARRATIONEM (part of the phrase -re narrationem).
Eadfrith also has added a host of tiny red dots that envelop words, except when they don’t—the letters “NIAM” of “quoniam” are composed of the vellum itself, the negative space now asserting itself as four letters.
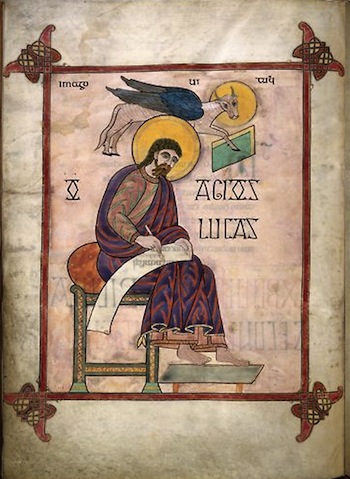
Luke’s incipit page is in marked contrast to his straightforward portrait page. Here Eadfrith seats the curly-haired, bearded evangelist on a red-cushioned stool against an unornamented background. Luke holds a quill in his right hand, poised to write words on a scroll unfurling from his lap. His feet hover above a tray supported by red legs. He wears a purple robe streaked with red, one that we can easily imagine on a late fourth or fifth century Roman philosopher. The gold halo behind Luke’s head indicates his divinity. Above his halo flies a blue-winged calf, its two eyes turned toward the viewer with its body in profile. The bovine clasps a green parallelogram between two forelegs, a reference to the Gospel.
According to the historian Bede from the nearby monastery in Monkwearmouth (d. 735), this calf, or ox, symbolizes Christ’s sacrifice on the cross. Bede assigns symbols for the other three evangelists as well, which Eadfrith duly includes in their respective portraits: Matthew’s is a man, suggesting the human aspect of Christ; Mark’s the lion, symbolizing the triumphant and divine Christ of the Resurrection; and John’s the eagle, referring to Christ’s second coming.
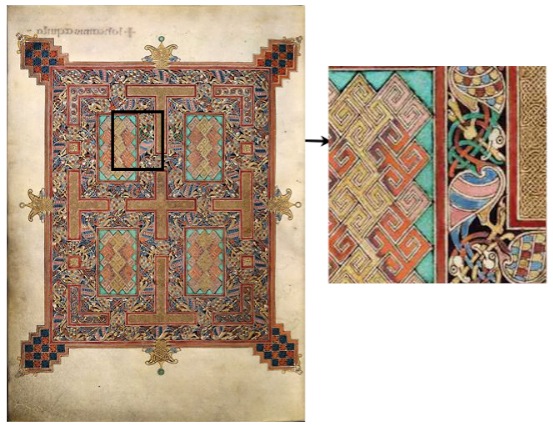
A dense interplay of stacked birds teem underneath the crosses of the carpet page that opens John’s Gospel. One bird, situated in the upper left-hand quadrant, has blue-and-pink stripes in contrast to others that sport registers of feathers. Stripes had a negative association to the medieval mind, appearing chaotic and disordered. The insane wore stripes, as did prostitutes, criminals, jugglers, sorcerers, and hangmen. Might Eadfrith be warning his viewers that evil lurks hidden in the most unlikely of places? Or was Eadfrith himself practicing humility in avoiding perfection?
All in all, the variety and splendor of the Lindisfarne Gospels are such that even in reproduction, its images astound. Artistic expression and inspired execution make this codex a high point of early medieval art.
Codex Amiatinus, the oldest complete Latin Bible
by DR. CLAIRE BREAY, THE BRITISH LIBRARY and DR. BETH HARRIS
Video \(\PageIndex{5}\): Codex Amiatinus, before 716, Wearmouth-Jarrow, c. 505 x 340 mm (Biblioteca Medicea Laurenziana, Florence, MS Amiatino 1) Speakers: Dr. Claire Breay, Head of Ancient, Medieval and Early Modern Manuscripts and Dr. Beth Harris
Additional resources:
This manuscript in the Biblioteca Medicea Laurenziana
This manuscript in the British Library’s Anglo-Saxons Kingdoms exhibition
The Codex Amiatinus and the St Cuthbert Gospel, British Library essay
The Utrecht Psalter and its influence
by DR. KATHLEEN DOYLE AT THE BRITISH LIBRARY and DR. BETH HARRIS
Video \(\PageIndex{6}\): The Utrecht Psalter, c. 825, Hautvilliers, near Reims, France, 380 x 310 mm (Universiteitsbibliotheek, Utrecht, MS 32, ff. 7v–8r), courtesy Universiteitsbibliothek, Utrecht; The Harley Psalter, early 11th century, Christ Church, Canterbury, 380 x 310 mm (British Library, BL, Harley MS 603, ff. 7v 8r), © 2019 British Library, used by permission; and the The Eadwine Psalter, c. 1150, Christ Church, Canterbury, 460 x 330 mm (Cambridge, Trinity College, MS R. 17.1, ff. 23v–24r) A conversation with Dr. Kathleen Doyle, Lead Curator, Illuminated Manuscripts, British Library and Dr. Beth Harris
Additional resources:
This manuscript in the Utrecht University Library
This manuscript in the British Library’s Anglo-Saxon Kingdoms exhibition
The Harley Psalter at the British Library