
9.3: Glaze Firing- Understanding Temperatures and Atmospheres
- Page ID
- 299318

\( \newcommand{\vecs}[1]{\overset { \scriptstyle \rightharpoonup} {\mathbf{#1}} } \)
\( \newcommand{\vecd}[1]{\overset{-\!-\!\rightharpoonup}{\vphantom{a}\smash {#1}}} \)
\( \newcommand{\dsum}{\displaystyle\sum\limits} \)
\( \newcommand{\dint}{\displaystyle\int\limits} \)
\( \newcommand{\dlim}{\displaystyle\lim\limits} \)
\( \newcommand{\id}{\mathrm{id}}\) \( \newcommand{\Span}{\mathrm{span}}\)
( \newcommand{\kernel}{\mathrm{null}\,}\) \( \newcommand{\range}{\mathrm{range}\,}\)
\( \newcommand{\RealPart}{\mathrm{Re}}\) \( \newcommand{\ImaginaryPart}{\mathrm{Im}}\)
\( \newcommand{\Argument}{\mathrm{Arg}}\) \( \newcommand{\norm}[1]{\| #1 \|}\)
\( \newcommand{\inner}[2]{\langle #1, #2 \rangle}\)
\( \newcommand{\Span}{\mathrm{span}}\)
\( \newcommand{\id}{\mathrm{id}}\)
\( \newcommand{\Span}{\mathrm{span}}\)
\( \newcommand{\kernel}{\mathrm{null}\,}\)
\( \newcommand{\range}{\mathrm{range}\,}\)
\( \newcommand{\RealPart}{\mathrm{Re}}\)
\( \newcommand{\ImaginaryPart}{\mathrm{Im}}\)
\( \newcommand{\Argument}{\mathrm{Arg}}\)
\( \newcommand{\norm}[1]{\| #1 \|}\)
\( \newcommand{\inner}[2]{\langle #1, #2 \rangle}\)
\( \newcommand{\Span}{\mathrm{span}}\) \( \newcommand{\AA}{\unicode[.8,0]{x212B}}\)
\( \newcommand{\vectorA}[1]{\vec{#1}} % arrow\)
\( \newcommand{\vectorAt}[1]{\vec{\text{#1}}} % arrow\)
\( \newcommand{\vectorB}[1]{\overset { \scriptstyle \rightharpoonup} {\mathbf{#1}} } \)
\( \newcommand{\vectorC}[1]{\textbf{#1}} \)
\( \newcommand{\vectorD}[1]{\overrightarrow{#1}} \)
\( \newcommand{\vectorDt}[1]{\overrightarrow{\text{#1}}} \)
\( \newcommand{\vectE}[1]{\overset{-\!-\!\rightharpoonup}{\vphantom{a}\smash{\mathbf {#1}}}} \)
\( \newcommand{\vecs}[1]{\overset { \scriptstyle \rightharpoonup} {\mathbf{#1}} } \)
\(\newcommand{\longvect}{\overrightarrow}\)
\( \newcommand{\vecd}[1]{\overset{-\!-\!\rightharpoonup}{\vphantom{a}\smash {#1}}} \)
\(\newcommand{\avec}{\mathbf a}\) \(\newcommand{\bvec}{\mathbf b}\) \(\newcommand{\cvec}{\mathbf c}\) \(\newcommand{\dvec}{\mathbf d}\) \(\newcommand{\dtil}{\widetilde{\mathbf d}}\) \(\newcommand{\evec}{\mathbf e}\) \(\newcommand{\fvec}{\mathbf f}\) \(\newcommand{\nvec}{\mathbf n}\) \(\newcommand{\pvec}{\mathbf p}\) \(\newcommand{\qvec}{\mathbf q}\) \(\newcommand{\svec}{\mathbf s}\) \(\newcommand{\tvec}{\mathbf t}\) \(\newcommand{\uvec}{\mathbf u}\) \(\newcommand{\vvec}{\mathbf v}\) \(\newcommand{\wvec}{\mathbf w}\) \(\newcommand{\xvec}{\mathbf x}\) \(\newcommand{\yvec}{\mathbf y}\) \(\newcommand{\zvec}{\mathbf z}\) \(\newcommand{\rvec}{\mathbf r}\) \(\newcommand{\mvec}{\mathbf m}\) \(\newcommand{\zerovec}{\mathbf 0}\) \(\newcommand{\onevec}{\mathbf 1}\) \(\newcommand{\real}{\mathbb R}\) \(\newcommand{\twovec}[2]{\left[\begin{array}{r}#1 \\ #2 \end{array}\right]}\) \(\newcommand{\ctwovec}[2]{\left[\begin{array}{c}#1 \\ #2 \end{array}\right]}\) \(\newcommand{\threevec}[3]{\left[\begin{array}{r}#1 \\ #2 \\ #3 \end{array}\right]}\) \(\newcommand{\cthreevec}[3]{\left[\begin{array}{c}#1 \\ #2 \\ #3 \end{array}\right]}\) \(\newcommand{\fourvec}[4]{\left[\begin{array}{r}#1 \\ #2 \\ #3 \\ #4 \end{array}\right]}\) \(\newcommand{\cfourvec}[4]{\left[\begin{array}{c}#1 \\ #2 \\ #3 \\ #4 \end{array}\right]}\) \(\newcommand{\fivevec}[5]{\left[\begin{array}{r}#1 \\ #2 \\ #3 \\ #4 \\ #5 \\ \end{array}\right]}\) \(\newcommand{\cfivevec}[5]{\left[\begin{array}{c}#1 \\ #2 \\ #3 \\ #4 \\ #5 \\ \end{array}\right]}\) \(\newcommand{\mattwo}[4]{\left[\begin{array}{rr}#1 \amp #2 \\ #3 \amp #4 \\ \end{array}\right]}\) \(\newcommand{\laspan}[1]{\text{Span}\{#1\}}\) \(\newcommand{\bcal}{\cal B}\) \(\newcommand{\ccal}{\cal C}\) \(\newcommand{\scal}{\cal S}\) \(\newcommand{\wcal}{\cal W}\) \(\newcommand{\ecal}{\cal E}\) \(\newcommand{\coords}[2]{\left\{#1\right\}_{#2}}\) \(\newcommand{\gray}[1]{\color{gray}{#1}}\) \(\newcommand{\lgray}[1]{\color{lightgray}{#1}}\) \(\newcommand{\rank}{\operatorname{rank}}\) \(\newcommand{\row}{\text{Row}}\) \(\newcommand{\col}{\text{Col}}\) \(\renewcommand{\row}{\text{Row}}\) \(\newcommand{\nul}{\text{Nul}}\) \(\newcommand{\var}{\text{Var}}\) \(\newcommand{\corr}{\text{corr}}\) \(\newcommand{\len}[1]{\left|#1\right|}\) \(\newcommand{\bbar}{\overline{\bvec}}\) \(\newcommand{\bhat}{\widehat{\bvec}}\) \(\newcommand{\bperp}{\bvec^\perp}\) \(\newcommand{\xhat}{\widehat{\xvec}}\) \(\newcommand{\vhat}{\widehat{\vvec}}\) \(\newcommand{\uhat}{\widehat{\uvec}}\) \(\newcommand{\what}{\widehat{\wvec}}\) \(\newcommand{\Sighat}{\widehat{\Sigma}}\) \(\newcommand{\lt}{<}\) \(\newcommand{\gt}{>}\) \(\newcommand{\amp}{&}\) \(\definecolor{fillinmathshade}{gray}{0.9}\)Glaze firing, including the maturation of glazes and the impact of different kiln atmospheres on results, is covered in this subchapter. Techniques for layering glazes and strategic kiln loading, along with the significance of cooling cycles, are discussed to guide artists in achieving desired glaze effects.
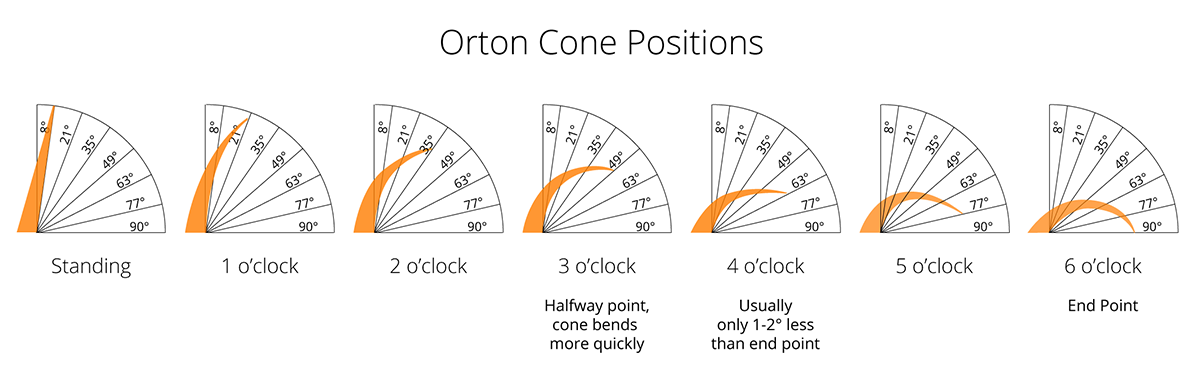
Pyrometric cones are small, cone-shaped devices made of ceramic materials designed to bend or melt at specific temperatures during a kiln firing. They are used to measure the heat work (a combination of temperature and time) experienced by ceramics in a kiln, providing a reliable indication of whether the desired firing conditions have been achieved.
Each cone is calibrated to deform at a precise temperature range, which depends on the firing rate. They come in a series, typically numbered from 022 to 42, with lower numbers corresponding to lower firing temperatures.
The Orton Firing Chart for Ceramics
The Orton Firing Chart is a reference tool provided by the Edward Orton Jr. Ceramic Foundation to help ceramists understand how pyrometric cones behave under different firing conditions. It includes:
- Cone Numbers: Indicates specific cones and their bending points.
- Temperature Ranges: Lists the temperature at which each cone bends under standard heating rates.
- Heating Rate (°C/°F per hour): Shows how the temperature at which the cone bends changes based on the speed of the firing process (e.g., slow, medium, fast).
- Deformation States: Illustrates the stages of cone deformation (e.g., standing upright, starting to bend, fully bent) to indicate when a particular cone has achieved its heat work.
Importance of Pyrometric Cones and Firing Charts
- Accurate Measurement of Heat Work:
- Kiln thermometers measure air temperature, but pyrometric cones account for both time and temperature, ensuring accurate control over the firing process.
- Firing Consistency:
- Using cones ensures repeatable results in ceramic projects, critical for achieving desired glaze effects or clay body vitrification.
- Kiln Calibration:
- Pyrometric cones help monitor if the kiln's temperature gauge is accurate, as they directly measure the effects of heat work on the materials.
- Glaze and Clay Performance:
- Different glazes and clays require specific firing conditions. Pyrometric cones ensure that the desired conditions are met.
- Identifying Issues:
- Cones can reveal uneven heat distribution in the kiln or firing errors, such as underfiring or overfiring.
Practical Use of Pyrometric Cones
- Placement:
- Place cones in various locations in the kiln (e.g., top, middle, bottom) to monitor temperature uniformity.
- Cone Packs:
- A typical cone pack includes a lower cone (to indicate nearing temperature), a target cone (the desired firing condition), and a higher cone (to warn of overfiring).
- Firing Charts:
- Refer to the Orton Firing Chart to choose the correct cones for the type of firing (e.g., bisque, glaze) and ensure the kiln is ramped at the appropriate rate.
Using pyrometric cones and the Orton Firing Chart ensures high-quality, consistent results in ceramic work while protecting the kiln and the ware from firing mishaps.

The Chemistry and Physics of Glaze Maturation
- Melting Point: During glaze firing, the components of the glaze (fluxes, silica, and alumina) melt and fuse to create a glassy surface. The exact melting point depends on the glaze recipe and firing temperature.
- Oxide Interactions: Fluxes lower the melting point of silica, while alumina adds viscosity and stability to the molten glaze, preventing it from running off the surface.
- Crystallization: In some glazes, slow cooling encourages the formation of crystals, adding texture or sparkle to the surface.
- Durability: Proper glaze maturation ensures a durable, food-safe finish that resists crazing or shivering.
Tailoring Glaze Firing Cycles for Specific Glaze Effects
- Slow Ramp Rates: Gradual heating allows the glaze to mature evenly, minimizing defects like pinholes or bubbles.
- Soak Periods: Holding the kiln at the peak temperature allows glazes to fully fuse and achieve their intended surface qualities.
- Rapid Cooling: Some glazes, like raku, require fast cooling for crackle effects, while others benefit from slow cooling to enhance colors and textures.
- Customization: Adjust firing cycles for specific glaze recipes to achieve consistent results and unique effects.
Strategies for Layering Glazes and Placing Work in the Kiln
- Layering Techniques: Apply multiple glazes to achieve complex color combinations, textures, or depth. Test interactions between glazes to avoid undesirable results.
- Strategic Placement: Position heavily glazed pieces on kiln shelves with catch plates to prevent dripping onto other work or shelves.
- Avoiding Overlap: Keep pieces with reactive glazes separated to prevent cross-contamination during firing.
- Experimentation: Test glaze layering on small tiles before applying to large pieces to understand how the layers interact.
The Impact of Firing Atmospheres on Glaze Outcomes
- Oxidation Atmosphere: Produces bright, predictable colors, especially in clear and transparent glazes. Glazes with cobalt or copper oxides yield vibrant blues and greens.
- Reduction Atmosphere: Encourages earthy, subtle tones and unique effects like celadons, copper reds, or carbon trapping.
- Neutral Atmosphere: Balances the two, creating stable glazes with nuanced variations.
- Atmosphere Selection: Match the firing atmosphere to the glaze’s requirements for consistent, desired results.
Cooling Cycles and Their Effects on Crystalline Glazes and Microcrystalline Surfaces
- Crystalline Glazes: Require slow cooling or programmed holds at specific temperatures (e.g., 1,850°F/1,010°C) to allow crystals to grow.
- Microcrystalline Surfaces: Develop subtle textures and patterns during slow cooling cycles, often enhanced by titanium or zinc oxides.
- Rapid Cooling Effects: Sudden cooling can freeze a glaze’s molten surface, locking in textures or creating crackle patterns.
- Balancing Cooling Rates: Test various cooling schedules to find the best balance between functionality and aesthetic appeal.