12.2: Reverse Outlining
- Page ID
- 22382

Often, outlining is recommended as an early component of the writing process, a way to organize and connect thoughts so the shape of what you are going to write is clear before you start drafting it. This is a tool many writers use that is probably already familiar to you.
Reverse outlining, though, is different in a few ways. First, it happens later in the process, after a draft is completed rather than before. Second, it gives you an opportunity to review and assess the ideas and connections that are actually present in the completed draft. This is almost an opposite approach from traditional outlining, as the traditional pre-writing outline considers an initial set of ideas, which might shift as the draft is actually being written and new ideas are added or existing ones are moved, changed, or removed entirely. A reverse outline can help you improve the structure and organization of your already-written draft, letting you see where support is missing for a specific point or where ideas don’t quite connect on the page as clearly as you wanted them to.
How to Create a Reverse Outline
- At the top of a fresh sheet of paper, write your primary thesis or claim for the text you want to outline. This should be the thesis exactly as it appears in your draft, not the thesis you know you intended. If you can’t find the actual words, write down that you can’t find them in this draft of the paper—it’s an important note to make!
- Draw a line down the middle of the page, creating two columns below your thesis.
- Read, preferably out loud, the first body paragraph of your draft.
- In the left column, write the single main idea of that paragraph (again, this should be using only the words that are actually on the page, not the ones you want to be on the page). If you find more than one main idea in a paragraph, write down all of them. If you can’t find a main idea, write that down, too.
- In the right column, state how the main idea of that paragraph supports the thesis.
- Repeat steps 3-5 for each body paragraph of the draft.
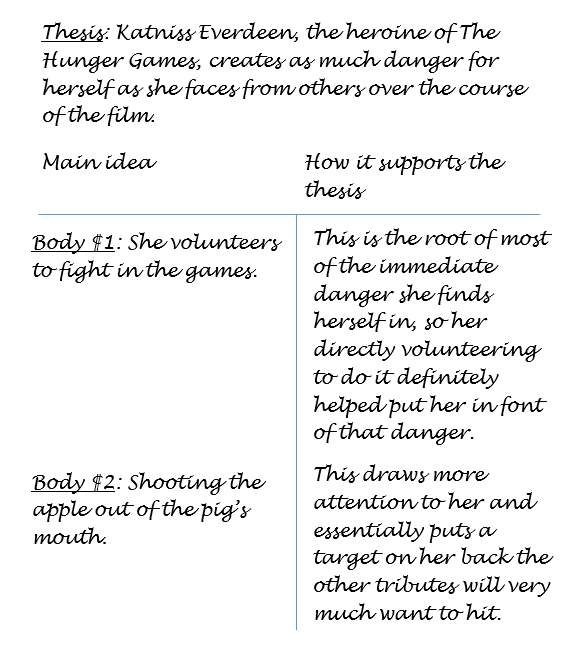
Once you have completed these steps, you have a reverse outline! It might look a little something like this (this one is only looking at two paragraphs of a draft for the sake of example; yours will likely be looking at more paragraphs than just two):

Working with the Results of Your Reverse Outline
Now what? You’ve probably already made some observations while completing this. Often students will speak up in class after we create these to tell me that they notice places where they are repeating themselves or that some of their paragraphs have too many points or don’t clearly support the thesis.
There are a number of observations that can be made with the aid of a reverse outline, and a number of ways it can help you strengthen your paper. Try considering the following questions as you review yours.
Do Multiple Paragraphs Share the Same Main Idea?
If so, you might try combining them, paring back the information for that specific idea soit doesn’t feel imbalanced in how much space it takes up, and/or organizing these paragraphs about the same point so they are next to each other in the paper.
Do Any Paragraphs Have Multiple Main Ideas?
Each paragraph should have only one primary focus. If you notice a paragraph does have more than one main idea, you could look for where some of those ideas might be discussed in other paragraphs and move them into a paragraph already focusing on that point, or select just the one main idea you think is most important to this paragraph and cut the other points out, or you might split that paragraph into multiple paragraphs and expand on each main idea.
Do Any Paragraphs Lack a Clear Main Idea?
If it was hard for you to find the main idea of a paragraph, it will also be hard for your reader to find. For paragraphs that don’t yet have a main idea, consider whether the information in that paragraph points to a main idea that just isn’t written on the page yet. If the information does all support one main idea, adding that idea to the paragraph might be all that is needed. Alternatively, you may find that some of the ideas fit into other paragraphs to support their ideas, or you may not need some of them in the next draft at all.
Do Any Main Ideas Not Connect Clearly and Directly Back to the Thesis?
Since the point of almost every paper is to support its thesis statement, this one can be critical. It should be clear how the main idea of each paragraph supports the thesis or claim of the paper. If that connection is not directly stated, ask yourself how the main idea of that paragraph furthers your thesis and then write that response.
Do Ideas Flow from Paragraph to Paragraph? Are There Gaps in Reasoning?
If a paper starts out introducing something that is a problem in a community, then presents a solution to the problem, and then talks about why the problem is…well, a problem, this organization is likely to confuse readers. Reorganizing to introduce the problem, discuss why it is a problem, and then move on to proposing a solution would do good work to help strengthen the next draft of this paper.
Note that you may need to move, revise, or add transition statements after moving paragraphs around.


