
7: Choosing Your Filmmaking Equipment
- Page ID
- 171020
\( \newcommand{\vecs}[1]{\overset { \scriptstyle \rightharpoonup} {\mathbf{#1}} } \)
\( \newcommand{\vecd}[1]{\overset{-\!-\!\rightharpoonup}{\vphantom{a}\smash {#1}}} \)
\( \newcommand{\id}{\mathrm{id}}\) \( \newcommand{\Span}{\mathrm{span}}\)
( \newcommand{\kernel}{\mathrm{null}\,}\) \( \newcommand{\range}{\mathrm{range}\,}\)
\( \newcommand{\RealPart}{\mathrm{Re}}\) \( \newcommand{\ImaginaryPart}{\mathrm{Im}}\)
\( \newcommand{\Argument}{\mathrm{Arg}}\) \( \newcommand{\norm}[1]{\| #1 \|}\)
\( \newcommand{\inner}[2]{\langle #1, #2 \rangle}\)
\( \newcommand{\Span}{\mathrm{span}}\)
\( \newcommand{\id}{\mathrm{id}}\)
\( \newcommand{\Span}{\mathrm{span}}\)
\( \newcommand{\kernel}{\mathrm{null}\,}\)
\( \newcommand{\range}{\mathrm{range}\,}\)
\( \newcommand{\RealPart}{\mathrm{Re}}\)
\( \newcommand{\ImaginaryPart}{\mathrm{Im}}\)
\( \newcommand{\Argument}{\mathrm{Arg}}\)
\( \newcommand{\norm}[1]{\| #1 \|}\)
\( \newcommand{\inner}[2]{\langle #1, #2 \rangle}\)
\( \newcommand{\Span}{\mathrm{span}}\) \( \newcommand{\AA}{\unicode[.8,0]{x212B}}\)
\( \newcommand{\vectorA}[1]{\vec{#1}} % arrow\)
\( \newcommand{\vectorAt}[1]{\vec{\text{#1}}} % arrow\)
\( \newcommand{\vectorB}[1]{\overset { \scriptstyle \rightharpoonup} {\mathbf{#1}} } \)
\( \newcommand{\vectorC}[1]{\textbf{#1}} \)
\( \newcommand{\vectorD}[1]{\overrightarrow{#1}} \)
\( \newcommand{\vectorDt}[1]{\overrightarrow{\text{#1}}} \)
\( \newcommand{\vectE}[1]{\overset{-\!-\!\rightharpoonup}{\vphantom{a}\smash{\mathbf {#1}}}} \)
\( \newcommand{\vecs}[1]{\overset { \scriptstyle \rightharpoonup} {\mathbf{#1}} } \)
\( \newcommand{\vecd}[1]{\overset{-\!-\!\rightharpoonup}{\vphantom{a}\smash {#1}}} \)
\(\newcommand{\avec}{\mathbf a}\) \(\newcommand{\bvec}{\mathbf b}\) \(\newcommand{\cvec}{\mathbf c}\) \(\newcommand{\dvec}{\mathbf d}\) \(\newcommand{\dtil}{\widetilde{\mathbf d}}\) \(\newcommand{\evec}{\mathbf e}\) \(\newcommand{\fvec}{\mathbf f}\) \(\newcommand{\nvec}{\mathbf n}\) \(\newcommand{\pvec}{\mathbf p}\) \(\newcommand{\qvec}{\mathbf q}\) \(\newcommand{\svec}{\mathbf s}\) \(\newcommand{\tvec}{\mathbf t}\) \(\newcommand{\uvec}{\mathbf u}\) \(\newcommand{\vvec}{\mathbf v}\) \(\newcommand{\wvec}{\mathbf w}\) \(\newcommand{\xvec}{\mathbf x}\) \(\newcommand{\yvec}{\mathbf y}\) \(\newcommand{\zvec}{\mathbf z}\) \(\newcommand{\rvec}{\mathbf r}\) \(\newcommand{\mvec}{\mathbf m}\) \(\newcommand{\zerovec}{\mathbf 0}\) \(\newcommand{\onevec}{\mathbf 1}\) \(\newcommand{\real}{\mathbb R}\) \(\newcommand{\twovec}[2]{\left[\begin{array}{r}#1 \\ #2 \end{array}\right]}\) \(\newcommand{\ctwovec}[2]{\left[\begin{array}{c}#1 \\ #2 \end{array}\right]}\) \(\newcommand{\threevec}[3]{\left[\begin{array}{r}#1 \\ #2 \\ #3 \end{array}\right]}\) \(\newcommand{\cthreevec}[3]{\left[\begin{array}{c}#1 \\ #2 \\ #3 \end{array}\right]}\) \(\newcommand{\fourvec}[4]{\left[\begin{array}{r}#1 \\ #2 \\ #3 \\ #4 \end{array}\right]}\) \(\newcommand{\cfourvec}[4]{\left[\begin{array}{c}#1 \\ #2 \\ #3 \\ #4 \end{array}\right]}\) \(\newcommand{\fivevec}[5]{\left[\begin{array}{r}#1 \\ #2 \\ #3 \\ #4 \\ #5 \\ \end{array}\right]}\) \(\newcommand{\cfivevec}[5]{\left[\begin{array}{c}#1 \\ #2 \\ #3 \\ #4 \\ #5 \\ \end{array}\right]}\) \(\newcommand{\mattwo}[4]{\left[\begin{array}{rr}#1 \amp #2 \\ #3 \amp #4 \\ \end{array}\right]}\) \(\newcommand{\laspan}[1]{\text{Span}\{#1\}}\) \(\newcommand{\bcal}{\cal B}\) \(\newcommand{\ccal}{\cal C}\) \(\newcommand{\scal}{\cal S}\) \(\newcommand{\wcal}{\cal W}\) \(\newcommand{\ecal}{\cal E}\) \(\newcommand{\coords}[2]{\left\{#1\right\}_{#2}}\) \(\newcommand{\gray}[1]{\color{gray}{#1}}\) \(\newcommand{\lgray}[1]{\color{lightgray}{#1}}\) \(\newcommand{\rank}{\operatorname{rank}}\) \(\newcommand{\row}{\text{Row}}\) \(\newcommand{\col}{\text{Col}}\) \(\renewcommand{\row}{\text{Row}}\) \(\newcommand{\nul}{\text{Nul}}\) \(\newcommand{\var}{\text{Var}}\) \(\newcommand{\corr}{\text{corr}}\) \(\newcommand{\len}[1]{\left|#1\right|}\) \(\newcommand{\bbar}{\overline{\bvec}}\) \(\newcommand{\bhat}{\widehat{\bvec}}\) \(\newcommand{\bperp}{\bvec^\perp}\) \(\newcommand{\xhat}{\widehat{\xvec}}\) \(\newcommand{\vhat}{\widehat{\vvec}}\) \(\newcommand{\uhat}{\widehat{\uvec}}\) \(\newcommand{\what}{\widehat{\wvec}}\) \(\newcommand{\Sighat}{\widehat{\Sigma}}\) \(\newcommand{\lt}{<}\) \(\newcommand{\gt}{>}\) \(\newcommand{\amp}{&}\) \(\definecolor{fillinmathshade}{gray}{0.9}\)7. Choosing Your Filmmaking Equipment
© 2021 Darren R. Reid and Brett Sanders, CC BY-NC 4.0 https://doi.org/10.11647/OBP.0255.07
Historically speaking, professional-grade filmmaking equipment has long been out of reach for most. High price points, the need for expensive film stock and processing, and the required specialist knowledge proved to be a near-insurmountable barrier for many would-be filmmakers. Radical changes to consumer technology, however, have fundamentally changed this. From the smartphone you likely already own, to more powerful and versatile cameras, there are many options available to you.
In this chapter and video lesson, we discuss the different types of equipment you may wish to utilise for your project. From smartphones to dedicated cameras, to tripods and microphones, we aim to provide you with a useful insight into how you can use the tools you already own, as well as those you may wish to acquire, to help you achieve your creative and intellectual goals. From smartphones to DSLRs and more specialised cameras, the potential range of options, at practically every budget level, for filmmaker-scholars is staggering. Whilst technology moves too quickly for this volume to offer an up-to-date guide, comparing and contrasting two case studies should provide you with enough relevant knowledge and context to inform any purchasing decision.
Smartphone Kit ($100–1,000)
Smartphones open up filmmaking to practically everyone. Modern phones (the type which, in all likelihood, you already own) record videos at resolutions of 1080p to 4K. Through the addition of a lavaliere microphone, you can record broadcast-quality sound along with your video. In addition, basic video-editing apps, such as iMovie, even allow you to edit and release a film from within the confines of a single device. For on-the-ground reporting, video journalism, or the creation of more involved pieces, smartphones can open many creative and intellectual doors.
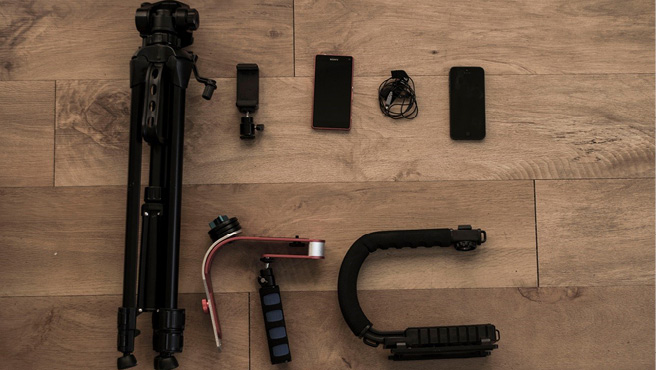
Fig. 12. With only a small additional investment, you can transform the equipment you already own into a basic documentary-making kit. You can utilise your existing smartphone if it is able to capture HD or 4K footage. An older model can be paired with a lavaliere microphone and used as a sound recorder. An inexpensive smartphone adaptor would allow the phone to be connected to a tripod or to one of the stabilisation devices pictured (a gimbal and C-grip). Excluding the cost of the phone(s), the equipment in this setup could be purchased for a total of approximately $120. Pictured, from left to right, top to bottom: tripod, phone holder with tripod adaptor, mobile phone, lavaliere microphone, second mobile phone, gimbal, c-grip.
The Kit:
- Camera: your existing smartphone, recording video at a minimum resolution of 1080p.
- Stabilisation: a tripod with smartphone adapter — this can be used to create stable, still footage, or it can be picked up to allow you to go handheld. More advanced solutions, such as motorised gimbals, are also available for smartphones.
- Audio: a lavaliere microphone paired with an older smartphone (acting as your sound recorder — dedicated sound recorders can also be purchased).
- Lenses: lens kits for smartphones are generally inexpensive and may add some additional functionality to your device. These can include macro lens adaptors (to allow your device to focus on objects very close to its lens) or zoom lens adaptors (allowing your device to film subjects that are further away).
- Filmmaking apps: FiLMIC Pro is currently an excellent option for smartphone users. It allows users to control specific settings on their device, allowing it to record footage at 24 framer per second, the same as most traditional film cameras (see chapter eight). In terms of editing, versions of iMovie and Adobe Premiere are both available for a variety of smartphones.
DSLR Kit ($300–5,000)
If smartphones and tablets provide a basic and accessible entry point, affordable consumer DSLRs (cameras with interchangeable lenses) offer filmmakers greater flexibility and the opportunity to capture footage that is of a higher, more cinematic quality. Whilst they are sometimes expensive, older camera models purchased second-hand can offer filmmakers an opportunity to build a comparatively inexpensive kit around a quality piece of filmmaking technology.

Fig. 13. Assembled over time, a DSLR kit’s cost can be staggered. This setup was assembled over two years, and cost approximately $800. The camera is a Nikon D5500. It has 18–55mm, 55–200mm, and 50mm lenses alongside a range of filters, a lens hood, and wide-angle and macro adaptors. A gimbal allows for smooth handheld footage, as does a C-grip. A smartphone with a compatible lavaliere microphone helps to round out this kit. Pictured, from left to right, top to bottom: tripod, c-grip, directional microphone, LED light panel, LED filters, focus pull, lens, lavaliere microphone, a pair of lenses, cold shoes, Nikon D5500, lens, mobile phone grip, assorted lens filters, mobile phone.
The Kit:
- Camera: entry-/mid-range DSLRs by Canon, Nikon, Sony (or others) that record video at a resolution of at least 1080p are available for less than $1,500. For budget-minded filmmakers, older camera models, particularly when purchased pre-owned, can help to reduce this cost. At the other end of the spectrum are full-frame DSLRs. These record higher-quality footage than the ‘cropped sensors’ found in cheaper models, with a price point that corresponds to this increased fidelity. Expect to pay in excess of $2,000 for a full-frame DSLR camera.
- Stabilisation: a tripod and other stabilisers. These will allow you to capture high-quality stationary and moving shots. Stabilisers need not be expensive. A C-grip can provide a versatile handheld option for under $30.
- Audio: your existing smartphone or tablet coupled with a lavaliere microphone. In addition, a directional microphone, which can be connected directly to your camera, will significantly increase the quality of the audio natively captured by your camera.
- Lenses: a range of lenses with variable focal lengths and apertures (also known as f-stops). When building a lens collection, aim to accumulate devices that will offer unique or distinct characteristics. For instance, a lens with a powerful zoom; a lens with a large f-stop; a lens with a wide field of view.
Remember:
- Sensor size: unlike DSLRs, the sensor (the chip onto which focused light is projected) on smartphones is very small. This means that even though a smartphone might record video footage at a resolution of 4K, it will capture much less detail than a DSLR with its larger sensor.
- Dynamic range: smartphones and tablets capture a comparatively limited spectrum of colour compared to most DSLRs. A higher dynamic range means that a camera captures more colours, which can add significant depth to footage, helping to give it a cinematic feel.
- Low-light performance: Cameras with poor low-light performance (a particular problem in smartphones) can add noise, grain, and other undesirable artefacts to footage.