
9: Exposure Controls
- Page ID
- 92240
This chapter rounds out your knowledge and allows you to understand a key relationship in photography so you can really control the your photographs and do some cool things.
There is not much text here, but a lot of illustrations (such as the ones at right). Make sure you understand these as they explain relationships students often have trouble grasping.
Shutter Speed & Aperture
In the previous two chapters shutter speed and aperture were examined. To see how they work together with exposure, just remember three things:
1. Each number change given in this text is one stop (twice or half the amount of light).
2. Higher shutter speed numbers let in less light.
3. Higher f-stop numbers let in less light.
Now look at the diagrams on this page and see if you can understand them with these three facts in mind.
The direction of more light is reversed for this demonstration. Shutter speeds are more light to the left and f-stops are more light to the right. This way the relationships can be shown clearly.
If you really understand this page fully, you might not need to read the next page, although it can’t hurt. Be aware that these are simple relationships but they can get confusing rather quickly.
| This is a key page that may be worth referring back to as you read this chapter. |
|
Review: A typical shutter speed range. Each of these is one stop apart. |

|
Review: A typical f-stop range. Each of these is one stop apart. |

|
Not Review: Both scales together. From the left to the right each box has a shutter speed which is decreasing the light. But each box box also has an f-stop that is increasing the light, so as far as overall exposure they are canceling each other out. So, the overall exposure in all the boxes is the same. |
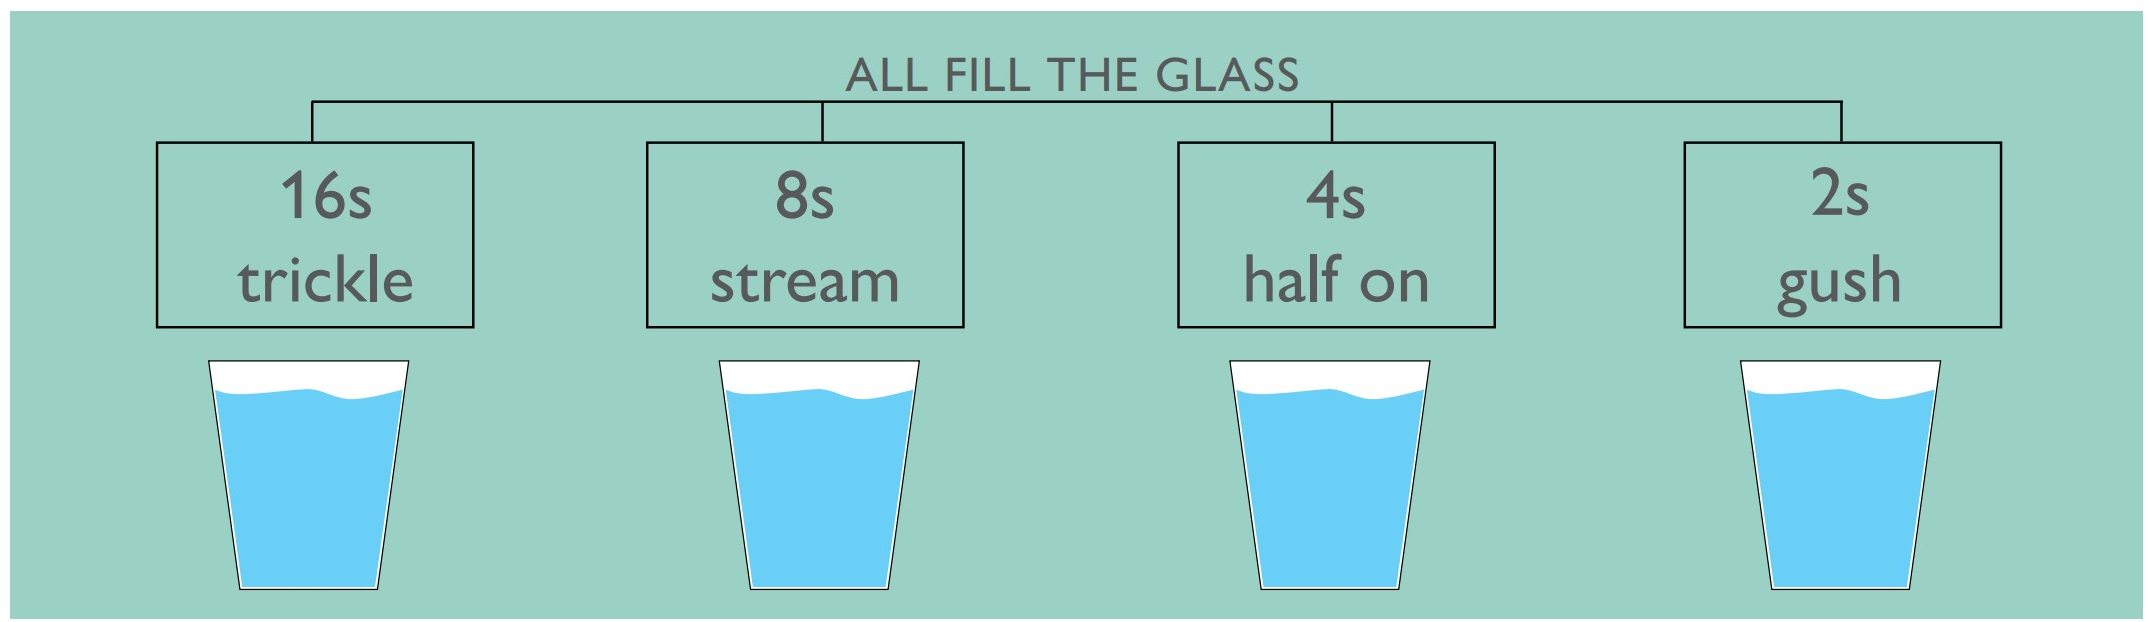
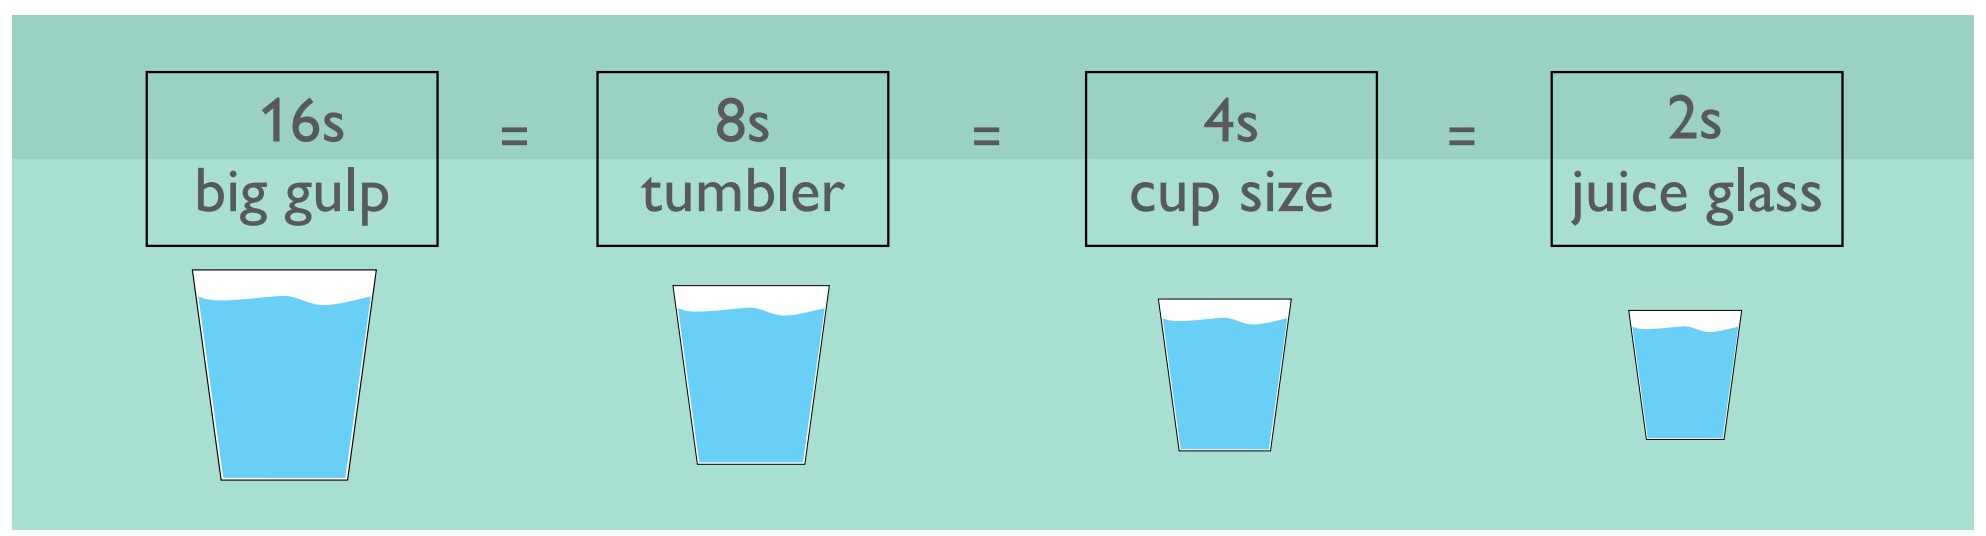
Since aperture regulates the flow of light (more light or less light), we can see this same relationship when we fill a glass with water. The illustration at right is the exact same as the previous illustration, but water has replaced light and a glass has replaced the sensor. Again, more fill time is to the left and more flow is to the right. Google the title of this section you will see many examples such as this.
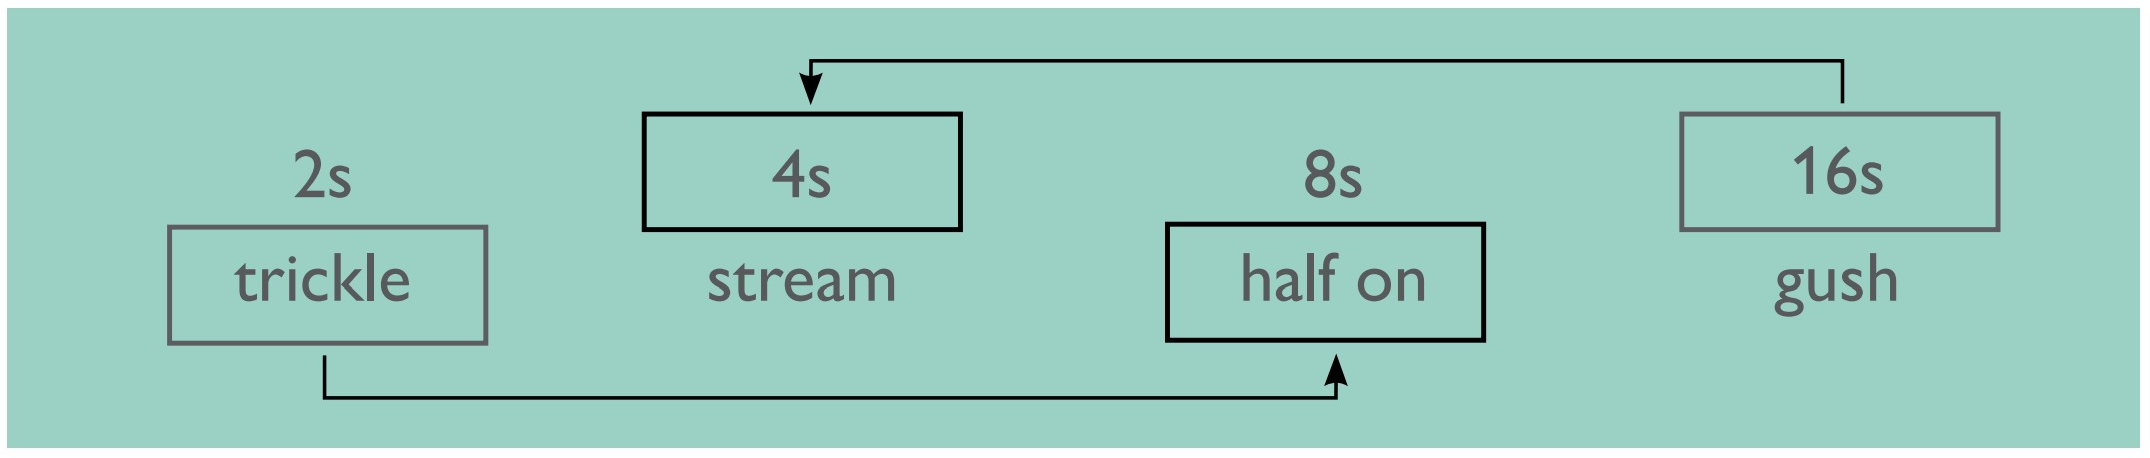
In the middle illustration the fill time and flow are not reversed. More water is always to the right. In this case we have to count the steps (like stops), which is two in the example shown.
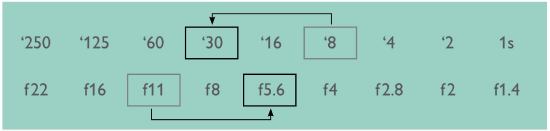
The same happens with the exposure relationship shown in the bottom illustration. More light is always to the right, so we now have to count the stops. Here the shift is two stops, but they could have been shifted any number of stops.
Changing the f-stop or the shutter speed to compensate for a change in the other is exactly what your camera does on P, A (Av) or S (Tv). This is why understanding this relationship is important. You don’t need to remember the numbers in practice, only the relationship as shown in the diagrams here.
|
Water glass analogy: Let’s say you want to fill a glass with water to a specific level. You have choices as to how to do this—less amount of water for more time or more amount of water for less time. The glass is the sensor and the water is the light. |
|
Now let’s put more water to the right and more flow to the right also. If the glass needs to be filled in 4 seconds instead of 16 (top arrow), the flow has to be increased from a trickle to half on (bottom arrow). |
|
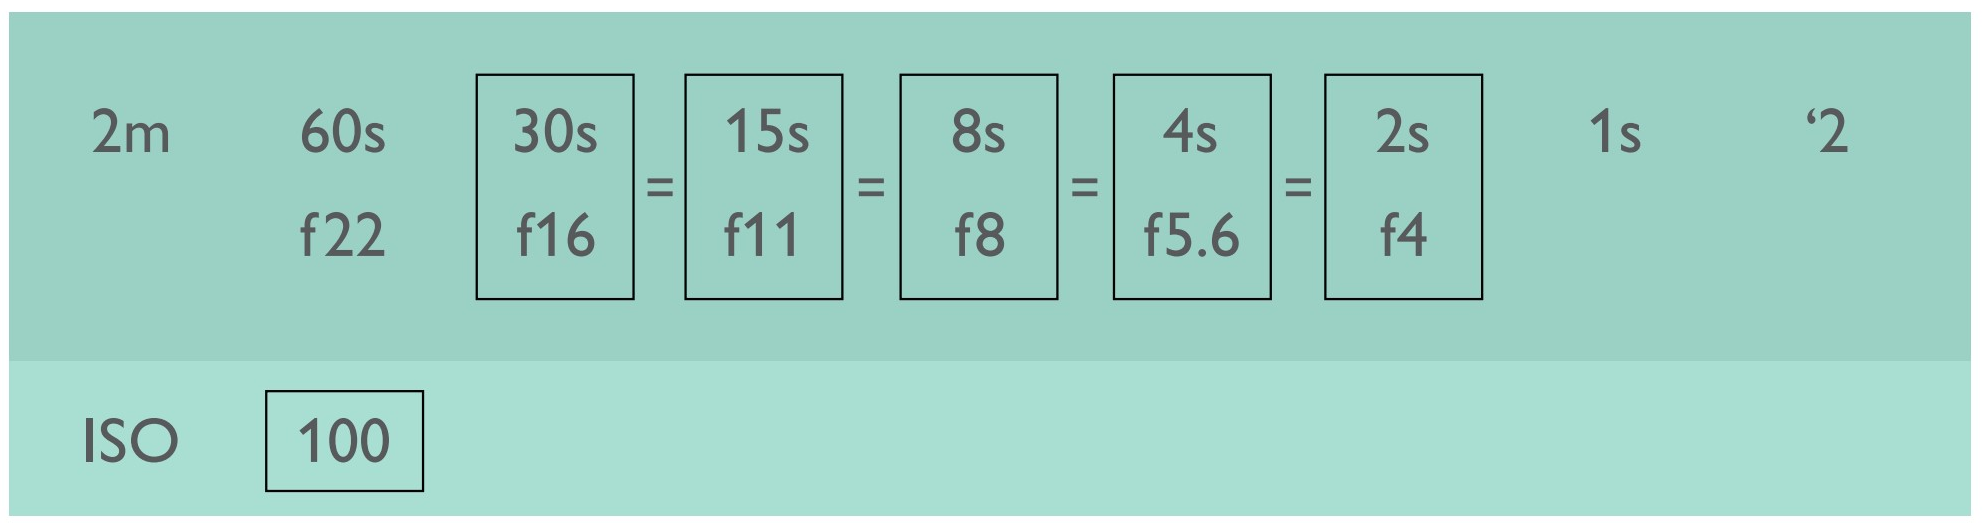
Like the previous illustration, more light is now to the right with both shutter speed and f-stop scales. If the numbers are arranged this way, then you have to count the stops to see the same overall exposure. In this example an exposure of 1/8s is given two stops less light (to 1/30s), so to get the same overall exposure the f-stop is given two stops more light (from f11 to f5.6). |
|
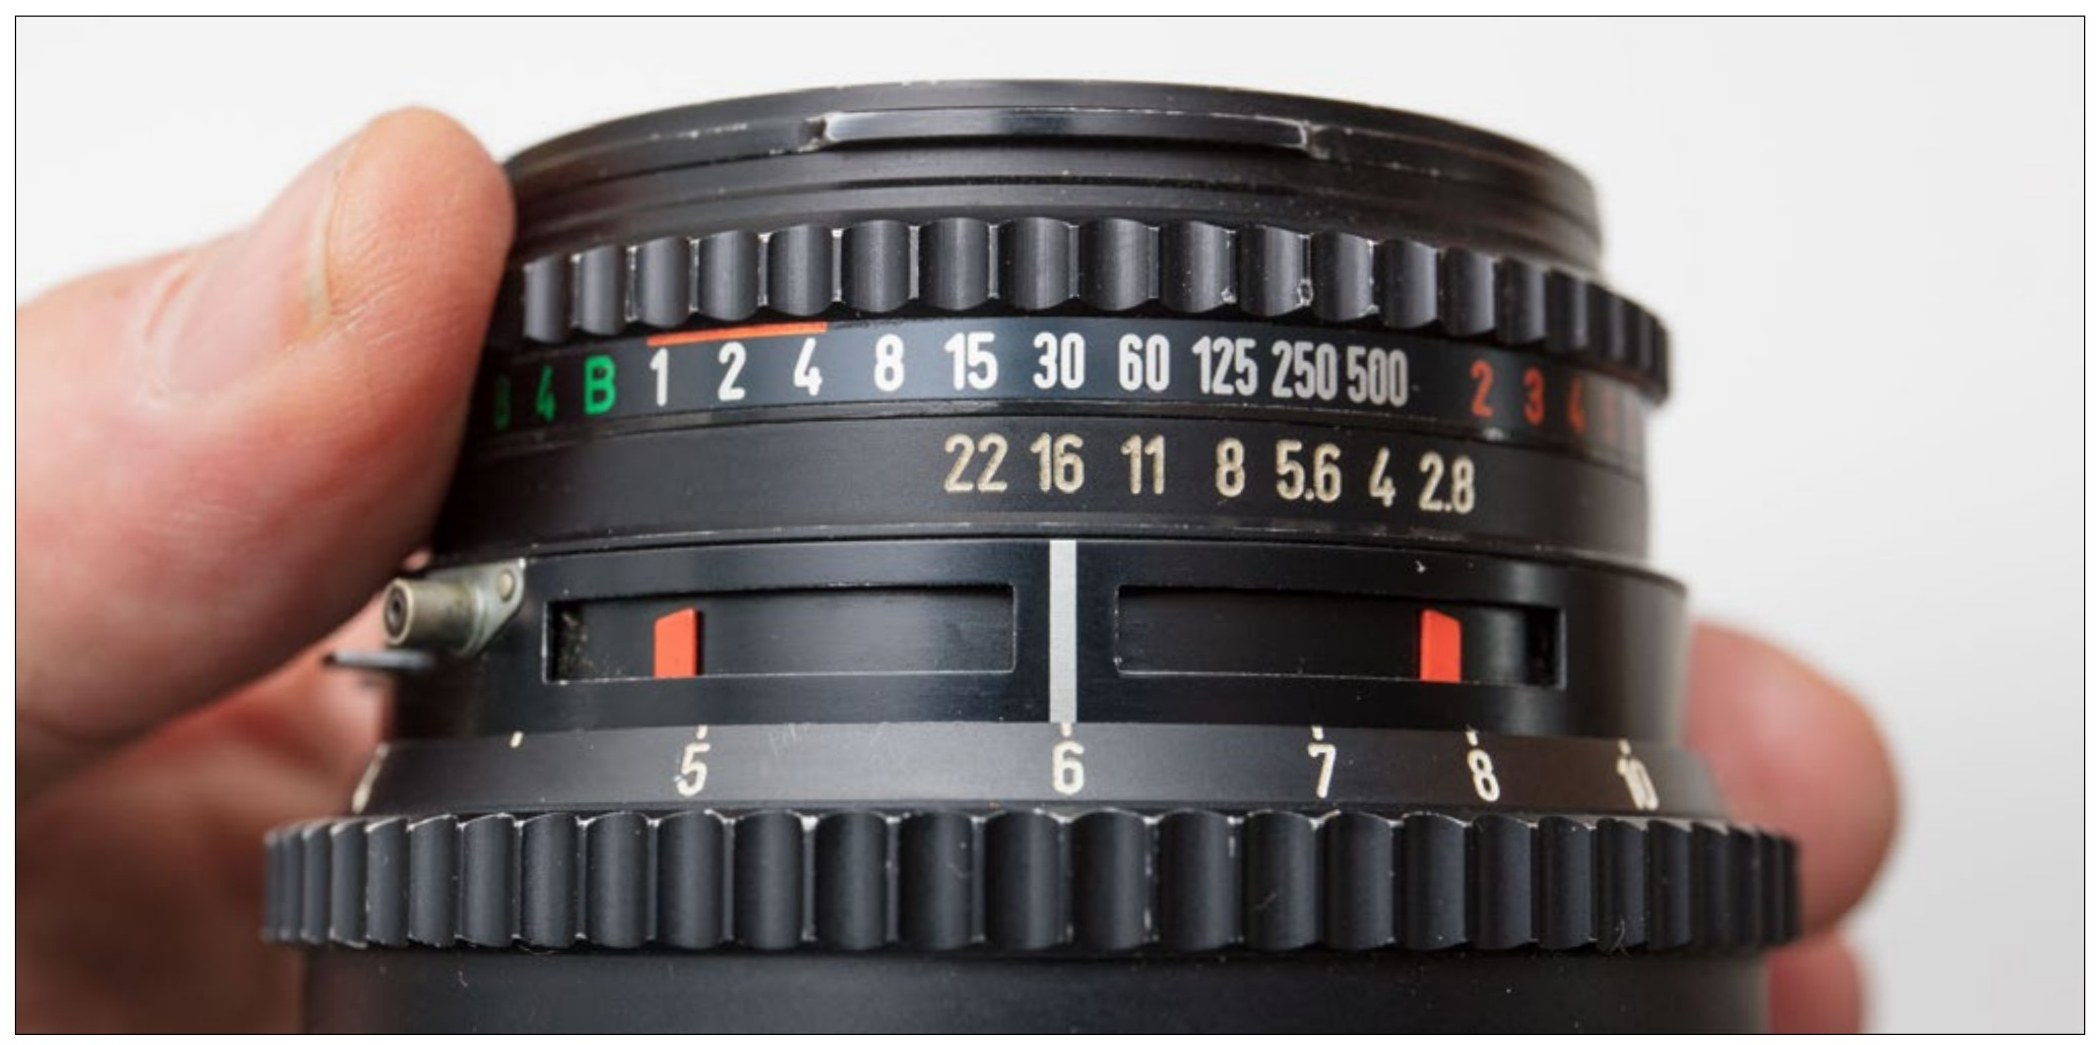
Just like the diagrams on this and the next few pages, this older camera features f-stops and shutter speeds that lock together so that turning the ring will give you different options for the same overall exposure. With digital cameras this is also the exact same control you have when turning the main dial when you are on P, T (Tv), or A (Av) modes. Unrelated to this discussion: notice the red flags that move with different f-stops. These show the depth of field. At f16 the depth of field will be from 5 feet to almost 8 feet when the lens is focused on 6 feet. Since this camera used different film for different ISOs, all of its controls (aperture, shutter speed, focus) are easily changed in one place with one hand.
|
RELATIONSHIPS IN PRACTICEBelow are all the combinations that will give the correct exposure in this situation. The equal sign between boxes indicates that the overall exposure will be the same in the different boxes. Since depth of field was not a concern and since the camera was handheld, the combination with the fastest shutter speed was chosen, as indicated by the bold box.
|


|
For this situation, the camera indicated an exposure of ‘60 at f5.6 with other combinations giving the same exposure shown in the other boxes. Since it was important to have enough depth of field to have everything sharp, the main dial was moved to f8, which set the shutter speed to ‘30. If a tripod was used and there was no wind, it could have been changed to ‘8 at f16 to ensure everything would be in focus. |
|
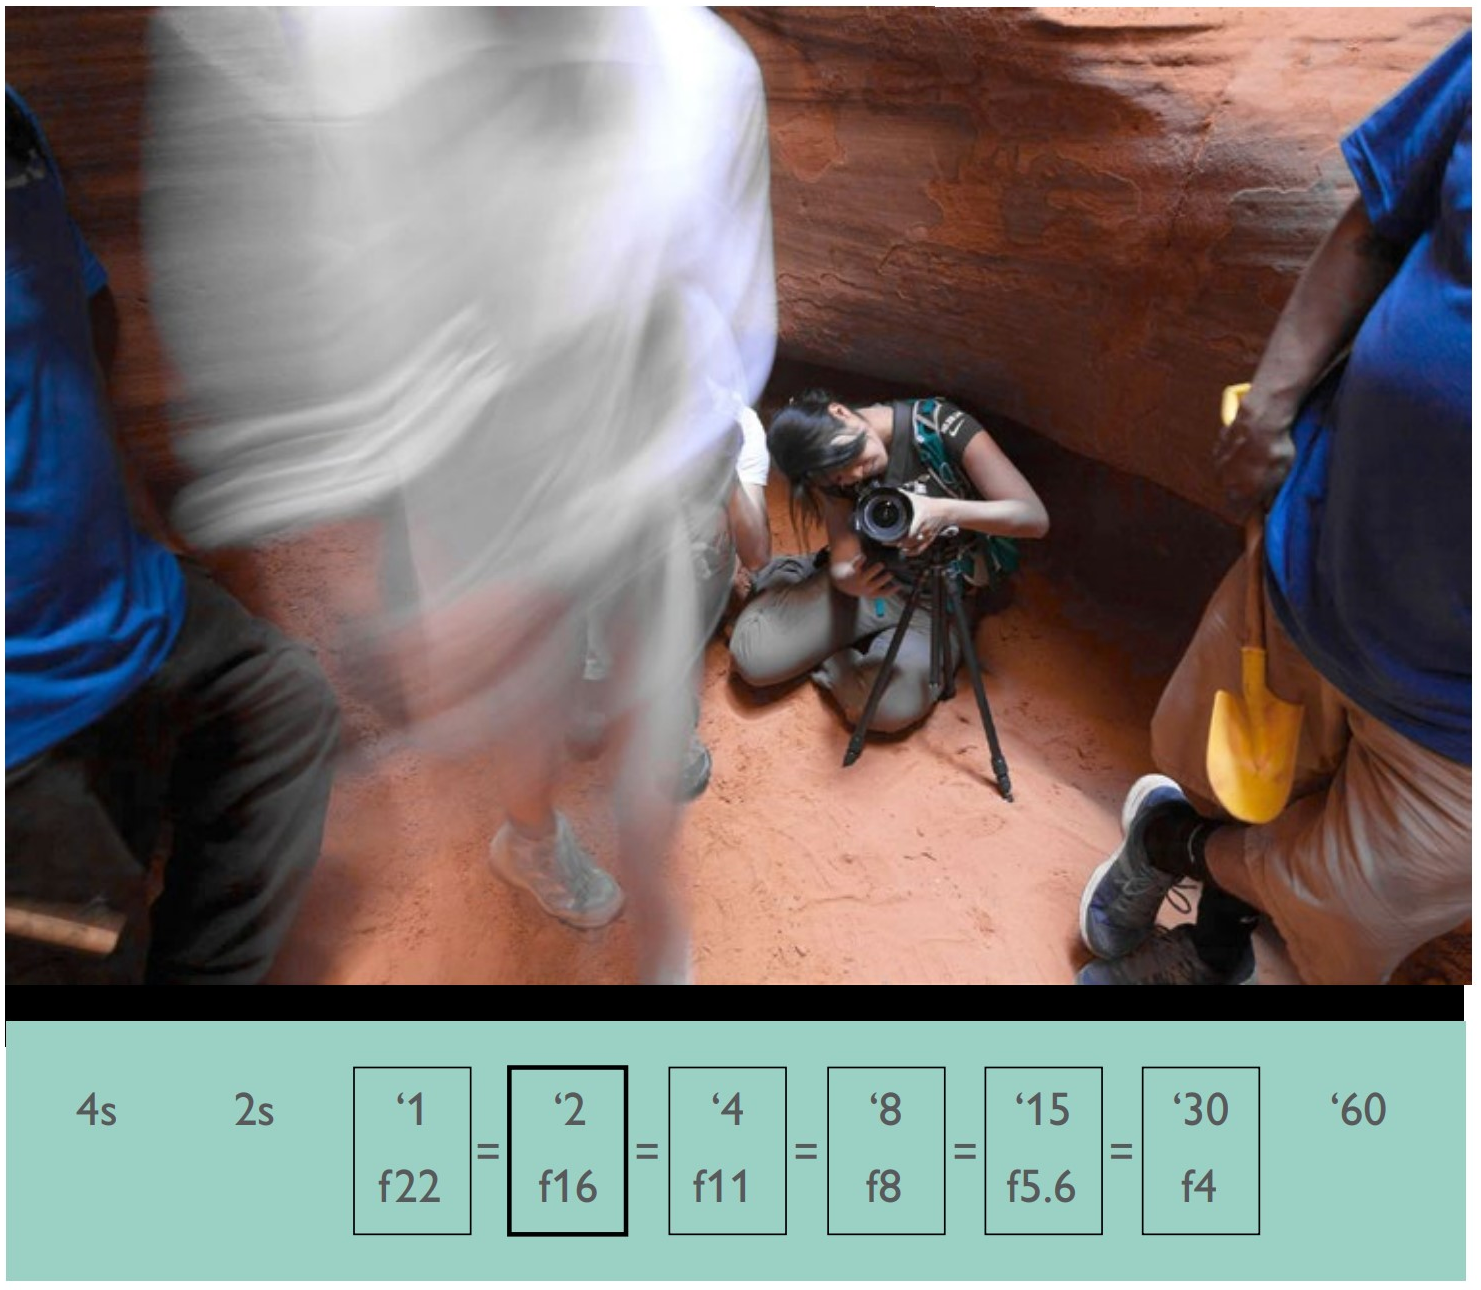
Here the camera indicated an exposure of ‘30 at f4. Since it was important to have some people blurred, a ‘2 at f16 was chosen. Notice that here the depth of field was not much of a concern. Also that a tripod was necessary.
|
|
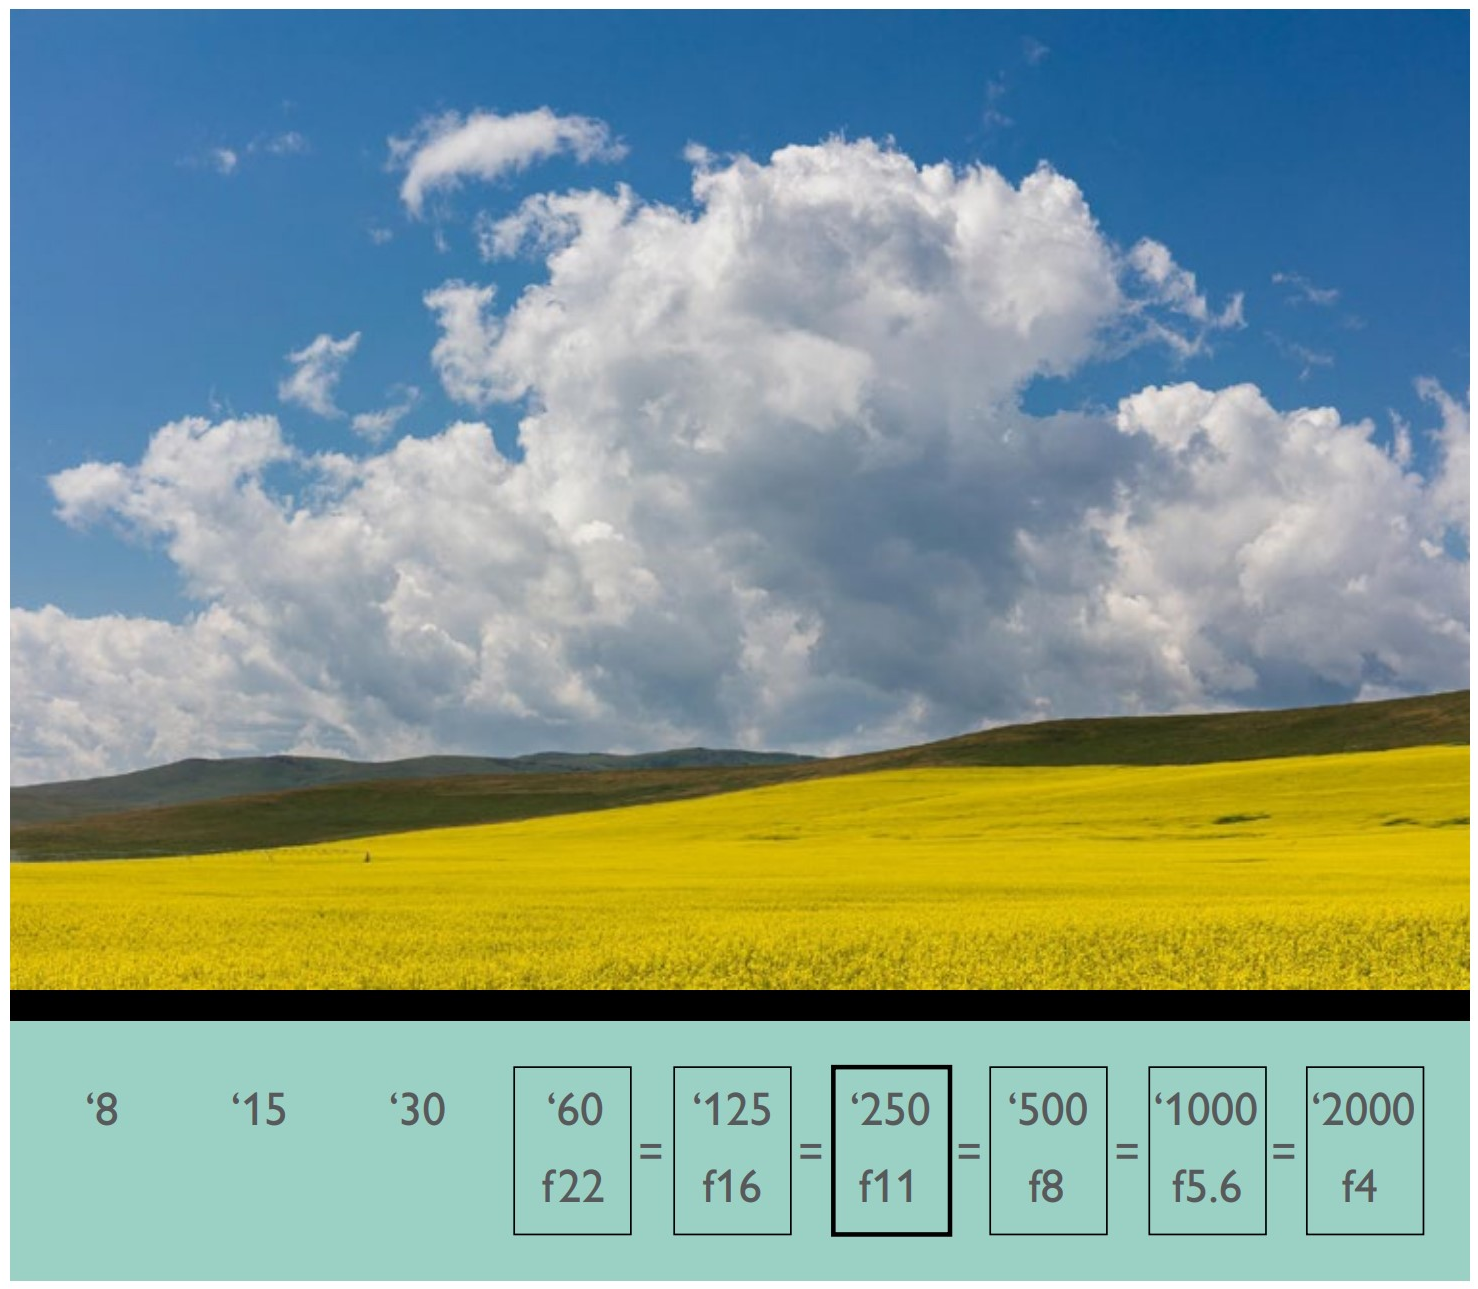
With this situation (in bright sunlight) it doesn’t matter which combination of shutter speed and f-stop is chosen. Any of the shutter speeds are fast enough |
|
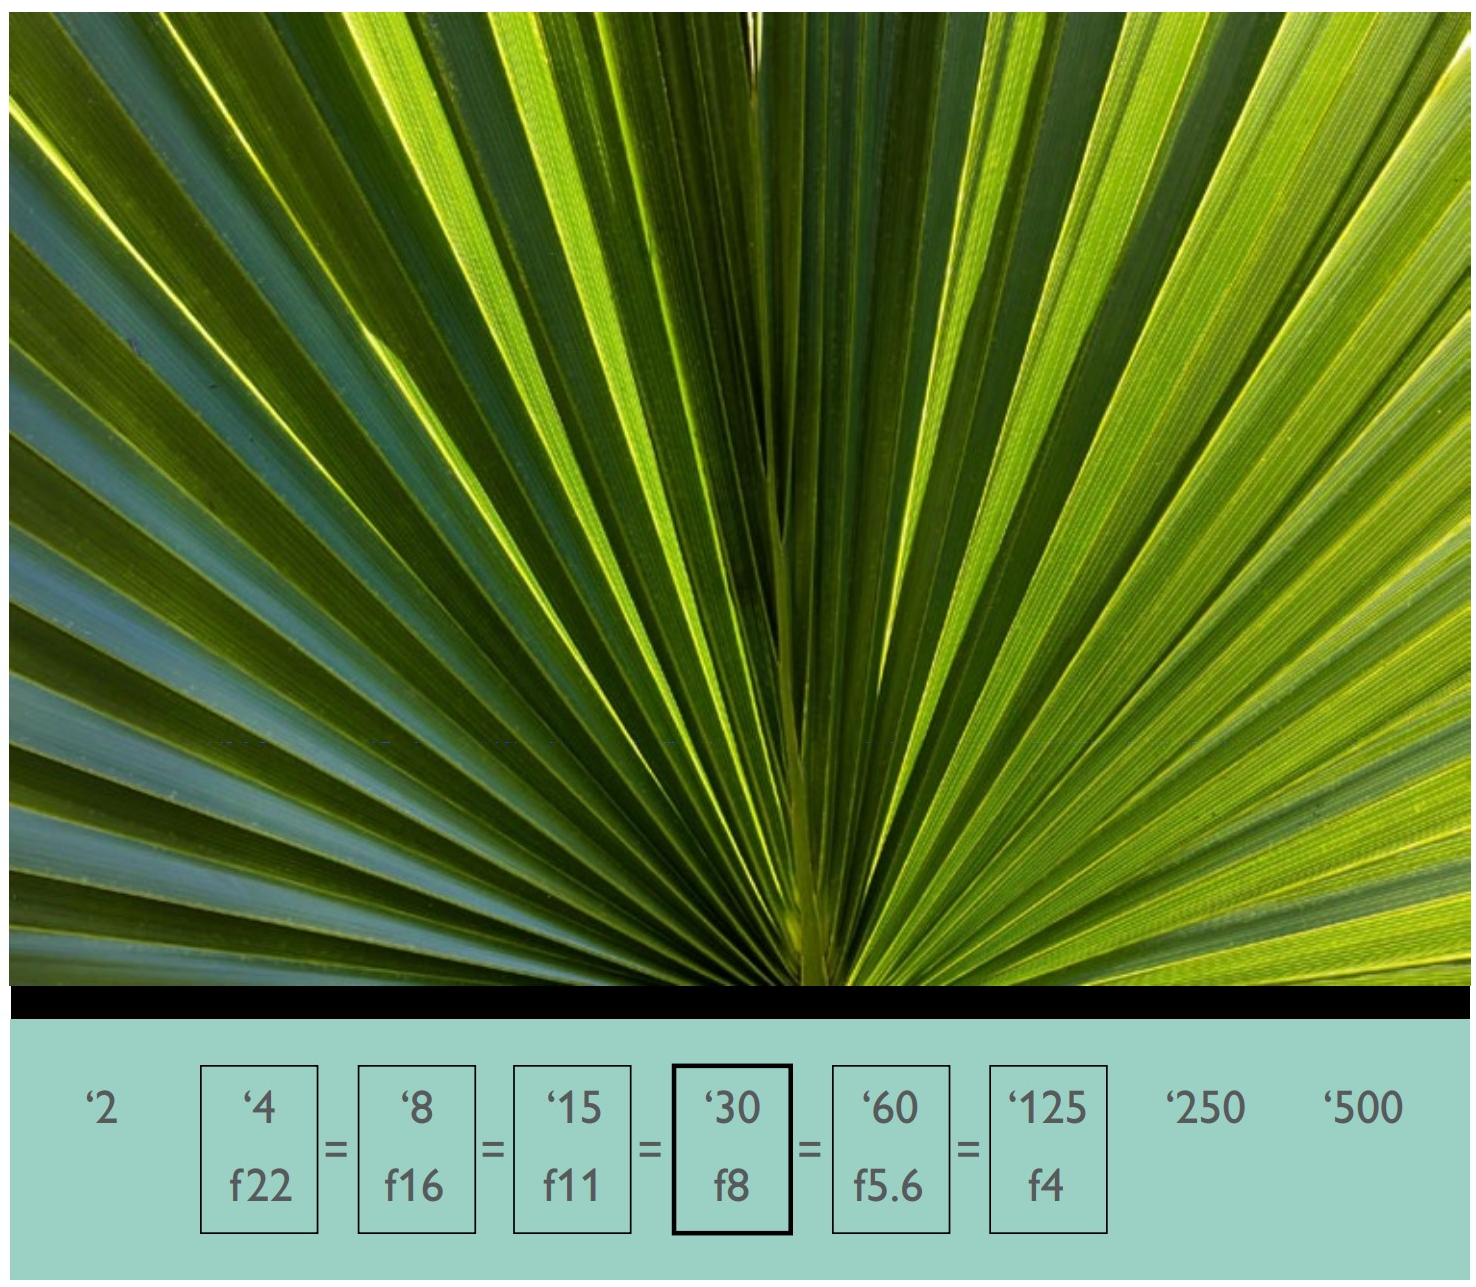
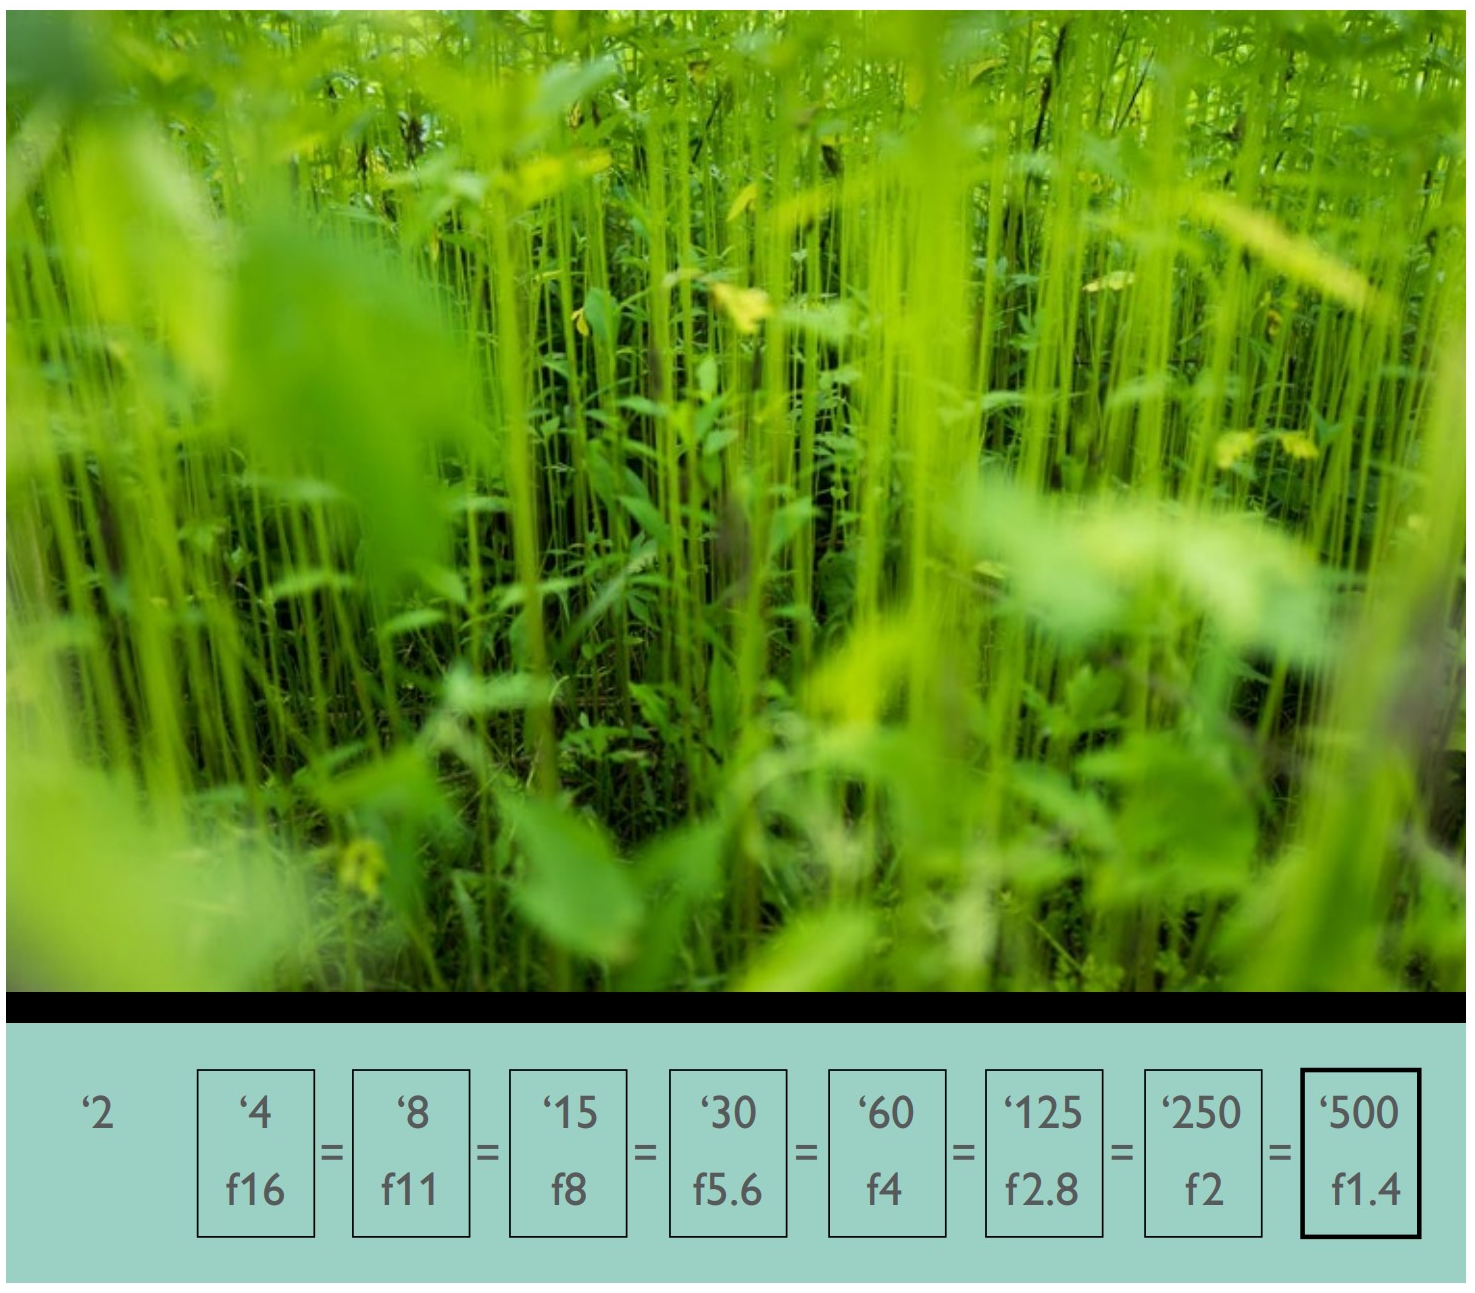
This example was taken with a fast lens in which the aperture opens up to f1.4, and only stops down to f16. Here the goal was to have a lot of softness in the foreground plants, so an f-stop of 1.4 was chosen. If the goal was to have all these plants in focus, even at f16 they would not be (they are too close). Also a tripod would have been necessary.
|
ISO & Exposure
ISO influences the shutter speed and aperture you use. Higher ISOs will allow you to use shorter shutter speeds and/or smaller apertures.
As noted earlier, setting the ISO higher comes at the expense of quality. But many times it is the only option.
When you find yourself taking photographs in a situation where your shutter speed is too slow, set your ISO higher to take the photographs. How much higher depends on how high you need to go to get a shutter speed you can reliably count on to avoid motion blur.
The same thing is applicable to f-stop. If you need more depth of field you can set your aperture to a smaller opening with a higher ISO setting. But usually a photographer increases the ISO to allow a faster shutter speed to minimize motion blur.
Study the illustrations at right and understand them. As with the relationship of shutter speed and aperture, you don’t have to memorize any numbers since the camera will do the math for you. But you do need to understand the relationship between ISO and shutter speed or aperture. And of course, the concept of a stop.
|
A lighting situation in which there is little light present. Notice that the shutter speeds are in full seconds. If you have a tripod, and nothing is moving, no problem. But what if things are moving? How do you get a shorter shutter speed? See the next illustration. |
|
Each doubling of ISO number makes the sensor 1 stop more sensitive to light. Here there are 6 doubles (stops) from ISO 100 to ISO 6400. So, by changing to ISO 6400 your shutter speed is shortened to ‘30s for the same overall exposure. This could have been shown with ISO and f-stop instead. |

|
Water glass analogy again: Here ISO is equated to the size of the glass, so instead of how much light the sensor needs, it is how much water the glass needs. The smaller glass (higher ISO) needs much less time to fill than the larger glass (lower ISO). |
|
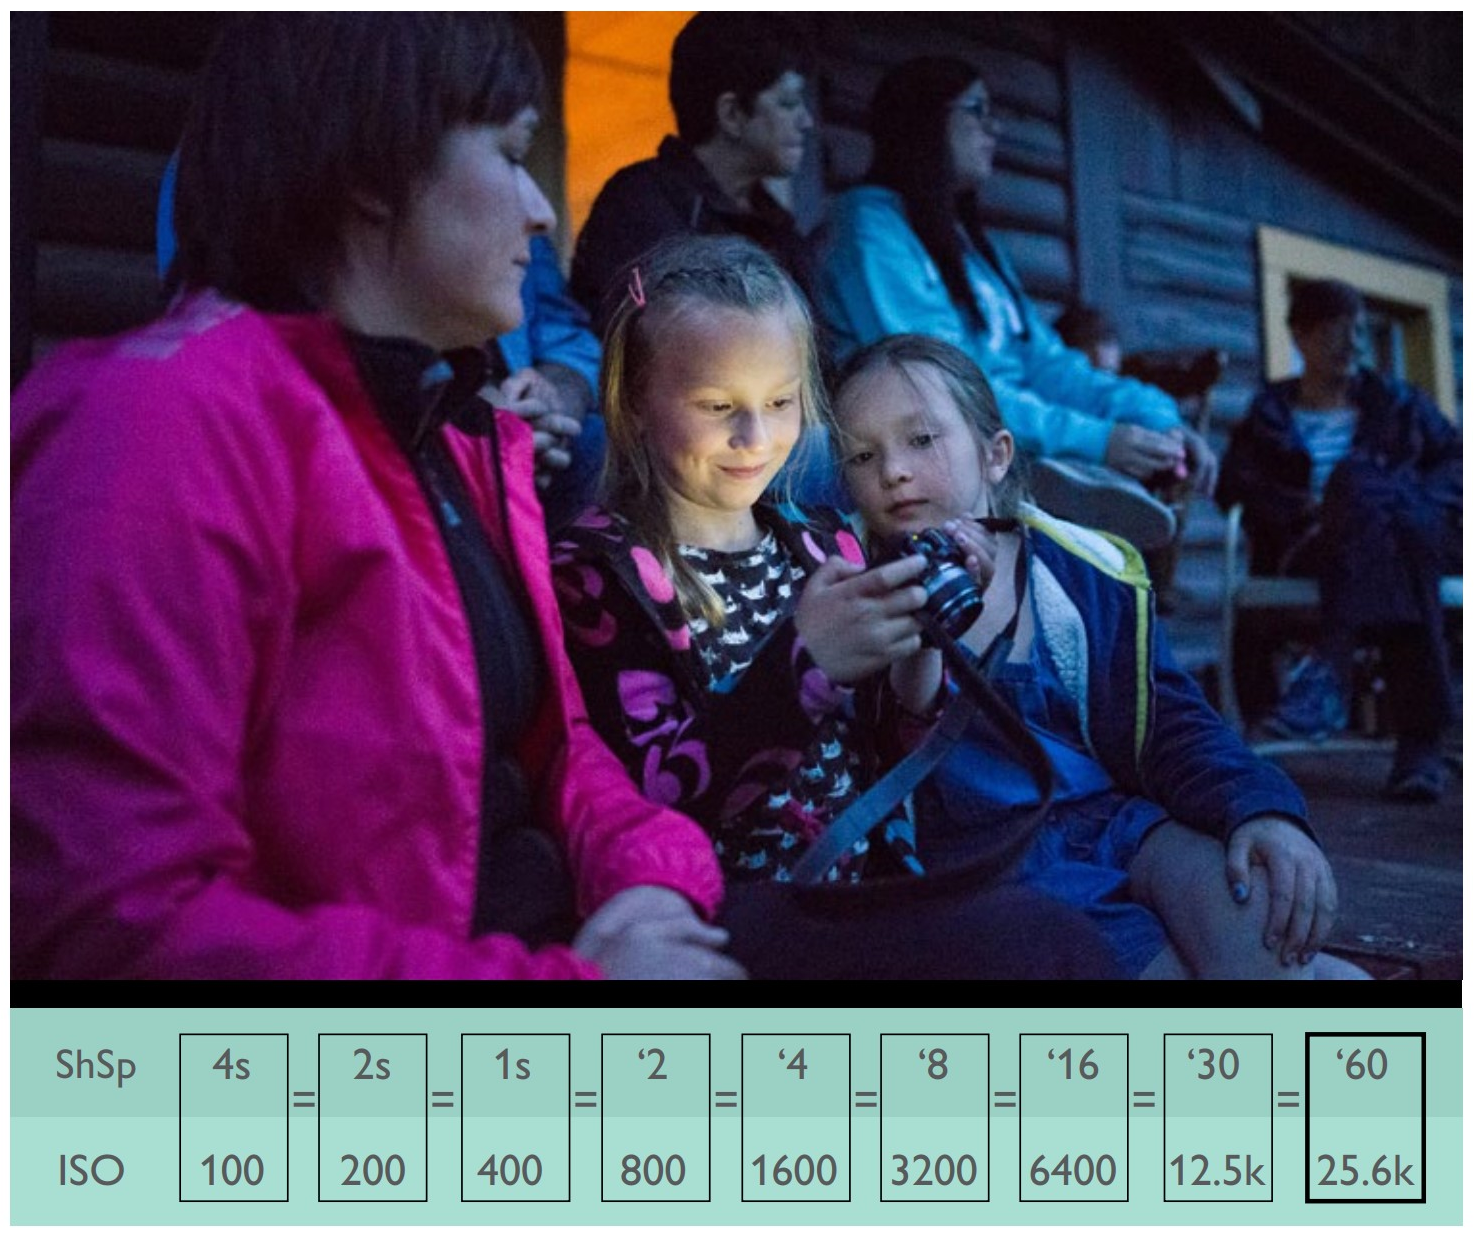
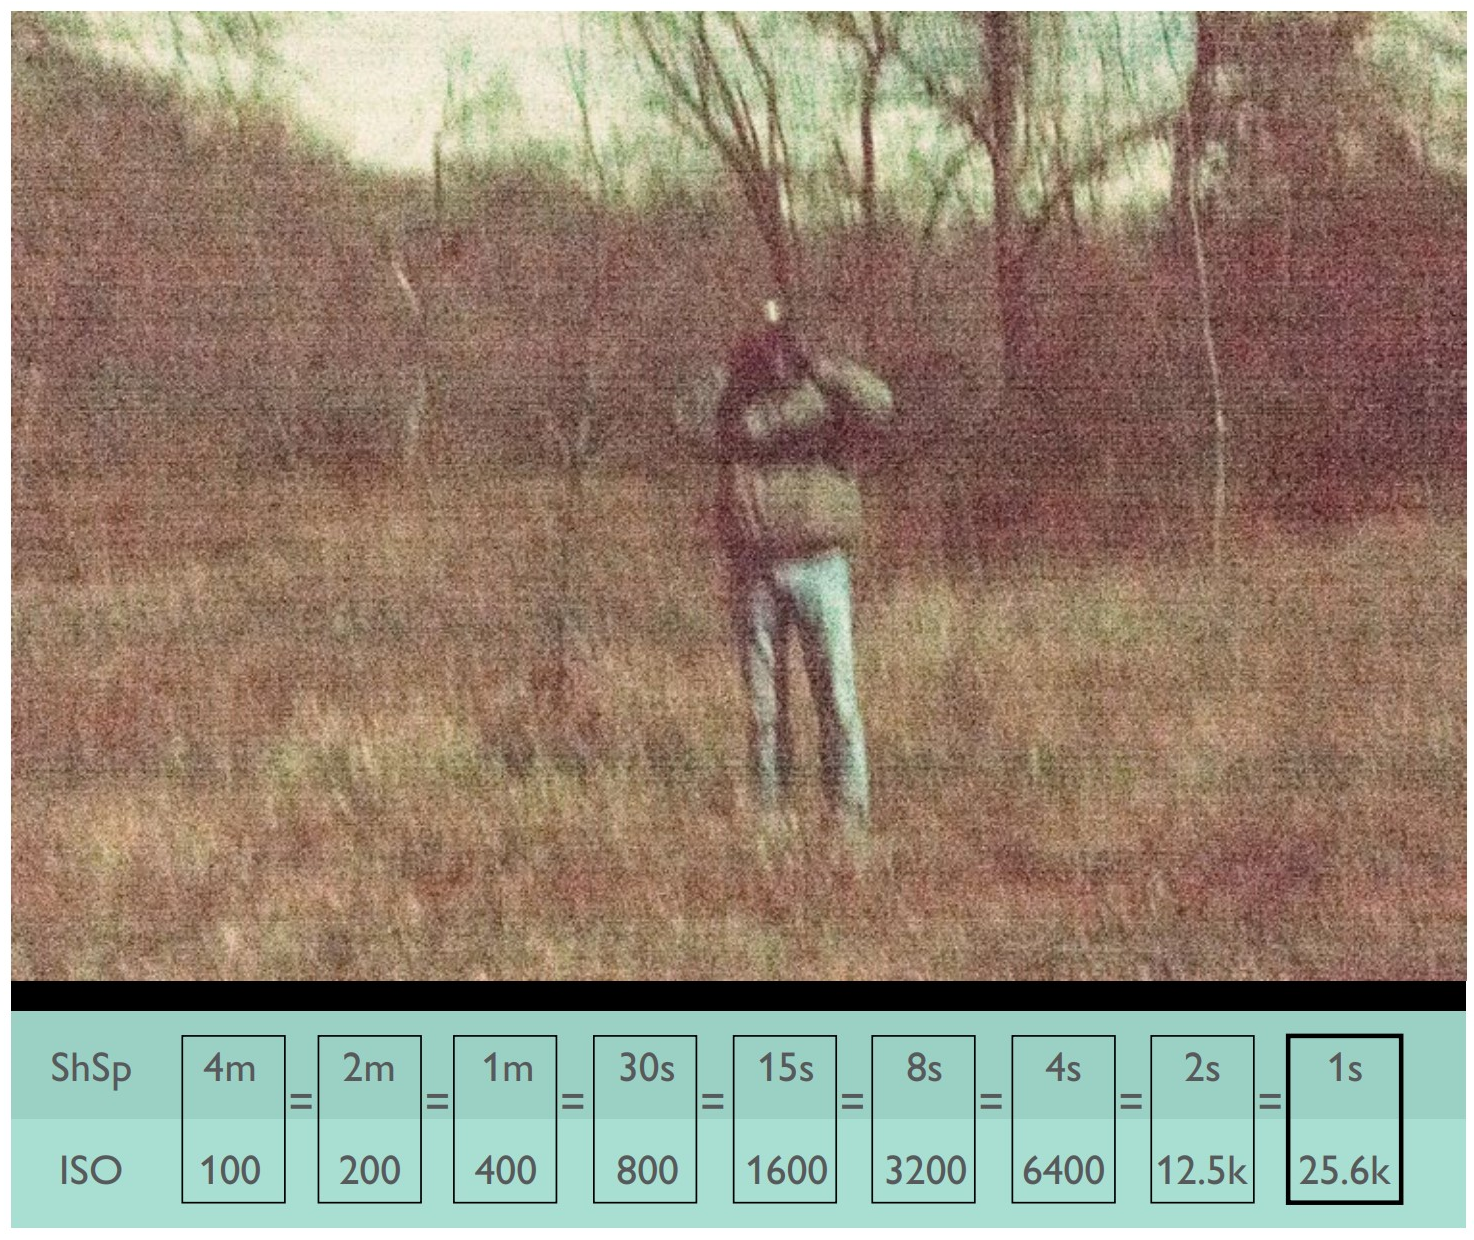
In this example, any of these shutter speed/ISO combinations would give the same exposure. Here the ISO was set to 25,600. This allowed for a shutter speed of ‘60 with the aperture wide open (as wide as possible—in this case f2). The camera used did not have image stabilization, and it was taken at the end of a long day, so it needed to be taken at a shutter speed of at least ‘60 to keep the image from having motion blur from camera shake. As you can see from the numbers in the diagram, at ISO 100 the exposure would have been 4 seconds. Surely not practical for this situation! |
|
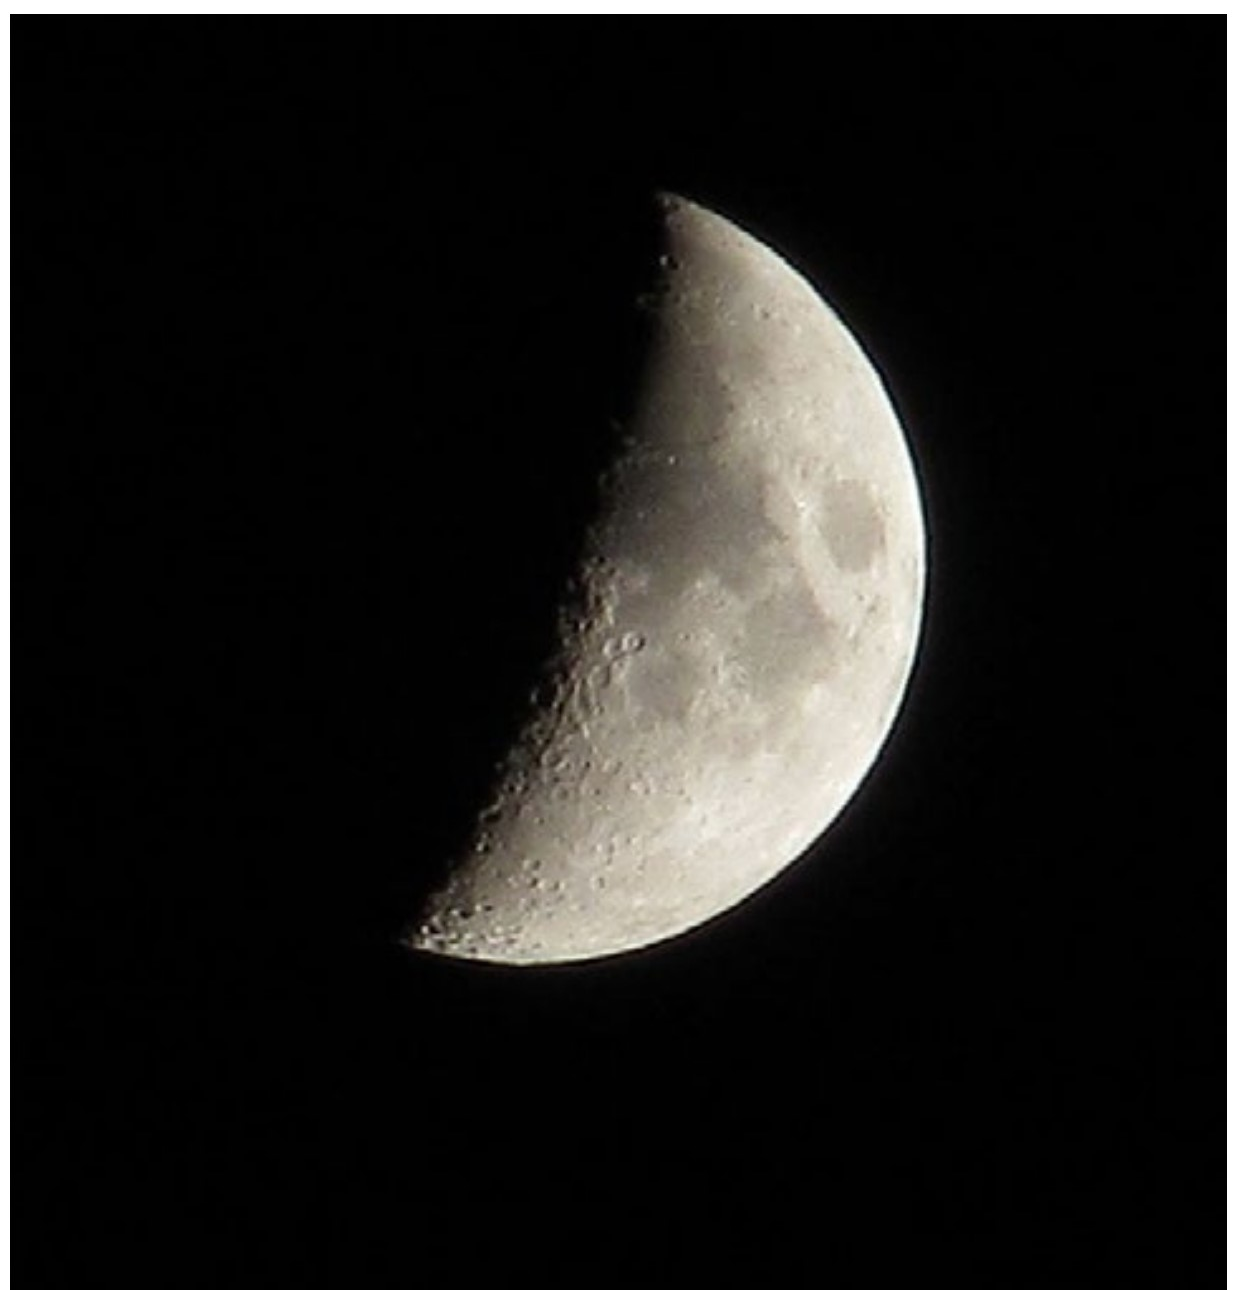
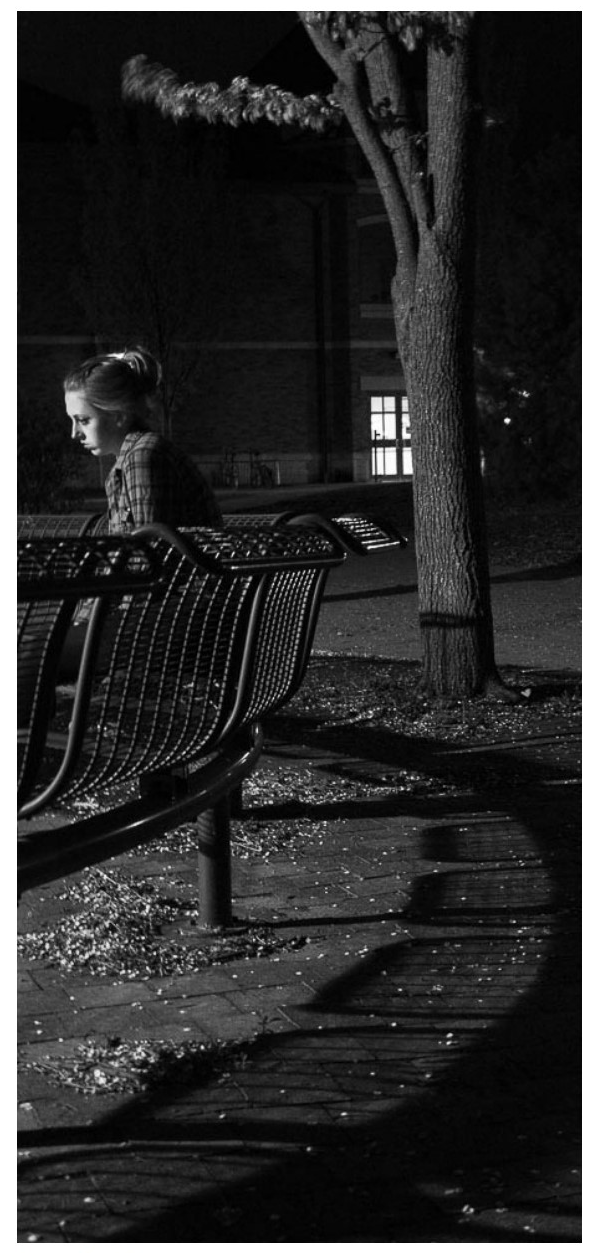
This photograph was taken in the middle of the night using only the light of a half-moon. As you can see, no tripod was used. Any of the shutter speed/ISO combinations would have given the same exposure, but at ISO 100, the exposure would have been 4 minutes. Even at ISO 25,600 the exposure was 1 second, not fast enough to ensure camera shake would not blur the image. This image begs the question of why it was even taken. It is a long and uninteresting story.
|
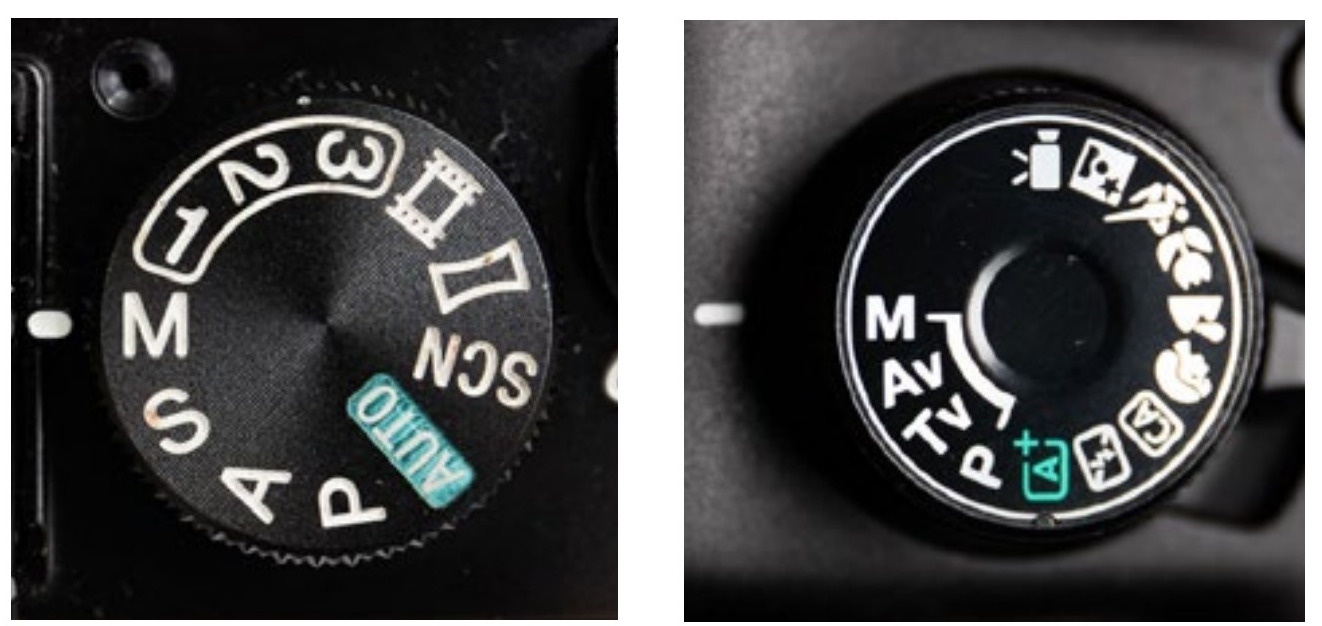
Manual Exposure
If you need to set both the aperture and the shutter speed independently, the M (Manual) mode setting on the camera’s main dial lets you do just that.
First set the mode dial to ‘M’, then (on most cameras) turn the main wheel to change the shutter speed. To change the aperture, you either turn another wheel or hold down the +/- button while you turn the main wheel. If this doesn’t work with your camera, it is time to pull out the instructions to see how it is done.
In manual mode, you control both the shutter speed and the aperture. You can still access your camera’s light meter to see what it suggests, and as a matter of fact, you can get the exact same control as you have with P, A (Av), and S (Tv) modes.
Hopefully you are using the EV scale introduced in the Exposure chapter. In manual mode, this EV scale becomes a pointer that allows you to see the exposure your camera recommends compared with your settings.
As you turn your shutter speed and your f-stop to different numbers, the pointer on the scale will zero. When it is at zero, your exposure will be the same as if you had your camera on P. If you turn your f-stop or shutter speed so that the pointer is -2, this would be the exact same exposure as if you were on P with EV-2.
In practice you don’t use Manual (M) mode that way. If you wanted to use your camera’s suggestions, you would just use one of the other modes. Quicker and easier than manual mode.
Manual Mode When?
So, why would you use manual mode? There are a variety of reasons, but it all boils down to using it when you need to. There are many situations in which your camera’s suggestions will fail you, but what follows are some of the more common or representative ones.
|
When on manual mode, the EV scale becomes an exposure scale. Centering the pointer on zero will give you the same exposure as having your camera on P, Av, or Tv (P,A,S) with no EV adjustments. |

High Contrast Scenes
One situation where the auto modes fail is with very contrasty scenes—those which have very light and very dark areas. These can fool your camera’s light meter to the extent that it is useless.
In this case, go to manual mode and try different f-stop and shutter speed combinations until you get the correct exposure as indicated in your histogram and your review image. Sure, it takes a while, but that may be your only choice.
Sometimes it is difficult to know when manual mode is the best. The situation on the upper right is contrasty, but perhaps not too contrasty to be compensated for with an EV of +3 or +4.
In practice, it becomes clear when you are in a situation where the automatic modes are not working. It simply becomes easier to set your camera on manual mode and experiment with different exposures.
|
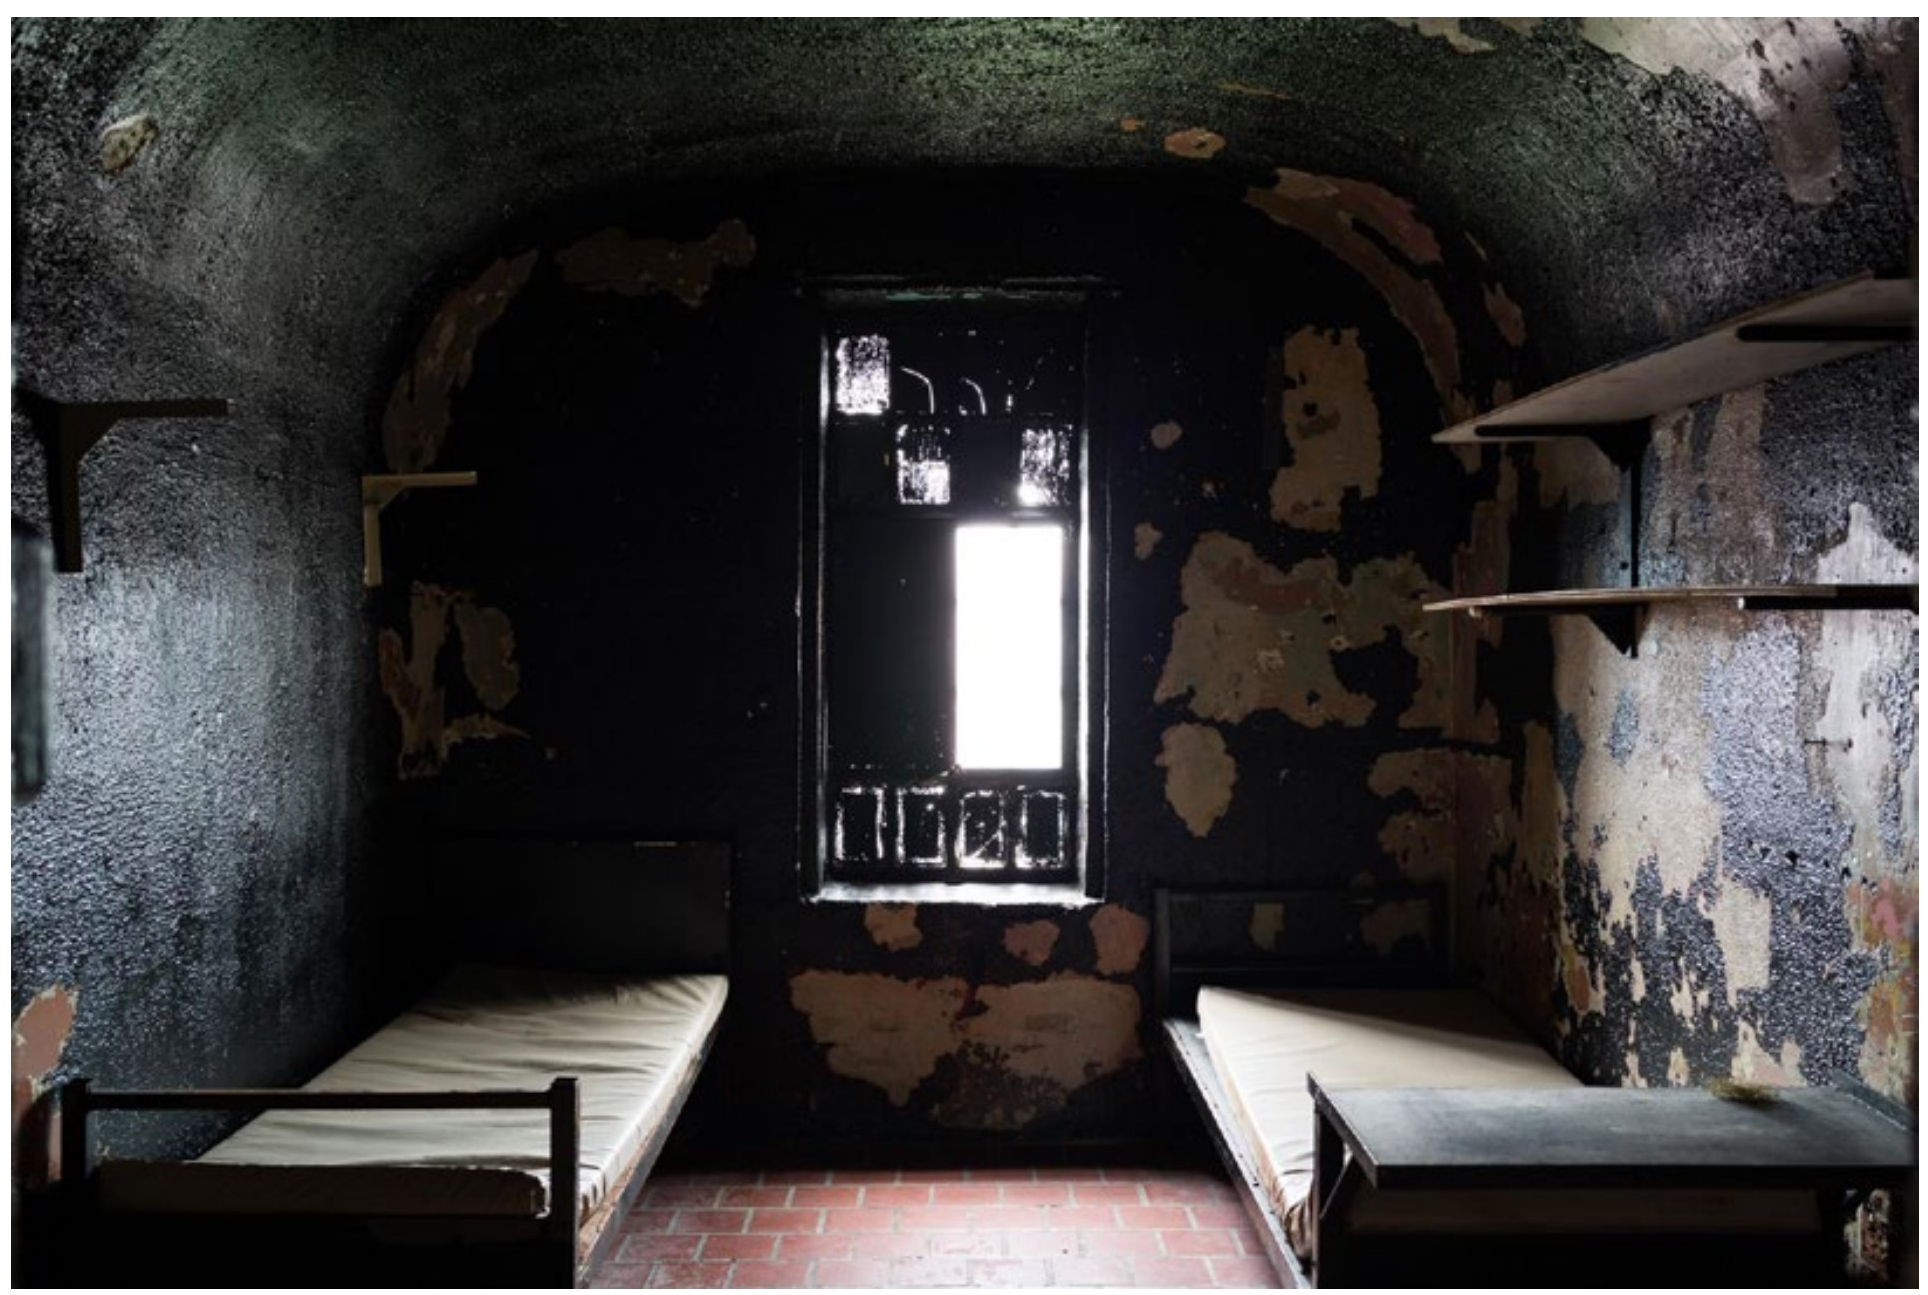
ABOVE The range of light in this historic prison cell was amazingly broad, with the light from the window hundreds of times brighter than the interior.
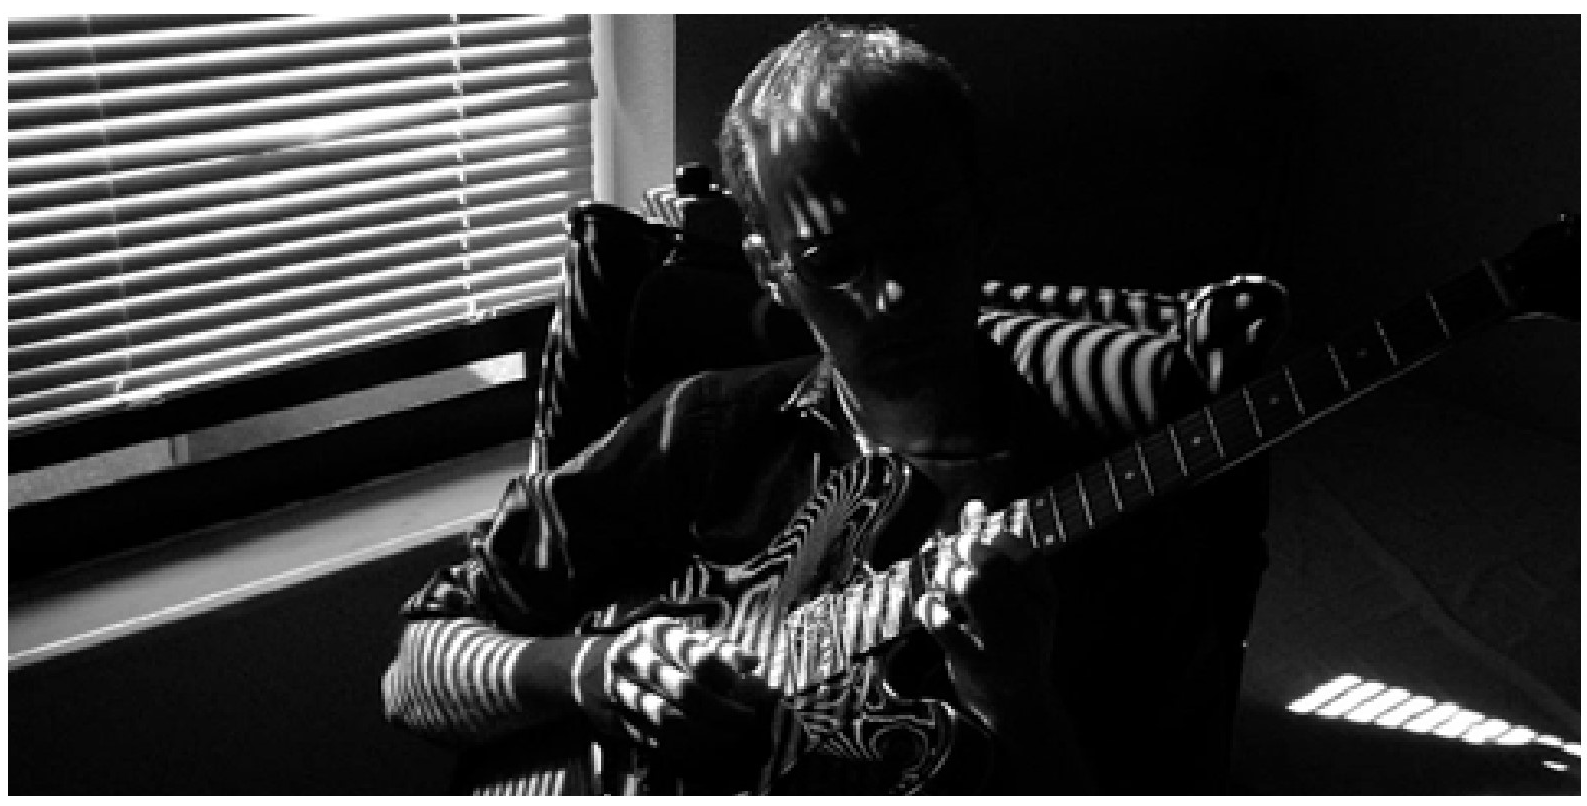
LEFT Jon Runaas. It is impossible for a light meter to average this contrasty light situation. RIGHT Jessica Grant. This is a small detail of a larger image. In the original frame there was so much dark sky that the camera meter would fail spectacularly. In this situation, expect your meter’s suggestion to be off by around 10 stops—far past the range of your EV scale on the automatic modes.
|
Changing Scenes
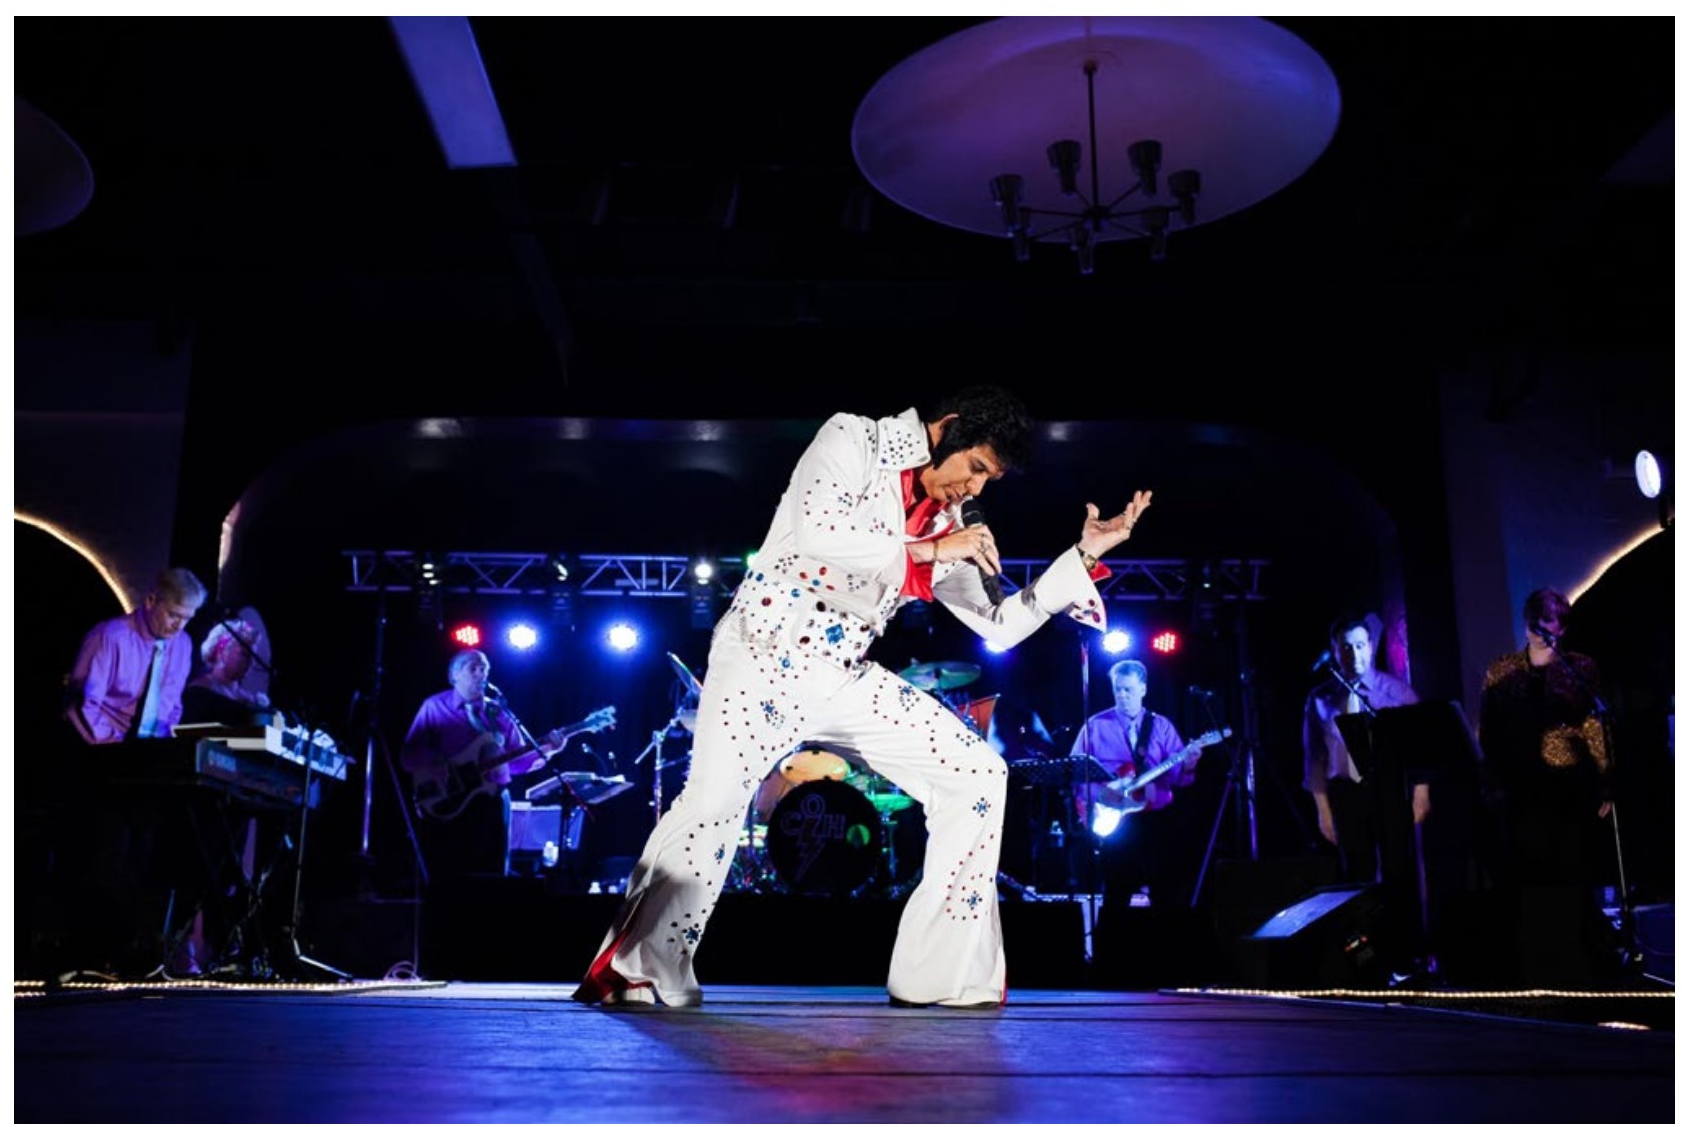
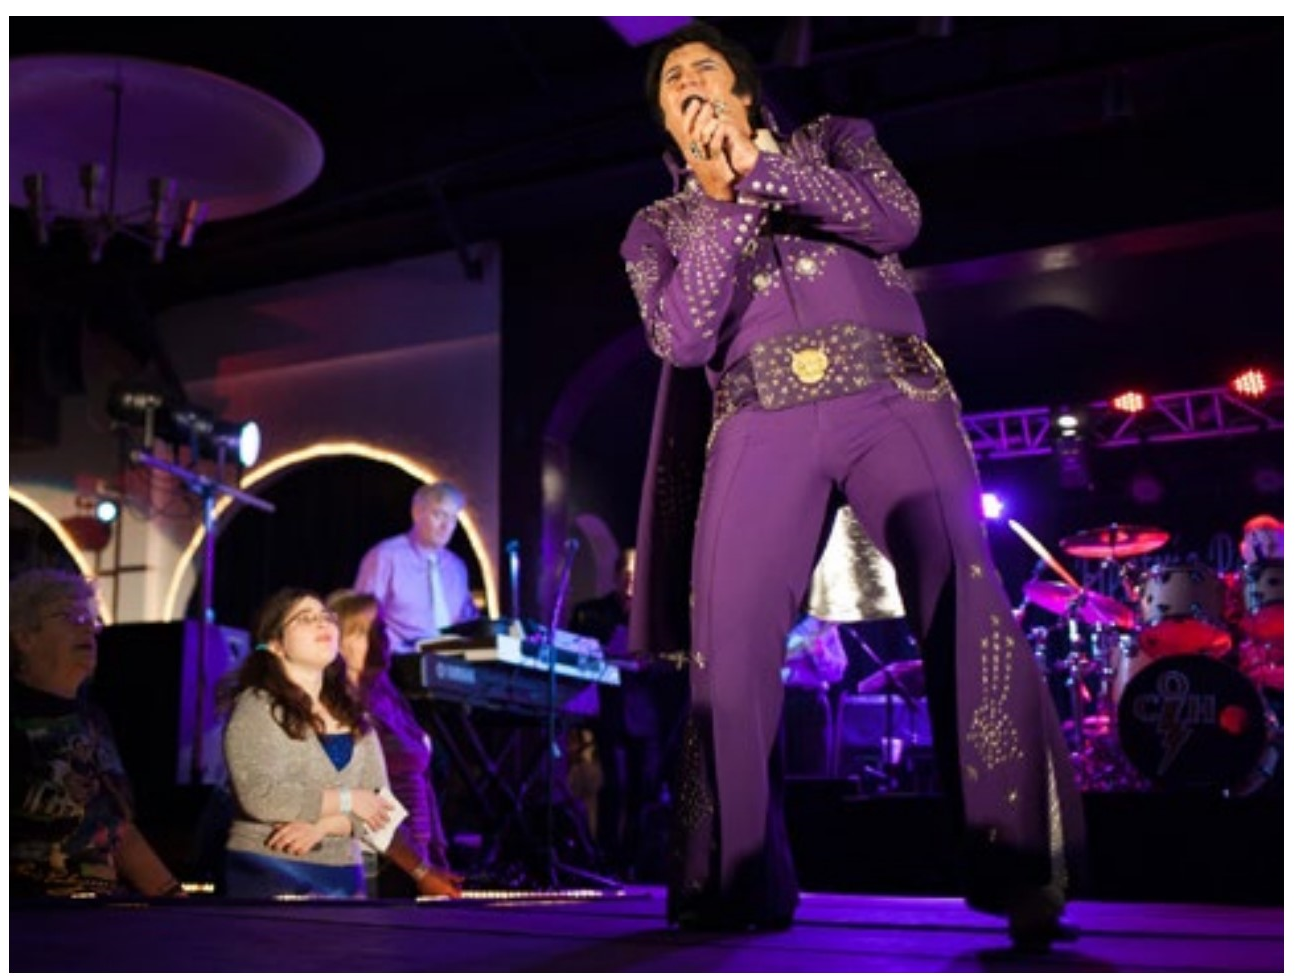
Taking photographs of Elvis proved to be impossible on any of the automatic modes. Except for the static dip shown, Elvis was moving around constantly. Like cats, Elvises (Elvi?) that are awake generally have a hard time being still.
As Elvis got closer, he got bigger in the frame, so the EV compensation needed was less. When he moved away, the needed EV compensation was more. To make matters worse, there were a number of Elvises, each with different clothing (lighter and darker).
The one thing that was constant was the main spotlight on all of the Elvises. So, his (their) brightness really didn’t change at all.
The solution to getting good exposures in this instance was to set the camera on manual mode. The correct exposure was then found by trial and error (actually it isn’t that hard to guess once you get used to those darned numbers).
After the correct exposure was found, the rest of the night, through many different Elvi (?) the exposure remained, like the song, the same.
|
ABOVE Elvis in what appears to be a combination of his younger and later years. LEFT Elvis from another stage in life, this time in a dark suit. This was taken at the same exposure (‘60 @ f4 ISO 400) as the image above and all the images of Elvises I shot that evening. I heartily recommend going to one of these competitions. Just once is enough though.
|
Unusual Light
There are many situations like the Elvis one that are hard to describe, but certainly need the camera set on manual mode.
As you experiment more with photography (isn’t every photograph you take an experiment in a way?) you might go well beyond what camera designers planned for automatic exposure.
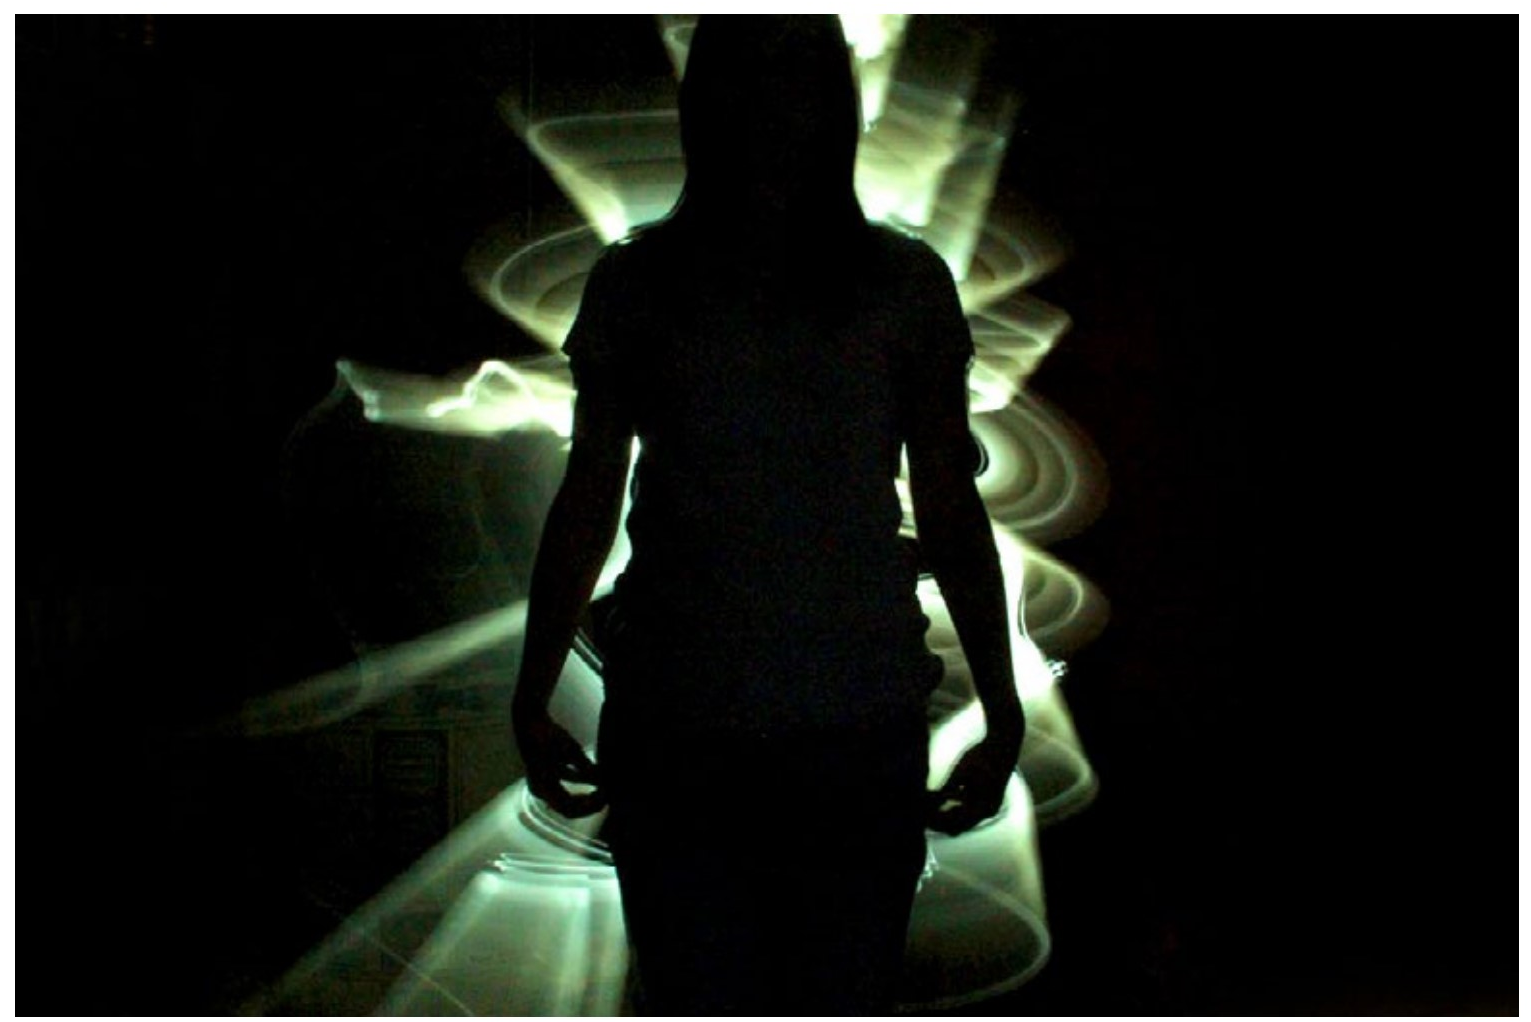
Light painting, which is covered in the appendix, is one many techniques where your camera’s meter is as useful as your appendix. Get it? Ugh.
Or Christmas lights. Or fireworks—your camera might have a setting for these, but using manual exposure will give you more control and better images.
Lightning is easier to photograph than you might think. Just set your camera on B and hold the shutter open until the lightning itself exposes the sensor. Experiment with different f-stops.
The list continues. If it emits or reflects light, it can be photographed. But sometimes only on manual mode.
|
Megan Rash, light painting |
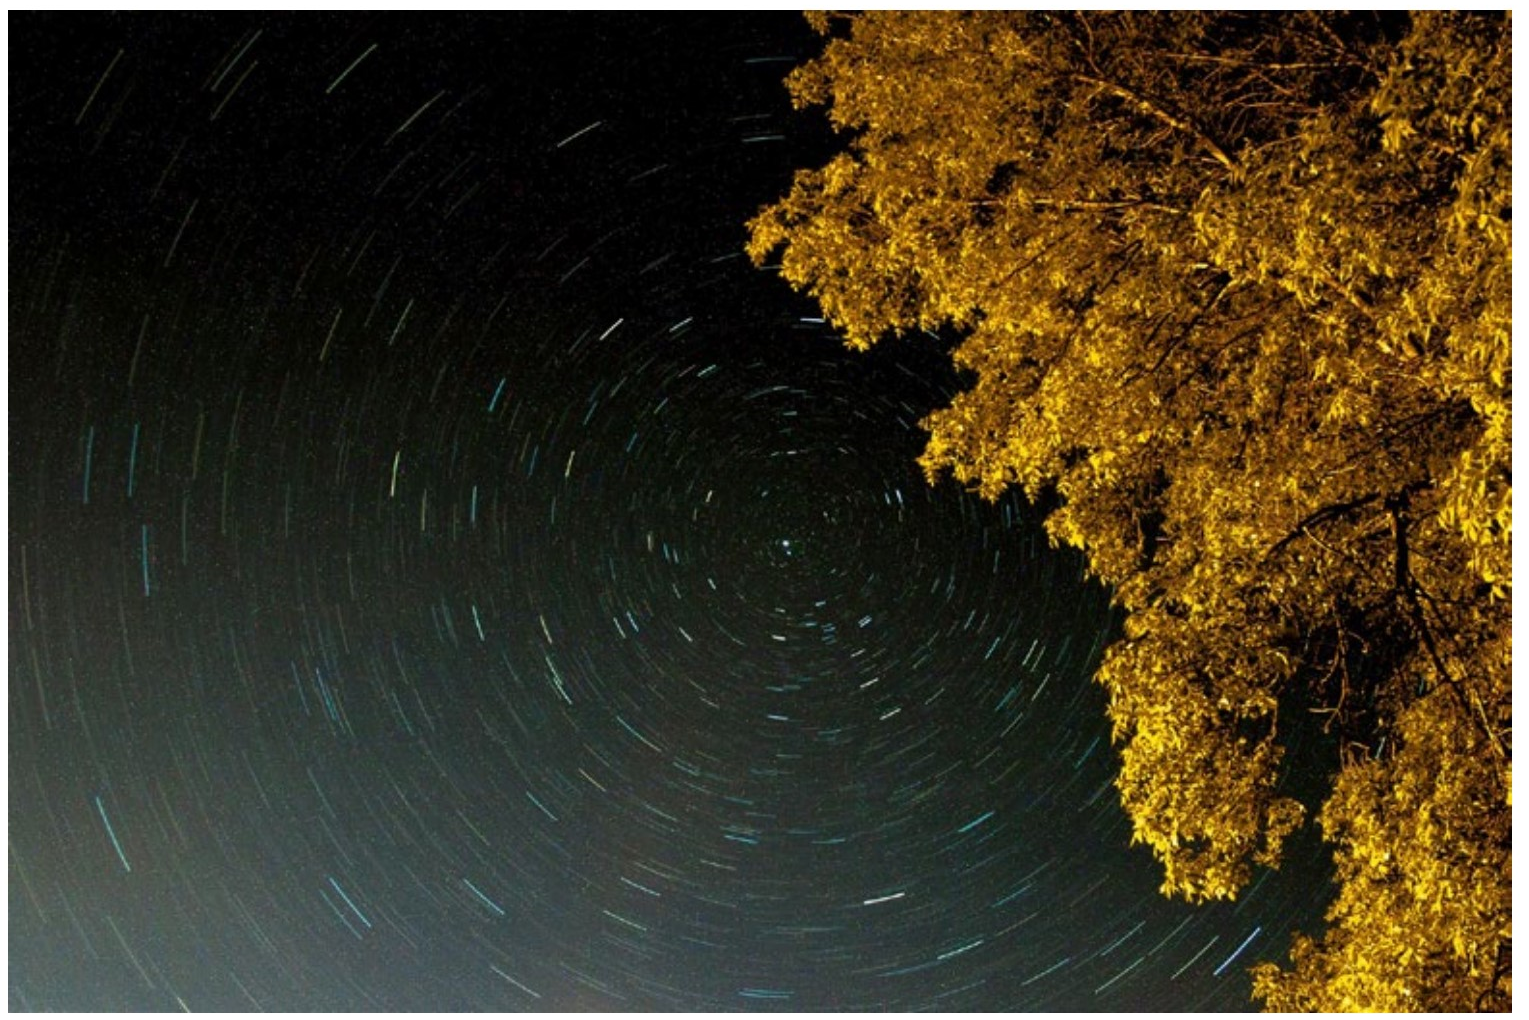
|
There was a lot of light pollution in this photograph of stars traveling around the North Star. The exposure time was 25 minutes. |
External Flash
When you use your camera with an external flash (covered in the next chapter), your camera’s meter is useless since the light only lasts for a fraction of a second.
The flash itself defines the exposure time, so your shutter speed needs to be set to 1/125s (with most cameras). Now you use either your aperture or the flash’s output control to adjust your exposure (you could also use the ISO). The light meter (and the automatic settings) in your camera are completely worthless.
You can also use the manual setting to control how the flash on your camera can be mixed with existing light, but that is a subject for another day, another book.
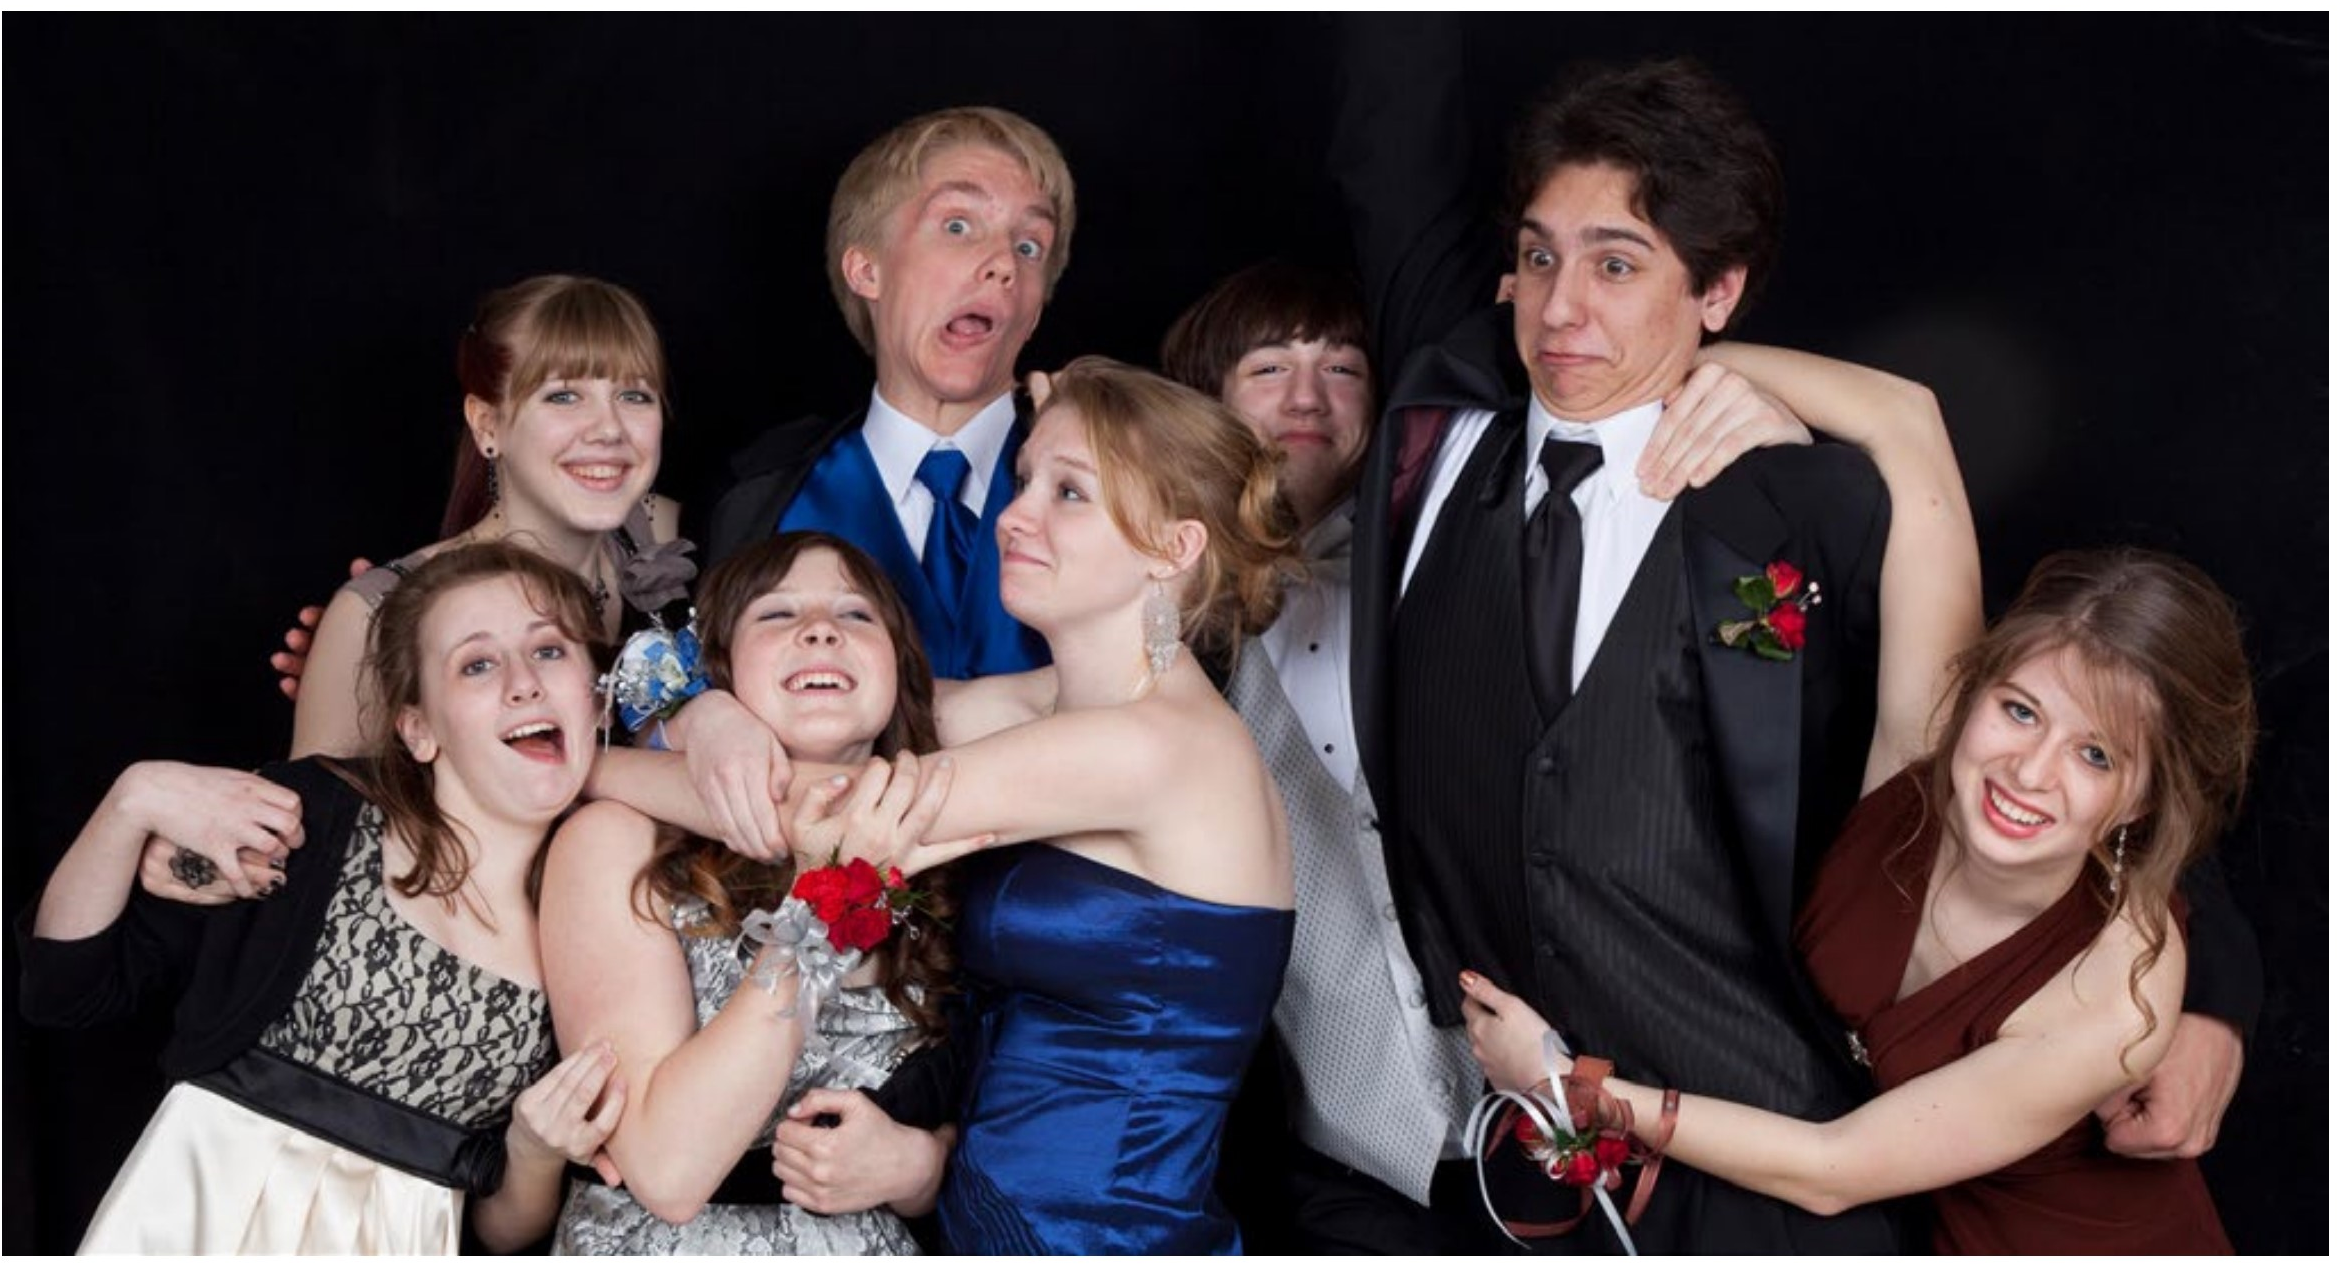
|
Prom night with studio flash |
Two DoorsThe shutter is actually two sliding doors—one opens, then another closes after it. With shutter speeds faster than (usually) ‘125, the second door starts to close before the other is fully open, hence at faster shutter speeds a moving slit exposes the sensor. Using a flash at higher shutter speeds exposes only the slit of the shutter open during the flash. Instead of the door type of shutter (called a focal plane shutter), a few cameras use an iris shutter that opens and closes like the aperture. With iris shutters flash pictures can be taken at any shutter speed. |
|
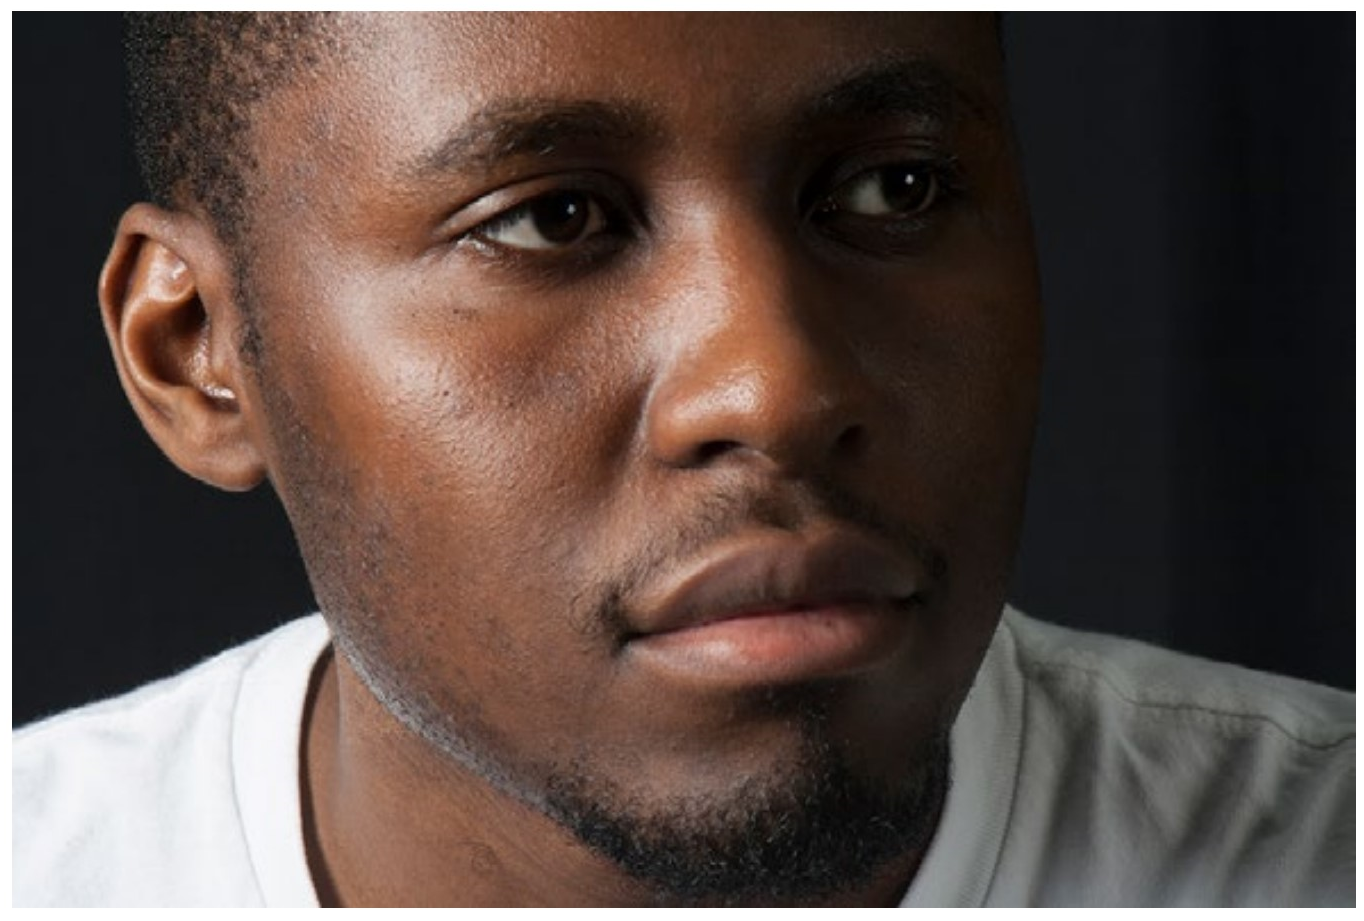
Charles Kunene, self portrait with monolight
|
|
Panorama of Grand Tetons made from five overlapping images |
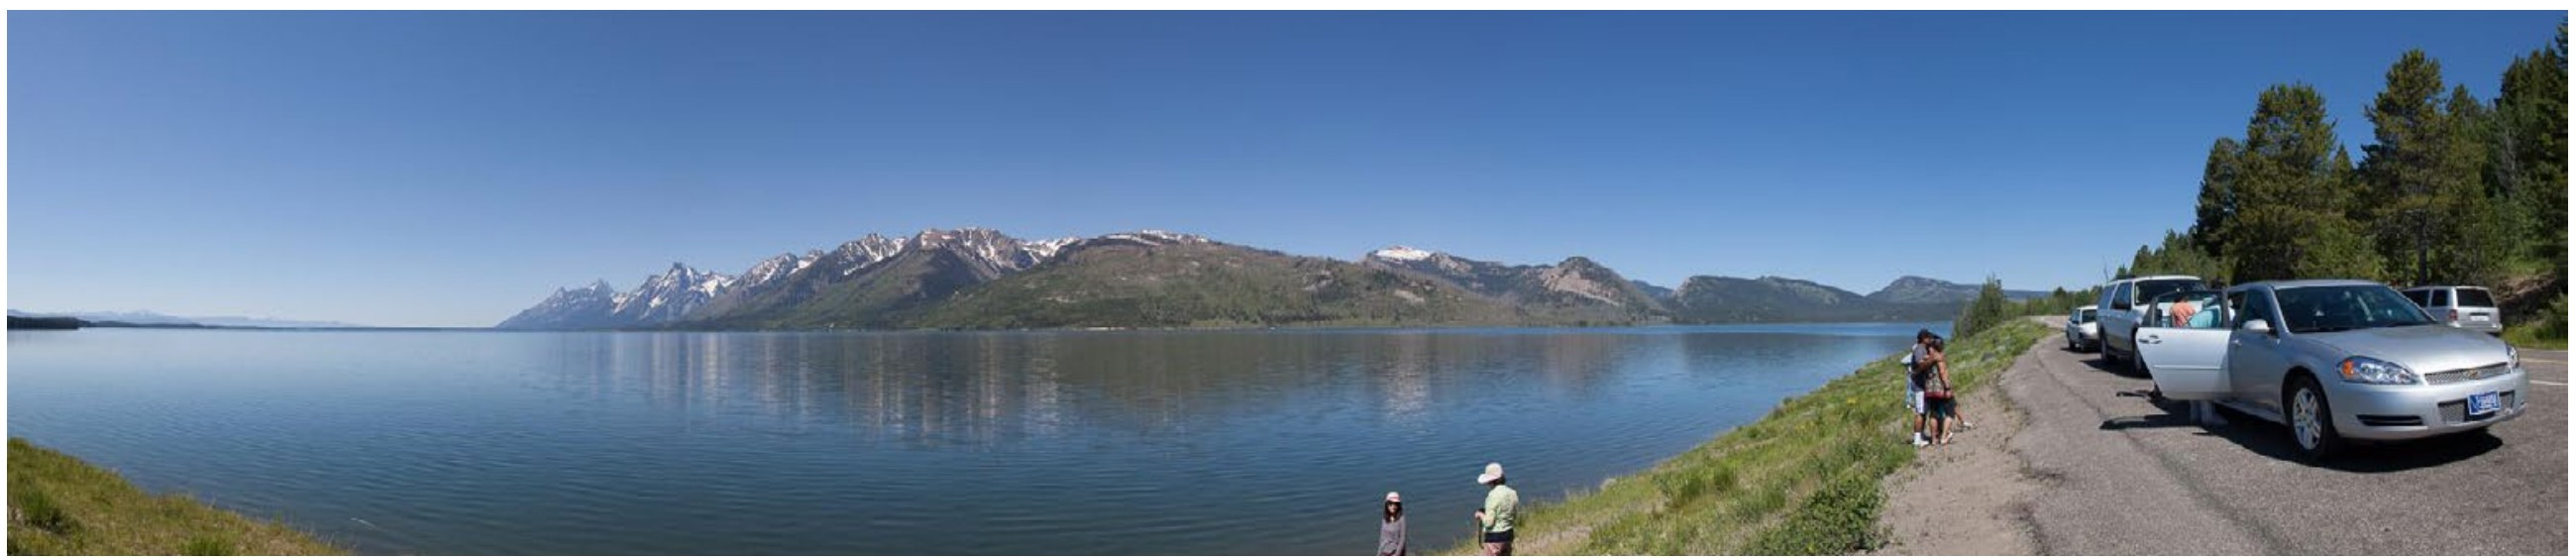

Multiple Images
Even though your camera may have a panorama setting, you will get better quality by taking a number of overlapping images and stitching them together in an image editing application such as Lightroom or Photoshop Camera Raw (see appendix). The panorama will also be better if all of the images are the same exposure. To do that, set your camera on manual, find one exposure that will work for all the images (by trial and error), then take all of the panorama images with this exposure (shutter speed and aperture combination).
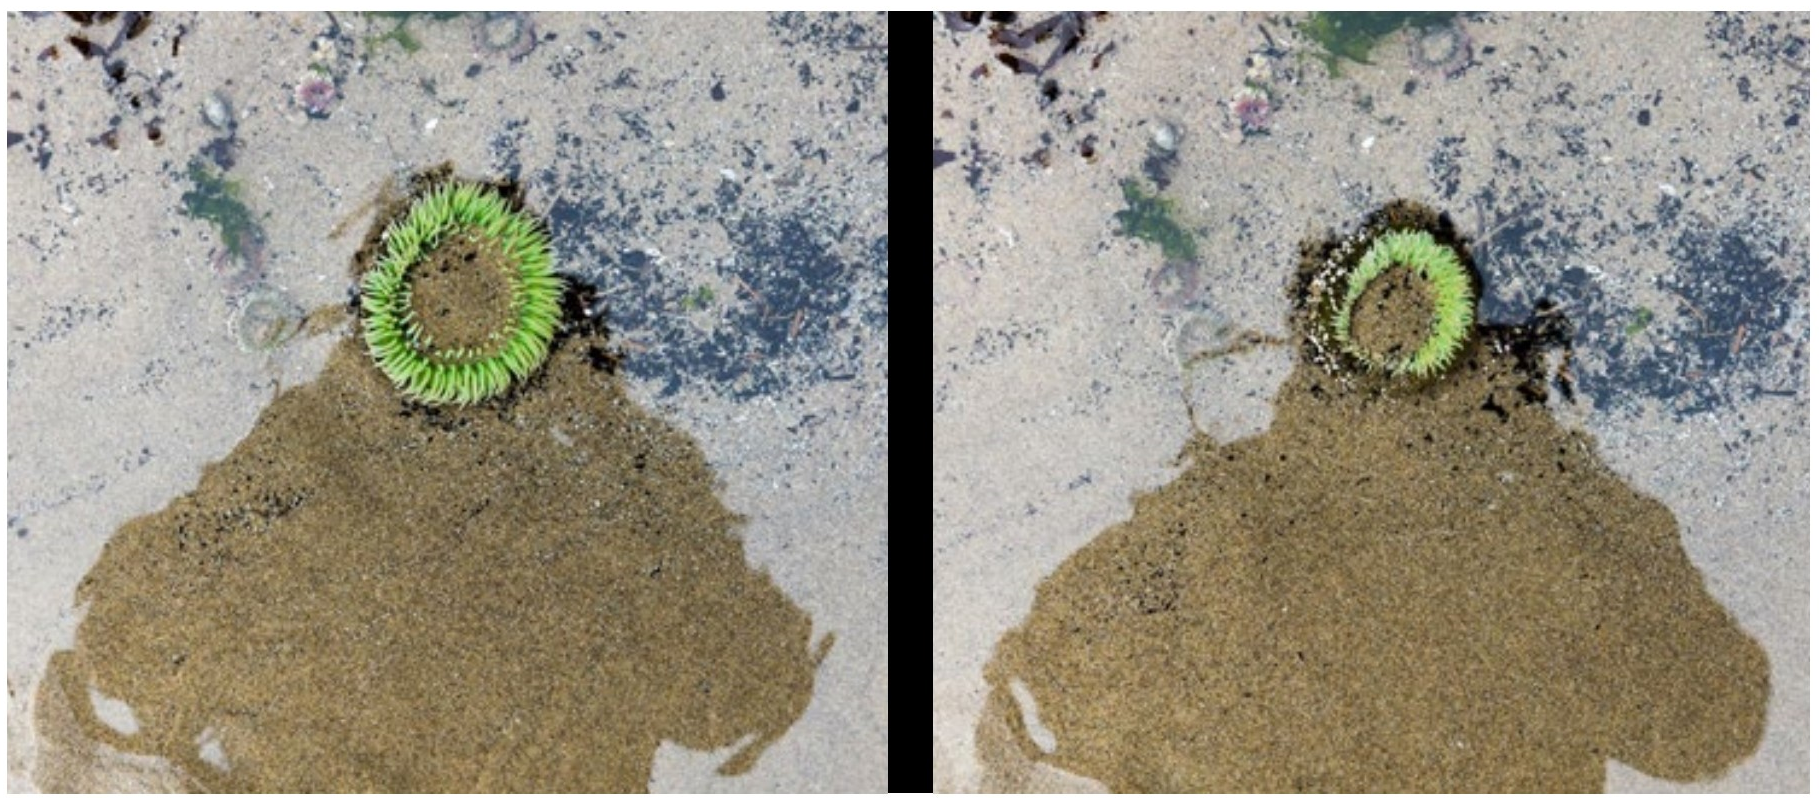
This technique works well whenever images are to be used together, such as with time-lapse and animated GIF (cinemagraph to be fancy) images.
|
Still images from an animated GIF. Manual exposure settings ensure that both images are exactly the same lightness for a smooth transitions between the extrovert and introvert images. |
Dial Paraphernalia
You have probably noticed that the mode dial on your camera has a lot of other settings. Maybe you are patiently waiting for me to explain them. Okay...
Most of these settings are fairly worthless once you know as much as you do now. For instance, Sports mode will opt for higher shutter speeds than program mode, but you can easily better do that by choosing the shutter speed you need.
There are a few modes that you may find useful. Movie mode is of course one of them, and if your camera has custom modes, those are also useful.

Camera Instructions
Now that we are done looking at most of your camera options, it is good time to investigate your camera instruction manual to see if there are settings hidden there that might be useful to you.
For example, I have a camera in which too much of the viewing image is hidden when showing the histogram. But there is a setting which shows highlight clipping on the viewing image—it doesn’t block the view, but does show me the most critical information for which I need the histogram.
You may find many settings that only apply to JPEGs saved from the camera or ones that only apply to automatic mode. You don’t generally need these.
Now Go Shoot
With your camera on P, see how much you can change your shutter speed and f-stop by just turning the adjusting wheel. Notice how your shutter speed compensates for aperture changes. See if you can interpret subjects using these controls.
Take some photographs using your Manual (M) setting. Just to get into the history of it all—that is the way photographers shot before automatic exposure.
Try some unusual lighting situations such as the ones in this chapter. Can you use the program mode with EV compensations or do you need to switch to manual mode in different situations?
The MoonPhotographers have long known that the sun is a fairly constant light source. Good exposure under bright sunlight can be calculated as approximately [ISO speed used as shutter speed] @ f16. So, with an ISO of 100, the exposure would be 1/125s (close enough) @ f16. A scene lit by a hazy sun might need a bit more exposure (and a cloudy day even more), but you can try this with your camera set on manual mode, and you will see that it holds true. Since the moon is illuminated by sunlight, one would expect that a photograph of the moon would require much the same shutter speed and f-stop. It does, although a few stops more might be needed to compensate for the filtering effect of the atmosphere or light clouds. So, do you need a tripod to take photographs of the moon? No! |
EXPERIMENT
In the previous experiments you did comparisons. This one is a little different, and is intended to have you gain familiarity with difficult lighting situations in which you need to use manual mode.
Go out tonight with your camera set to manual mode. In the dark, look around and take photographs of what you find. It will not be difficult to find things where automatic exposure doesn’t work.
Try different shutter speeds and apertures. You know enough at this point to use either a larger aperture or a slower shutter speed if your image turns out dark. Just take and retake until you get the right combination.
If you have a tripod, that would certainly be helpful with this experimental shooting, but if you don’t, think about celebrating (and controlling) motion blur. And be safe. There are lots of things you can trip over and bump into at night. Some might even want a camera so they can use this book.
|
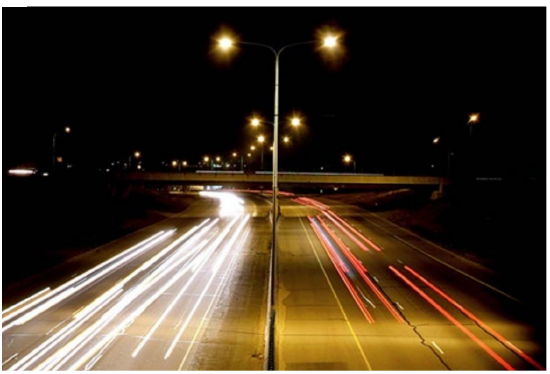
Dianna Zierke |
|
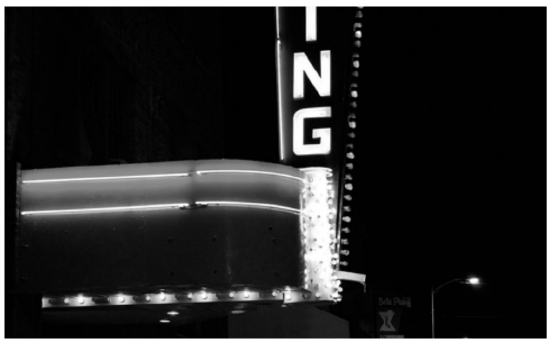
Laura Grevas |
|
Alicia Ford |
|
Alex Stoffrengen |
Exposure Controls Questions
For the next three questions your life will be easier if you have a pencil or something to count the stop changes with. You could instead enlarge them and use your finger.
Notice that the stop changes are all ordered with more light to the left.
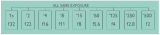
If your exposure was 1/125 second at f4, what shutter speed would give you the same exposure at f5.6? At other shutter speed ans f-d stops?
shutter speeds in stops: ‘4 - ‘8 - ’15 - ’30 - ’60 - ‘125 - ‘250 apertures in stops: f2.8 - f4 - f5.6 - f8 - f11 - f16
If your exposure was 1/30 second at f8, what aperture would give you the same exposure at 1/125th? At other shutter speeds an f-d stops?
shutter speeds in stops: ‘4 - ‘8 - ’15 - ’30 - ’60 - ‘125 - ‘250 apertures in stops: f2.8 - f4 - f5.6 - f8 - f11 - f16
If your exposure was f8 with an ISO of 800, what f-stop would give you the same exposure with ISO 100? At other ISOs and f-stops?
apertures in stops: f2.8 - f4 - f5.6 - f8 - f11 - f16
ISO in stops: 100, 200, 400, 800, 1600, 3200
What mode allows you to set both the shutter speed and aperture independently?
What can you use to see what exposure your camera recommends while on manual mode?
What type of scene might necessitate using manual mode?
What setting on the mode dial would be good to use when taking a series of photographs for a panorama?
What shutter speed would you use for light painting (very approximately).
What shutter speed is generally used with an external flash?
When does the book suggest you use the flower setting on your mode dial? (trick question)
