
5: Listening to Lectures and Taking Notes
- Page ID
- 375693
\( \newcommand{\vecs}[1]{\overset { \scriptstyle \rightharpoonup} {\mathbf{#1}} } \)
\( \newcommand{\vecd}[1]{\overset{-\!-\!\rightharpoonup}{\vphantom{a}\smash {#1}}} \)
\( \newcommand{\dsum}{\displaystyle\sum\limits} \)
\( \newcommand{\dint}{\displaystyle\int\limits} \)
\( \newcommand{\dlim}{\displaystyle\lim\limits} \)
\( \newcommand{\id}{\mathrm{id}}\) \( \newcommand{\Span}{\mathrm{span}}\)
( \newcommand{\kernel}{\mathrm{null}\,}\) \( \newcommand{\range}{\mathrm{range}\,}\)
\( \newcommand{\RealPart}{\mathrm{Re}}\) \( \newcommand{\ImaginaryPart}{\mathrm{Im}}\)
\( \newcommand{\Argument}{\mathrm{Arg}}\) \( \newcommand{\norm}[1]{\| #1 \|}\)
\( \newcommand{\inner}[2]{\langle #1, #2 \rangle}\)
\( \newcommand{\Span}{\mathrm{span}}\)
\( \newcommand{\id}{\mathrm{id}}\)
\( \newcommand{\Span}{\mathrm{span}}\)
\( \newcommand{\kernel}{\mathrm{null}\,}\)
\( \newcommand{\range}{\mathrm{range}\,}\)
\( \newcommand{\RealPart}{\mathrm{Re}}\)
\( \newcommand{\ImaginaryPart}{\mathrm{Im}}\)
\( \newcommand{\Argument}{\mathrm{Arg}}\)
\( \newcommand{\norm}[1]{\| #1 \|}\)
\( \newcommand{\inner}[2]{\langle #1, #2 \rangle}\)
\( \newcommand{\Span}{\mathrm{span}}\) \( \newcommand{\AA}{\unicode[.8,0]{x212B}}\)
\( \newcommand{\vectorA}[1]{\vec{#1}} % arrow\)
\( \newcommand{\vectorAt}[1]{\vec{\text{#1}}} % arrow\)
\( \newcommand{\vectorB}[1]{\overset { \scriptstyle \rightharpoonup} {\mathbf{#1}} } \)
\( \newcommand{\vectorC}[1]{\textbf{#1}} \)
\( \newcommand{\vectorD}[1]{\overrightarrow{#1}} \)
\( \newcommand{\vectorDt}[1]{\overrightarrow{\text{#1}}} \)
\( \newcommand{\vectE}[1]{\overset{-\!-\!\rightharpoonup}{\vphantom{a}\smash{\mathbf {#1}}}} \)
\( \newcommand{\vecs}[1]{\overset { \scriptstyle \rightharpoonup} {\mathbf{#1}} } \)
\(\newcommand{\longvect}{\overrightarrow}\)
\( \newcommand{\vecd}[1]{\overset{-\!-\!\rightharpoonup}{\vphantom{a}\smash {#1}}} \)
\(\newcommand{\avec}{\mathbf a}\) \(\newcommand{\bvec}{\mathbf b}\) \(\newcommand{\cvec}{\mathbf c}\) \(\newcommand{\dvec}{\mathbf d}\) \(\newcommand{\dtil}{\widetilde{\mathbf d}}\) \(\newcommand{\evec}{\mathbf e}\) \(\newcommand{\fvec}{\mathbf f}\) \(\newcommand{\nvec}{\mathbf n}\) \(\newcommand{\pvec}{\mathbf p}\) \(\newcommand{\qvec}{\mathbf q}\) \(\newcommand{\svec}{\mathbf s}\) \(\newcommand{\tvec}{\mathbf t}\) \(\newcommand{\uvec}{\mathbf u}\) \(\newcommand{\vvec}{\mathbf v}\) \(\newcommand{\wvec}{\mathbf w}\) \(\newcommand{\xvec}{\mathbf x}\) \(\newcommand{\yvec}{\mathbf y}\) \(\newcommand{\zvec}{\mathbf z}\) \(\newcommand{\rvec}{\mathbf r}\) \(\newcommand{\mvec}{\mathbf m}\) \(\newcommand{\zerovec}{\mathbf 0}\) \(\newcommand{\onevec}{\mathbf 1}\) \(\newcommand{\real}{\mathbb R}\) \(\newcommand{\twovec}[2]{\left[\begin{array}{r}#1 \\ #2 \end{array}\right]}\) \(\newcommand{\ctwovec}[2]{\left[\begin{array}{c}#1 \\ #2 \end{array}\right]}\) \(\newcommand{\threevec}[3]{\left[\begin{array}{r}#1 \\ #2 \\ #3 \end{array}\right]}\) \(\newcommand{\cthreevec}[3]{\left[\begin{array}{c}#1 \\ #2 \\ #3 \end{array}\right]}\) \(\newcommand{\fourvec}[4]{\left[\begin{array}{r}#1 \\ #2 \\ #3 \\ #4 \end{array}\right]}\) \(\newcommand{\cfourvec}[4]{\left[\begin{array}{c}#1 \\ #2 \\ #3 \\ #4 \end{array}\right]}\) \(\newcommand{\fivevec}[5]{\left[\begin{array}{r}#1 \\ #2 \\ #3 \\ #4 \\ #5 \\ \end{array}\right]}\) \(\newcommand{\cfivevec}[5]{\left[\begin{array}{c}#1 \\ #2 \\ #3 \\ #4 \\ #5 \\ \end{array}\right]}\) \(\newcommand{\mattwo}[4]{\left[\begin{array}{rr}#1 \amp #2 \\ #3 \amp #4 \\ \end{array}\right]}\) \(\newcommand{\laspan}[1]{\text{Span}\{#1\}}\) \(\newcommand{\bcal}{\cal B}\) \(\newcommand{\ccal}{\cal C}\) \(\newcommand{\scal}{\cal S}\) \(\newcommand{\wcal}{\cal W}\) \(\newcommand{\ecal}{\cal E}\) \(\newcommand{\coords}[2]{\left\{#1\right\}_{#2}}\) \(\newcommand{\gray}[1]{\color{gray}{#1}}\) \(\newcommand{\lgray}[1]{\color{lightgray}{#1}}\) \(\newcommand{\rank}{\operatorname{rank}}\) \(\newcommand{\row}{\text{Row}}\) \(\newcommand{\col}{\text{Col}}\) \(\renewcommand{\row}{\text{Row}}\) \(\newcommand{\nul}{\text{Nul}}\) \(\newcommand{\var}{\text{Var}}\) \(\newcommand{\corr}{\text{corr}}\) \(\newcommand{\len}[1]{\left|#1\right|}\) \(\newcommand{\bbar}{\overline{\bvec}}\) \(\newcommand{\bhat}{\widehat{\bvec}}\) \(\newcommand{\bperp}{\bvec^\perp}\) \(\newcommand{\xhat}{\widehat{\xvec}}\) \(\newcommand{\vhat}{\widehat{\vvec}}\) \(\newcommand{\uhat}{\widehat{\uvec}}\) \(\newcommand{\what}{\widehat{\wvec}}\) \(\newcommand{\Sighat}{\widehat{\Sigma}}\) \(\newcommand{\lt}{<}\) \(\newcommand{\gt}{>}\) \(\newcommand{\amp}{&}\) \(\definecolor{fillinmathshade}{gray}{0.9}\)Why do we need to take notes?
Taking effective notes is a crucial skill for academic success. Even in modern classrooms that use technology and interactive learning, you will still likely need to listen to a professor, guest speaker, or classmate talking and write down the important ideas you hear. On this page you will learn some strategies to enhance your note-taking abilities: practicing active listening; noticing verbal cues, keywords, and nonverbal cues; checking your comprehension; and annotating your notes. You will also learn how to use the Cornell Method, a popular technique for taking notes that puts it all together.
Active Listening
Active listening is essential for effective note-taking. Here are some strategies:
- Focus Fully: Eliminate distractions and concentrate on the speaker. Put your phone away and straighten up any papers on your desk. This helps you absorb the material better.
- Paraphrase: Summarize what the speaker is saying in your own words. This reinforces your understanding and helps you remember the information. It also helps you avoid accidental plagiarism if you use your notes later to write a class assignment.
- Engage with the Speaker and Material: Nod, ask questions, and provide feedback to show you are engaged. This can enhance your understanding and retention, as well as communicating to the instructor that you are listening.
Notice this!
American Cultural Customs for Listeners

Figure \(\PageIndex{1}\): 7 universal facial expressions of emotions by PhD.Paul Ekman. (Icerko Lýdia, CC-BY 3.0, via Wikimedia Commons)
- Facial Expressions- Many U.S. instructors will notice the faces of their students and expect to see an interested and engaged facial expression. If you look very serious, you might be just innocently concentrating, but they might interpret your face as angry, bored, or confused. Which of the facial expressions shown in Figure 2.5.1 do you think you should avoid making during a lecture in a U.S. classroom?
- Eye Contact- In American culture, maintaining direct eye contact indicates active listening, attentiveness, and respect. In some cultures, closing your eyes shows that you are listening deeply and respectfully, but some American instructors may consider it rude for listeners to close their eyes for more than a second or two, as they consider eye contact a sign that you are paying attention. Even while taking notes, try to look up every minute or so. If direct eye contact is uncomfortable or impossible for you, it's OK to turn your face toward the speaker and look at their forehead, or look at the board or screen if they are using visual aids.
- Nodding- Nodding your head up and down is a common way to signal that you are listening and understanding the speaker.
- Verbal Affirmations- Using verbal affirmations is a way to verbally indicate that you are listening and following along, especially in a small group situation. Examples: uh-huh, mm-hmm, oh! wow! I see, go on. In a large lecture, it is customary to keep quiet.
- Posture- An open and attentive posture with uncrossed arms shows that you are attentive and receptive to the speaker.
Noticing verbal cues and keywords
- Verbal cues: Sometimes called "signal words/phrases" or "transitions," these words and phrases help listeners follow the structure of a lecture and identify important points and how they are connected.
- Keywords: It is important to listen for keywords and phrases that capture the main ideas, key concepts, and supporting examples. These keywords can help you identify the most important points in a lecture and structure your notes effectively. Usually keywords are repeated in the lecture.
Table 2.5.1 gives some examples of these important words to listen for:
| Type of verbal cue | Examples |
|---|---|
|
Introductory remarks: Pay attention to summaries or overviews of the main points given at the beginning of the lecture. |
|
|
Signal words/phrases: Listen for phrases that indicate the speaker is about to tell you an important point, review what they already said, present a different perspective, or predict the structure or purpose of the next part of the lecture. |
|
|
Repeated words or concepts: If a word or concept is repeated multiple times, it is likely to be an important keyword to write down and look up later if you don't already know it. |
|
Noticing Nonverbal Cues
Nonverbal cues can significantly enhance your understanding during lectures. Pay attention to:
- The instructor's body language: Notice gestures, facial expressions, and posture. These can indicate the importance of certain points. For example, if an instructor glances at their notes and then makes a point, it is probably a signal that the information is especially important. Anything they read from their notes is a potential test question. If they walk to another place in the room, it may indicate an important shift in the topic.
- Visual aids: Charts, graphs, and slides often highlight key information. Make sure to include these in your notes. Copy all diagrams and drawings, equations, names, places, dates, statistics, and definitions that the speaker writes on the board or includes in a slide presentation.
- Changes in tone: A shift in the instructor's voice can signal a transition to a critical topic or a summary. Do they ask a question? Does their voice suddenly get serious? Do they slow down or repeat a phrase to emphasize its importance?
Checking your comprehension
The whole point of note-taking is to help you remember and understand the material. Here are some strategies to improve comprehension:
- Summarize: After each section of a lecture, take a moment to summarize what you've learned in your own words. This reinforces your understanding and helps you retain the information better.
- Ask questions: If something is unclear, jot down questions during the lecture. Seek clarification from the lecturer or classmates afterward. This active engagement helps deepen your understanding. In many U.S. classrooms, students will often raise a hand to interrupt the instructor with a question, and the instructor likes it - they see it as a sign that you are paying attention. In other situations, they expect you to wait until the end of a section, a slide, or the whole lecture. Notice the classroom culture for each situation, or ask a friendly classmate if you aren't sure. Example Questions:
- “Can you clarify the difference between these two concepts?”
- "I know you explained this part, but I'm still a little unclear about..."
- “Could you provide an example to illustrate this point?"
- "How does this concept relate to what we discussed in the last class?"
Annotating your notes
Annotating your notes can significantly enhance their effectiveness. Here’s how to do it:
- Highlight Key Points: Use different colors or symbols to emphasize important concepts. This makes it easier to review later.
- Add Examples: Include relevant examples or personal experiences that relate to the material. This not only aids memory but also makes the notes more meaningful.
- Use Diagrams and Visuals: Incorporate diagrams, charts, or illustrations to represent complex ideas visually. This can help in understanding and recalling information.
Using the Cornell Method
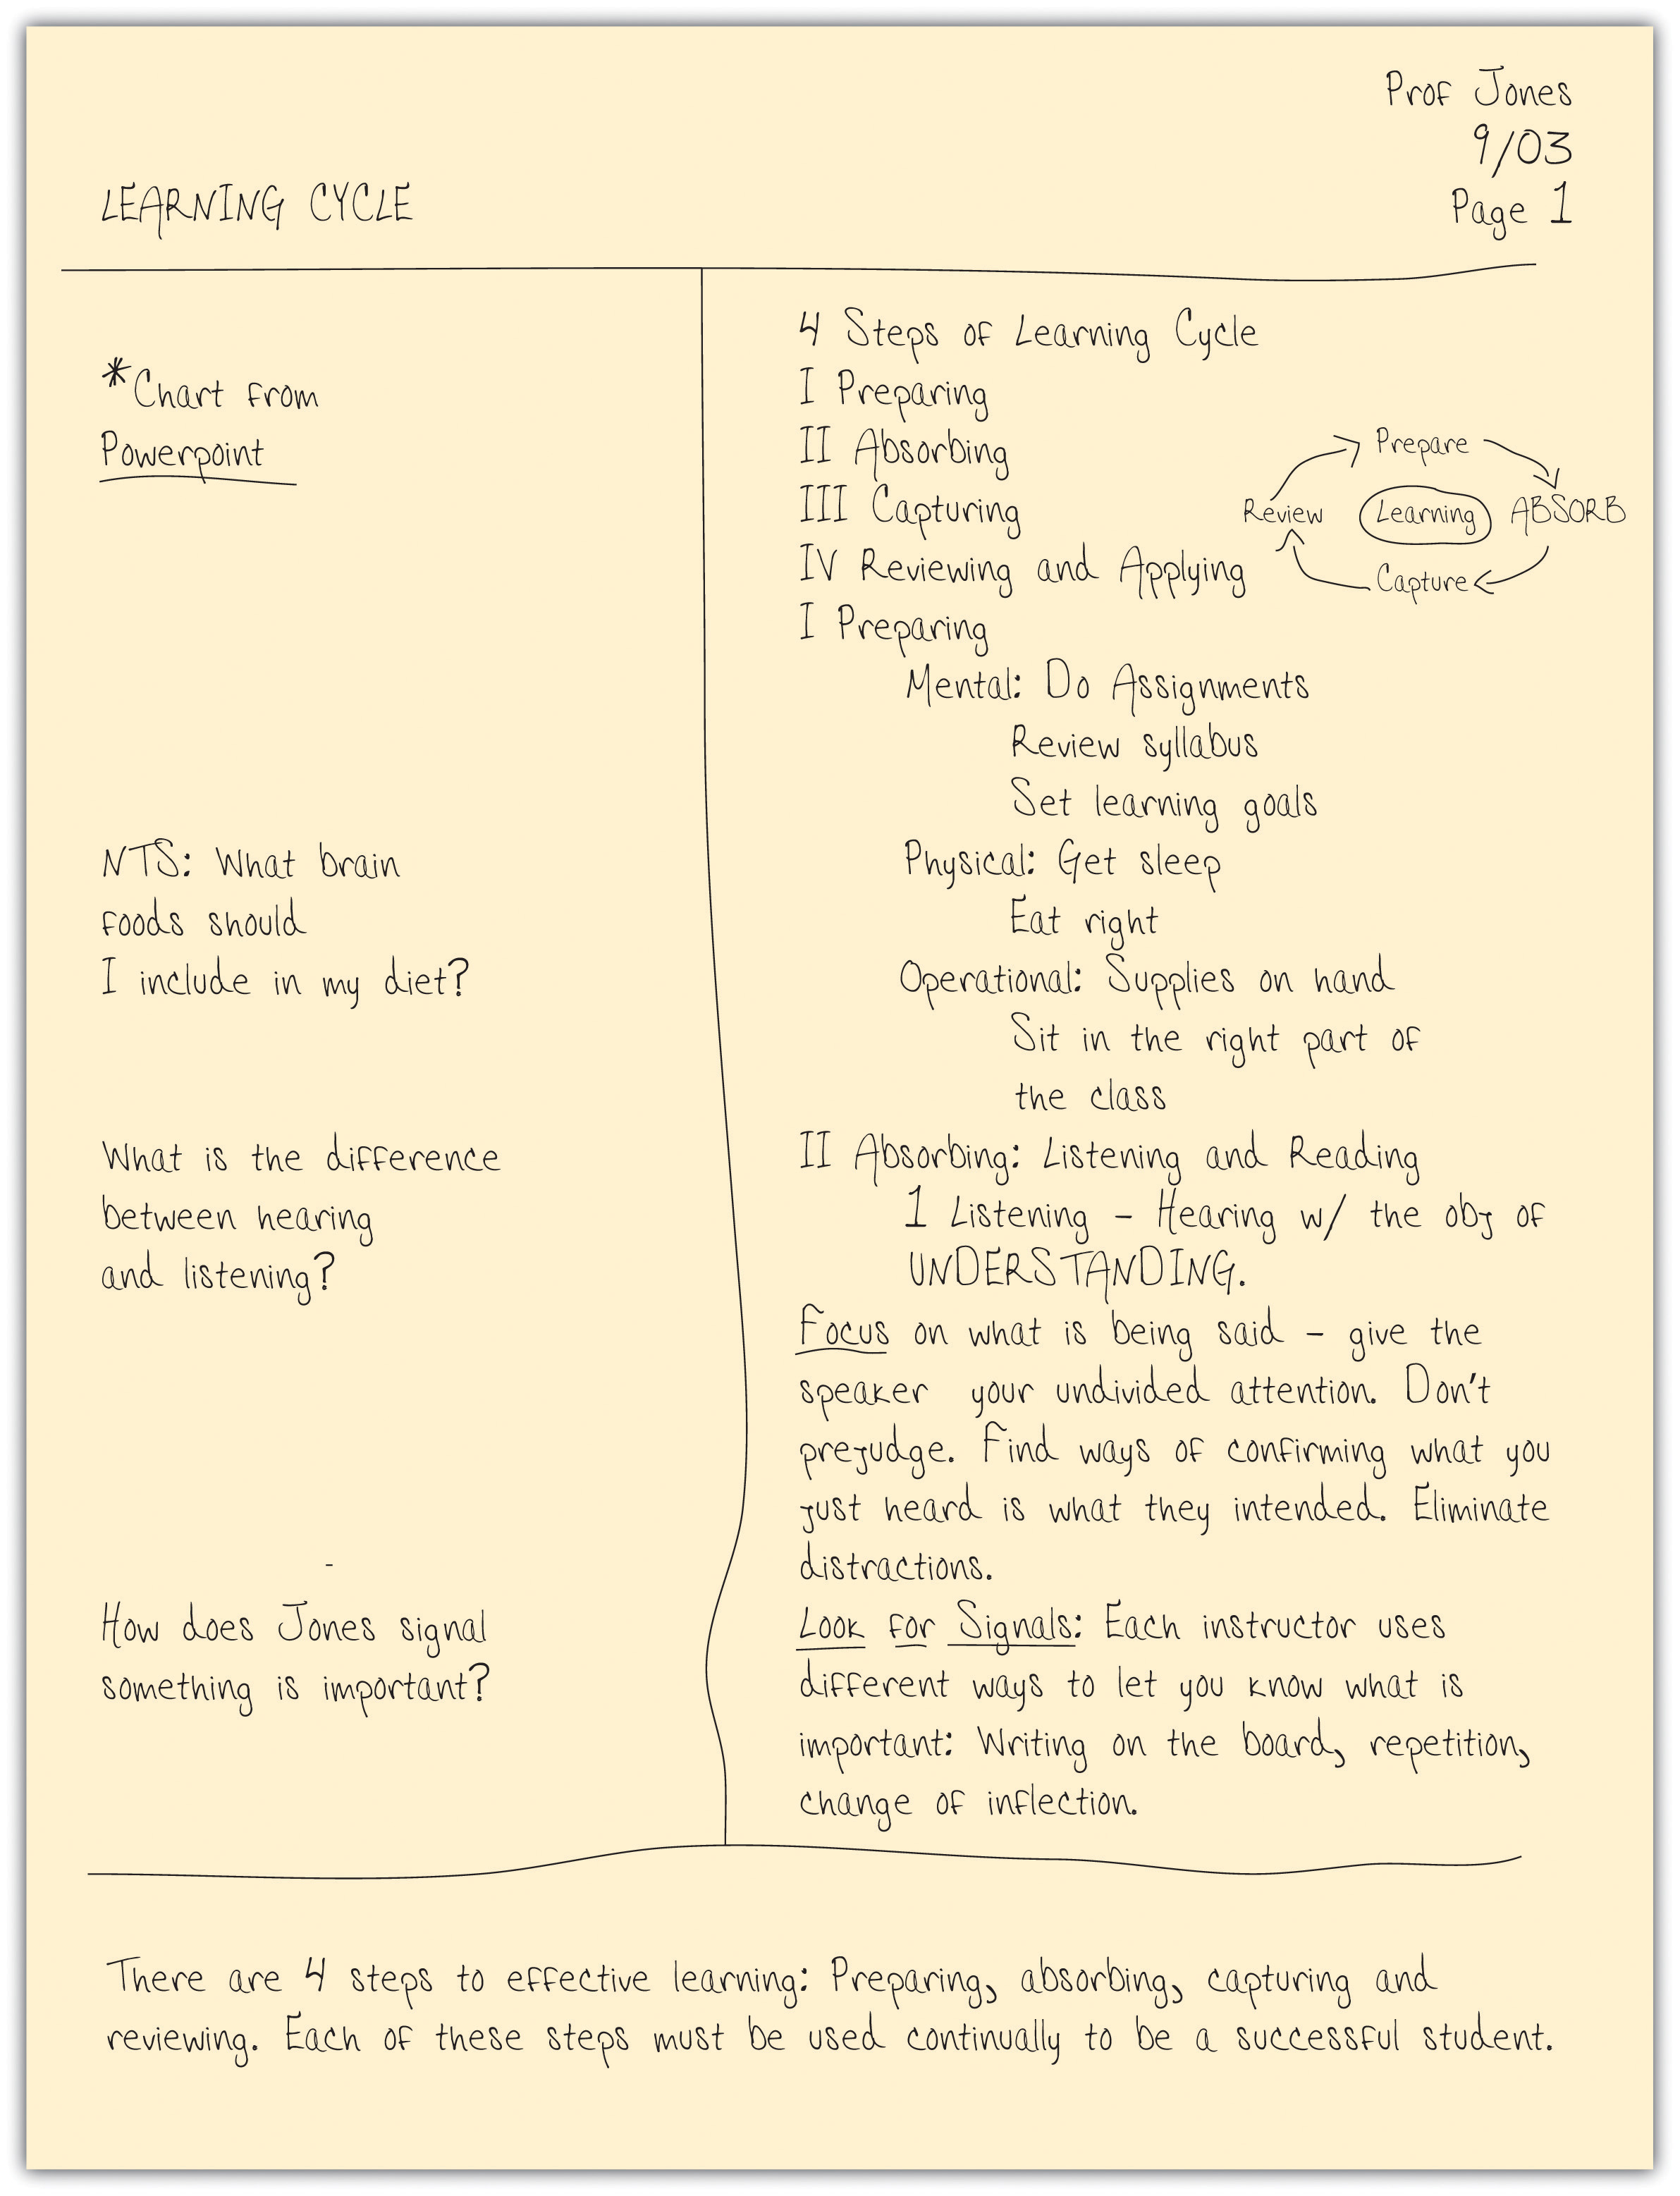 Figure \(\PageIndex{1}\):The Cornell Method of Note Taking (CC-BY-SA 3.0 section 4.4 from the book Success in College v. 1.0)
One way to organize your notes is a note-taking system that has worked for students around the world, the Cornell Method (Pauk and Owens 2011). Originally developed by Walter Pauk at Cornell University during the 1950s, this approach continues to be taught across the United States and in other countries as well. The cornerstone of this method is what Pauk calls the cue column—a wide margin on the left side of the paper. The cue column is the key to the Cornell method’s many benefits. Here’s how to use it:
- Format your paper. On each sheet, draw a vertical line from top to bottom about 2 inches from the left edge of the paper (see the example in Figure 2.5.2. This line creates the cue column—the space to the left of the line. You can also download this template or copy it onto a GoogleDoc: Cornell Notes Instructions and Template.docx
- Take notes, leaving the cue column blank. As you read an assignment or listen to a lecture, take notes on the right side of the paper. Fill up this column with sentences, paragraphs, outlines, charts, or drawings. Do not write in the cue column. You’ll use this space later, as you do the next steps.
- Condense your notes in the cue column. Think of the notes you took on the right side of the paper as a set of answers. In the cue column, list potential test questions that correspond to your notes. Write one question for each major term or point.
- As an alternative to questions, you can list keywords from your notes. Another option is to pretend that your notes are a series of articles on different topics. In the cue column, write a newspaper-style headline for each “article.” In any case, be brief. Cramming the cue column full of words defeats its purpose—to reduce the number and length of your notes.
- Write a summary. Pauk recommends reducing your notes even more by writing a brief summary at the bottom of each page. This step offers you another way to engage actively with the material.
- Use the cue column to recite. Cover the right side of your notes with a blank sheet of paper. Leave only the cue column showing. Then, look at each item you wrote in the cue column and talk about it. If you wrote questions, answer each question. If you wrote key words, define each word and talk about why it’s important. If you wrote headlines in the cue column, explain what each one means and offer supporting details. After reciting, uncover your notes and look for any important points you missed.
Watch this video from Cornell University demonstrating how to use the Cornell Method:
Technology Tools for Note-Taking
Utilizing technology can streamline the note-taking process. Here are some tools to consider:
- Digital Note-Taking Apps: Explore apps like Microsoft OneNote or Google Docs for organizing and sharing notes. These platforms allow for easy editing and collaboration.
- Annotation Tools: Use tools like Google Slides for visual presentations. These can enhance your notes with interactive elements.
Before you use a digital tool though, consider that some scientific studies suggest that writing with a pen or pencil on paper might help you learn better! For example, researchers Umejima et al. from the University of Tokyo tested how much university students retained an hour after taking notes on a lecture, and published their results in this article: "Paper Notebooks vs. Mobile Devices: Brain Activation Differences During Memory Retrieval." What do you predict they found?
Check your knowledge
1. What is one way to engage in active listening during a lecture?
A. Texting friends
B. Nodding and asking questions
C. Daydreaming
- Click here to see the answer
-
B. Nodding and asking questions
2. Why is summarizing important in note-taking?
A. It helps reinforce understanding
B. It takes too much time
C. It makes notes look neat
- Click here to see the answer
-
A. It helps reinforce understanding
3. What is a benefit of using technology for note-taking?
A. It can lead to confusion
B. It can streamline the process
C. It is less effective
- Click here to see the answer
-
B. It can streamline the process
Now use these skills
Apply this!
1. Listening for verbal cues and keywords: listen to the following 3 sentences carefully, and write down the verbal cues you hear, that let you know what is coming next or what is important. Listen to each sentence again and write down any keywords you hear.
A. ►sentence A
- Click here to see the answer
-
A. Signal Word: "In conclusion..."
B. ►sentence B
- Click here to see the answer
-
B. Introductory remarks that signal the main sections: "three main sections..."
C. ►sentence C
- Click here to see the answer
-
C. Crucial concept explained: "This concept plays a crucial role..."
2. Listen to the TED Talk by Julian Treasure, "5 Ways to Listen Better." Practice using the Cornell Method to take notes on his speech (use your own paper, or download Cornell Notes Instructions and Template.docx).
After you listen and take notes, use the transcript of the video to check anything you missed. Make sure to go through all the Cornell method steps: write keywords and/or questions in the Cues column on the left, write a summary at the bottom, go back and annotate your notes to highlight and/or add to important points, and test yourself by covering the Notes column to see how much you remember just from looking at the Cues column.
Then exchange notes with a classmate and provide feedback on each other's note-taking techniques. Discuss what worked well and what could be improved.
Works Cited
“Seven Ways to Make Notes" | StudyHub.” Studyhub.fxplus.ac.uk.
Treasure, Julian. “5 Ways to Listen Better.” Ted.com, TED Talks, July 2011, www.ted.com/talks/julian_treasure_5_ways_to_listen_better.
Umejima, Keita, et al. “Paper Notebooks vs. Mobile Devices: Brain Activation Differences during Memory Retrieval.” Frontiers in Behavioral Neuroscience, vol. 15, no. 15, 19 Mar. 2021, https://doi.org/10.3389/fnbeh.2021.634158.
Licenses and Attributions
CC Licensed Content: Original
Authored by Nicole Otero, Kapi'olani Community College and Gabriel Winer, Berkeley City College License: CC BY NC.
CC Licensed Content: Previously Published
Some content on this page was adapted from the following CC-licensed sources:
- 1.3.2: Preparation for Note-Taking is shared under a CC BY-NC-ND license and was authored, remixed, and/or curated by Dave Dillon.
- Foundations for College Success: Reading Strategies: Readings (Content on this page is a derivative of “Reading and Notetaking: Taking Notes” by Amy Baldwin, published by OpenStax, and is licensed CC BY 4.0. Access for free at https://openstax.org/books/college-success/pages/1-introduction).
- “Got Notes?”, section 4.4 from the book Success in College (v. 1.0). For details on it (including licensing), click here.
- Open Now College Success (Cengage) 9.4: Note-Taking Strategies is shared under a CC BY license