
6.3: Categorical Syllogisms
- Page ID
- 223862
\( \newcommand{\vecs}[1]{\overset { \scriptstyle \rightharpoonup} {\mathbf{#1}} } \)
\( \newcommand{\vecd}[1]{\overset{-\!-\!\rightharpoonup}{\vphantom{a}\smash {#1}}} \)
\( \newcommand{\id}{\mathrm{id}}\) \( \newcommand{\Span}{\mathrm{span}}\)
( \newcommand{\kernel}{\mathrm{null}\,}\) \( \newcommand{\range}{\mathrm{range}\,}\)
\( \newcommand{\RealPart}{\mathrm{Re}}\) \( \newcommand{\ImaginaryPart}{\mathrm{Im}}\)
\( \newcommand{\Argument}{\mathrm{Arg}}\) \( \newcommand{\norm}[1]{\| #1 \|}\)
\( \newcommand{\inner}[2]{\langle #1, #2 \rangle}\)
\( \newcommand{\Span}{\mathrm{span}}\)
\( \newcommand{\id}{\mathrm{id}}\)
\( \newcommand{\Span}{\mathrm{span}}\)
\( \newcommand{\kernel}{\mathrm{null}\,}\)
\( \newcommand{\range}{\mathrm{range}\,}\)
\( \newcommand{\RealPart}{\mathrm{Re}}\)
\( \newcommand{\ImaginaryPart}{\mathrm{Im}}\)
\( \newcommand{\Argument}{\mathrm{Arg}}\)
\( \newcommand{\norm}[1]{\| #1 \|}\)
\( \newcommand{\inner}[2]{\langle #1, #2 \rangle}\)
\( \newcommand{\Span}{\mathrm{span}}\) \( \newcommand{\AA}{\unicode[.8,0]{x212B}}\)
\( \newcommand{\vectorA}[1]{\vec{#1}} % arrow\)
\( \newcommand{\vectorAt}[1]{\vec{\text{#1}}} % arrow\)
\( \newcommand{\vectorB}[1]{\overset { \scriptstyle \rightharpoonup} {\mathbf{#1}} } \)
\( \newcommand{\vectorC}[1]{\textbf{#1}} \)
\( \newcommand{\vectorD}[1]{\overrightarrow{#1}} \)
\( \newcommand{\vectorDt}[1]{\overrightarrow{\text{#1}}} \)
\( \newcommand{\vectE}[1]{\overset{-\!-\!\rightharpoonup}{\vphantom{a}\smash{\mathbf {#1}}}} \)
\( \newcommand{\vecs}[1]{\overset { \scriptstyle \rightharpoonup} {\mathbf{#1}} } \)
\( \newcommand{\vecd}[1]{\overset{-\!-\!\rightharpoonup}{\vphantom{a}\smash {#1}}} \)
\(\newcommand{\avec}{\mathbf a}\) \(\newcommand{\bvec}{\mathbf b}\) \(\newcommand{\cvec}{\mathbf c}\) \(\newcommand{\dvec}{\mathbf d}\) \(\newcommand{\dtil}{\widetilde{\mathbf d}}\) \(\newcommand{\evec}{\mathbf e}\) \(\newcommand{\fvec}{\mathbf f}\) \(\newcommand{\nvec}{\mathbf n}\) \(\newcommand{\pvec}{\mathbf p}\) \(\newcommand{\qvec}{\mathbf q}\) \(\newcommand{\svec}{\mathbf s}\) \(\newcommand{\tvec}{\mathbf t}\) \(\newcommand{\uvec}{\mathbf u}\) \(\newcommand{\vvec}{\mathbf v}\) \(\newcommand{\wvec}{\mathbf w}\) \(\newcommand{\xvec}{\mathbf x}\) \(\newcommand{\yvec}{\mathbf y}\) \(\newcommand{\zvec}{\mathbf z}\) \(\newcommand{\rvec}{\mathbf r}\) \(\newcommand{\mvec}{\mathbf m}\) \(\newcommand{\zerovec}{\mathbf 0}\) \(\newcommand{\onevec}{\mathbf 1}\) \(\newcommand{\real}{\mathbb R}\) \(\newcommand{\twovec}[2]{\left[\begin{array}{r}#1 \\ #2 \end{array}\right]}\) \(\newcommand{\ctwovec}[2]{\left[\begin{array}{c}#1 \\ #2 \end{array}\right]}\) \(\newcommand{\threevec}[3]{\left[\begin{array}{r}#1 \\ #2 \\ #3 \end{array}\right]}\) \(\newcommand{\cthreevec}[3]{\left[\begin{array}{c}#1 \\ #2 \\ #3 \end{array}\right]}\) \(\newcommand{\fourvec}[4]{\left[\begin{array}{r}#1 \\ #2 \\ #3 \\ #4 \end{array}\right]}\) \(\newcommand{\cfourvec}[4]{\left[\begin{array}{c}#1 \\ #2 \\ #3 \\ #4 \end{array}\right]}\) \(\newcommand{\fivevec}[5]{\left[\begin{array}{r}#1 \\ #2 \\ #3 \\ #4 \\ #5 \\ \end{array}\right]}\) \(\newcommand{\cfivevec}[5]{\left[\begin{array}{c}#1 \\ #2 \\ #3 \\ #4 \\ #5 \\ \end{array}\right]}\) \(\newcommand{\mattwo}[4]{\left[\begin{array}{rr}#1 \amp #2 \\ #3 \amp #4 \\ \end{array}\right]}\) \(\newcommand{\laspan}[1]{\text{Span}\{#1\}}\) \(\newcommand{\bcal}{\cal B}\) \(\newcommand{\ccal}{\cal C}\) \(\newcommand{\scal}{\cal S}\) \(\newcommand{\wcal}{\cal W}\) \(\newcommand{\ecal}{\cal E}\) \(\newcommand{\coords}[2]{\left\{#1\right\}_{#2}}\) \(\newcommand{\gray}[1]{\color{gray}{#1}}\) \(\newcommand{\lgray}[1]{\color{lightgray}{#1}}\) \(\newcommand{\rank}{\operatorname{rank}}\) \(\newcommand{\row}{\text{Row}}\) \(\newcommand{\col}{\text{Col}}\) \(\renewcommand{\row}{\text{Row}}\) \(\newcommand{\nul}{\text{Nul}}\) \(\newcommand{\var}{\text{Var}}\) \(\newcommand{\corr}{\text{corr}}\) \(\newcommand{\len}[1]{\left|#1\right|}\) \(\newcommand{\bbar}{\overline{\bvec}}\) \(\newcommand{\bhat}{\widehat{\bvec}}\) \(\newcommand{\bperp}{\bvec^\perp}\) \(\newcommand{\xhat}{\widehat{\xvec}}\) \(\newcommand{\vhat}{\widehat{\vvec}}\) \(\newcommand{\uhat}{\widehat{\uvec}}\) \(\newcommand{\what}{\widehat{\wvec}}\) \(\newcommand{\Sighat}{\widehat{\Sigma}}\) \(\newcommand{\lt}{<}\) \(\newcommand{\gt}{>}\) \(\newcommand{\amp}{&}\) \(\definecolor{fillinmathshade}{gray}{0.9}\)A Syllogism is a two-premise inference. A Categorical Syllogism is a two-premise inference where the premises and the conclusion are categorical propositions.
For example:
All Smart Animals can Use Computers
All Monkeys are Smart Animals
Therefore all Monkeys can use Computers.
I’ve deviated from standard form a bit (can you see how?), but we can see the basic anatomy here. The first premise is false, btw.
We have three “terms” here. Subjects and Predicates of each proposition are different kinds of “terms” or categories that we’re dealing with.
1) Major Term: The term that appears in the first premise and the conclusion as its predicate.
2) Middle Term: The term that doesn’t appear in the conclusion (only in both premises)
3) Minor Term: The term that appears in the second premise and the conclusion as its subject.
So in our example here, The Major Term is Things that can use computers, the Minor Term is Monkeys, and the Middle Term is Smart Animals.
Finally, the premises have names as well:
1) The Major Premise is the first premise (must have the major term)
2) The Minor Premise is the second premise (must have the minor term)
Mood and Figure
Syllogisms also have Mood and Figure.
Mood is simply a list of the categorical proposition forms used in the argument. Our argument about monkeys above is an AAA syllogism because it uses three A propositions. You can also have EIO or EAE or OOO syllogisms. The order is always Major Premise, Minor Premise, Conclusion. This is pretty straightforward.
Figure is a description of the “shape” of the proposition based on where the middle terms fall.
There are four figures:
| Figure 1 | Figure 2 | Figure 3 | Figure 4 |
|---|---|---|---|
| \(\frac{M-P\\S-M}{S-P}\) | \(\frac{P-M\\S-M}{S-P}\) | \(\frac{M-P\\M-S}{S-P}\) | \(\frac{P-M\\M-S}{S-P}\) |
Above, we have the figures with their labels. Note that “P” means “major term” (or predicate of the conclusion) and “S” means “minor term” (or subject of the conclusion).
Below, you’ll see them laid out graphically, and you can see how they make the shape of a dress shirt’s collars. This is a mnemonic device for remembering the shape of the figures.

Once we know the Mood and Figure of a syllogism, we can a) reconstruct the structure in standard form without any more information and b) identify whether or not it’s a valid syllogism structure. How? Well by memorizing the list of valid structures.
Three-Term Diagrams
Okay, now that we’ve got some of the terminology out of the way, we can start to see how syllogisms work.
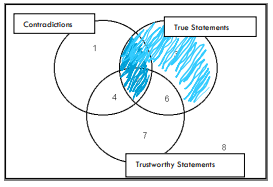
No Contradictions are True Statements
All True Statements are Trustworthy Statements
Therefore No Contradictions are Trustworthy Statements
Syllogisms post relations between categories that, taken together, already contain another relation between a category. The best way to see this is by going straight to Venn Diagrams.
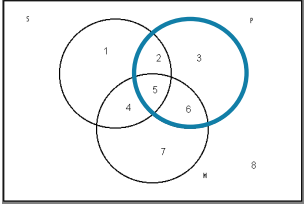
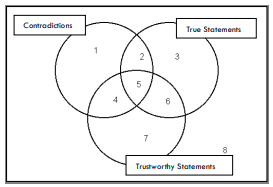
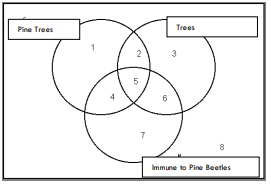
In order to diagram three terms, we’ll need to beef up our Venn Diagram a bit:
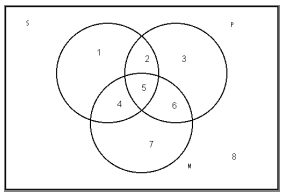
The names of the regions aren’t super important. You’ll find different numbers or letters being used in different texts and videos. What is important is that we see that we now have three circles and more regions that can be filled in or X’d.
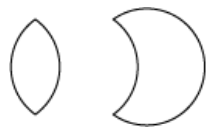
Rest assured, though, we’re still only ever working with two circles at a time, just like we did with immediate inferences and single propositions.
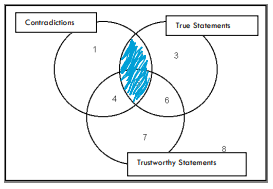
This means that you’ll only ever be focusing on a region that looks like these:
So even if your diagram looks like this:
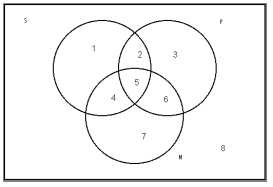
You'll still focus only on this:
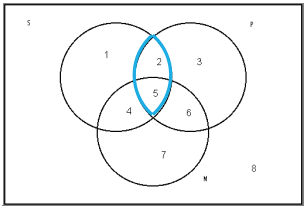
Or this:
At any given time.
Analyzing Syllogisms
Okay, how do go about analyzing syllogisms?
Let’s recall our previous example:
No Contradictions are True Statements
All True Statements are Trustworthy Statements
Therefore No Contradictions are Trustworthy Statements
We have three terms in this syllogism:
1) Trustworthy Statements (Major Term)
2) True Statements (Middle Term)
3) Contradictions (Minor Term)
We assign each a circle (just like we have been doing):
Then we take each statement and diagram it normally:
Note that here, we’re only focusing on these two circles and ignoring the other:
Moving on...
This time, we’ve focused on a different pair of circles and ignored Contradictions instead.
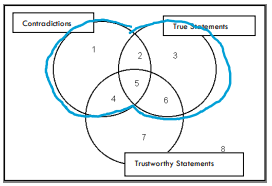
Now we look at the conclusion and try to discern whether the information is already present in the diagram:
Therefore, No Contradictions are Trustworthy Statements
Here’s the diagram for this statement:
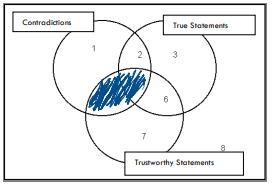
But this isn’t contained in twice-shaded the diagram above because region 4 is not totally filled in. For all we know, according to our twice-shaded diagram, there could be a Contradiction that is a Trustworthy Statement (there could be something in region 4).
Therefore, this syllogism is Invalid.
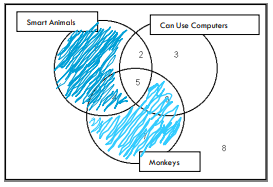
Here’s another example from above:
All Smart Animals can Use Computers
All Monkeys are Smart Animals
Therefore all Monkeys can use Computers.
If we diagram this syllogism following the steps above, we get the following diagram:
Then we look at our “target diagram” or the diagram of the conclusion:
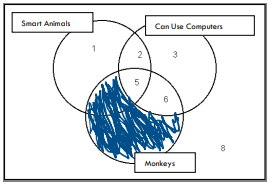
And we find that it is already represented in our premise diagram:

Notice how the dark blue outline is totally filled in in the premise diagram, so in overlaying our conclusion diagram, we won’t be changing the diagram at all.
Therefore, this syllogism is Valid.
Let’s try a particular syllogism:
No Pine Trees are Immune to Pine Beetles
Some Tree is a Pine Tree
So, sadly, Some Tree is not Immune to Pine Beetles
|
Again, I’ve deviated from standard form, but so long as we understand what they’re saying, it isn't too important.
|
Here we are after the first premise is diagrammed:
|
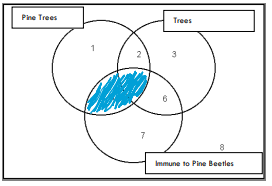
Now, normally when we put an X in a diagram, we’ll do the following:
Say the proposition is Some S is a P

Note how I’ve put the X on the line, signifying that we don’t know whether it goes in region 2 or 5.
Now Suppose we already have the proposition No M is a P in place:

This time, when we go to diagram Some S is a P, we’ll be forced to put it in region 2 since we know it can’t be in region 5.
In general, therefore, it’s best to diagram the universal statements first.
Okay, back to Pine Trees:
Piney is a Pine Tree, so we put an X:
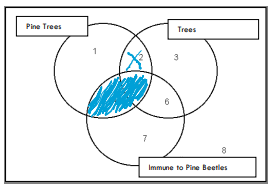
Then we ask whether the conclusion diagram is already represented.

Note how our X is straddling the line between 2 and 3 because any tree in 2 or 3 is not Immune to Pine Beetles, which is what we’re trying to express.
Is that information contained in the previous diagram? Yes, there is an X in 2, which is more specific than “There is an X in 2 or 3”. We know, therefore, that there is a tree that isn’t immune to pine beetles and that tree is one of the pine trees. So, this argument is Valid.