4.11: The Second Intermediate Period
- Page ID
- 72188
\( \newcommand{\vecs}[1]{\overset { \scriptstyle \rightharpoonup} {\mathbf{#1}} } \)
\( \newcommand{\vecd}[1]{\overset{-\!-\!\rightharpoonup}{\vphantom{a}\smash {#1}}} \)
\( \newcommand{\dsum}{\displaystyle\sum\limits} \)
\( \newcommand{\dint}{\displaystyle\int\limits} \)
\( \newcommand{\dlim}{\displaystyle\lim\limits} \)
\( \newcommand{\id}{\mathrm{id}}\) \( \newcommand{\Span}{\mathrm{span}}\)
( \newcommand{\kernel}{\mathrm{null}\,}\) \( \newcommand{\range}{\mathrm{range}\,}\)
\( \newcommand{\RealPart}{\mathrm{Re}}\) \( \newcommand{\ImaginaryPart}{\mathrm{Im}}\)
\( \newcommand{\Argument}{\mathrm{Arg}}\) \( \newcommand{\norm}[1]{\| #1 \|}\)
\( \newcommand{\inner}[2]{\langle #1, #2 \rangle}\)
\( \newcommand{\Span}{\mathrm{span}}\)
\( \newcommand{\id}{\mathrm{id}}\)
\( \newcommand{\Span}{\mathrm{span}}\)
\( \newcommand{\kernel}{\mathrm{null}\,}\)
\( \newcommand{\range}{\mathrm{range}\,}\)
\( \newcommand{\RealPart}{\mathrm{Re}}\)
\( \newcommand{\ImaginaryPart}{\mathrm{Im}}\)
\( \newcommand{\Argument}{\mathrm{Arg}}\)
\( \newcommand{\norm}[1]{\| #1 \|}\)
\( \newcommand{\inner}[2]{\langle #1, #2 \rangle}\)
\( \newcommand{\Span}{\mathrm{span}}\) \( \newcommand{\AA}{\unicode[.8,0]{x212B}}\)
\( \newcommand{\vectorA}[1]{\vec{#1}} % arrow\)
\( \newcommand{\vectorAt}[1]{\vec{\text{#1}}} % arrow\)
\( \newcommand{\vectorB}[1]{\overset { \scriptstyle \rightharpoonup} {\mathbf{#1}} } \)
\( \newcommand{\vectorC}[1]{\textbf{#1}} \)
\( \newcommand{\vectorD}[1]{\overrightarrow{#1}} \)
\( \newcommand{\vectorDt}[1]{\overrightarrow{\text{#1}}} \)
\( \newcommand{\vectE}[1]{\overset{-\!-\!\rightharpoonup}{\vphantom{a}\smash{\mathbf {#1}}}} \)
\( \newcommand{\vecs}[1]{\overset { \scriptstyle \rightharpoonup} {\mathbf{#1}} } \)
\(\newcommand{\longvect}{\overrightarrow}\)
\( \newcommand{\vecd}[1]{\overset{-\!-\!\rightharpoonup}{\vphantom{a}\smash {#1}}} \)
\(\newcommand{\avec}{\mathbf a}\) \(\newcommand{\bvec}{\mathbf b}\) \(\newcommand{\cvec}{\mathbf c}\) \(\newcommand{\dvec}{\mathbf d}\) \(\newcommand{\dtil}{\widetilde{\mathbf d}}\) \(\newcommand{\evec}{\mathbf e}\) \(\newcommand{\fvec}{\mathbf f}\) \(\newcommand{\nvec}{\mathbf n}\) \(\newcommand{\pvec}{\mathbf p}\) \(\newcommand{\qvec}{\mathbf q}\) \(\newcommand{\svec}{\mathbf s}\) \(\newcommand{\tvec}{\mathbf t}\) \(\newcommand{\uvec}{\mathbf u}\) \(\newcommand{\vvec}{\mathbf v}\) \(\newcommand{\wvec}{\mathbf w}\) \(\newcommand{\xvec}{\mathbf x}\) \(\newcommand{\yvec}{\mathbf y}\) \(\newcommand{\zvec}{\mathbf z}\) \(\newcommand{\rvec}{\mathbf r}\) \(\newcommand{\mvec}{\mathbf m}\) \(\newcommand{\zerovec}{\mathbf 0}\) \(\newcommand{\onevec}{\mathbf 1}\) \(\newcommand{\real}{\mathbb R}\) \(\newcommand{\twovec}[2]{\left[\begin{array}{r}#1 \\ #2 \end{array}\right]}\) \(\newcommand{\ctwovec}[2]{\left[\begin{array}{c}#1 \\ #2 \end{array}\right]}\) \(\newcommand{\threevec}[3]{\left[\begin{array}{r}#1 \\ #2 \\ #3 \end{array}\right]}\) \(\newcommand{\cthreevec}[3]{\left[\begin{array}{c}#1 \\ #2 \\ #3 \end{array}\right]}\) \(\newcommand{\fourvec}[4]{\left[\begin{array}{r}#1 \\ #2 \\ #3 \\ #4 \end{array}\right]}\) \(\newcommand{\cfourvec}[4]{\left[\begin{array}{c}#1 \\ #2 \\ #3 \\ #4 \end{array}\right]}\) \(\newcommand{\fivevec}[5]{\left[\begin{array}{r}#1 \\ #2 \\ #3 \\ #4 \\ #5 \\ \end{array}\right]}\) \(\newcommand{\cfivevec}[5]{\left[\begin{array}{c}#1 \\ #2 \\ #3 \\ #4 \\ #5 \\ \end{array}\right]}\) \(\newcommand{\mattwo}[4]{\left[\begin{array}{rr}#1 \amp #2 \\ #3 \amp #4 \\ \end{array}\right]}\) \(\newcommand{\laspan}[1]{\text{Span}\{#1\}}\) \(\newcommand{\bcal}{\cal B}\) \(\newcommand{\ccal}{\cal C}\) \(\newcommand{\scal}{\cal S}\) \(\newcommand{\wcal}{\cal W}\) \(\newcommand{\ecal}{\cal E}\) \(\newcommand{\coords}[2]{\left\{#1\right\}_{#2}}\) \(\newcommand{\gray}[1]{\color{gray}{#1}}\) \(\newcommand{\lgray}[1]{\color{lightgray}{#1}}\) \(\newcommand{\rank}{\operatorname{rank}}\) \(\newcommand{\row}{\text{Row}}\) \(\newcommand{\col}{\text{Col}}\) \(\renewcommand{\row}{\text{Row}}\) \(\newcommand{\nul}{\text{Nul}}\) \(\newcommand{\var}{\text{Var}}\) \(\newcommand{\corr}{\text{corr}}\) \(\newcommand{\len}[1]{\left|#1\right|}\) \(\newcommand{\bbar}{\overline{\bvec}}\) \(\newcommand{\bhat}{\widehat{\bvec}}\) \(\newcommand{\bperp}{\bvec^\perp}\) \(\newcommand{\xhat}{\widehat{\xvec}}\) \(\newcommand{\vhat}{\widehat{\vvec}}\) \(\newcommand{\uhat}{\widehat{\uvec}}\) \(\newcommand{\what}{\widehat{\wvec}}\) \(\newcommand{\Sighat}{\widehat{\Sigma}}\) \(\newcommand{\lt}{<}\) \(\newcommand{\gt}{>}\) \(\newcommand{\amp}{&}\) \(\definecolor{fillinmathshade}{gray}{0.9}\)- Explain the dynamics between the various groups of people vying for power during the Second Intermediate Period
Key Points
- The brilliant Twelfth Dynasty was succeeded by a weaker Thirteenth Dynasty, which experienced a splintering of power.
- The Hyksos made their first appearance during the reign of Sobekhotep IV, and overran Egypt at the end of the Fourteenth Dynasty. They ruled through the Fifteenth and Sixteenth Dynasties.
- The Abydos Dynasty was a short-lived Dynasty that ruled over part of Upper Egypt, and was contemporaneous with the Fifteenth and Sixteenth Dynasties.
- The Seventeeth Dynasty established itself in Thebes around the time that the Hyksos took power in Egypt, and co-existed with the Hyksos through trade for a period of time. However, rulers from the Seventeenth Dynasty undertook several wars of liberation that eventually once again unified Egypt in the Eighteenth Dynasty.
Hyksos
An Asiatic people from West Asia who took over the eastern Nile Delta, ending the Thirteenth dynasty of Egypt and initiating the Second Intermediate Period.
Abydos Dynasty
A short-lived local dynasty ruling over parts of Upper Egypt during the Second Intermediate Period in Ancient Egypt.
Baal
The native storm god of the Hyksos.
Second Intermediate Period
Spanning the Fourteenth to Seventeenth Dynasties, a period of Egyptian history where power was split between the Hyksos and a Theban-based dynasty in Upper Egypt.
The Second Intermediate Period (c. 1782-1550 BCE) marks a time when Ancient Egypt once again fell into disarray between the end of the Middle Kingdom, and the start of the New Kingdom. It is best known as the period when the Hyksos, who reigned during the Fifteenth and Sixteenth Dynasties, made their appearance in Egypt.
The Thirteenth Dynasty (1803 – 1649 BCE)
The brilliant Egyptian Twelfth Dynasty—and the Golden Age of the Middle Kingdom— came to an end around 1800 BCE with the death of Queen Sobekneferu (1806-1802 BCE), and was succeeded by the much weaker Thirteenth Dynasty (1803-1649 BCE). Pharoahs ruled from Memphis until the Hyksos conquered the capital in 1650 BCE.
The Fourteenth Dynasty (c. 1725-1650 BCE)
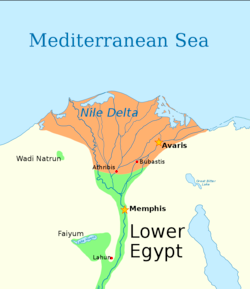
The Thirteenth Dynasty proved unable to hold onto the long land of Egypt, and the provincial ruling family in Xois, located in the marshes of the western Delta, broke away from the central authority to form the Fourteenth Dynasty. The capital of this dynasty was likely Avaris. It existed concurrently with the Thirteenth Dynasty, and its rulers seemed to be of Canaanite or West Semitic descent.

The Fifteenth Dynasty (c. 1650-1550 BCE)
The Hyksos made their first appearance in 1650 BCE and took control of the town of Avaris. They would also conquer the Sixteenth Dynasty in Thebes and a local dynasty in Abydos (see below). The Hyksos were of mixed Asiatic origin with mainly Semitic components, and their native storm god, Baal, became associated with the Egyptian storm god Seth. They brought technological innovation to Egypt, including bronze and pottery techniques, new breeds of animals and new crops, the horse and chariot, composite bow, battle-axes, and fortification techniques for warfare. These advances helped Egypt later rise to prominence.

The Sixteenth Dynasty
This dynasty ruled the Theban region in Upper Egypt for 70 years, while the armies of the Fifteenth Dynasty advanced against southern enemies and encroached on Sixteenth territory. Famine was an issue during this period, most notably during the reign of Neferhotep III.
The Abydos Dynasty
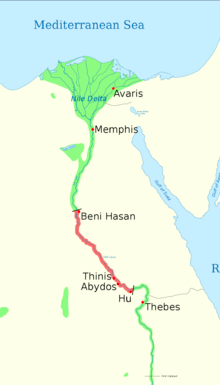
The Abydos Dynasty was a short-lived local dynasty that ruled over part of Upper Egypt and was contemporaneous with the Fifteenth and Sixteenth Dynasties c. 1650-1600 BCE. The royal necropolis of the Abydos Dynasty was found in the southern part of Abydos, in an area called Anubis Mountain in ancient times, adjacent to the tombs of the Middle Kingdom rulers.

The Seventeenth Dynasty (c. 1580-1550 BCE)
Around the time Memphis and Itj-tawy fell to the Hyksos, the native Egyptian ruling house in Thebes declared its independence from Itj-tawy and became the Seventeenth Dynasty. This dynasty would eventually lead the war of liberation that drove the Hyksos back into Asia. The Theban-based Seventeenth Dynasty restored numerous temples throughout Upper Egypt while maintaining peaceful trading relations with the Hyksos kingdom in the north. Indeed, Senakhtenre Ahmose, the first king in the line of Ahmoside kings, even imported white limestone from the Hyksos-controlled region of Tura to make a granary door at the Temple of Karnak. However, his successors—the final two kings of this dynasty—,Seqenenre Tao and Kamose, defeated the Hyksos through several wars of liberation. With the creation of the Eighteenth Dynasty around 1550 BCE, the New Kingdom period of Egyptian history began with Ahmose I, its first pharaoh, who completed the expulsion of the Hyksos from Egypt and placed the country, once again, under centralized administrative control.
Sources
- Boundless World History. Authored by: Boundless. Located at: https://www.boundless.com/world-history/textbooks/boundless-world-history-textbook/. License: CC BY-SA: Attribution-ShareAlike


