
4.4: Headings
- Page ID
- 51540

\( \newcommand{\vecs}[1]{\overset { \scriptstyle \rightharpoonup} {\mathbf{#1}} } \)
\( \newcommand{\vecd}[1]{\overset{-\!-\!\rightharpoonup}{\vphantom{a}\smash {#1}}} \)
\( \newcommand{\id}{\mathrm{id}}\) \( \newcommand{\Span}{\mathrm{span}}\)
( \newcommand{\kernel}{\mathrm{null}\,}\) \( \newcommand{\range}{\mathrm{range}\,}\)
\( \newcommand{\RealPart}{\mathrm{Re}}\) \( \newcommand{\ImaginaryPart}{\mathrm{Im}}\)
\( \newcommand{\Argument}{\mathrm{Arg}}\) \( \newcommand{\norm}[1]{\| #1 \|}\)
\( \newcommand{\inner}[2]{\langle #1, #2 \rangle}\)
\( \newcommand{\Span}{\mathrm{span}}\)
\( \newcommand{\id}{\mathrm{id}}\)
\( \newcommand{\Span}{\mathrm{span}}\)
\( \newcommand{\kernel}{\mathrm{null}\,}\)
\( \newcommand{\range}{\mathrm{range}\,}\)
\( \newcommand{\RealPart}{\mathrm{Re}}\)
\( \newcommand{\ImaginaryPart}{\mathrm{Im}}\)
\( \newcommand{\Argument}{\mathrm{Arg}}\)
\( \newcommand{\norm}[1]{\| #1 \|}\)
\( \newcommand{\inner}[2]{\langle #1, #2 \rangle}\)
\( \newcommand{\Span}{\mathrm{span}}\) \( \newcommand{\AA}{\unicode[.8,0]{x212B}}\)
\( \newcommand{\vectorA}[1]{\vec{#1}} % arrow\)
\( \newcommand{\vectorAt}[1]{\vec{\text{#1}}} % arrow\)
\( \newcommand{\vectorB}[1]{\overset { \scriptstyle \rightharpoonup} {\mathbf{#1}} } \)
\( \newcommand{\vectorC}[1]{\textbf{#1}} \)
\( \newcommand{\vectorD}[1]{\overrightarrow{#1}} \)
\( \newcommand{\vectorDt}[1]{\overrightarrow{\text{#1}}} \)
\( \newcommand{\vectE}[1]{\overset{-\!-\!\rightharpoonup}{\vphantom{a}\smash{\mathbf {#1}}}} \)
\( \newcommand{\vecs}[1]{\overset { \scriptstyle \rightharpoonup} {\mathbf{#1}} } \)
\( \newcommand{\vecd}[1]{\overset{-\!-\!\rightharpoonup}{\vphantom{a}\smash {#1}}} \)
\(\newcommand{\avec}{\mathbf a}\) \(\newcommand{\bvec}{\mathbf b}\) \(\newcommand{\cvec}{\mathbf c}\) \(\newcommand{\dvec}{\mathbf d}\) \(\newcommand{\dtil}{\widetilde{\mathbf d}}\) \(\newcommand{\evec}{\mathbf e}\) \(\newcommand{\fvec}{\mathbf f}\) \(\newcommand{\nvec}{\mathbf n}\) \(\newcommand{\pvec}{\mathbf p}\) \(\newcommand{\qvec}{\mathbf q}\) \(\newcommand{\svec}{\mathbf s}\) \(\newcommand{\tvec}{\mathbf t}\) \(\newcommand{\uvec}{\mathbf u}\) \(\newcommand{\vvec}{\mathbf v}\) \(\newcommand{\wvec}{\mathbf w}\) \(\newcommand{\xvec}{\mathbf x}\) \(\newcommand{\yvec}{\mathbf y}\) \(\newcommand{\zvec}{\mathbf z}\) \(\newcommand{\rvec}{\mathbf r}\) \(\newcommand{\mvec}{\mathbf m}\) \(\newcommand{\zerovec}{\mathbf 0}\) \(\newcommand{\onevec}{\mathbf 1}\) \(\newcommand{\real}{\mathbb R}\) \(\newcommand{\twovec}[2]{\left[\begin{array}{r}#1 \\ #2 \end{array}\right]}\) \(\newcommand{\ctwovec}[2]{\left[\begin{array}{c}#1 \\ #2 \end{array}\right]}\) \(\newcommand{\threevec}[3]{\left[\begin{array}{r}#1 \\ #2 \\ #3 \end{array}\right]}\) \(\newcommand{\cthreevec}[3]{\left[\begin{array}{c}#1 \\ #2 \\ #3 \end{array}\right]}\) \(\newcommand{\fourvec}[4]{\left[\begin{array}{r}#1 \\ #2 \\ #3 \\ #4 \end{array}\right]}\) \(\newcommand{\cfourvec}[4]{\left[\begin{array}{c}#1 \\ #2 \\ #3 \\ #4 \end{array}\right]}\) \(\newcommand{\fivevec}[5]{\left[\begin{array}{r}#1 \\ #2 \\ #3 \\ #4 \\ #5 \\ \end{array}\right]}\) \(\newcommand{\cfivevec}[5]{\left[\begin{array}{c}#1 \\ #2 \\ #3 \\ #4 \\ #5 \\ \end{array}\right]}\) \(\newcommand{\mattwo}[4]{\left[\begin{array}{rr}#1 \amp #2 \\ #3 \amp #4 \\ \end{array}\right]}\) \(\newcommand{\laspan}[1]{\text{Span}\{#1\}}\) \(\newcommand{\bcal}{\cal B}\) \(\newcommand{\ccal}{\cal C}\) \(\newcommand{\scal}{\cal S}\) \(\newcommand{\wcal}{\cal W}\) \(\newcommand{\ecal}{\cal E}\) \(\newcommand{\coords}[2]{\left\{#1\right\}_{#2}}\) \(\newcommand{\gray}[1]{\color{gray}{#1}}\) \(\newcommand{\lgray}[1]{\color{lightgray}{#1}}\) \(\newcommand{\rank}{\operatorname{rank}}\) \(\newcommand{\row}{\text{Row}}\) \(\newcommand{\col}{\text{Col}}\) \(\renewcommand{\row}{\text{Row}}\) \(\newcommand{\nul}{\text{Nul}}\) \(\newcommand{\var}{\text{Var}}\) \(\newcommand{\corr}{\text{corr}}\) \(\newcommand{\len}[1]{\left|#1\right|}\) \(\newcommand{\bbar}{\overline{\bvec}}\) \(\newcommand{\bhat}{\widehat{\bvec}}\) \(\newcommand{\bperp}{\bvec^\perp}\) \(\newcommand{\xhat}{\widehat{\xvec}}\) \(\newcommand{\vhat}{\widehat{\vvec}}\) \(\newcommand{\uhat}{\widehat{\uvec}}\) \(\newcommand{\what}{\widehat{\wvec}}\) \(\newcommand{\Sighat}{\widehat{\Sigma}}\) \(\newcommand{\lt}{<}\) \(\newcommand{\gt}{>}\) \(\newcommand{\amp}{&}\) \(\definecolor{fillinmathshade}{gray}{0.9}\)Learning Objectives
Upon completion of this chapter, readers will be able to:
- Identify the uses of headings.
- Distinguish between the different levels of headings.
- Evaluate the use of headings in technical documents.
- Use the Styles tool in Microsoft Word to create custom headings.
- Create and use headings in your own documents.
One of the most useful characteristics of technical writing is the use of headings.
Headings are the titles and subtitles you see within the actual text of much scientific, technical, and business writing. Headings are like the parts of an outline that have been pasted into the actual pages of the document.
Headings are an important feature of technical writing: they alert readers to upcoming topics and subtopics, help readers find their way around in long reports and skip what they are not interested in, and break up long stretches of straight text. They make text easy to navigate and enable the reader to find information they need quickly.
Headings are also useful for you, the writer. They keep you organized and focused on the topic. When you begin using headings, your impulse may be to slap in the headings after you've written the rough draft. Instead, visualize the headings before you start the rough draft, and plug them in as you write.
Take a look at this page from Healthy People.gov: Environmental Health
Examine the page, and observe how the use of headings makes the document readable and accessible. Its easy to see what each section is about, and you can quickly jump to sections that interest you.
"Well-designed headings can help not only readers but also writers understand the organization of a document."
General Guidelines for Headings
In this chapter, you are encouraged to use a specific style of headings. If you want to use a different style, contact your instructor. Here are some specific guidelines on headings (see the figures at the end of this chapter for illustrations of these guidelines):
- Use headings to mark off the boundaries of the major sections and subsections of a report.
- Until you become confident in the use of heading styles, use exactly the design for headings described here and shown in the illustrations in this chapter. Use the same spacing (vertical and horizontal location), capitalization, punctuation, and typography (bold, italics, etc.)
- Try for 2 to 3 headings per regular page of text. Don't overdo headings: for example, a heading for each of a series of one- or two-sentence paragraphs. (Also, you don't need a heading per paragraph; normally, an individual heading can apply to multiple paragraphs.)
- For short documents, begin with the second-level heading; skip the first-level.
- Make the phrasing of headings parallel. In the following illustration, notice that the second-level headings use the how, what, when, where, why style of phrasing. The third-levels use noun phrases. (Check out this tutorial on Parallel Structure from the Purdue OWL)
- Make the phrasing of headings self-explanatory: instead of "Background" or "Technical Information," make it more specific, such as "Physics of Fiber Optics."
- Make headings indicate the range of topic coverage in the section. For example, if the section covers the design and operation of a pressurized water reactor, the heading "Pressurized Water Reactor Design" would be incomplete and misleading.
- Avoid "lone" headings—any heading by itself within a section without another like it in that same section. For example, avoid having a second-level heading followed by only one third-level and then by another second-level. (The third-level heading would be the lone heading.)
- Avoid pronoun reference to headings. For example, if you have a third-level heading "Torque," don't begin the sentence following it with something like this: "This is a physics principle....."
- When possible, omit articles from the beginning of headings. For example, "The Pressurized Water Reactor" can easily be changed to "Pressurized Water Reactor" or, better yet, "Pressurized Water Reactors."
- Don't use headings as lead-ins to lists or as figure titles.
- Avoid "widowed" headings: that's where a heading occurs at the bottom of a page and the text it introduces starts at the top of the next page. Keep at least two lines of body text with the heading, or force it to start the new page.
Headings: Specific Format and Style
The style and format for headings shown in this chapter is not the "right" or the "only" one, just one among many. Many technical writers must write according to a "house" style. Most organizations expect their documents to look a certain way. Using the style and format for headings described here gives you some experience with one of the key requirements in technical writing—writing according to "specifications."
To see the "house style" for headings—the style and format for headings you will use—see the illustrations in this chapter. Pay close attention to formatting details such as vertical and horizontal spacing, capitalization, use of bold, italics, or underlining, and punctuation. Notice that you can substitute bold for underlining.
Headings occur within the body of a document. Don't confuse headings with document titles. Although titles may look like first-level headings in smaller documents, think of them as separate things. Now, here are the specifications for headings in this chapter.
Note: To make things less complicated, consider the document title as a title not as a first-level heading. They certainly look the same, except that the title could be prefaced by a roman numeral. In short documents such as those you write for technical writing classes, use a centered title and then start with second-level headings in the body of the document.
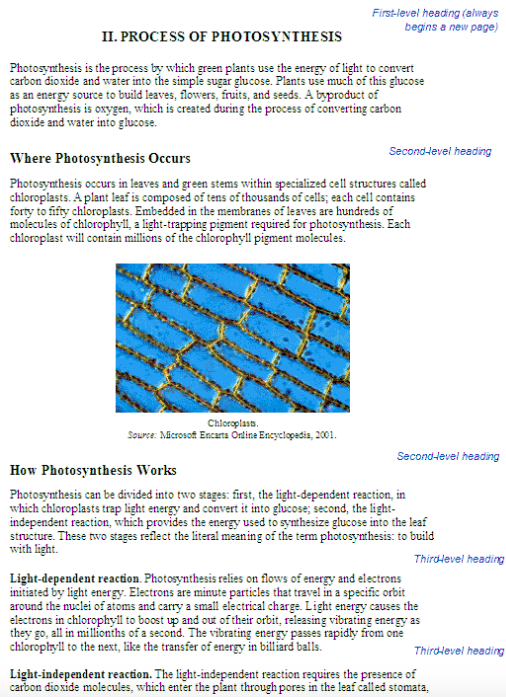
Figure \(\PageIndex{1}\)
First-Level Headings
First-level headings are for formal reports with multiple sections (or "chapters"). If you are writing a brief document, start with secondlevel headings in the body of the document. Follow these guidelines for first-level headings:
- Make first-levels all-caps.
- Use Roman numerals with first-levels.
- Bold the entire heading including the Roman numeral.
- Make first-levels centered on the page.
- Start a new page whenever you have a first-level heading.
- Begin first-levels on the standard first text line of a page.
Note: In short documents such as those you write for technical writing classes, use a centered title and then start with second-level headings in the body of the document.
Second-Level Headings
In smaller documents (such as a two-page set of instructions), first level headings are too much. Start with second-level headings in the body of these smaller documents. Follow these guidelines for second-level headings:
- Make second-levels headline-style caps (every main word).
- Use bold on second-levels.
- Do not include outlining apparatus such as "A." or "B." or "1." or "2." with second-levels.
- Make second-levels flush left.
- Leave the equivalent of 2 blank lines between previous text and second-levels.
- Leave the equivalent of 1 blank line between second-levels and the following text.
Note: If you prefer to make third-level headings standalone like second-levels, they may not be visually distinct enough from second-levels. If so, put a top border on second-levels, as you can see in this chapter.
Third-Level Headings
Third-level headings are "run in to" the paragraph they introduce. Follow these guidelines for third-level headings:
- Make third-levels sentence-style caps. Use bold for third-levels including the period.
- End third-levels with a period, which is also bold. Do not include outlining apparatus such as "A." or "B." or "1." or "2." with third-levels.
- Either indent third-levels standard paragraph indentation, or just start third-levels flush left.
- Do not make third-levels a grammatical part of sentences that follow.
- Whether third-levels are indented or not, start all following lines flush left. Don't indent the entire paragraph.
- Use the standard spacing between paragraphs for paragraphs that contain third-levels.
Note: If you need a fourth level of heading, consider using italics instead of bold on the run-in heading format
Using Word-Processing Styles for Headings
If you manually format each individual heading using the guidelines presented in the preceding, you'll find you're doing quite a lot of repetitive work. The styles provided by Microsoft Word, OpenOffice Writer, and other software save you this work. You simply select Heading 1, Heading 2, Heading 3, and so on. You'll notice the format and style are different from what is presented here. However, you can design your own styles for headings. Here's a video tutorial that will show you quickly how to use the Styles feature in MicroSoft Word.
Styles in MS Word
Common Problems with Headings
When you design your own heading style, be careful about going overboard with fancy typographical elements. Also, continue to use the guidelines presented in this chapter; they apply to practically any design. And finally, use your heading design consistently throughout your document.
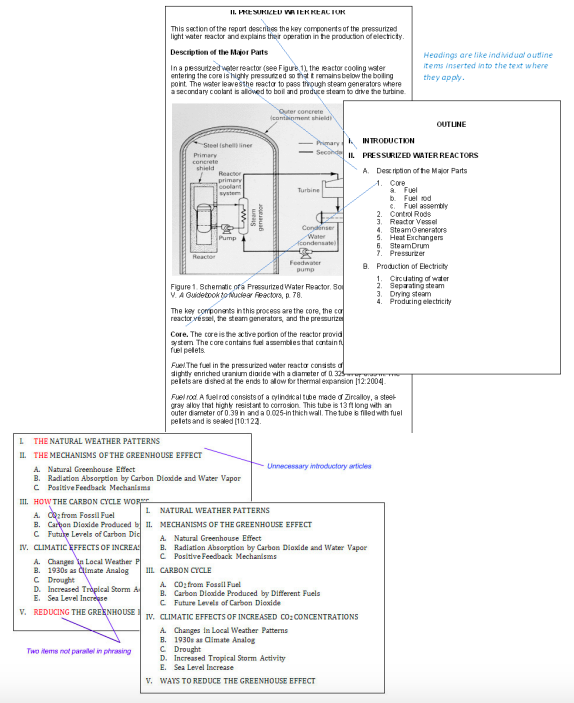
Figure \(\PageIndex{2}\)
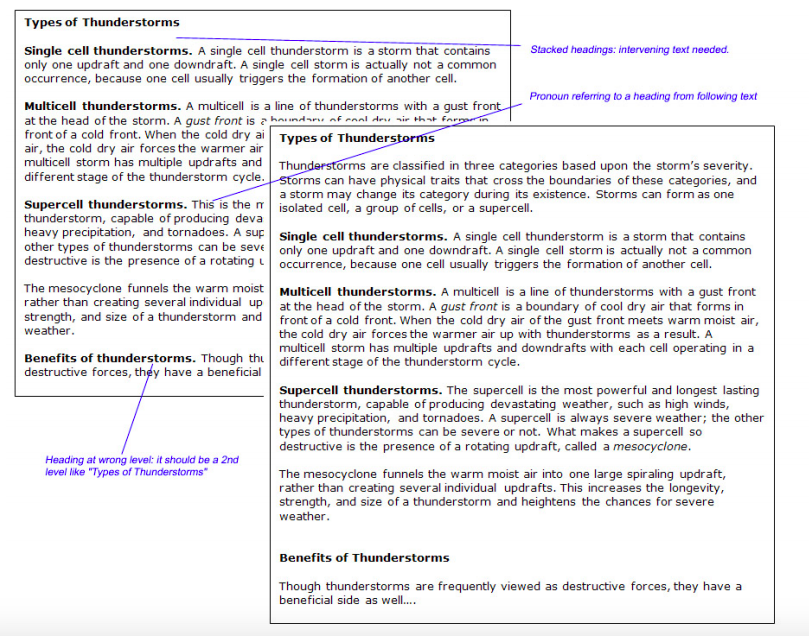
Figure \(\PageIndex{3}\)
A few more common heading problems: nonstandard capitalization, incorrect subordination, and "stacked" heads. There's nothing "wrong" about the caps style used in the first version; it's just not the "house" style. Subordination refers to the level of headings. "Stacked" headings occur when there is no text between two consecutive headings.
Want some more information on using headings? The Purdue OWL has a great guide on using APA style to create your headings. This style is also compatible with the styles noted for scientific journals. Check out the APA Headings page!
Practice what you've learned! Complete the following activities to reinforce what you have learned about headings.
Activity 1: Locate a professional journal in your chosen major field,and locate the guidelines for writers who want to submit articles to that journal. What format is given for the use of headings?
Activity 2: In that same journal (you may have to actually visit the library...or use the university's data base) examine the use of headings. Can you explain in your own words how the headings work to organize the article? See if you can find examples of headings that don't reflect the guidelines in this chapter.