
7: Depth of Field
- Page ID
- 91706
\( \newcommand{\vecs}[1]{\overset { \scriptstyle \rightharpoonup} {\mathbf{#1}} } \)
\( \newcommand{\vecd}[1]{\overset{-\!-\!\rightharpoonup}{\vphantom{a}\smash {#1}}} \)
\( \newcommand{\dsum}{\displaystyle\sum\limits} \)
\( \newcommand{\dint}{\displaystyle\int\limits} \)
\( \newcommand{\dlim}{\displaystyle\lim\limits} \)
\( \newcommand{\id}{\mathrm{id}}\) \( \newcommand{\Span}{\mathrm{span}}\)
( \newcommand{\kernel}{\mathrm{null}\,}\) \( \newcommand{\range}{\mathrm{range}\,}\)
\( \newcommand{\RealPart}{\mathrm{Re}}\) \( \newcommand{\ImaginaryPart}{\mathrm{Im}}\)
\( \newcommand{\Argument}{\mathrm{Arg}}\) \( \newcommand{\norm}[1]{\| #1 \|}\)
\( \newcommand{\inner}[2]{\langle #1, #2 \rangle}\)
\( \newcommand{\Span}{\mathrm{span}}\)
\( \newcommand{\id}{\mathrm{id}}\)
\( \newcommand{\Span}{\mathrm{span}}\)
\( \newcommand{\kernel}{\mathrm{null}\,}\)
\( \newcommand{\range}{\mathrm{range}\,}\)
\( \newcommand{\RealPart}{\mathrm{Re}}\)
\( \newcommand{\ImaginaryPart}{\mathrm{Im}}\)
\( \newcommand{\Argument}{\mathrm{Arg}}\)
\( \newcommand{\norm}[1]{\| #1 \|}\)
\( \newcommand{\inner}[2]{\langle #1, #2 \rangle}\)
\( \newcommand{\Span}{\mathrm{span}}\) \( \newcommand{\AA}{\unicode[.8,0]{x212B}}\)
\( \newcommand{\vectorA}[1]{\vec{#1}} % arrow\)
\( \newcommand{\vectorAt}[1]{\vec{\text{#1}}} % arrow\)
\( \newcommand{\vectorB}[1]{\overset { \scriptstyle \rightharpoonup} {\mathbf{#1}} } \)
\( \newcommand{\vectorC}[1]{\textbf{#1}} \)
\( \newcommand{\vectorD}[1]{\overrightarrow{#1}} \)
\( \newcommand{\vectorDt}[1]{\overrightarrow{\text{#1}}} \)
\( \newcommand{\vectE}[1]{\overset{-\!-\!\rightharpoonup}{\vphantom{a}\smash{\mathbf {#1}}}} \)
\( \newcommand{\vecs}[1]{\overset { \scriptstyle \rightharpoonup} {\mathbf{#1}} } \)
\(\newcommand{\longvect}{\overrightarrow}\)
\( \newcommand{\vecd}[1]{\overset{-\!-\!\rightharpoonup}{\vphantom{a}\smash {#1}}} \)
\(\newcommand{\avec}{\mathbf a}\) \(\newcommand{\bvec}{\mathbf b}\) \(\newcommand{\cvec}{\mathbf c}\) \(\newcommand{\dvec}{\mathbf d}\) \(\newcommand{\dtil}{\widetilde{\mathbf d}}\) \(\newcommand{\evec}{\mathbf e}\) \(\newcommand{\fvec}{\mathbf f}\) \(\newcommand{\nvec}{\mathbf n}\) \(\newcommand{\pvec}{\mathbf p}\) \(\newcommand{\qvec}{\mathbf q}\) \(\newcommand{\svec}{\mathbf s}\) \(\newcommand{\tvec}{\mathbf t}\) \(\newcommand{\uvec}{\mathbf u}\) \(\newcommand{\vvec}{\mathbf v}\) \(\newcommand{\wvec}{\mathbf w}\) \(\newcommand{\xvec}{\mathbf x}\) \(\newcommand{\yvec}{\mathbf y}\) \(\newcommand{\zvec}{\mathbf z}\) \(\newcommand{\rvec}{\mathbf r}\) \(\newcommand{\mvec}{\mathbf m}\) \(\newcommand{\zerovec}{\mathbf 0}\) \(\newcommand{\onevec}{\mathbf 1}\) \(\newcommand{\real}{\mathbb R}\) \(\newcommand{\twovec}[2]{\left[\begin{array}{r}#1 \\ #2 \end{array}\right]}\) \(\newcommand{\ctwovec}[2]{\left[\begin{array}{c}#1 \\ #2 \end{array}\right]}\) \(\newcommand{\threevec}[3]{\left[\begin{array}{r}#1 \\ #2 \\ #3 \end{array}\right]}\) \(\newcommand{\cthreevec}[3]{\left[\begin{array}{c}#1 \\ #2 \\ #3 \end{array}\right]}\) \(\newcommand{\fourvec}[4]{\left[\begin{array}{r}#1 \\ #2 \\ #3 \\ #4 \end{array}\right]}\) \(\newcommand{\cfourvec}[4]{\left[\begin{array}{c}#1 \\ #2 \\ #3 \\ #4 \end{array}\right]}\) \(\newcommand{\fivevec}[5]{\left[\begin{array}{r}#1 \\ #2 \\ #3 \\ #4 \\ #5 \\ \end{array}\right]}\) \(\newcommand{\cfivevec}[5]{\left[\begin{array}{c}#1 \\ #2 \\ #3 \\ #4 \\ #5 \\ \end{array}\right]}\) \(\newcommand{\mattwo}[4]{\left[\begin{array}{rr}#1 \amp #2 \\ #3 \amp #4 \\ \end{array}\right]}\) \(\newcommand{\laspan}[1]{\text{Span}\{#1\}}\) \(\newcommand{\bcal}{\cal B}\) \(\newcommand{\ccal}{\cal C}\) \(\newcommand{\scal}{\cal S}\) \(\newcommand{\wcal}{\cal W}\) \(\newcommand{\ecal}{\cal E}\) \(\newcommand{\coords}[2]{\left\{#1\right\}_{#2}}\) \(\newcommand{\gray}[1]{\color{gray}{#1}}\) \(\newcommand{\lgray}[1]{\color{lightgray}{#1}}\) \(\newcommand{\rank}{\operatorname{rank}}\) \(\newcommand{\row}{\text{Row}}\) \(\newcommand{\col}{\text{Col}}\) \(\renewcommand{\row}{\text{Row}}\) \(\newcommand{\nul}{\text{Nul}}\) \(\newcommand{\var}{\text{Var}}\) \(\newcommand{\corr}{\text{corr}}\) \(\newcommand{\len}[1]{\left|#1\right|}\) \(\newcommand{\bbar}{\overline{\bvec}}\) \(\newcommand{\bhat}{\widehat{\bvec}}\) \(\newcommand{\bperp}{\bvec^\perp}\) \(\newcommand{\xhat}{\widehat{\xvec}}\) \(\newcommand{\vhat}{\widehat{\vvec}}\) \(\newcommand{\uhat}{\widehat{\uvec}}\) \(\newcommand{\what}{\widehat{\wvec}}\) \(\newcommand{\Sighat}{\widehat{\Sigma}}\) \(\newcommand{\lt}{<}\) \(\newcommand{\gt}{>}\) \(\newcommand{\amp}{&}\) \(\definecolor{fillinmathshade}{gray}{0.9}\)Controlling the focus in a photograph—what is in focus, what is out of focus, and how much so for each, is important. This chapter explains how to control focus.
In the Lens chapter the concept of depth of field, or the amount in focus, was introduced. The primary way of controlling depth-of-field is with the aperture.
Aperture (F-Stop)
In the general sense, an aperture is an opening. In photography, it is an adjustable opening at the center of the lens. Just like the iris in your eye, a smaller opening lets less light pass through the lens, and a larger opening lets in more light. Like adjusting a water faucet to vary the flow of water, aperture varies the flow of light.
With your camera in program mode, this aperture is controlled automatically by the camera, but it is often advantageous to control it yourself. This is because the size of the aperture also determines the amount in focus in the photograph.
The standard for describing the size of an aperture is a number that is called an f-stop. The lower the number, the larger the aperture. If this (lower the number the larger the opening) is confusing to you, just remember that it is backwards from what you might think it is.
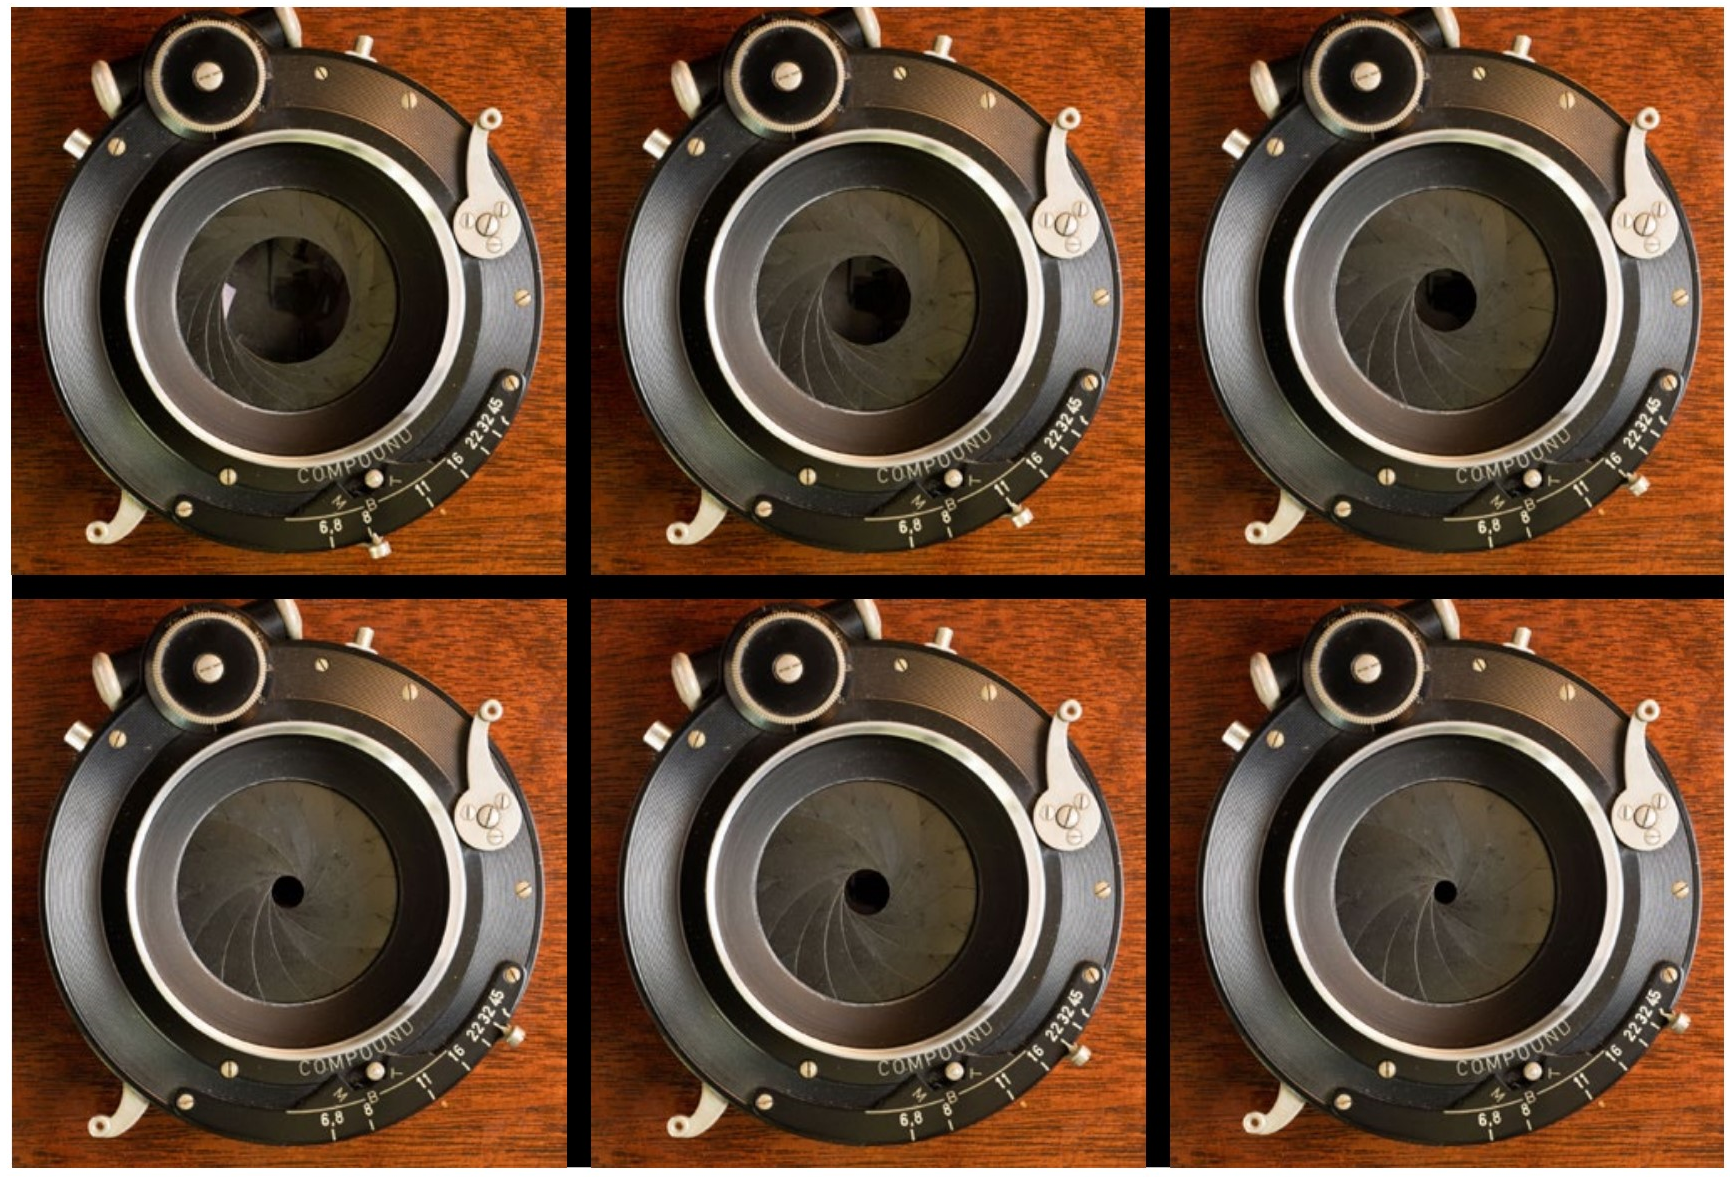
|
Different f-stops with an antique lens from f8 at the upper left to f45 at the lower right. These are exactly the same in a modern camera, although the range of possible f-stops may be different. |
While f-stop and aperture are fairly interchangeable terms, f-stop refers to the number, and the aperture refers to the opening. When referring to the relative size of the opening, the term aperture is used, as in a larger aperture. If you instead referred to a larger f-stop, there would be confusion since it is not clear if you are talking about the number or the opening.
Each model of lens has a different range of apertures (f-stops), but within that range, the numbers are standardized. So, just about any lens will have an f-stop of 8 (expressed f8 or f/8). This is a standard number. Another standard number is f5.6. This lets in twice the amount of light, or one stop more light (hey, here are those stops again meaning one half or twice the light). Conversely, f11 lets in one stop less light than f8.
Every photographer knows these numbers by heart, but don’t be too concerned about memorizing the actual numbers even though they will be referred to. Just remember that the higher the number (smaller aperture or opening), the less light—and that each standard number change is a stop change.
Plane of Focus
If you have your lens at the largest aperture and you are focused on something ten feet away, everything that is ten feet away will be in focus. Anything that is more or less than ten feet away will not be in focus. You can think of focus as a large plane, in this case ten feet away from the camera. Or like a large sheet of glass parallel with the back of the camera. This is called the plane of focus. Anything intersecting that plane will be in focus.
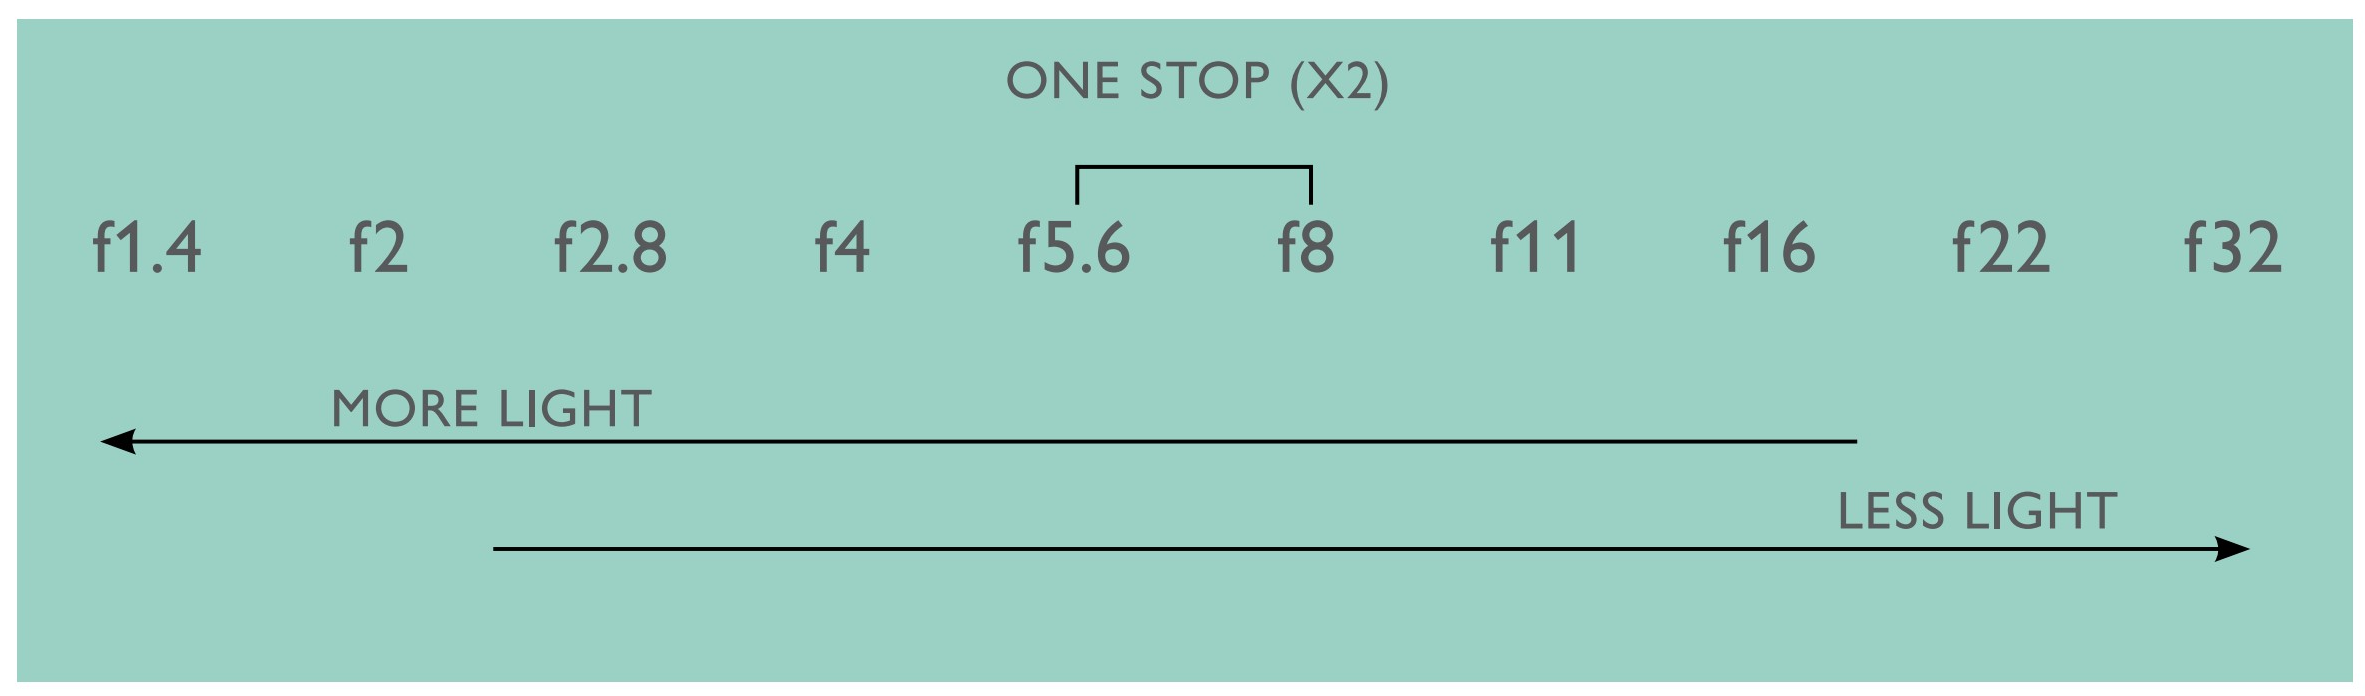
|
A range of standard f-stop numbers, each letting in half or double the amount of light. Your lens has a subset of these same numbers. |
F-Stop as Fraction or RatioAn f-stop of f4 (f/4 or 1:4) means that the diameter of the aperture is 1/4 the focal length of the lens. But there are exceptions this, and the practical implications of this relationship to a photographer are nil. |
Nonsense NumbersF-stops are usually referred to only by their standard numbers (like f8 and f11). These are also the numbers on some lenses. If you want to refer to an aperture between these numbers, you would say something like f11 plus a third-stop. Digital read-outs are not very good at saying f11 plus a third stop, but are good at saying f10 instead. Although this is the correct number, it is not on the standard stop scale, so for the photographer who is concerned with half and twice the amount of light, f10 doesn’t say much. |
As stated before, the only thing that matters with focus is distance from the camera. So, if your auto-focus lands upon something that is ten feet from the camera, it sets the focus to ten feet—anything that is ten feet away from the camera will be in focus at this setting.
This is all assuming your lens is opened up to the largest aperture. Things change when we stop down to a smaller aperture.
FocusFocus distances are not from the lens, but from the sensor. This is only a practical consideration when taking very close-up images. |
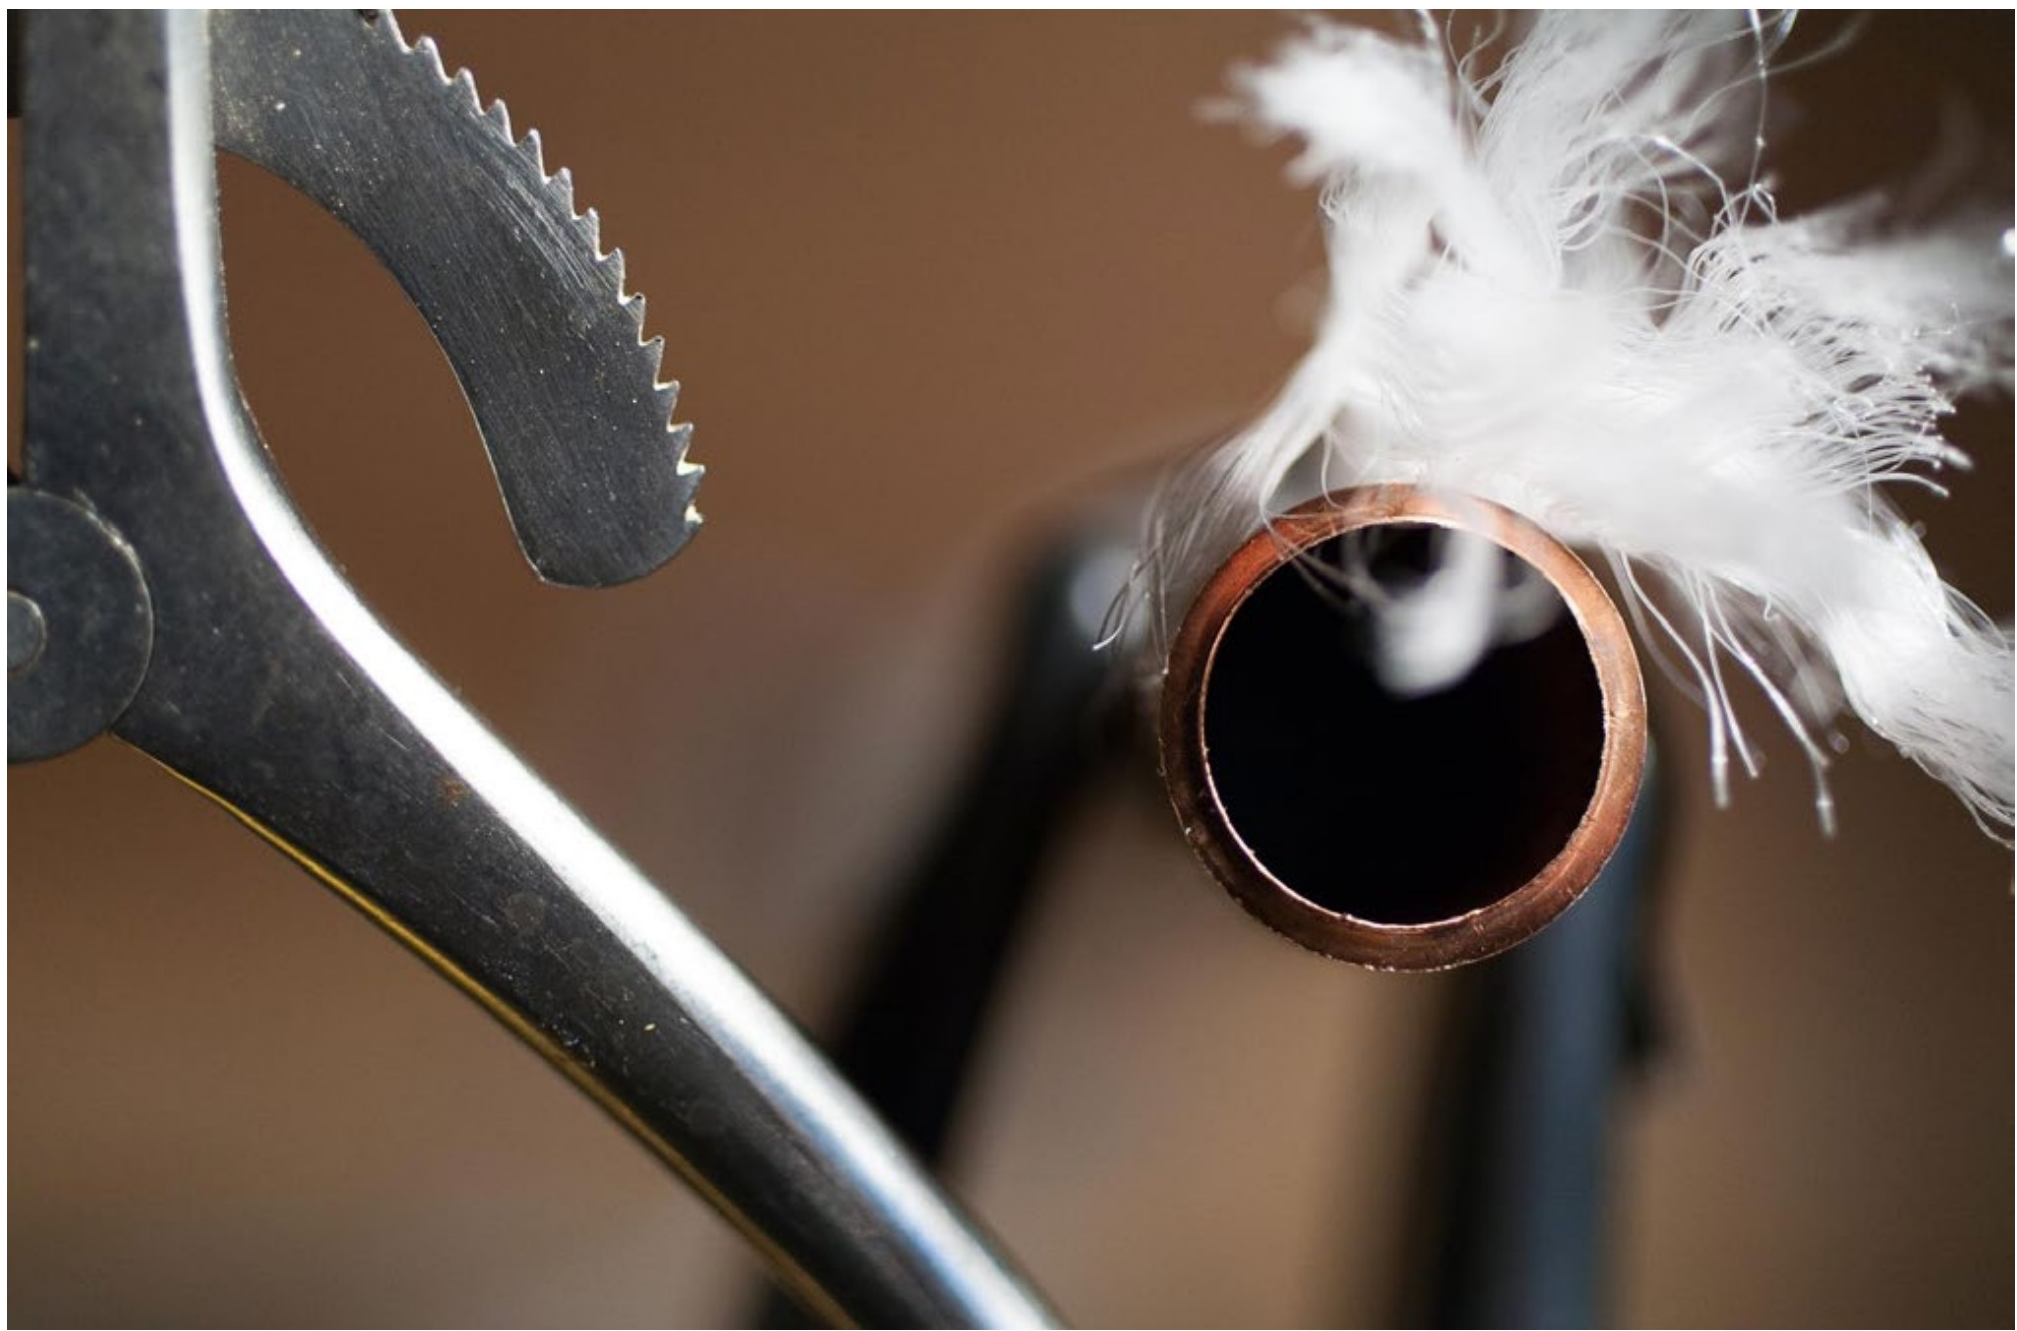
|
The steel instrument on the left, the copper pipe and parts of the nylon rope all intersect with the plane of focus. In this case that plane of focus includes everything about eight inches from the camera. |
|
Here the plane of focus is represented in two dimensions by the sharp green line. At ten feet, anything nearer or farther away will be out of focus. Objects farther away from the plane of focus will be blurrier. |
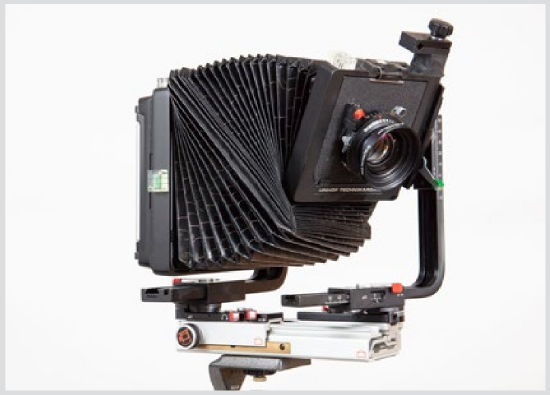
Tilting LensesSome special-use lenses and controls for large cameras (image below) allow tilting the plane of focus by tilting the lens. This allows getting both objects that are close to the camera and those far away in focus at the same time as long as they lie on the same plane (like the side of a building or the ground). Since these lenses also shift off-axis to control perspective, they are called tilt and shift lenses.
You will probably never need one of these lenses, but it is interesting to know that the plane of focus can be changed. |
|
|

Depth of Field
As you stop down your camera to a smaller aperture, the plane of focus effectively becomes thicker. More in front and behind the set focus point will also be in focus—lie within that plane of focus, which now has thickness. This thickness (depth) is called depth of field. Less depth of field means that the plane is thinner (therefore has less in focus) and more depth of field means the plane is thicker and has more is in focus. Studying the illustrations on the right and on the next page will help you understand this.
Depth of Field Preview
With most cameras you cannot see the changing depth of field as you change your f-stop. The reason for this is that aperture also controls the amount of light. If DSLR viewfinders actually showed the change in aperture, your viewing would get darker. With electronic viewing systems (DSLR back screen or mirrorless cameras) automatic focus might be less precise.
Instead, many cameras only activate the set f-stop when you actually take the photograph: The fully open aperture stops down to your set aperture (f-stop) a fraction of a second before the photograph is taken, then opens back up to the maximum size a fraction of a second after the photograph is taken.
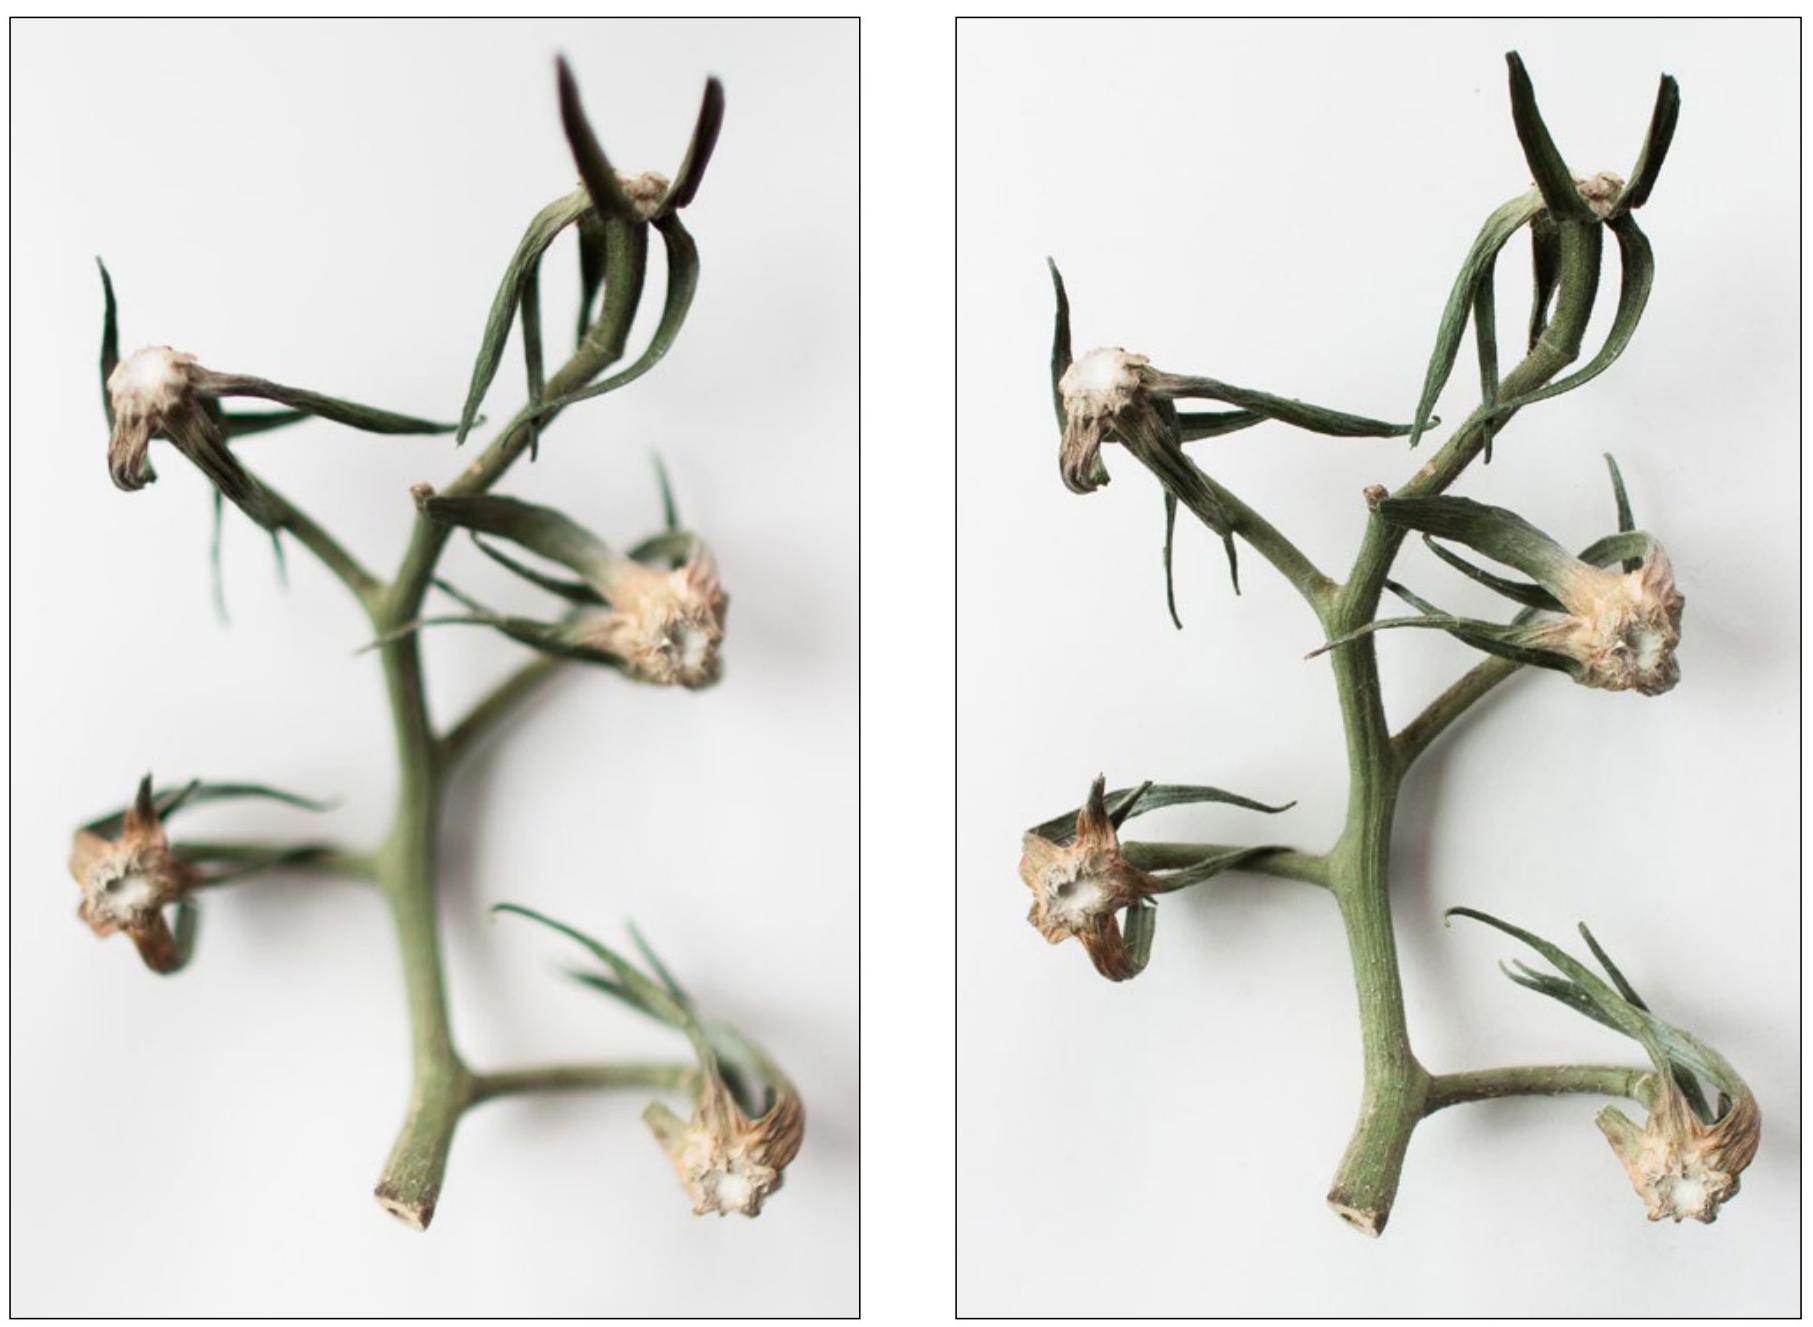
|
LEFT The plane of focus intersects the tomato stem in several places in this image. Imagine the plane of focus as a sheet of glass parallel to the camera. RIGHT With the lens at a smaller aperture, that sheet of glass becomes thicker, and now all parts of the tomato stem are in focus. |
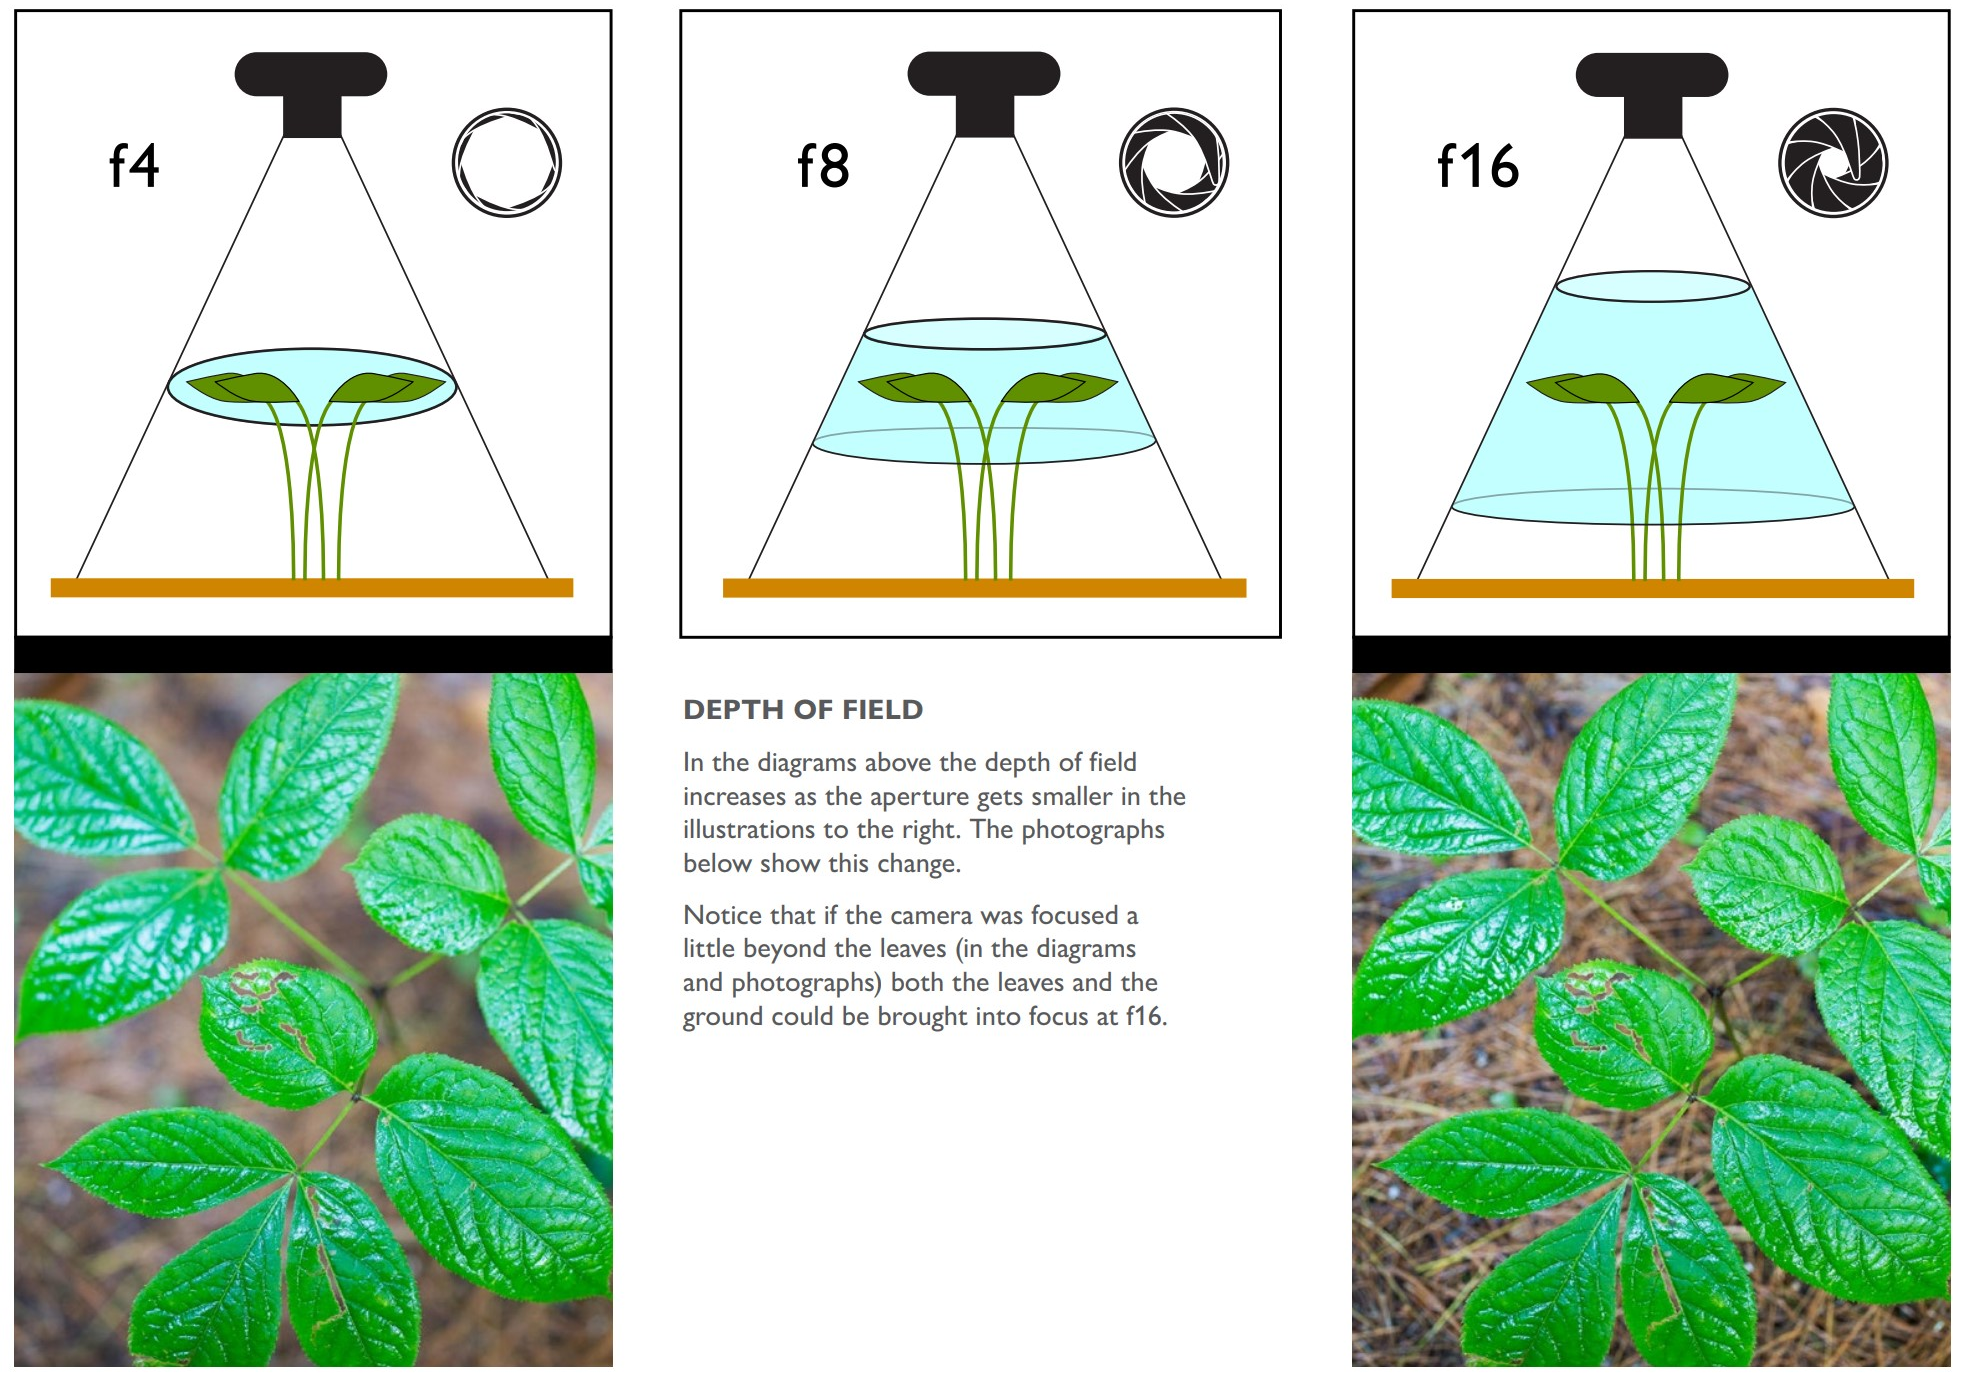
Nonetheless, many cameras do have a provision for seeing a depth of field preview before you take the photograph. This is very useful, although it is difficult to see the exact amount in focus on the camera’s small viewing screen.
If a depth of field preview can be shown, the method cameras use for activating it varies greatly with the camera model. With DSLRs, it is even different if you are using the viewfinder or if you are using the back screen. Refer to depth of field preview in your camera manual.
In short, if you don’t see the amount in focus changing as you change your f-stop, the camera is not previewing your depth of field.
Choosing the Aperture
Changing your aperture and the resulting depth of field is easy. With your camera set to program mode and camera’s display active, you just turn the biggest, most immediate wheel (or rocker button) you can find. This will change the f-stop (aperture), which is usually the second number in the display.

|
LEFT Maddie Fletcher BELOW Emily McCalla A common way to isolate subjects from a background is to use a large aperture with its shallow depth of field.
|


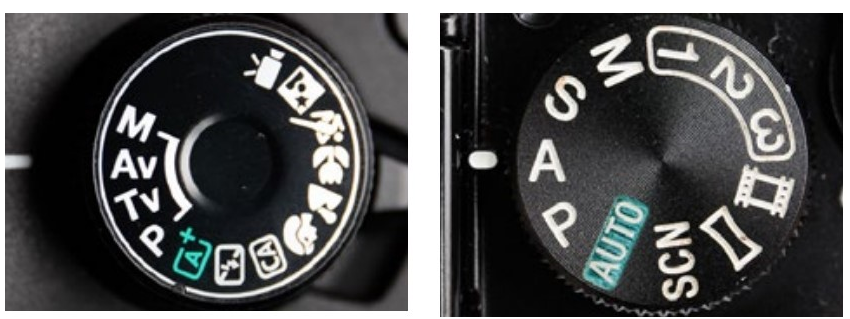
Many times a easier way of changing your aperture (and hence your depth of field) is by setting your main dial to the A or Av (Aperture or Aperture Value) setting. This will allow you to set your aperture directly and not have to reset it with each photograph you take. You might even find that it is advantageous to leave your camera on A or Av as you take photographs. Many photographers prefer this setting over the program (P) mode since it is easier to be more intentionally setting the f-stop (changing the aperture).
Distance
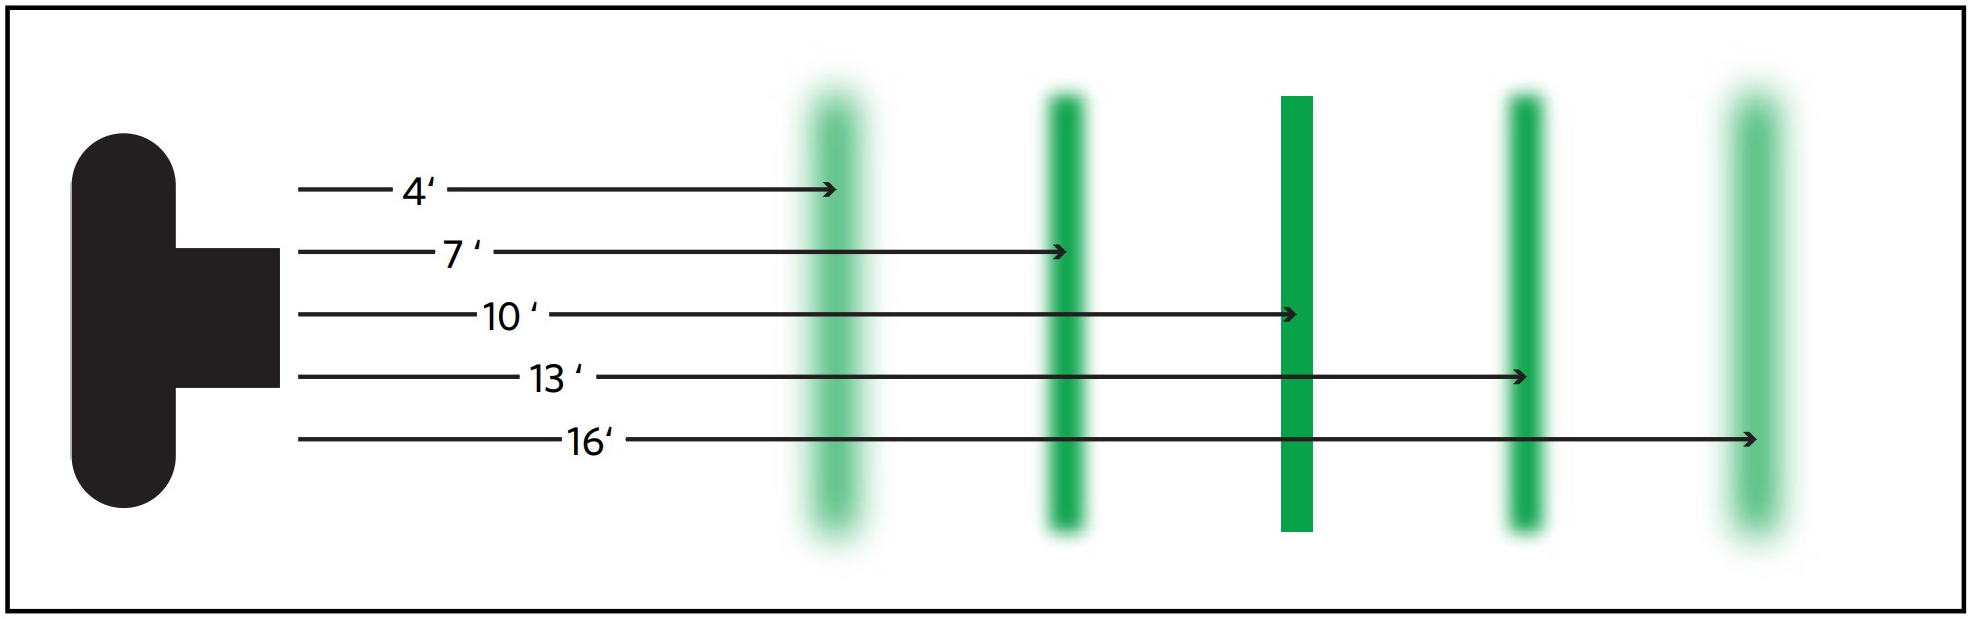
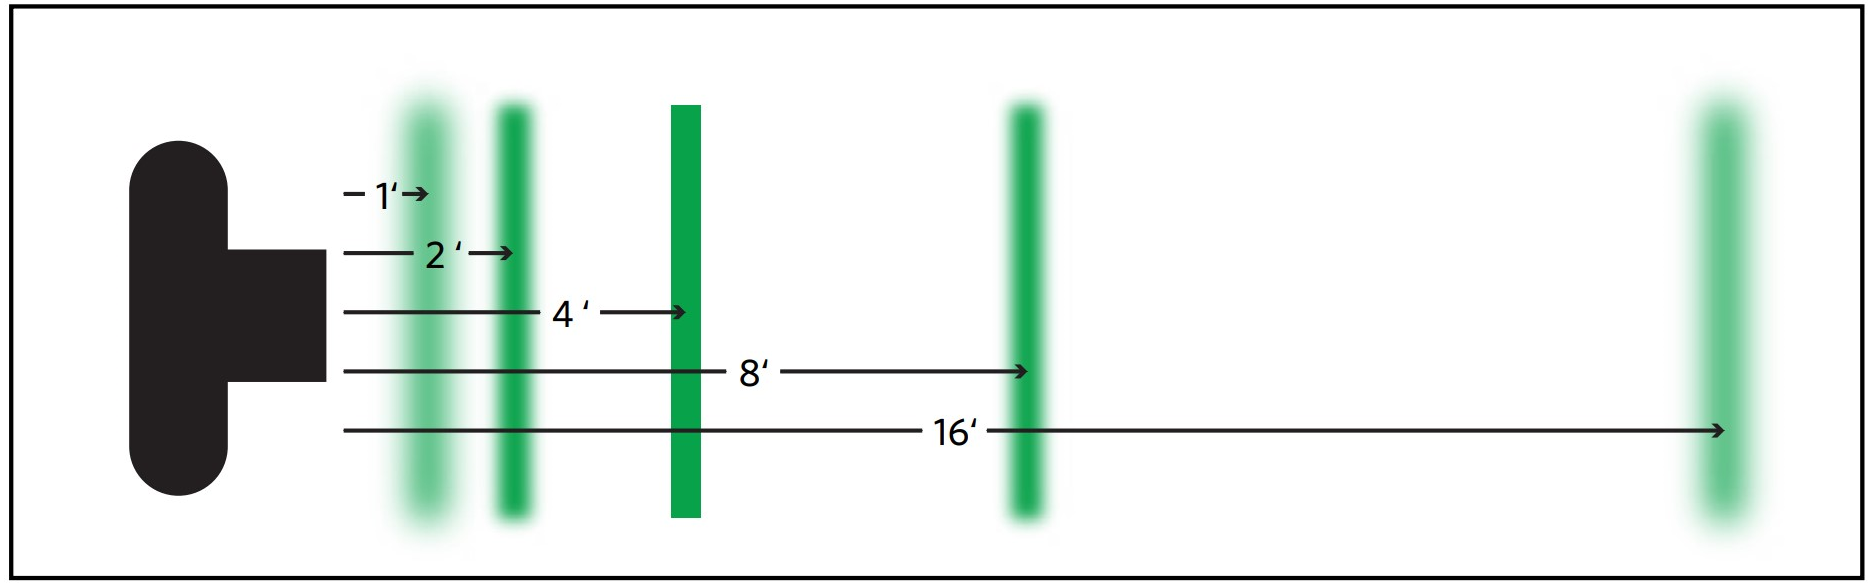
While thinking about depth of field, it is helpful to know that distances in photography are geometric. In other words, doubling the distance of 2 feet is 4 feet, and doubling it again is 8 feet. Practically, this means that if you want your depth of field to cover two objects, don’t focus half-way between them, but instead about a third of the way between them (see illustration at the top of this page). This is a good thing to know when you want to maximize your depth of field.
Also important is the fact that the closer the camera is to a subject (the closer it is focused), the less depth of field there is. Even at small apertures, it is impossible get a lot of depth of field when taking close-up photographs.
|
The geometric nature of depth of field, where the distance from 2 feet to 4 feet is the same as the distance from 4 feet to 8 feet (the first time this illustration showed up it wasn’t quite accurate). If you spend some time pondering this, it might occur to you that there is more depth of field at greater distances and less at close distances. If it doesn’t occur to you, just trust that it is true. |
|
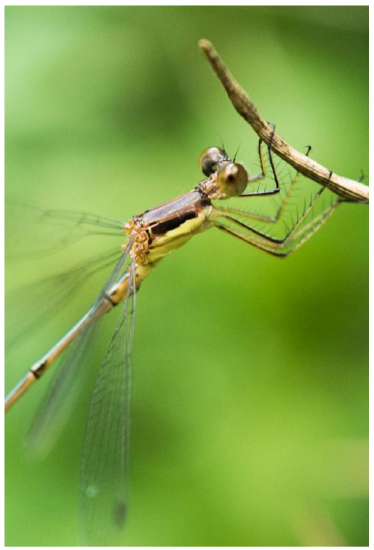
Depth of field decreases at closer distances. The bug-eyed bug is very close. No matter what f-stop you use, getting a lot of depth of field in this situation is impossible. |
As distance increases, so does depth of field. With many lenses, any two objects that are over about 20 feet away will both be in focus at any aperture, no matter how far apart they are. As mentioned before, these distances both lie at infinity, a distance that changes with different focal lengths or different zoom settings.
Focal Length & Sensor Size
How focal length influences depth of field was discussed in the Focal Length chapter. A wide angle lens (or zoom setting) has more depth of field at any given aperture, and a telephoto lens has less.
However, there was a point that was glossed over in that chapter. Although a lens’ field of view and perspective is dependent on the full-frame equivalent focal length, the amount of depth of field inherent in a lens is actually in strict relation to the actual focal length.
So, an 8mm lens will always have the same depth of field at a given aperture. It doesn’t matter if that lens is used as a very wide angle lens on a large sensor camera or a normal lens on a cellphone camera.
This is why it is difficult to get the background out of focus with cellphone cameras. Smaller sensor cameras always have more depth of field because they use shorter actual focal length lenses.
Shutter Speed
The camera will change the amount of time the sensor is exposed (shutter speed) relative to the aperture you have set.
In other words, when you stop down to a smaller aperture you are not only increasing your depth of field, but also decreasing the amount of light available to the sensor. The camera has to compensate for that decrease somehow, so it opens the shutter for a longer amount of time.
You can see how this works by changing your f-stop as you point your camera at a scene with the viewfinder numbers activated. Not only will the aperture number change, but so will the shutter speed.
Because of this shutter speed change, the amount of light available also effects depth of field. To shoot a scene stopped down to a small aperture like f22, you either need a lot of light (like outdoors) or a tripod, since in low light situations the shutter speed gets too long to not show blur from the motion of the subject or the motion inherent in holding the camera.
|
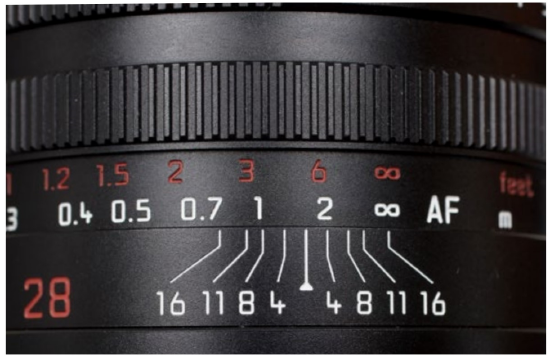
Prime lenses often have a depth of field scale on the focus setting. This shows what distances will be in focus at any given f-stop. In this example, at f16 everything from about 2/3 meter (21/2 feet) to infinity will be in focus. Unfortunately, the mechanics of zoom lenses preclude having these scales. |
The Sharpest F-Stop (Part 1)When a lens is used at its largest aperture, sharpness is actually not equal across the field of view, even if the subject is all in the plain of focus. Most commonly the sharpness decreases towards the edges of the frame. Changing to a smaller aperture will minimize this lens fault. |
Fast Lenses
Your zoom lens may have a maximum aperture around f4, which is fairly typical of zoom lenses (this may change with the focal length the lens is set to). Lenses which are able to open their apertures wider are generally more expensive since a wider opening means a greater diameter of glass (among other things, such as more expensive glass elements).
The Sharpest F-Stop (Part 2)While there is more depth of field at smaller f-stops, the sharpness of an image actually decreases after the aperture gets past a certain point. In other words, as you stop down to smaller apertures, any lens starts to take on the characteristics of a pin-hole lens. Practically this is of little concern, as most lenses will only stop down to the smallest opening where the image appears sharp. But if you are trying to make the sharpest photograph possible (perhaps to print very big), it is a concern. The sharpest f-stop differs with each lens, but with most lenses it is about two stops short of the smallest aperture. You can make careful tests to see which f-stop is sharpest for your lens. This may also change with different zoom settings |
|
The light source for this photograph was a firework, and the aperture was f1.7. Fast lenses allow you to shoot photographs with little light. What I was interested in here was the child watching fireworks through a tablet camera. But it is a confused image which shows almost nothing of my intent. |

No zoom lens allows very wide apertures. For that, one needs a prime lens. Introduced in the Focal Length chapter, these lenses only have one focal length. They can be had in a variety of focal lengths, with the widest apertures available near the normal (50mm) focal lengths.
With much wider apertures at less cost than zoom lenses, these fast lenses are great for low light situations since they have the ability to open up to apertures as wide as f1.4 (3 stops more light than f4). Some have even wider apertures.
The other advantage of these lenses is the ability to have a narrow depth of field so that areas in an image can be rendered very out of focus.
Portrait lenses (slightly telephoto) have wide apertures to allow the photographer to easily soften the focus of the background. Most lens manufacturers make fast versions of (approximately) 80mm equivalent lenses for this reason.
Fast lenses can get very expensive very quickly, and the ability to open up one stop more light in either a zoom or prime lens can equate to a thousand dollars or more. They are also heavier than other lenses (it takes more glass to let in more light). And, if you don’t need or want that extra stop of light or less depth of field they are also a waste of money, as they are no sharper or better than the slower version of the same focal length or zoom range.
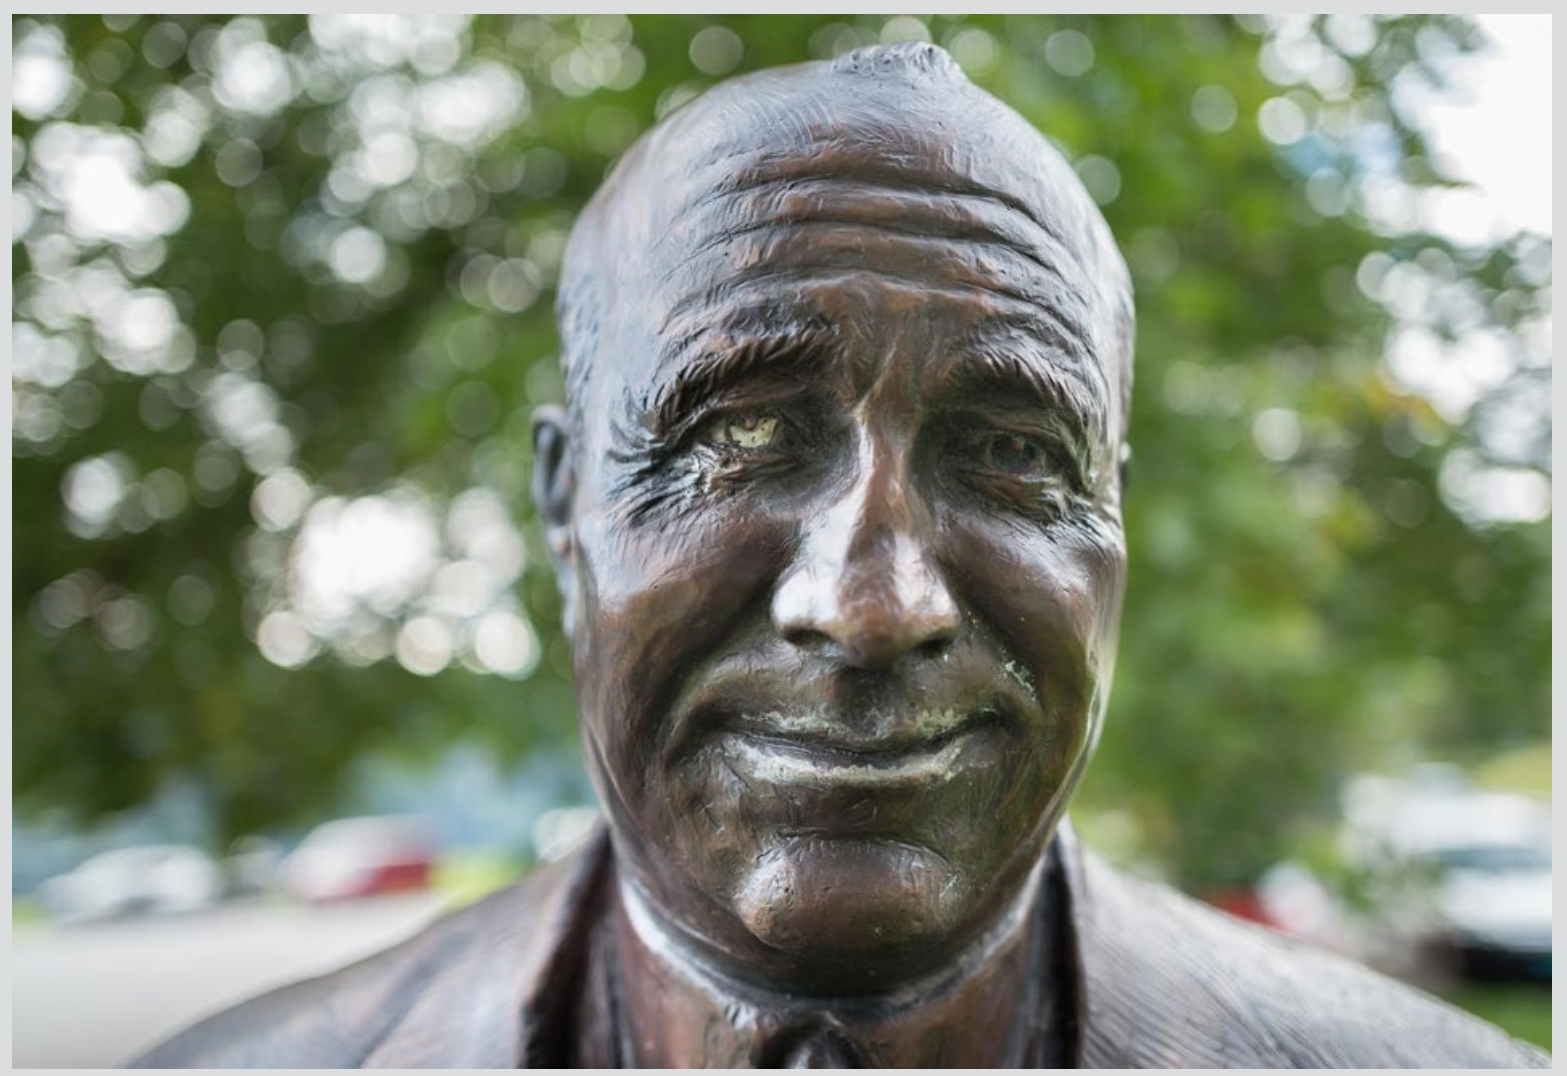
ConfusionThings out of focus actually form circles, which are called circles of confusion. Normally these circles cannot be seen because they overlap unevenly many times (in the image below, see cars at lower left or shoulders of Knute). When light is from smaller areas, like the light coming through the trees in this image, you can easily see the effect of circles of confusion (which take the shape of your aperture). Different lens designs render blur differently, and some are highly regarded for the quality of their blur. Blur is also called bokeh, which is the Japanese term for... blur. That is such a fancy word that it is even a name for a (2017) movie.
|
Lens SpeedThe maximum aperture of a lens is referred to as the speed of the lens. This is probably because lenses that have wide maximum apertures allow you to take photographs at faster shutter speeds. Hence, a fast lens. Slow lenses (that only open to f5.6 or f4) demand slower shutter speeds, at least in low light. |
Now Go Shoot
Changing your aperture, and hence your depth of field, is as easy as turning a dial with your camera set on P or A (or Av). Try it using each mode.
Shoot in different situations with subjects at different distances. How much depth of field do you get with far away subjects compared to close subjects? How much difference is there with your lens set to telephoto compared to wide angle?
As you take photographs try to imagine that plane of focus. Use a wide aperture and telephoto setting (for very little depth of field) to easily see what things are in focus other than what you focused on. Try a small aperture with wide angle setting to see how much you can get in focus from the foreground to the background.
See if you can get a lot of depth of field in darker situations without blurring the image. See if you can get very little depth of field in bright sunlight without the image being overexposed. Different cameras will produce different results.
Look at the quality of the blur when things are out of focus. Is it pleasant or distracting? How much blur is there at different distances?
Pay attention to your aperture number as you shoot. How much do changes in the numbers influence your depth of field? You don’t need to remember the exact f-stop numbers, since you can choose something around f4 or a lower number for little depth of field (or more light) and a higher number like f16 or above if you would like a lot of depth of field.
If your camera has a depth of field preview, try using it. Compare the depth of field it shows in the viewfinder with the image enlarged on the computer screen. Could you see exactly what would be in focus on the viewing screen?
|
Melanie Oeltjenbruns, f4.5 (top) and f16
|
EXPERIMENT
With your camera set on A (or Av), shoot one scene with at least two different f-stops. Make these f-stops as far apart as possible. Make all other things (like focus and framing) exactly the same. What you are trying to demonstrate is the change in depth of field.
Outdoors you may not be able to get a change in aperture (and corresponding depth of field), so it may be more practical to do this indoors with the camera on a support.
Make sure your scene is suitable to show depth of field. This is not the same as the focus experiment: In this one your point of focus should stay the same with all your photographs. You may want to do several sets of these and make sure you can see depth of field working. You should not have changes in overall exposure!
What you should see is the plane of focus getting thicker (your depth of field increasing) with every decrease in aperture size.
Some Depth of Field Hints
Make sure your foreground is very close, especially if the sensor in your camera is small.
Do not change your focus point between images—be it on the foreground, background, or in between.
Your overall exposure (lightness) should be the same in the pair of photographs. If it is not, redo it.
Your camera may indicate at a given aperture (with a blinking or red number) it cannot maintain the correct exposure—try a different lighting situation if this is the case.
|
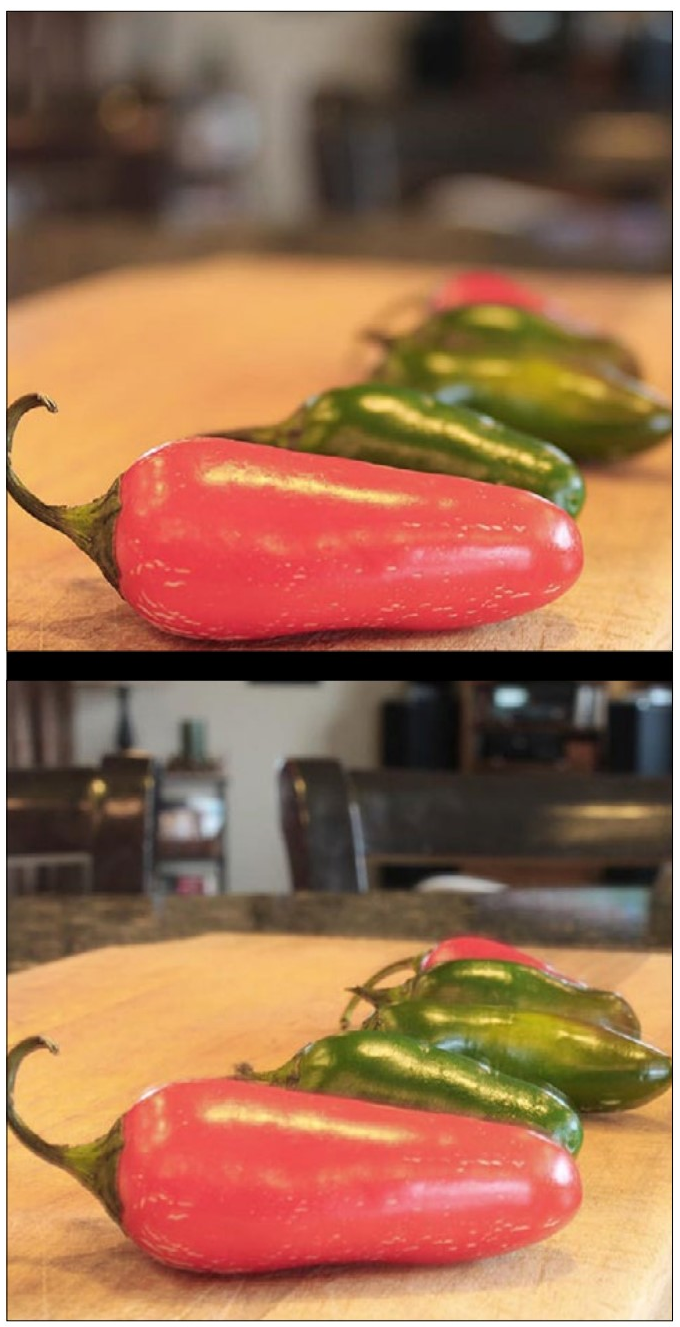
Krystal Larson f5.6 top, f32 bottom |

Depth of Field Questions
What is the number assigned to the aperture size called?
What f-stop will let the most light through the lens? The least light?
If your f-stop was f8, what f-stop would let in half the amount of light? Twice the amount? At other f-stops?
apertures in stops: f2.8 - f4 - f5.6 - f8 - f11 - f16
What does the depth of field refer to?
Aperture controls the amount of light and what?
What f-stop would give you the most depth of field? The least depth of field?
What mode dial setting allows you to set your f-stop directly?
How far should you focus past the foreground to possibly get the background also in focus?
Can you get one object at infinity out of focus while getting a second object also at infinity in focus?
Which has more depth of field at a given f-stop—a 20mm lens or a 80mm lens?
With closer objects is there more or less depth of field?
In general, do cameras with large sensors or small sensors give more depth of field?
How does the camera compensate for less light with a smaller aperture?
A lens with a large maximum aperture is called what? What is an advantage of a fast lens? A disadvantage?
