
6.2: 6CR MORE LOCAL ADJUSTMENTS
- Page ID
- 91705
\( \newcommand{\vecs}[1]{\overset { \scriptstyle \rightharpoonup} {\mathbf{#1}} } \)
\( \newcommand{\vecd}[1]{\overset{-\!-\!\rightharpoonup}{\vphantom{a}\smash {#1}}} \)
\( \newcommand{\dsum}{\displaystyle\sum\limits} \)
\( \newcommand{\dint}{\displaystyle\int\limits} \)
\( \newcommand{\dlim}{\displaystyle\lim\limits} \)
\( \newcommand{\id}{\mathrm{id}}\) \( \newcommand{\Span}{\mathrm{span}}\)
( \newcommand{\kernel}{\mathrm{null}\,}\) \( \newcommand{\range}{\mathrm{range}\,}\)
\( \newcommand{\RealPart}{\mathrm{Re}}\) \( \newcommand{\ImaginaryPart}{\mathrm{Im}}\)
\( \newcommand{\Argument}{\mathrm{Arg}}\) \( \newcommand{\norm}[1]{\| #1 \|}\)
\( \newcommand{\inner}[2]{\langle #1, #2 \rangle}\)
\( \newcommand{\Span}{\mathrm{span}}\)
\( \newcommand{\id}{\mathrm{id}}\)
\( \newcommand{\Span}{\mathrm{span}}\)
\( \newcommand{\kernel}{\mathrm{null}\,}\)
\( \newcommand{\range}{\mathrm{range}\,}\)
\( \newcommand{\RealPart}{\mathrm{Re}}\)
\( \newcommand{\ImaginaryPart}{\mathrm{Im}}\)
\( \newcommand{\Argument}{\mathrm{Arg}}\)
\( \newcommand{\norm}[1]{\| #1 \|}\)
\( \newcommand{\inner}[2]{\langle #1, #2 \rangle}\)
\( \newcommand{\Span}{\mathrm{span}}\) \( \newcommand{\AA}{\unicode[.8,0]{x212B}}\)
\( \newcommand{\vectorA}[1]{\vec{#1}} % arrow\)
\( \newcommand{\vectorAt}[1]{\vec{\text{#1}}} % arrow\)
\( \newcommand{\vectorB}[1]{\overset { \scriptstyle \rightharpoonup} {\mathbf{#1}} } \)
\( \newcommand{\vectorC}[1]{\textbf{#1}} \)
\( \newcommand{\vectorD}[1]{\overrightarrow{#1}} \)
\( \newcommand{\vectorDt}[1]{\overrightarrow{\text{#1}}} \)
\( \newcommand{\vectE}[1]{\overset{-\!-\!\rightharpoonup}{\vphantom{a}\smash{\mathbf {#1}}}} \)
\( \newcommand{\vecs}[1]{\overset { \scriptstyle \rightharpoonup} {\mathbf{#1}} } \)
\(\newcommand{\longvect}{\overrightarrow}\)
\( \newcommand{\vecd}[1]{\overset{-\!-\!\rightharpoonup}{\vphantom{a}\smash {#1}}} \)
\(\newcommand{\avec}{\mathbf a}\) \(\newcommand{\bvec}{\mathbf b}\) \(\newcommand{\cvec}{\mathbf c}\) \(\newcommand{\dvec}{\mathbf d}\) \(\newcommand{\dtil}{\widetilde{\mathbf d}}\) \(\newcommand{\evec}{\mathbf e}\) \(\newcommand{\fvec}{\mathbf f}\) \(\newcommand{\nvec}{\mathbf n}\) \(\newcommand{\pvec}{\mathbf p}\) \(\newcommand{\qvec}{\mathbf q}\) \(\newcommand{\svec}{\mathbf s}\) \(\newcommand{\tvec}{\mathbf t}\) \(\newcommand{\uvec}{\mathbf u}\) \(\newcommand{\vvec}{\mathbf v}\) \(\newcommand{\wvec}{\mathbf w}\) \(\newcommand{\xvec}{\mathbf x}\) \(\newcommand{\yvec}{\mathbf y}\) \(\newcommand{\zvec}{\mathbf z}\) \(\newcommand{\rvec}{\mathbf r}\) \(\newcommand{\mvec}{\mathbf m}\) \(\newcommand{\zerovec}{\mathbf 0}\) \(\newcommand{\onevec}{\mathbf 1}\) \(\newcommand{\real}{\mathbb R}\) \(\newcommand{\twovec}[2]{\left[\begin{array}{r}#1 \\ #2 \end{array}\right]}\) \(\newcommand{\ctwovec}[2]{\left[\begin{array}{c}#1 \\ #2 \end{array}\right]}\) \(\newcommand{\threevec}[3]{\left[\begin{array}{r}#1 \\ #2 \\ #3 \end{array}\right]}\) \(\newcommand{\cthreevec}[3]{\left[\begin{array}{c}#1 \\ #2 \\ #3 \end{array}\right]}\) \(\newcommand{\fourvec}[4]{\left[\begin{array}{r}#1 \\ #2 \\ #3 \\ #4 \end{array}\right]}\) \(\newcommand{\cfourvec}[4]{\left[\begin{array}{c}#1 \\ #2 \\ #3 \\ #4 \end{array}\right]}\) \(\newcommand{\fivevec}[5]{\left[\begin{array}{r}#1 \\ #2 \\ #3 \\ #4 \\ #5 \\ \end{array}\right]}\) \(\newcommand{\cfivevec}[5]{\left[\begin{array}{c}#1 \\ #2 \\ #3 \\ #4 \\ #5 \\ \end{array}\right]}\) \(\newcommand{\mattwo}[4]{\left[\begin{array}{rr}#1 \amp #2 \\ #3 \amp #4 \\ \end{array}\right]}\) \(\newcommand{\laspan}[1]{\text{Span}\{#1\}}\) \(\newcommand{\bcal}{\cal B}\) \(\newcommand{\ccal}{\cal C}\) \(\newcommand{\scal}{\cal S}\) \(\newcommand{\wcal}{\cal W}\) \(\newcommand{\ecal}{\cal E}\) \(\newcommand{\coords}[2]{\left\{#1\right\}_{#2}}\) \(\newcommand{\gray}[1]{\color{gray}{#1}}\) \(\newcommand{\lgray}[1]{\color{lightgray}{#1}}\) \(\newcommand{\rank}{\operatorname{rank}}\) \(\newcommand{\row}{\text{Row}}\) \(\newcommand{\col}{\text{Col}}\) \(\renewcommand{\row}{\text{Row}}\) \(\newcommand{\nul}{\text{Nul}}\) \(\newcommand{\var}{\text{Var}}\) \(\newcommand{\corr}{\text{corr}}\) \(\newcommand{\len}[1]{\left|#1\right|}\) \(\newcommand{\bbar}{\overline{\bvec}}\) \(\newcommand{\bhat}{\widehat{\bvec}}\) \(\newcommand{\bperp}{\bvec^\perp}\) \(\newcommand{\xhat}{\widehat{\xvec}}\) \(\newcommand{\vhat}{\widehat{\vvec}}\) \(\newcommand{\uhat}{\widehat{\uvec}}\) \(\newcommand{\what}{\widehat{\wvec}}\) \(\newcommand{\Sighat}{\widehat{\Sigma}}\) \(\newcommand{\lt}{<}\) \(\newcommand{\gt}{>}\) \(\newcommand{\amp}{&}\) \(\definecolor{fillinmathshade}{gray}{0.9}\)In addition to the adjustment brush, there are two other local adjustment tools in Camera Raw. These behave the same way as the brush, and like with it you can define multiple areas with their own separate adjustments.

The Graduated Filter allows you to define an adjustment area by clicking and dragging in an image. This is helpful to do something like darken a sky. Where you first click is the extent of the fullest part of the adjustment, and where you drag to defines the area where the adjustment fades out (the feather). You can (now or later) move this adjustment or edit it with a brush, either removing parts from it or adding parts to it.

The Radial Filter allows you to adjust a circular or oval area. This might be used for making the center of an image lighter to emphasize it or to correct for dark edges produced by a lens (even though there is another control dedicated to this).
Like the adjustment brush, there is a feather adjustment for the effect, but unlike the brush, the effect does not coincide with the oval drawn. Fifteen minutes of playing around with this tool is worth more than all explaining that can be done here. Neither the radial nor the graduated filters do anything that the adjustment brush won’t. But they do make some things easier.

|
A circular radial filter used to make Capn’ more obvious in the image |
You may have noticed that you don’t have all the adjustments over a local area that you do for a whole image. One important thing missing is the ability to change just one color in an area the way you changed colors in an image.
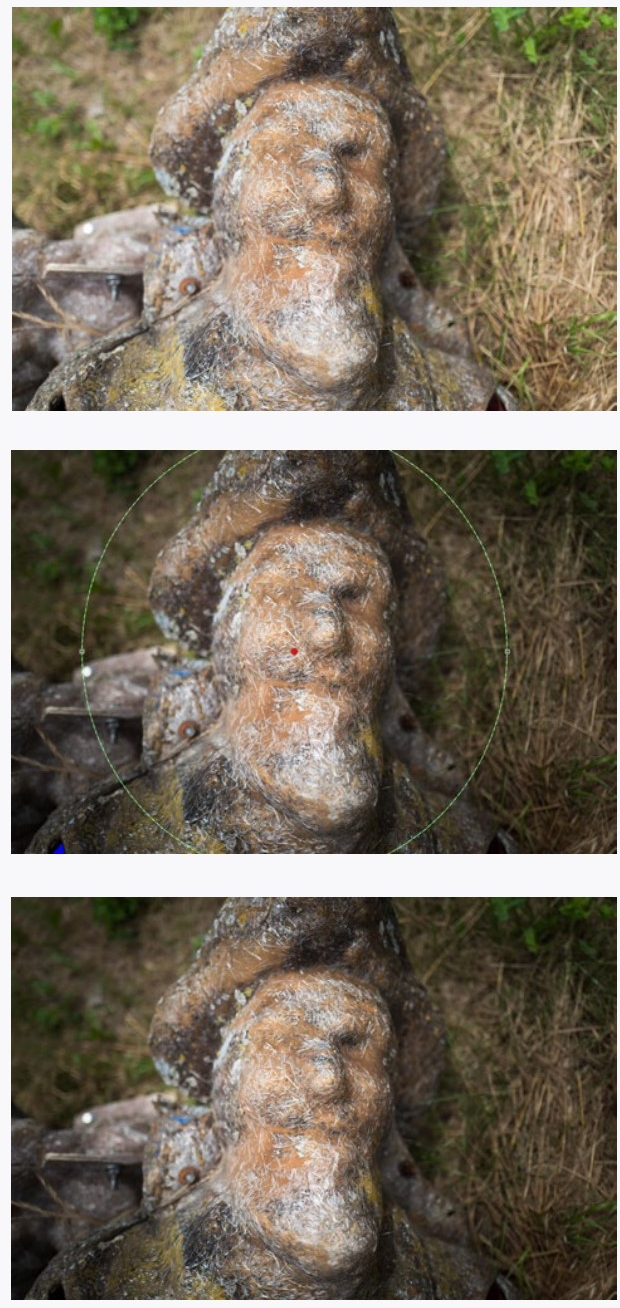
The solution to this is near the bottom of all local adjustments. It is the Range Mask. After painting in an adjustment area (it can be really rough), you can limit that area to only work on a certain color. Set the range mask to Color, then with the eyedropper tool selected (red arrow) click the color you want to adjust.
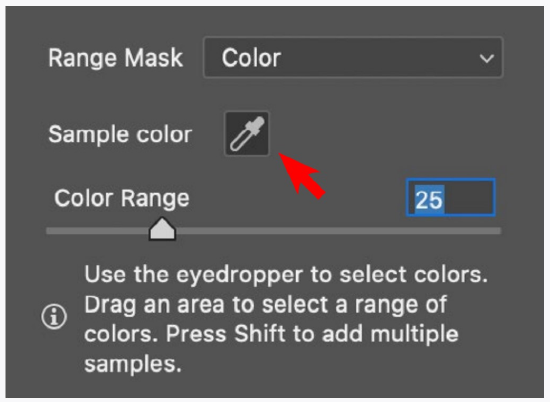
You can expand your color area by picking on similar colors with the shift key held down, and/or you can drag across an area with the eyedropper. After you select the color(s), use the Color Range slider to expand (or narrow) the range of colors selected.
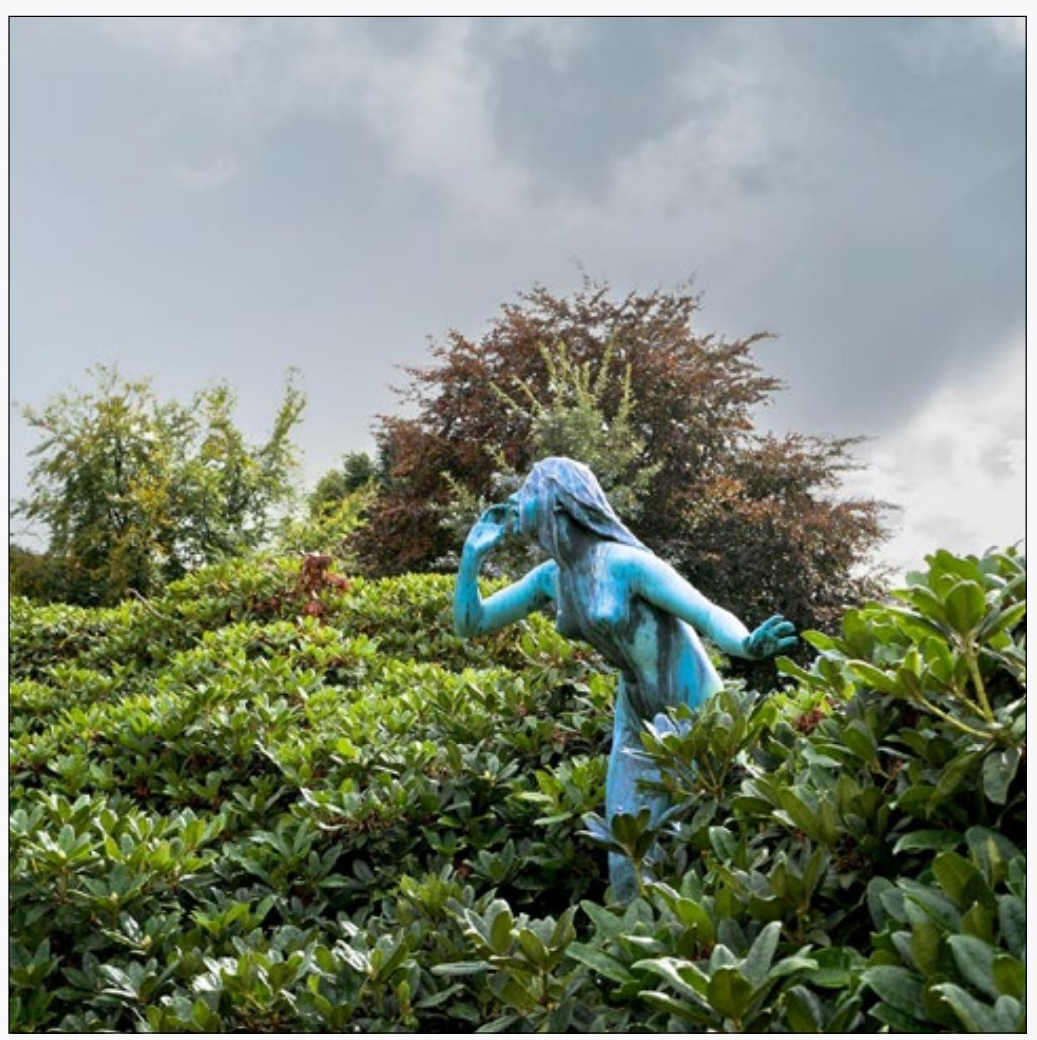
The statue in the bottom image at right was very roughly selected and the white balance was shifted. That selection was then limited to the statue by shift-clicking with the eyedropper on several parts of the bronze.
Instead of limiting an adjustment brush to a color range, you can limit it to a Luminance Range (a range of brightnesses).
After you make your rough selection, drag the left Luminance Range slider to limit the adjustment area to the lighter areas, or the right slider to limit it to the darker areas. Experiment with this after you have made the adjustments you plan to make.
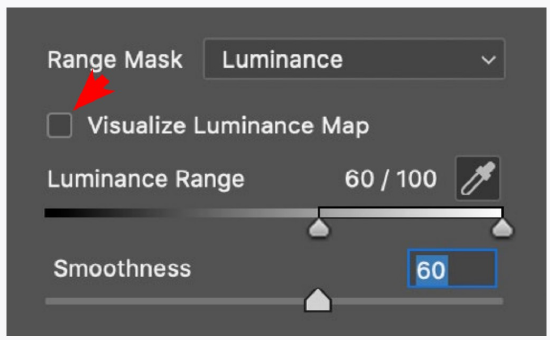
After your luminance range is picked, use the Smoothness slider to fine-tune the adjustment area (it acts to feather the selection).
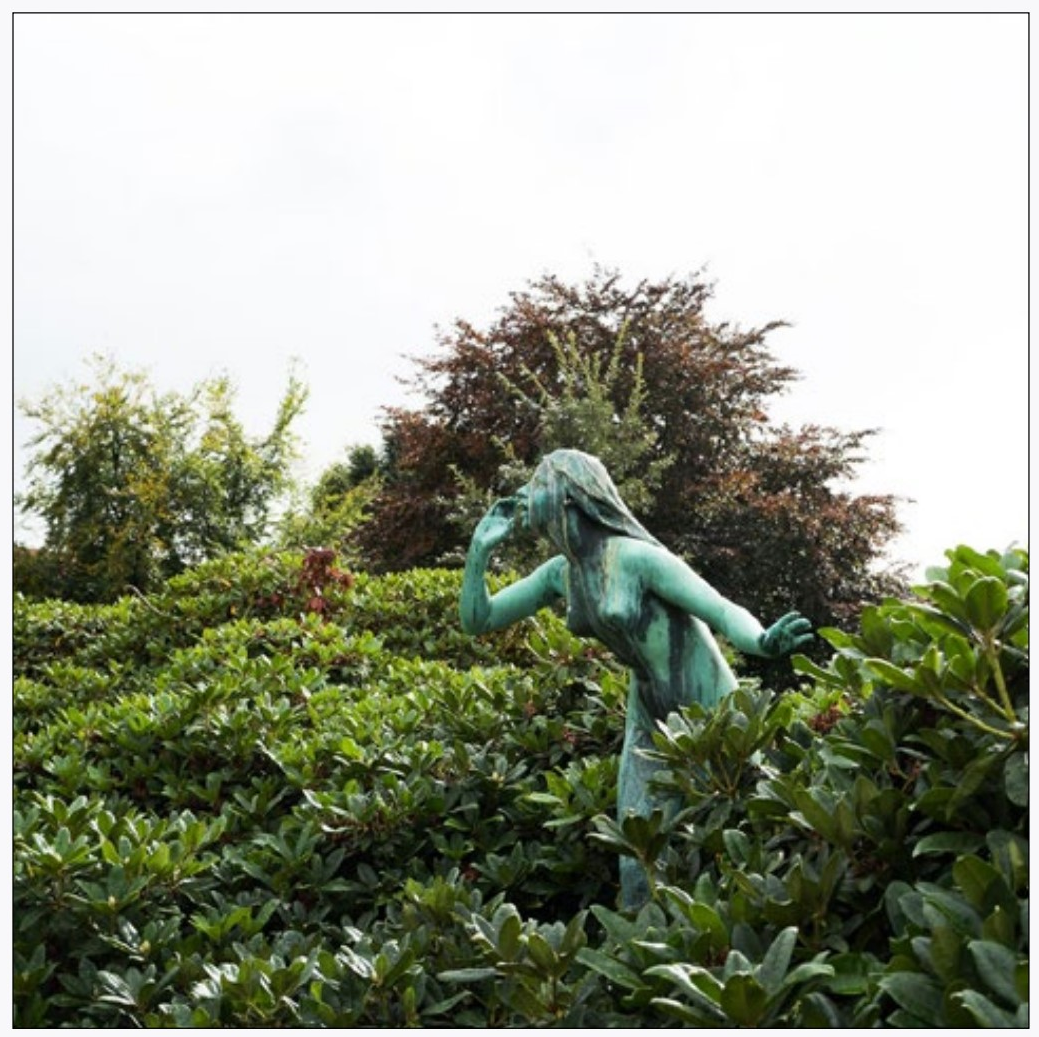
In the bottom illustration the graduated filter was pulled over the top two thirds of the image and the sky was darkened. Then the left luminance range slider was pulled to the right until the adjustment did not include the foliage.
You can edit your adjustment masks even after you define a color or luminance range. Making the a mask visible using Visualize Luminance Map (arrow) and/or holding down the option key while moving the sliders may help you see what is happening while adjusting.
MORE LOCAL ADJUSTMENTS
The graduated filter tool is the most used in my toolbox. It is simple, direct, and very quick to use. Try using it to darken skies or the edges of images.
Try editing your graduated filter area using a brush. Erase parts of the filter, periodically switching the mask (not auto mask) on to see where you are painting.
Use both adjustment brushes and the graduated filters on the same image. See how strong you can make the adjustments. I will be willing to bet that what you think looks a bit like a ‘fakey’ adjustment will be accepted by the viewer as unadjusted.
The radial filter is much less useful as an adjustment, but when it is needed it is great. Try lightening the area where a main subject is in an image. Try using it to darken an image’s corners.
RANGE MASKS
Okay, I admit it, range masks are a little difficult considering how useful they are at this point. But they can be great in certain situations, so try them out. Then when you get to an image that really calls for them you are prepared to learn the finer details about how to use them.
Try to select different colors using the color range mask. Also try to use the luminance range mask to limit adjustments to one tonal area. Play with these controls. We are learning tools here, and the more tools you have the better you will be able to make improvements in the future when you need them.
CAN YOU...
- Use the graduated filter to adjust parts of an image?
- Erase parts of a graduated filter?
- Erase using auto mask?
- Use the flow tool to control how much to erase parts of the graduated filter?
- Use multiple graduated filters and edit them?
- Use the radial filter and invert the effect? (don’t tell me you didn’t see that option)
- Use the color and luminance range masks in conjunction with the adjustment brush and the graduated filter?
- Use the color range mask tool to limit an adjustment to similar colors?
- Select a range of colors with multiple samples or dragging through an area of colors?
- Use the luminance range mask to adjust only the darker or lighter parts of the masked portion of the image?