
6: Exposure
- Page ID
- 91142
\( \newcommand{\vecs}[1]{\overset { \scriptstyle \rightharpoonup} {\mathbf{#1}} } \)
\( \newcommand{\vecd}[1]{\overset{-\!-\!\rightharpoonup}{\vphantom{a}\smash {#1}}} \)
\( \newcommand{\dsum}{\displaystyle\sum\limits} \)
\( \newcommand{\dint}{\displaystyle\int\limits} \)
\( \newcommand{\dlim}{\displaystyle\lim\limits} \)
\( \newcommand{\id}{\mathrm{id}}\) \( \newcommand{\Span}{\mathrm{span}}\)
( \newcommand{\kernel}{\mathrm{null}\,}\) \( \newcommand{\range}{\mathrm{range}\,}\)
\( \newcommand{\RealPart}{\mathrm{Re}}\) \( \newcommand{\ImaginaryPart}{\mathrm{Im}}\)
\( \newcommand{\Argument}{\mathrm{Arg}}\) \( \newcommand{\norm}[1]{\| #1 \|}\)
\( \newcommand{\inner}[2]{\langle #1, #2 \rangle}\)
\( \newcommand{\Span}{\mathrm{span}}\)
\( \newcommand{\id}{\mathrm{id}}\)
\( \newcommand{\Span}{\mathrm{span}}\)
\( \newcommand{\kernel}{\mathrm{null}\,}\)
\( \newcommand{\range}{\mathrm{range}\,}\)
\( \newcommand{\RealPart}{\mathrm{Re}}\)
\( \newcommand{\ImaginaryPart}{\mathrm{Im}}\)
\( \newcommand{\Argument}{\mathrm{Arg}}\)
\( \newcommand{\norm}[1]{\| #1 \|}\)
\( \newcommand{\inner}[2]{\langle #1, #2 \rangle}\)
\( \newcommand{\Span}{\mathrm{span}}\) \( \newcommand{\AA}{\unicode[.8,0]{x212B}}\)
\( \newcommand{\vectorA}[1]{\vec{#1}} % arrow\)
\( \newcommand{\vectorAt}[1]{\vec{\text{#1}}} % arrow\)
\( \newcommand{\vectorB}[1]{\overset { \scriptstyle \rightharpoonup} {\mathbf{#1}} } \)
\( \newcommand{\vectorC}[1]{\textbf{#1}} \)
\( \newcommand{\vectorD}[1]{\overrightarrow{#1}} \)
\( \newcommand{\vectorDt}[1]{\overrightarrow{\text{#1}}} \)
\( \newcommand{\vectE}[1]{\overset{-\!-\!\rightharpoonup}{\vphantom{a}\smash{\mathbf {#1}}}} \)
\( \newcommand{\vecs}[1]{\overset { \scriptstyle \rightharpoonup} {\mathbf{#1}} } \)
\(\newcommand{\longvect}{\overrightarrow}\)
\( \newcommand{\vecd}[1]{\overset{-\!-\!\rightharpoonup}{\vphantom{a}\smash {#1}}} \)
\(\newcommand{\avec}{\mathbf a}\) \(\newcommand{\bvec}{\mathbf b}\) \(\newcommand{\cvec}{\mathbf c}\) \(\newcommand{\dvec}{\mathbf d}\) \(\newcommand{\dtil}{\widetilde{\mathbf d}}\) \(\newcommand{\evec}{\mathbf e}\) \(\newcommand{\fvec}{\mathbf f}\) \(\newcommand{\nvec}{\mathbf n}\) \(\newcommand{\pvec}{\mathbf p}\) \(\newcommand{\qvec}{\mathbf q}\) \(\newcommand{\svec}{\mathbf s}\) \(\newcommand{\tvec}{\mathbf t}\) \(\newcommand{\uvec}{\mathbf u}\) \(\newcommand{\vvec}{\mathbf v}\) \(\newcommand{\wvec}{\mathbf w}\) \(\newcommand{\xvec}{\mathbf x}\) \(\newcommand{\yvec}{\mathbf y}\) \(\newcommand{\zvec}{\mathbf z}\) \(\newcommand{\rvec}{\mathbf r}\) \(\newcommand{\mvec}{\mathbf m}\) \(\newcommand{\zerovec}{\mathbf 0}\) \(\newcommand{\onevec}{\mathbf 1}\) \(\newcommand{\real}{\mathbb R}\) \(\newcommand{\twovec}[2]{\left[\begin{array}{r}#1 \\ #2 \end{array}\right]}\) \(\newcommand{\ctwovec}[2]{\left[\begin{array}{c}#1 \\ #2 \end{array}\right]}\) \(\newcommand{\threevec}[3]{\left[\begin{array}{r}#1 \\ #2 \\ #3 \end{array}\right]}\) \(\newcommand{\cthreevec}[3]{\left[\begin{array}{c}#1 \\ #2 \\ #3 \end{array}\right]}\) \(\newcommand{\fourvec}[4]{\left[\begin{array}{r}#1 \\ #2 \\ #3 \\ #4 \end{array}\right]}\) \(\newcommand{\cfourvec}[4]{\left[\begin{array}{c}#1 \\ #2 \\ #3 \\ #4 \end{array}\right]}\) \(\newcommand{\fivevec}[5]{\left[\begin{array}{r}#1 \\ #2 \\ #3 \\ #4 \\ #5 \\ \end{array}\right]}\) \(\newcommand{\cfivevec}[5]{\left[\begin{array}{c}#1 \\ #2 \\ #3 \\ #4 \\ #5 \\ \end{array}\right]}\) \(\newcommand{\mattwo}[4]{\left[\begin{array}{rr}#1 \amp #2 \\ #3 \amp #4 \\ \end{array}\right]}\) \(\newcommand{\laspan}[1]{\text{Span}\{#1\}}\) \(\newcommand{\bcal}{\cal B}\) \(\newcommand{\ccal}{\cal C}\) \(\newcommand{\scal}{\cal S}\) \(\newcommand{\wcal}{\cal W}\) \(\newcommand{\ecal}{\cal E}\) \(\newcommand{\coords}[2]{\left\{#1\right\}_{#2}}\) \(\newcommand{\gray}[1]{\color{gray}{#1}}\) \(\newcommand{\lgray}[1]{\color{lightgray}{#1}}\) \(\newcommand{\rank}{\operatorname{rank}}\) \(\newcommand{\row}{\text{Row}}\) \(\newcommand{\col}{\text{Col}}\) \(\renewcommand{\row}{\text{Row}}\) \(\newcommand{\nul}{\text{Nul}}\) \(\newcommand{\var}{\text{Var}}\) \(\newcommand{\corr}{\text{corr}}\) \(\newcommand{\len}[1]{\left|#1\right|}\) \(\newcommand{\bbar}{\overline{\bvec}}\) \(\newcommand{\bhat}{\widehat{\bvec}}\) \(\newcommand{\bperp}{\bvec^\perp}\) \(\newcommand{\xhat}{\widehat{\xvec}}\) \(\newcommand{\vhat}{\widehat{\vvec}}\) \(\newcommand{\uhat}{\widehat{\uvec}}\) \(\newcommand{\what}{\widehat{\wvec}}\) \(\newcommand{\Sighat}{\widehat{\Sigma}}\) \(\newcommand{\lt}{<}\) \(\newcommand{\gt}{>}\) \(\newcommand{\amp}{&}\) \(\definecolor{fillinmathshade}{gray}{0.9}\)Without light, there is no photography. This chapter explores how light interacts with your camera, and explains some controls that will help you get technically better images.
Histogram
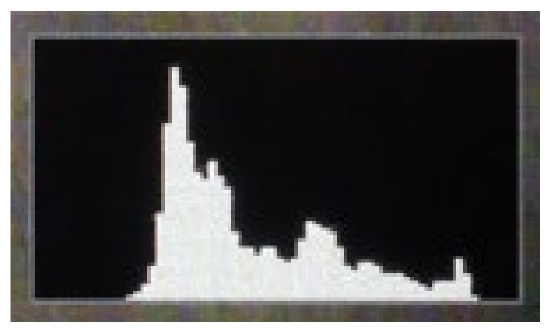
A histogram (at top right) is a graph which shows values and frequency. In photography the values are the brightnesses of the pixels from dark on the left to light on the right. The frequency is the number of pixels of each brightness, and is represented by the height of the graph. The more pixels of a certain brightness, the higher the line on the graph. When you put all the brightnesses closely together you get what look like the typical hills you see in a histogram.
Histograms are important because they give a definitive view of the tonality of an image. Unlike an image, a histogram is undistorted by such things as the light with which you are viewing the image, screen brightness, and tonal relationships. They can be found in almost any image editing programs and on the camera itself.
You can set your camera to display a histogram either before the image is taken and/or during review of an image. If you set it to show while you are shooting you get instant feedback of your tonality and exposure, but it also somewhat limits the view of your scene.
As covered in the Sensor chapter, when light hits a sensor, brightnesses are assigned numbers, which are called levels. No light hitting a pixel on the sensor registers as 0, which will be rendered black, 126 is a medium value, and 255 is white. The left side of the histogram is 0, or black, and the right side is 255, or white. The middle parts of the histogram depicts the gray or medium tonality areas.
No tones lay outside of the histogram, although one exception to this will be discussed in a few pages.
Using histograms to assess the tonality of images takes practice, but the fundamentals are straightforward.
|
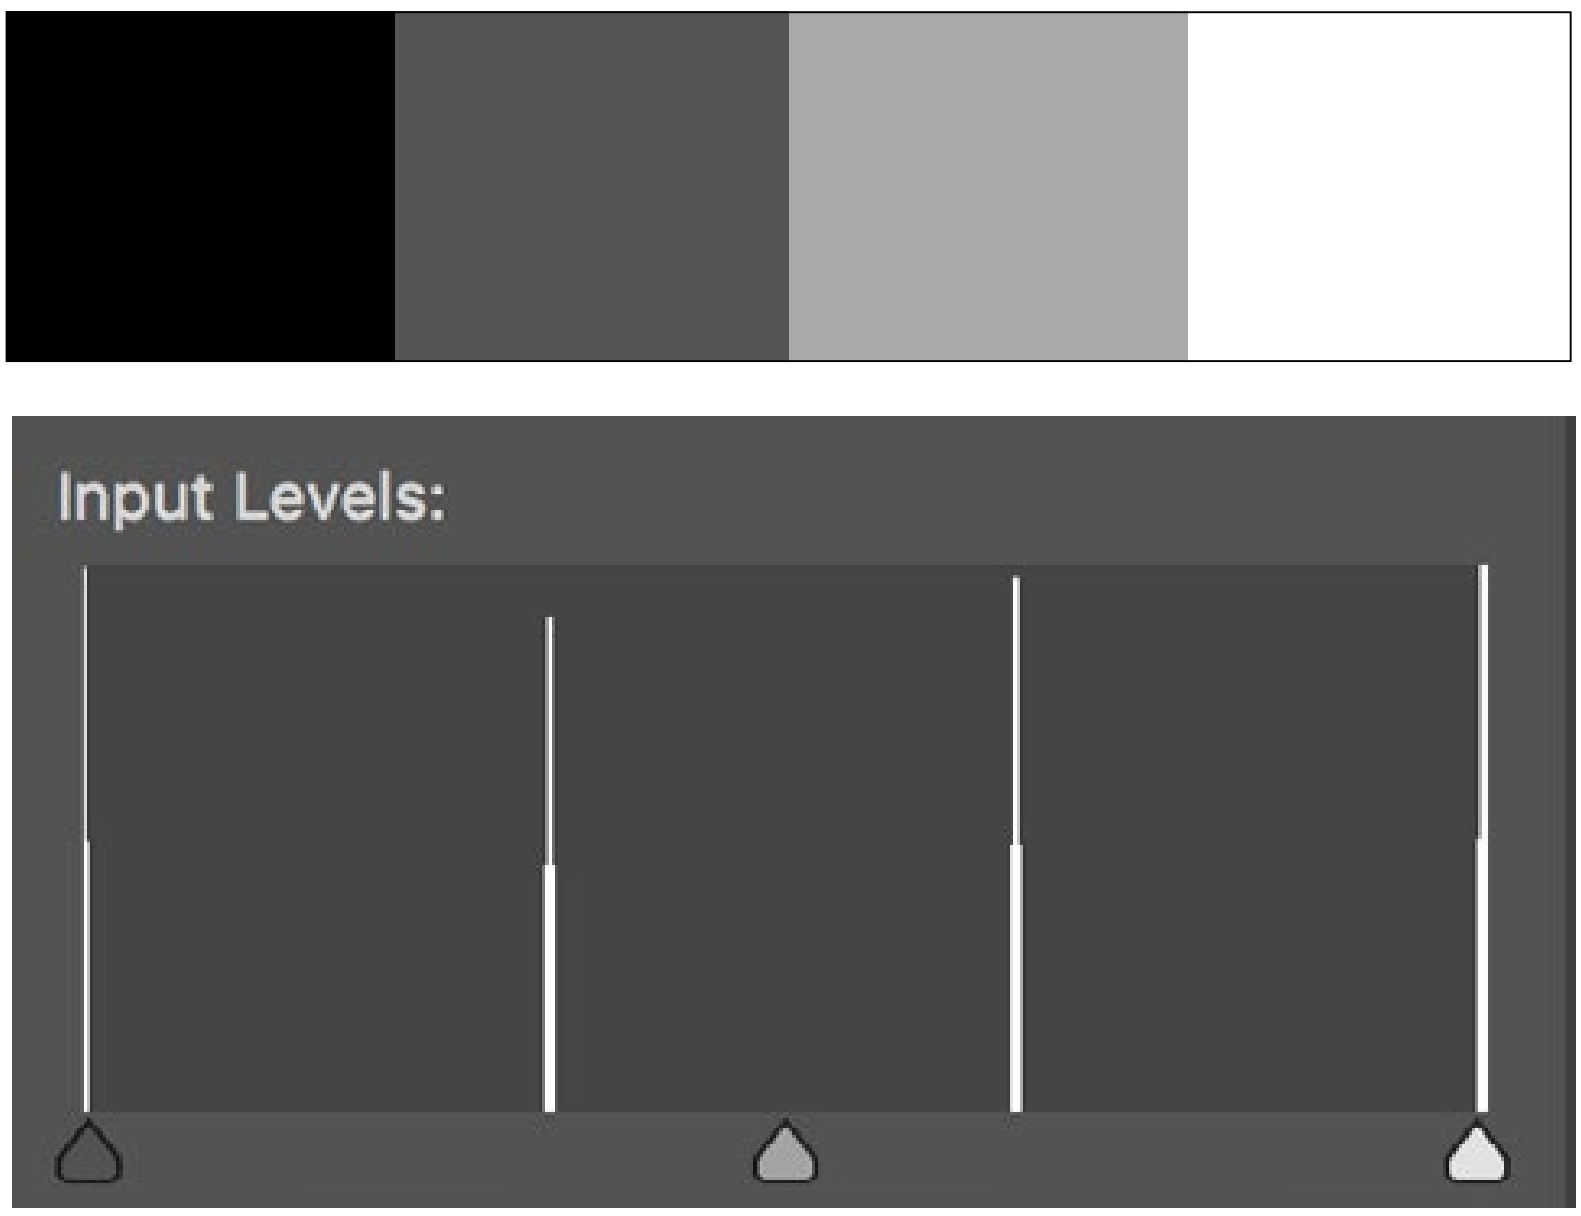
TOP Histograms show the number of pixels in height and brightness of the pixels across from black on the left to white on the right. BOTTOM An unlikely four-value image with its histogram below it. The levels (values) from left to right of both are 0, 85, 170, and 255. This numerical scale is standard across cameras and computer programs. Many histograms overlay graphs for each of the three color channels (RGB).
|

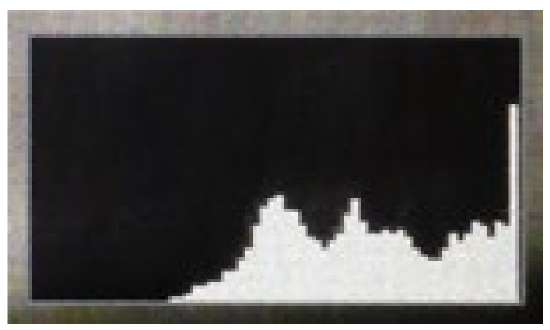
For example, if you see a histogram in which the hills are to the right (especially if they are cut off), it is probably an indication of overexposure, or too much light hitting the sensor. The tones that are cut off are gone, and no amount of image correction will bring them back.
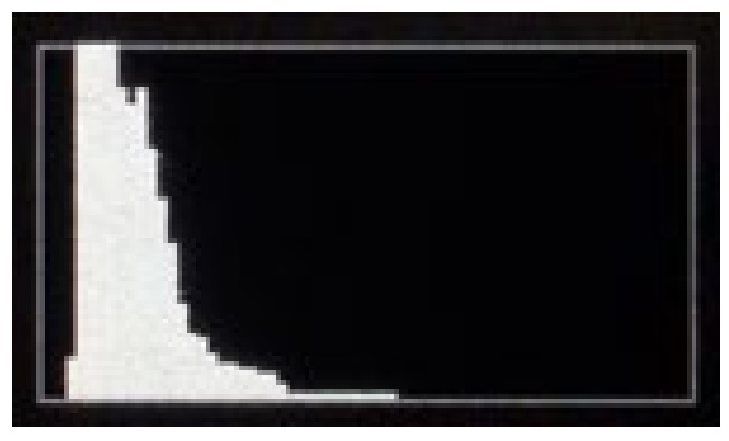
On the other hand, if the hills are only on the left (especially if they are cut off), this probably indicates underexposure, or not enough light hitting the sensor. Again, the tones that lie outside the left of the histogram are lost.
A correctly exposed image will have a histogram where all the tones lay contained in it. For many subjects, the tones will also spread across a large portion of the histogram.
This is a good a time to note three more terms that photographers use. Highlights refer to the tones that lie on the right side of the histogram. In your image they are the lighter areas. Shadows are not just areas in the shade, but are any darker areas.
|
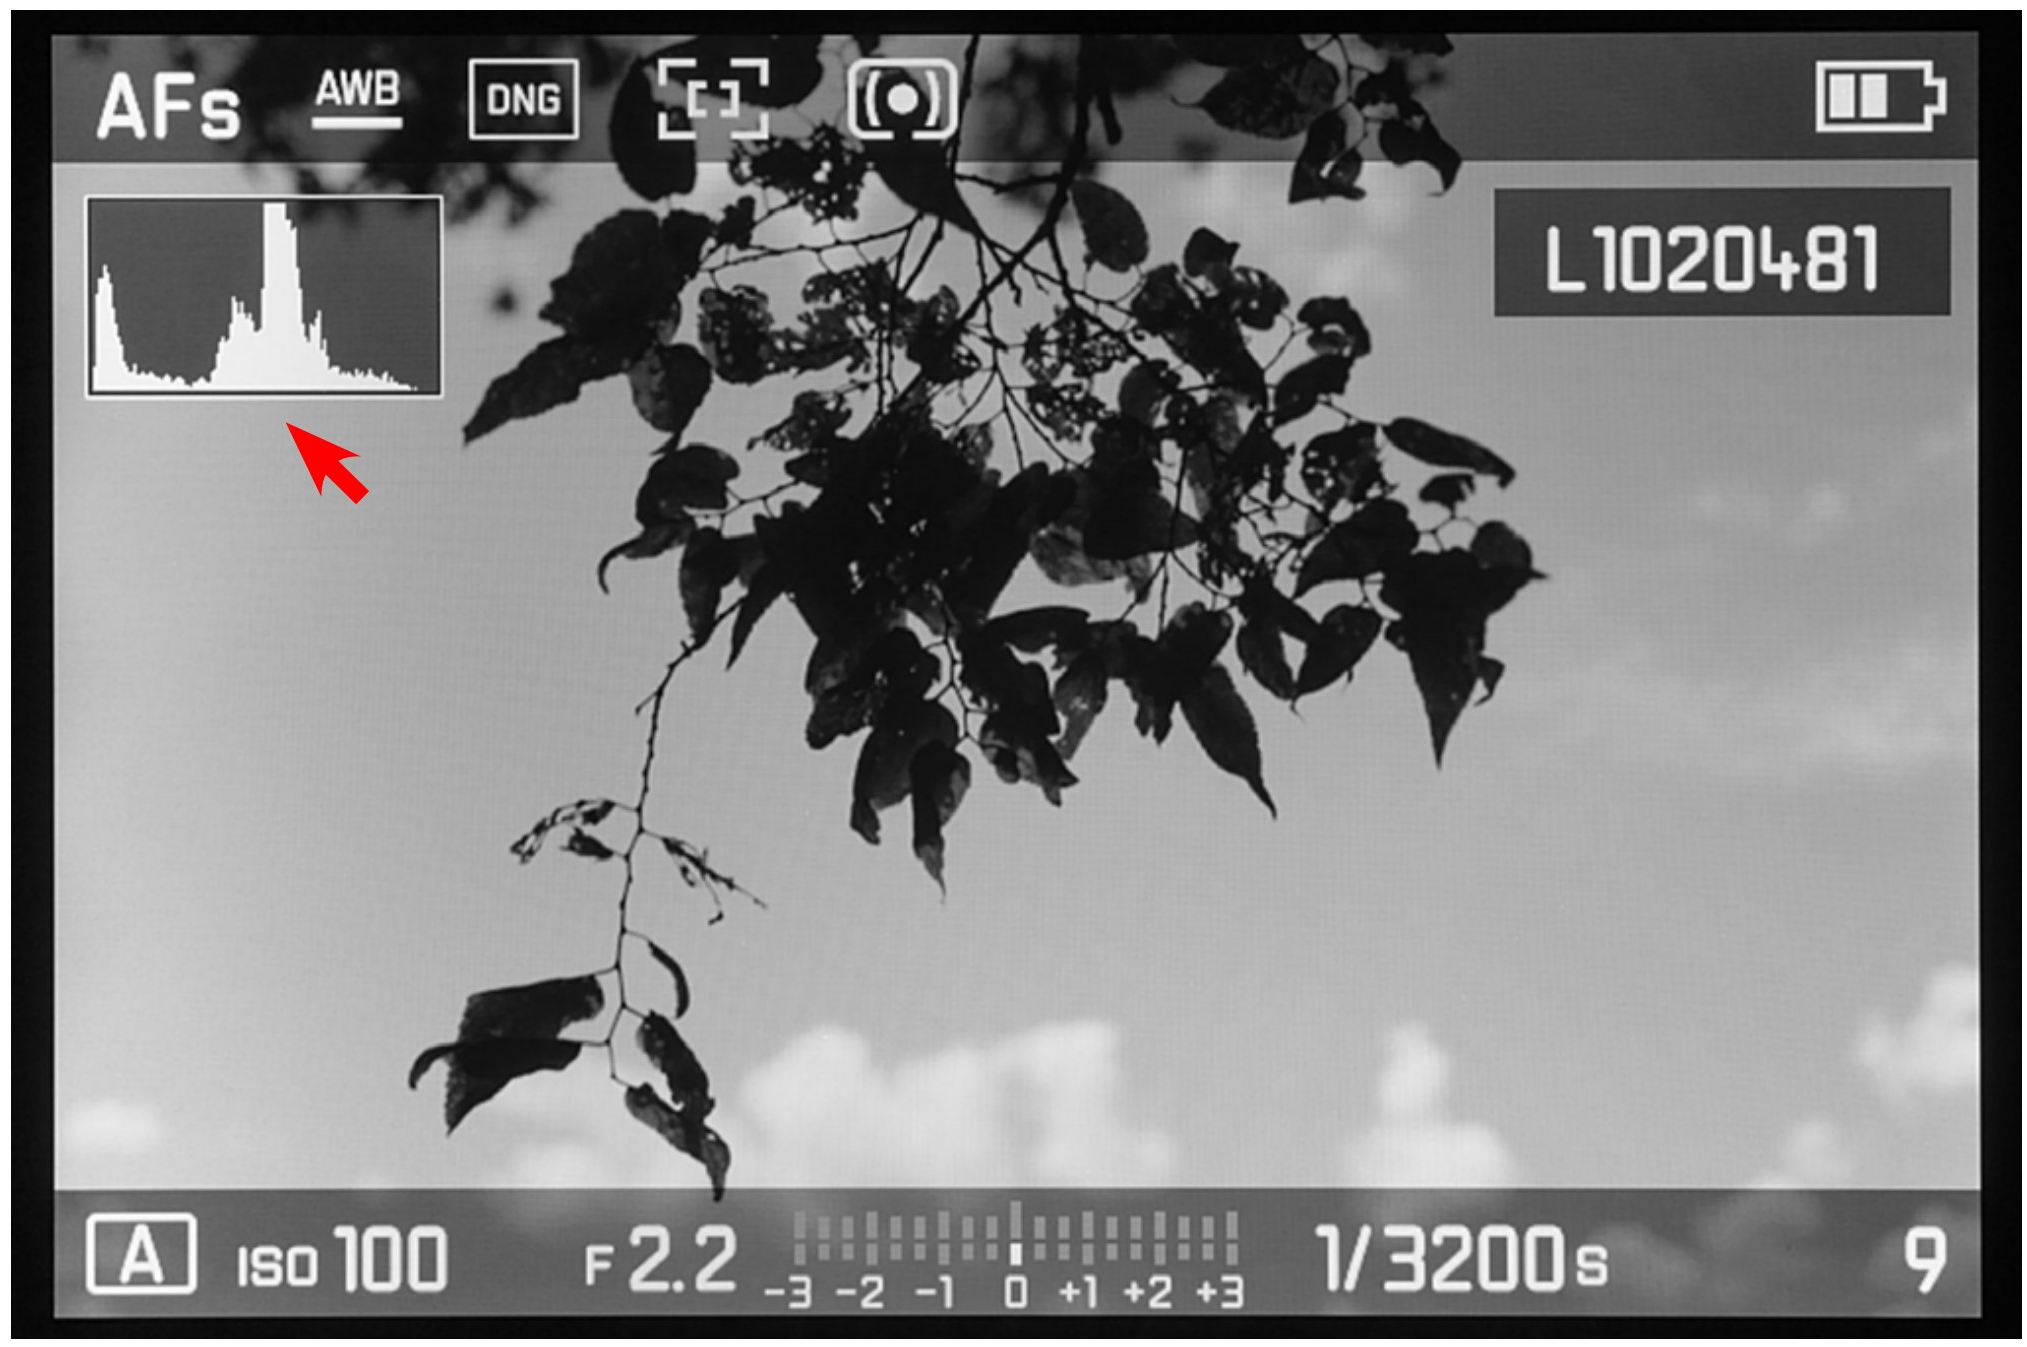
Review and/or taking image showing histogram in the upper left of the image. This histogram clearly shows the shadow areas (darker pixels) of the leaves on the left of the graph and the midtones (gray pixels) of the sky in the middle. There are few highlights (the clouds) in this image. More importantly, all tones appear to be confined to the histogram and are spread across it, indicating the correct exposure. |
These lie to the left in a histogram. Finally, midtones are the areas towards the middle of the histogram.
The most common exposure mistake happens when the highlights are not contained in the histogram, but lie outside the right of it. These lost tones, where a number of different levels are defined as 255, are called lost highlights. Because the highlights are clipped from the histogram, this is also called highlight clipping. The lighter areas of the image will have no detail or differentiation of tones. Often they are described as blasted out highlights. You have probably seen these unpleasant bright areas in images from your cellphone camera. Not only are the tones compressed, but colors also tend to go awry.
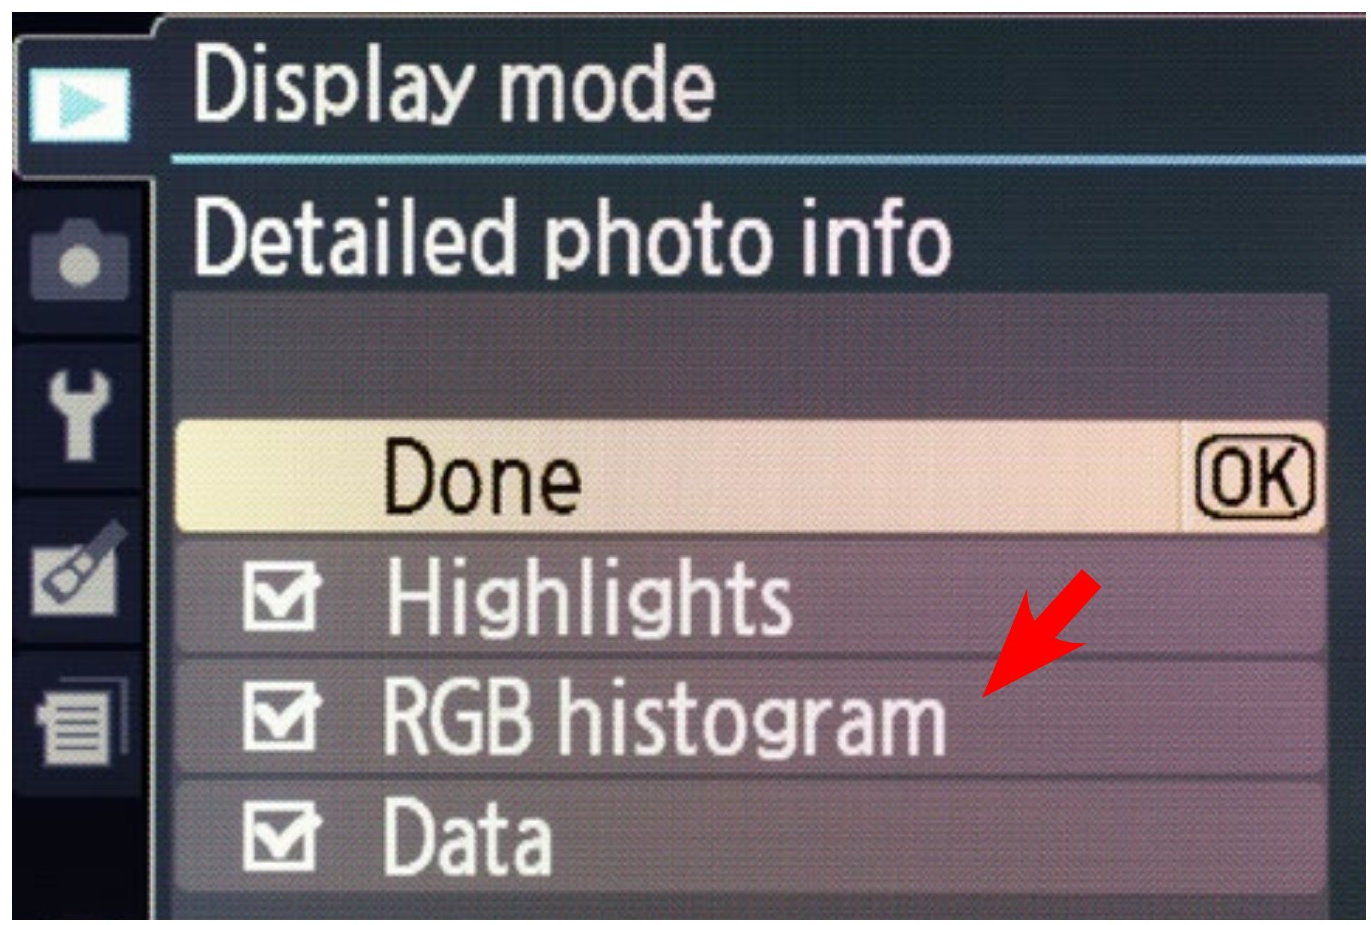
Cameras also include a feature which provides a stronger warning than the histogram for lost highlights. In the review image the levels that are white or lighter (level 255) will flash a color. This is why you often see photographers looking down at their review image—not to see if they were pointing the right direction, but to see if they have any lost highlights.
When tones are lost off the left side of the histogram it is called shadow clipping. For a variety of reasons this presents fewer problems than highlight clipping.
|
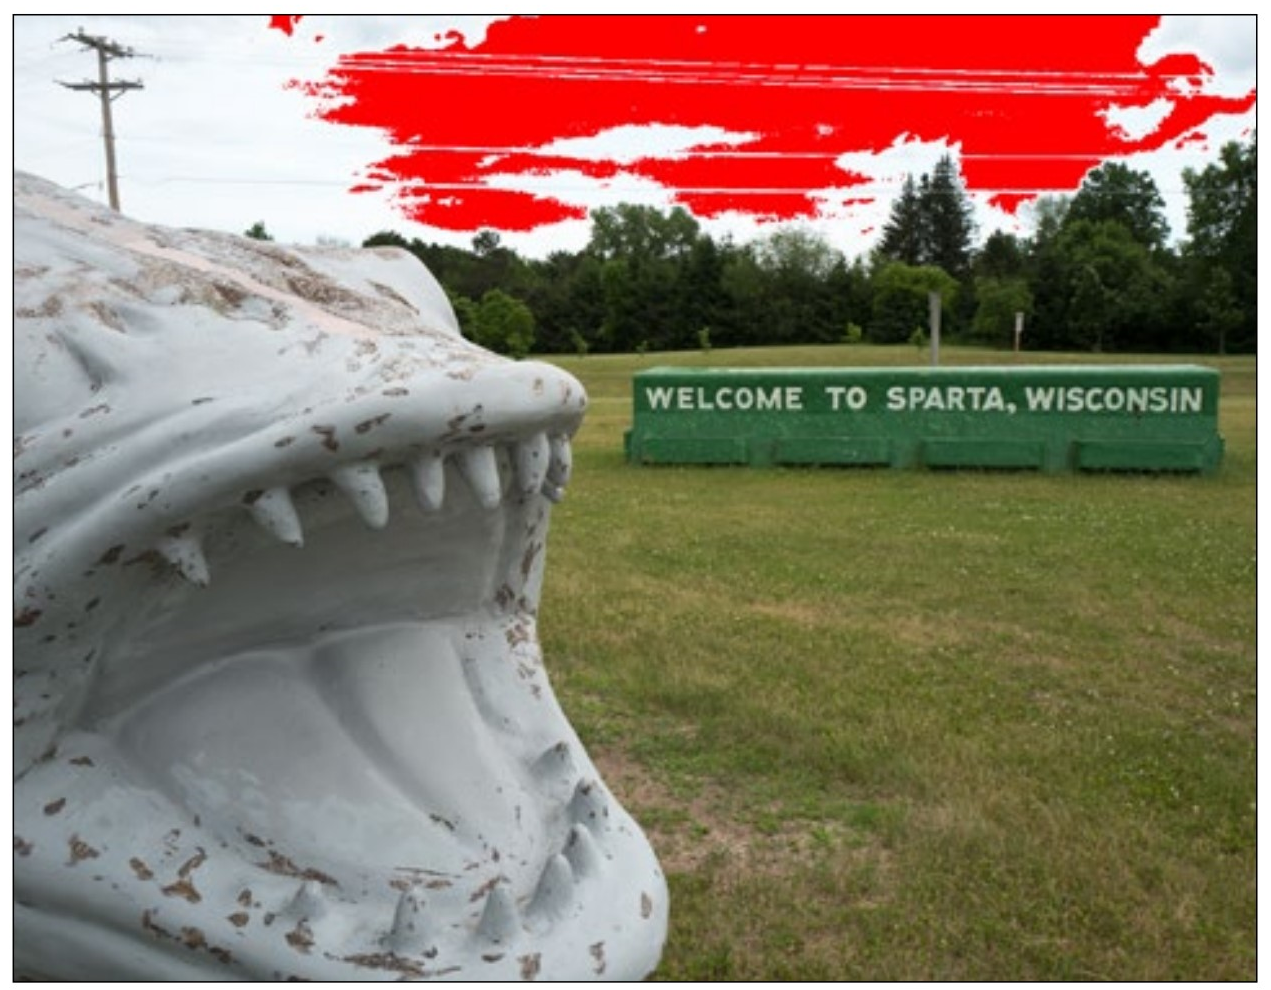
Camera review image showing highlight clipping with a flashing red area. |
Exposure
When you take a photograph, your camera assesses the amount of light coming from the subject and adjusts the aperture (the quantity of light) and shutter (the time the light is let in) so that the right amount of light falls on the sensor, ensuring that the histogram will contain all the tones necessary.
|
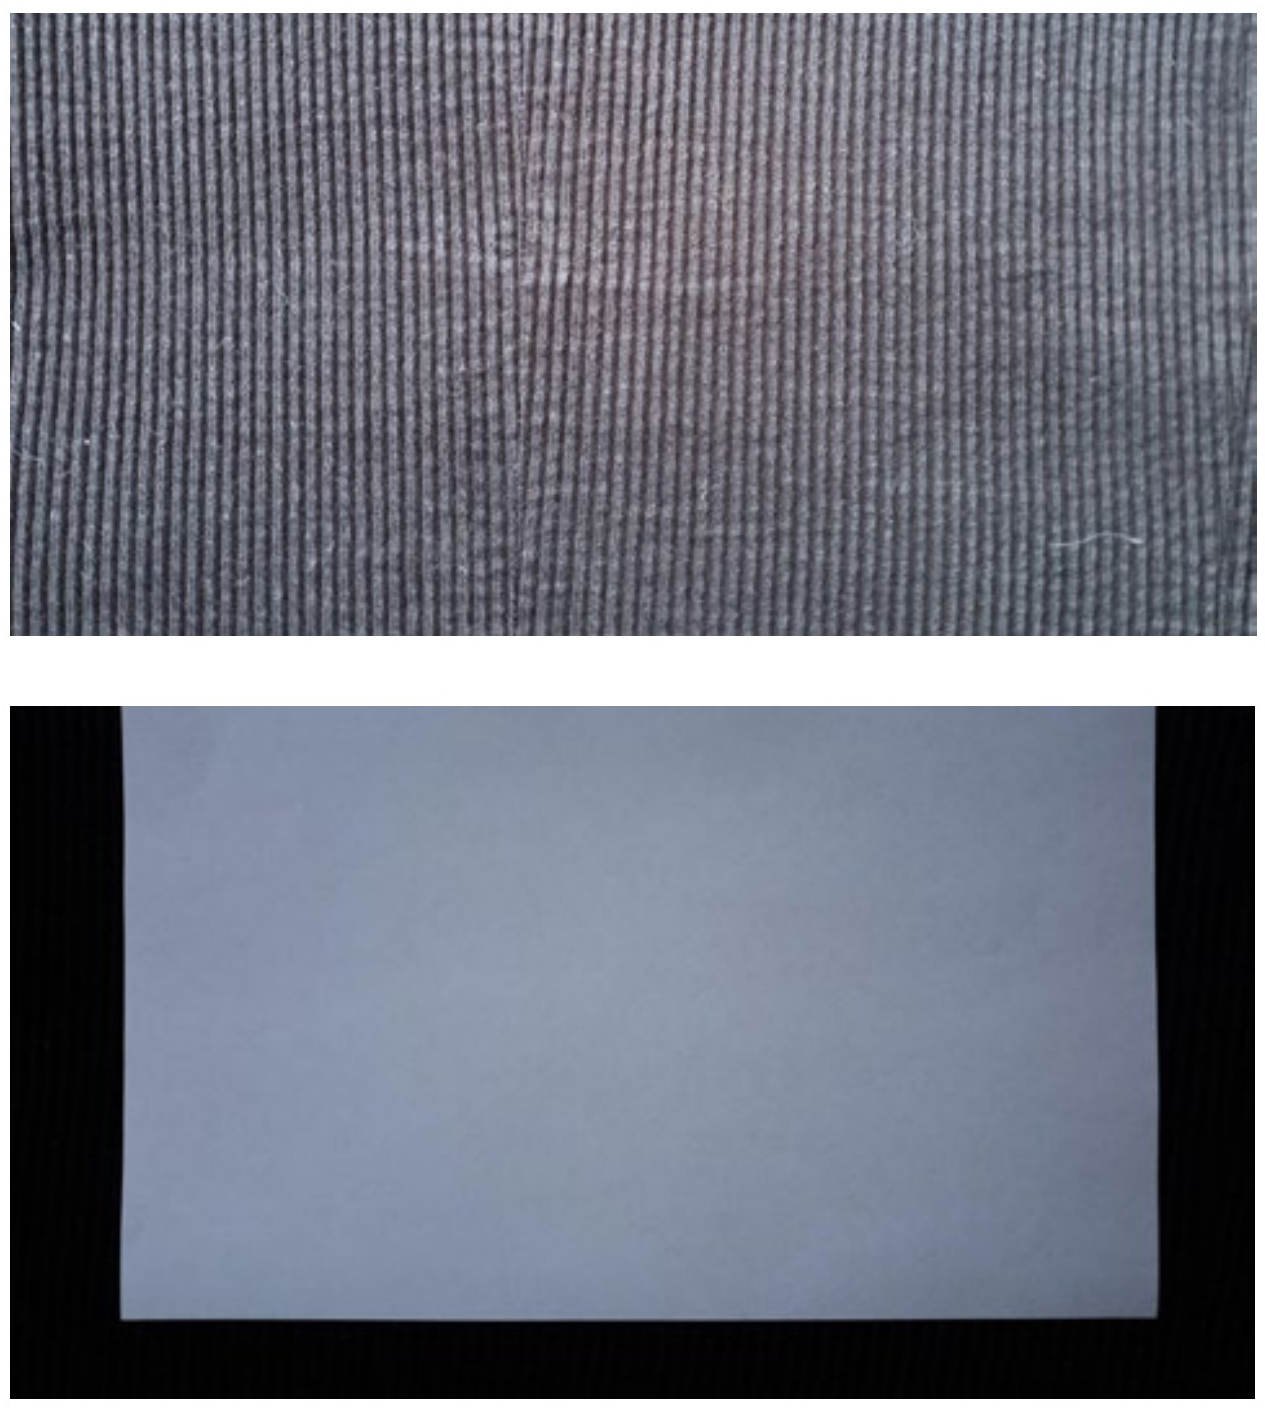
These two photographs were taken on automatic exposure with no corrections. The top one is a dark black corduroy jacket and the bottom is a white sheet of paper laying on the same jacket. The top image is overexposed (too much light) and the bottom one underexposed (too little light). You can do this same test and get the same results with any camera—even a cellphone camera. |
For many photographs this works great, but for some, it doesn’t. This is because your camera does not know what you are taking a picture of.
If the camera sees a lot of dark when you are taking a picture, it will think think there is very little light. Therefore, it will allow too much light to the sensor, and the photograph will be overexposed, or too light. Like in the top right illustration of black corduroy.
Another example of overexposure might be seen when taking a picture of a spotlit singer from far away. The camera sees all the dark around the singer and so assumes the subject is dark. In trying to make that dark normal, the singer will be rendered too light—no more than a white blob whose levels (brightness) would be far off the right side of the histogram.
If, on the other hand, the camera sees a lot of lightly colored things, it will try to darken them to normal and the resulting image will be underexposed, or too dark.
This can be seen with the paper in the illustration on the previous page or a snowy scene. With snow, all the camera sees is a lot of light. So it will let in too little light and underexpose the picture.
Neutral Gray
Any time a photograph is taken, the camera is actually averaging all the tones in a scene to a neutral gray value, which looks somewhat like the gray below.

|
A typical scene in which there is a full range of levels (tones) distributed evenly. Some representative levels are shown in green. The histogram below confirms the fairly even distribution of tones in this image.
|
In a typical scene there are both lighter and darker areas. The camera averages these together and makes that average neutral gray. In the resulting image their respective brightnesses are maintained so the image has an exposure that is usable. The darks are dark and the lights are light. As you get more experienced with photography, you will find that many times the most interesting images are not of typical scenes, and so the automatic exposure often (or at least sometimes) needs to be overridden.
Exposure Correction
Fortunately it is fairly easy to correct exposure problems if you have the time to take another photograph: After you take a photograph, look at the histogram in the image review. If the hills are not contained in the histogram (image is too dark or too light), you can correct it and take another photograph.
This correction is simple. Somewhere readily accessible on your camera (refer to your camera’s instructions) is an adjustment for Exposure Value (EV) Compensation or
Exposure Compensation. It will be labeled with a +/- symbol or with EV. If your first picture is underexposed (too dark), adjust the EV scale so that the pointer is in the plus range, and if overexposed (too light), turn it to the minus range, then re-shoot the scene at that setting.
You can repeat this process using different EV corrections until you get the exposure correct. You should depend mostly on the histogram on the camera’s review screen—if the hills are to the left, the image is probably too dark, and if they are on the right, the image is probably too light. If all the tones are within the histogram, the image can be successfully adjusted later on the computer. Using the histogram in this way is a much more accurate way to assess exposure than using the camera’s review image.
These EV compensation numbers actually have meaning—each number lets in twice or half the amount of light. In photography each one of these numbers is called a stop (remember?).
If you are having trouble finding the EV scale, it is in reach of the digits on your right hand. Cameras have a wheel dedicated to it or a button that when depressed makes the main wheel function as the EV compensation. Most photographers change the EV compensation number frequently. As you get used to using it you will pretty much know how to compensate your exposure before you even take the photograph.
There is another EV adjustments for the flash that has a little lightning bolt next to it. That is NOT the one you want to adjust, as it only adjusts the brightness of flash photographs.
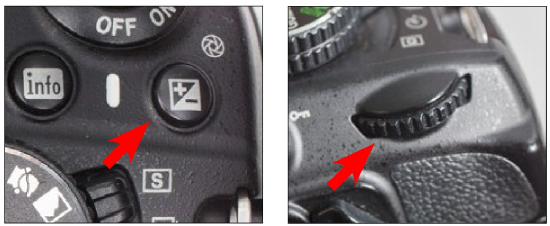
|
The EV (+/-) button is held down while main control wheel is turned for EV adjustment. Some cameras have a second wheel that is dedicated to EV changes. |
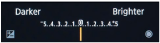
|
A typical EV scale in the viewfinder or on the back viewing screen. This one allows 5 stops of correction in either direction.
|
EV NumbersAn Exposure Value is actually a standardized number which defines the amount of light available relative to how much light the sensor needs. Since these numbers do not help increase understanding nor do they show up anywhere on most digital cameras, they are of little utility. |
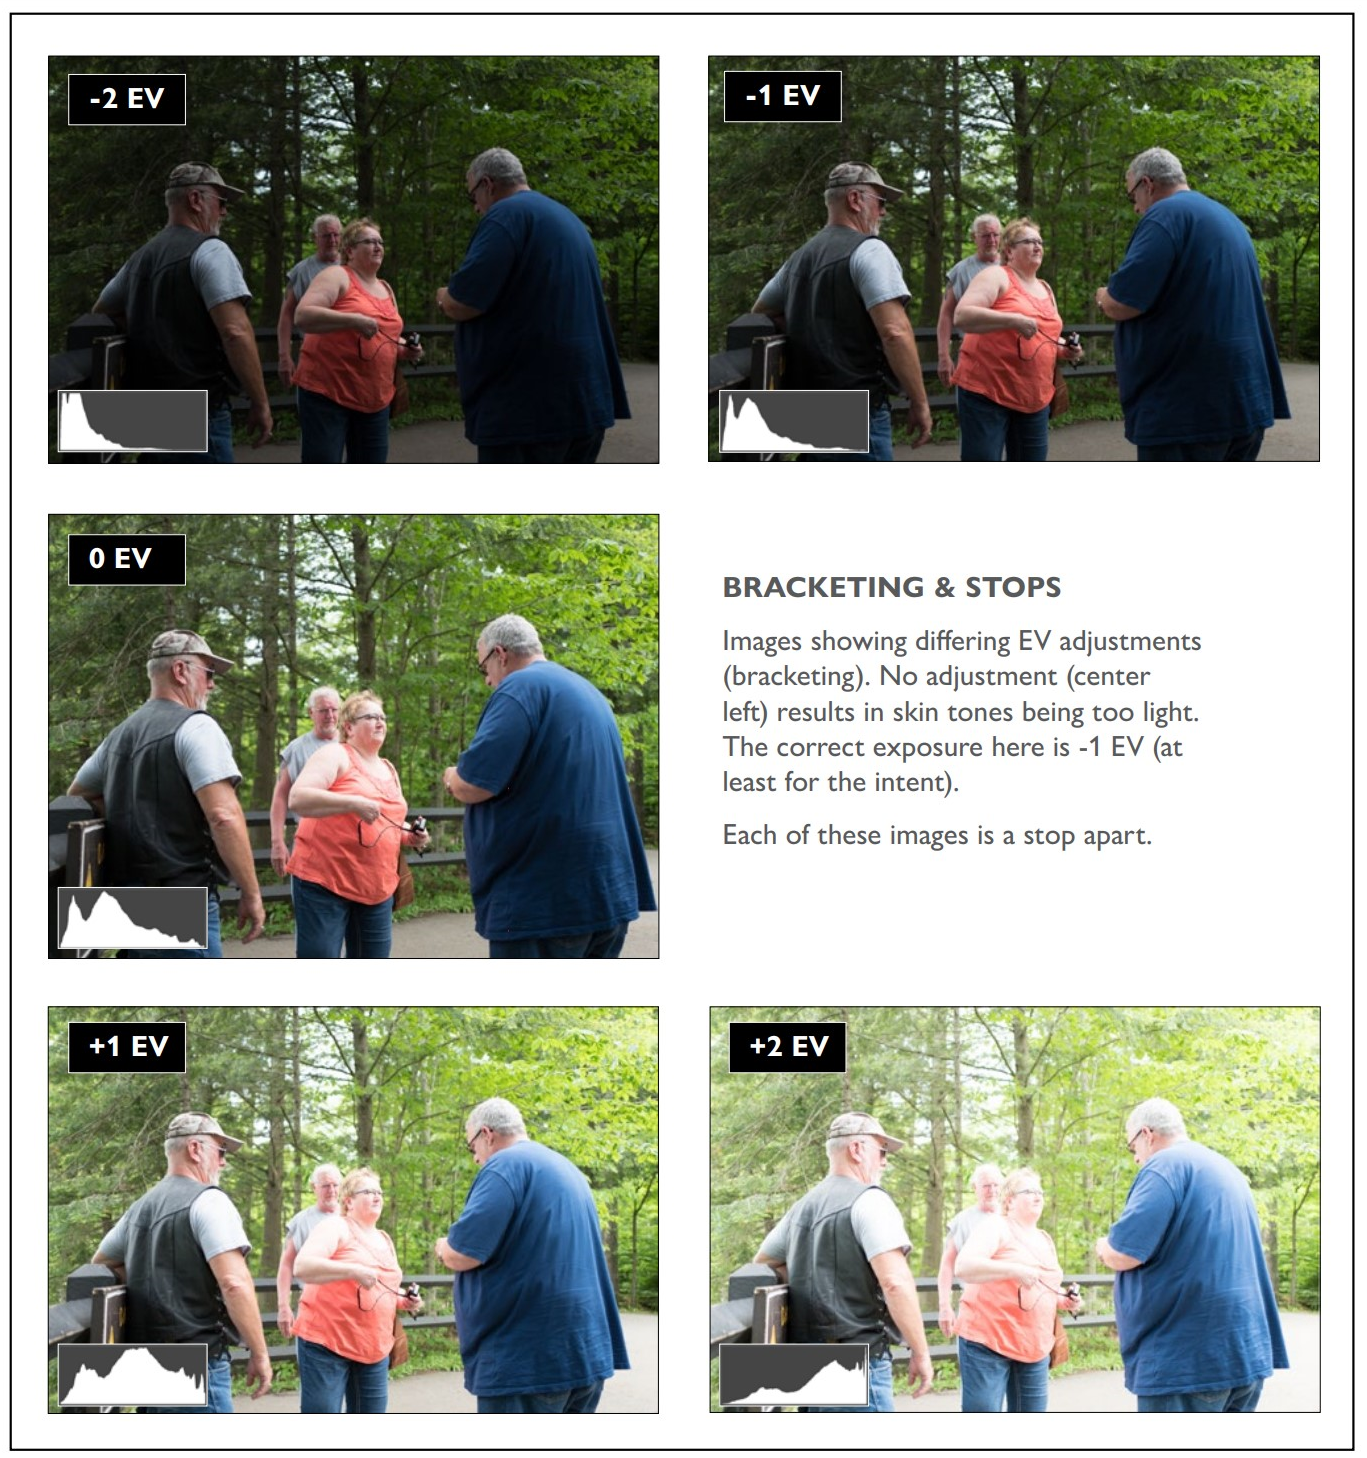
Bracketing
A way to get the correct exposure every time is by bracketing. To bracket a photograph means to take several shots, all at different exposure value compensations (EVs). If you have plenty of time, you can take five images of the same thing, changing your EV to a different number with each. A typical sequence is -2, -1, 0, +1, +2.
Most cameras will also allow you to bracket shots automatically. Deep in the menu is where you will find Auto-Bracketing. This directs the camera to take multiple photographs in rapid sequence, all at different EV values. I have never found this particularly useful, but in certain situations it could be.
Bracketing is something you should try, but in taking photographs you can evaluate your histogram and retake as many shots at as many EV compensation values as necessary to get the correct exposure.
And if the subject is fleeting and you can only get one or two shots, then you don’t have time to bracket anyway, even with auto-bracketing.
Besides showing bracketing, the illustration at right should also help you see how much exposure change a stop is.
Metering
To determine how much light to let in for the correct exposure, cameras have exposure meters (also called light meters) built into them. These are like thermometers, but measure the amount of light instead of the amount of heat. The meter evaluates the amount of light so your camera knows what aperture and shutter speed (overall exposure) to use.
In other words, the exposure meter is the tool the camera uses to take all the brightness reflected by objects in a scene and average them to neutral gray.
Following are several different metering modes you can set your camera to use (again, see your camera instructions).
Evaluative metering (also called multi-point, matrix, and other things) tries to figure out what you are taking a photograph of by the type of light pattern it sees. While it works well with a predictable scene such as a portrait or group of people, it will revert to another metering mode with an unpredictable scene.
Center-weighted metering sees the light towards the center of the frame most—based on the assumption that you will put the most important part of your subject near the center of the frame. So, if you are taking a picture of a person centered against a dark or light background it will not be fooled into trying to make that background a normal exposure. This center weighting is usually not very heavy, so it is like averaging the entire scene’s light.
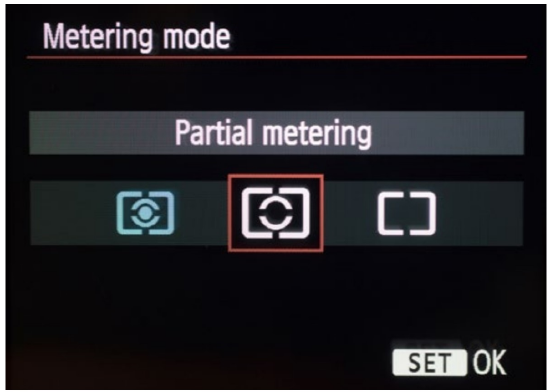
Spot metering (also called partial metering) only looks at the center of the scene to figure out the exposure. Of course, this assumes that you are putting the most important thing in the middle of the frame. And while sometimes you might, hopefully you are trying to compose differently.
There are additional metering modes in many cameras. You can read your camera’s instructions about these to see if they would be of use as a general setting or in specific instances.
Each metering mode has its benefits and drawbacks. Now that you know the basics of how they work, you can pick the one you think might be best for you, then use it to get familiar with how it works.
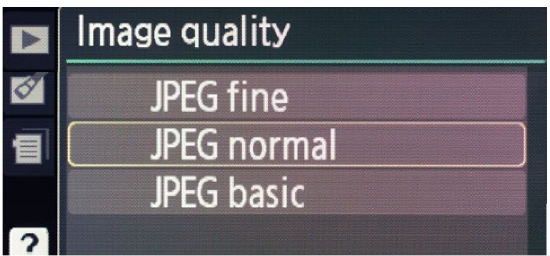
|
This menu has three metering modes available. |
Histogram EvaluationWhy don’t cameras evaluate the light using the histogram? Many do have this capability, but only to some extent and not with RAW format images. Probably this capability is limited because at some point too much automation will work against getting a good exposure. Histograms really need a human to interpret them. |
But remember that whatever metering mode you use, your camera meter only knows neutral gray. It does not know what you are taking a photograph of or how to interpret it. On the following pages are some examples that will help you understand this.
Of course you cannot evaluate your exposure with every photograph you take. If you have less than a second to secure a scene, you are not going to be changing the EV compensation number, because by the time you do, your image will be gone.
Exposure LockMost cameras have a provision to lock the exposure when taking a photograph. For instance, if you are taking a photograph with a bright sky, you can point the camera down so that it doesn’t include the sky, lock the exposure, and then frame it with the sky. In this way the bright sky won’t make the ground too dark. While you might find this to be a useful control, it can also confuse things. Using the EV compensation instead is simpler and works in more situations for most students. |
Also, you are not going to be able to use the histogram with every photograph you take. But whenever you can, get used to using it on your camera’s review and in your image editing application. It takes practice to know how a histogram reflects the actual tones of an image.
|
The color histogram seems to indicate the image above it is too dark, but the exposure is fine for this predominantly dark subject. The histogram also shows lost (clipped) highlights, and although there are, they are inconsequential. With practice it becomes easier to evaluate images using their histograms. |

Exposure MetersYou can buy exposure meters that are separate from the camera. These read the amount of light and tell you the correct settings for shutter speed and aperture at a given ISO. Reflected-light meters evaluate the amount of light reflected from the subject in much the same way your camera does. Spot meters read light coming from a very small portion of the subject. This is good for small bright things like a singer on a stage. Also, with several readings you can predict what tone each part of any scene will be. Incident meters read the light falling on the subject. In this way they are very accurate, but awkward to use since they are held at the subject. Flash meters read the light coming from flashes, something that your camera’s meter cannot do. With the instant feedback available in digital cameras the need for these meters is narrow. |
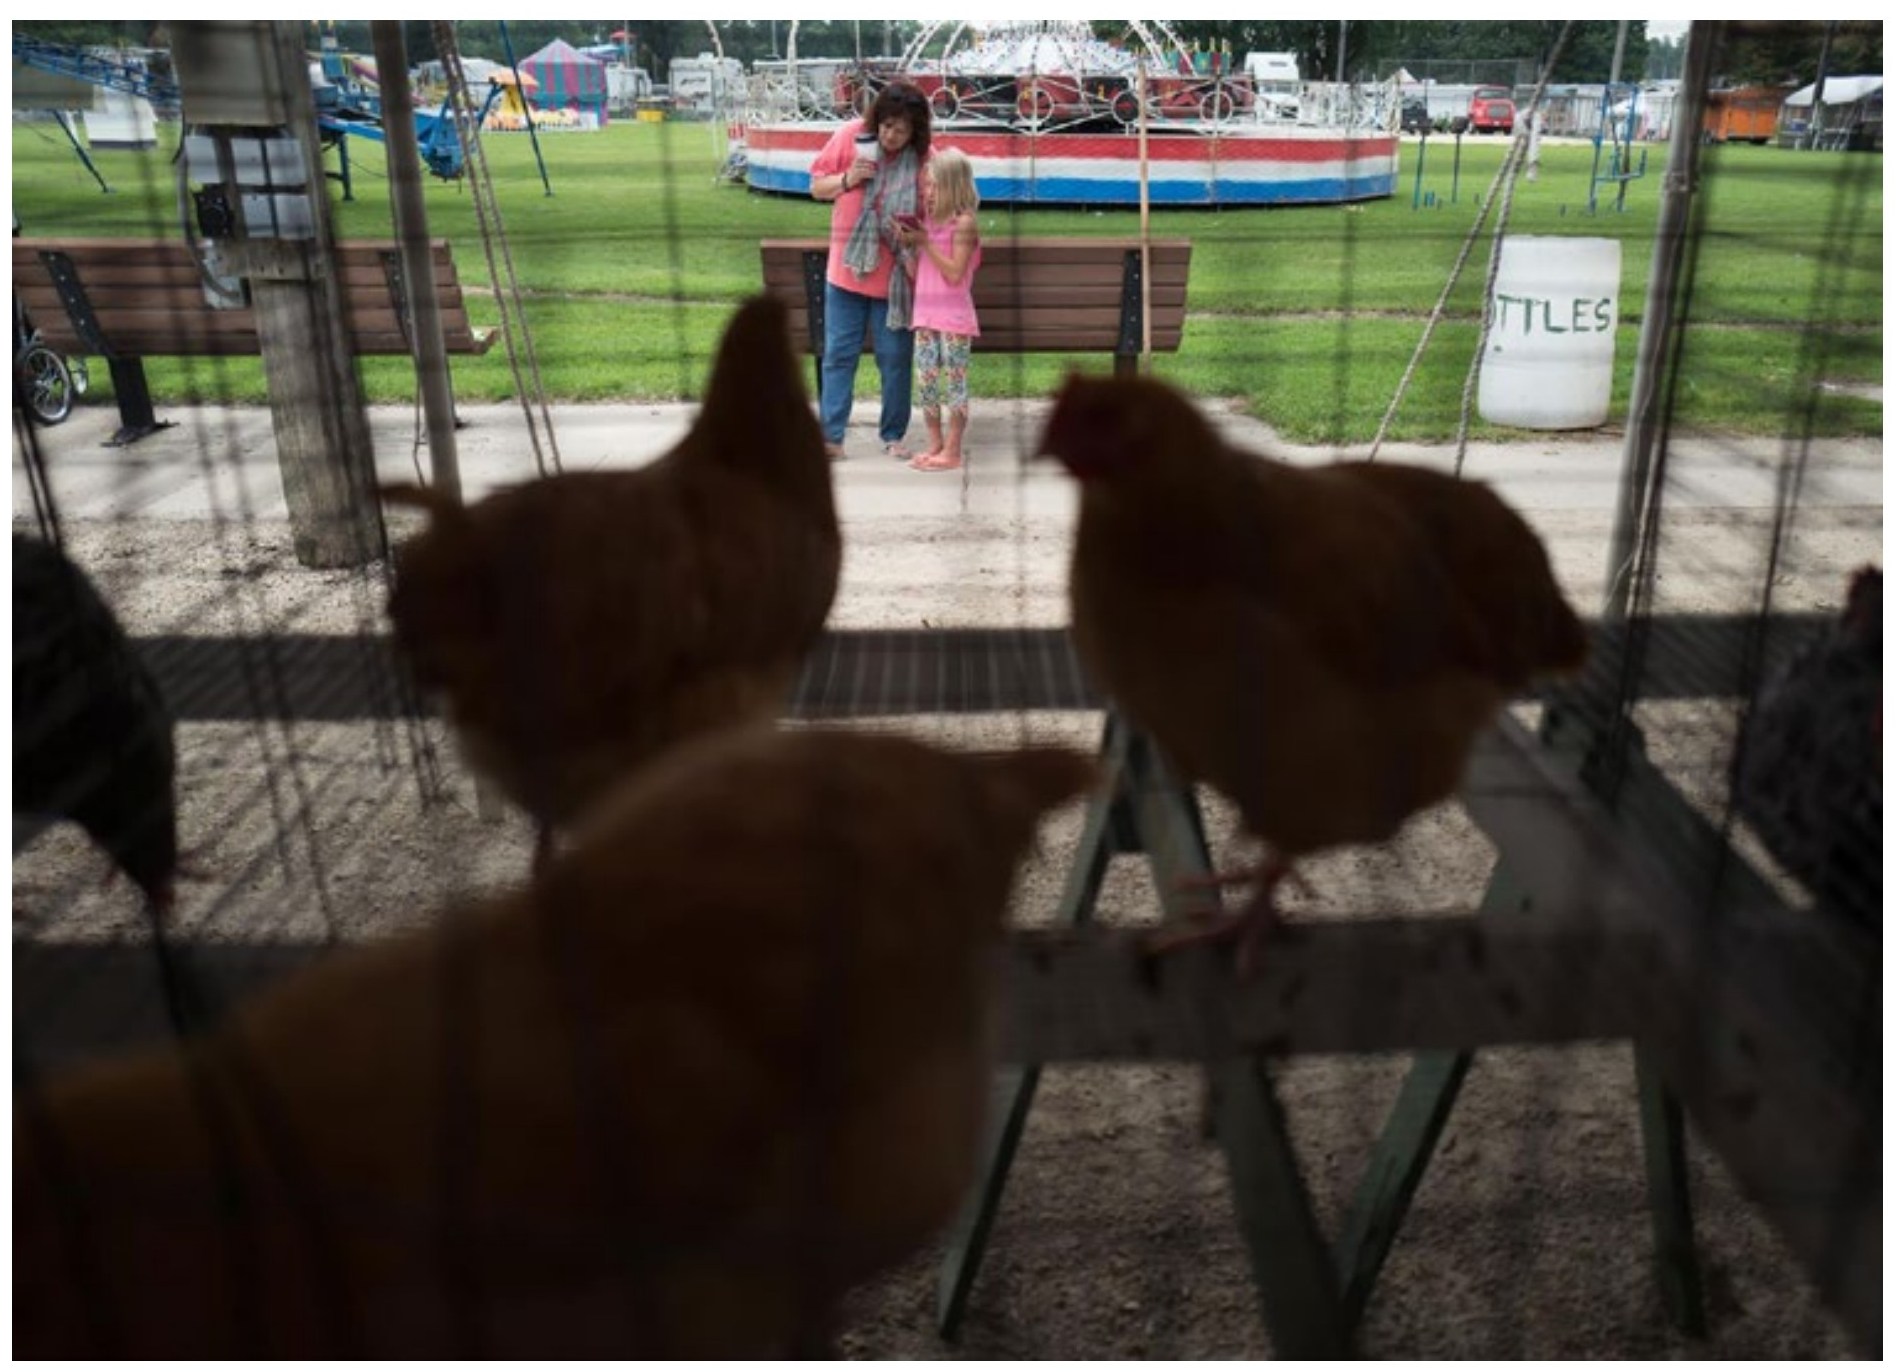
EXPOSURE COMPENSATION EXAMPLES
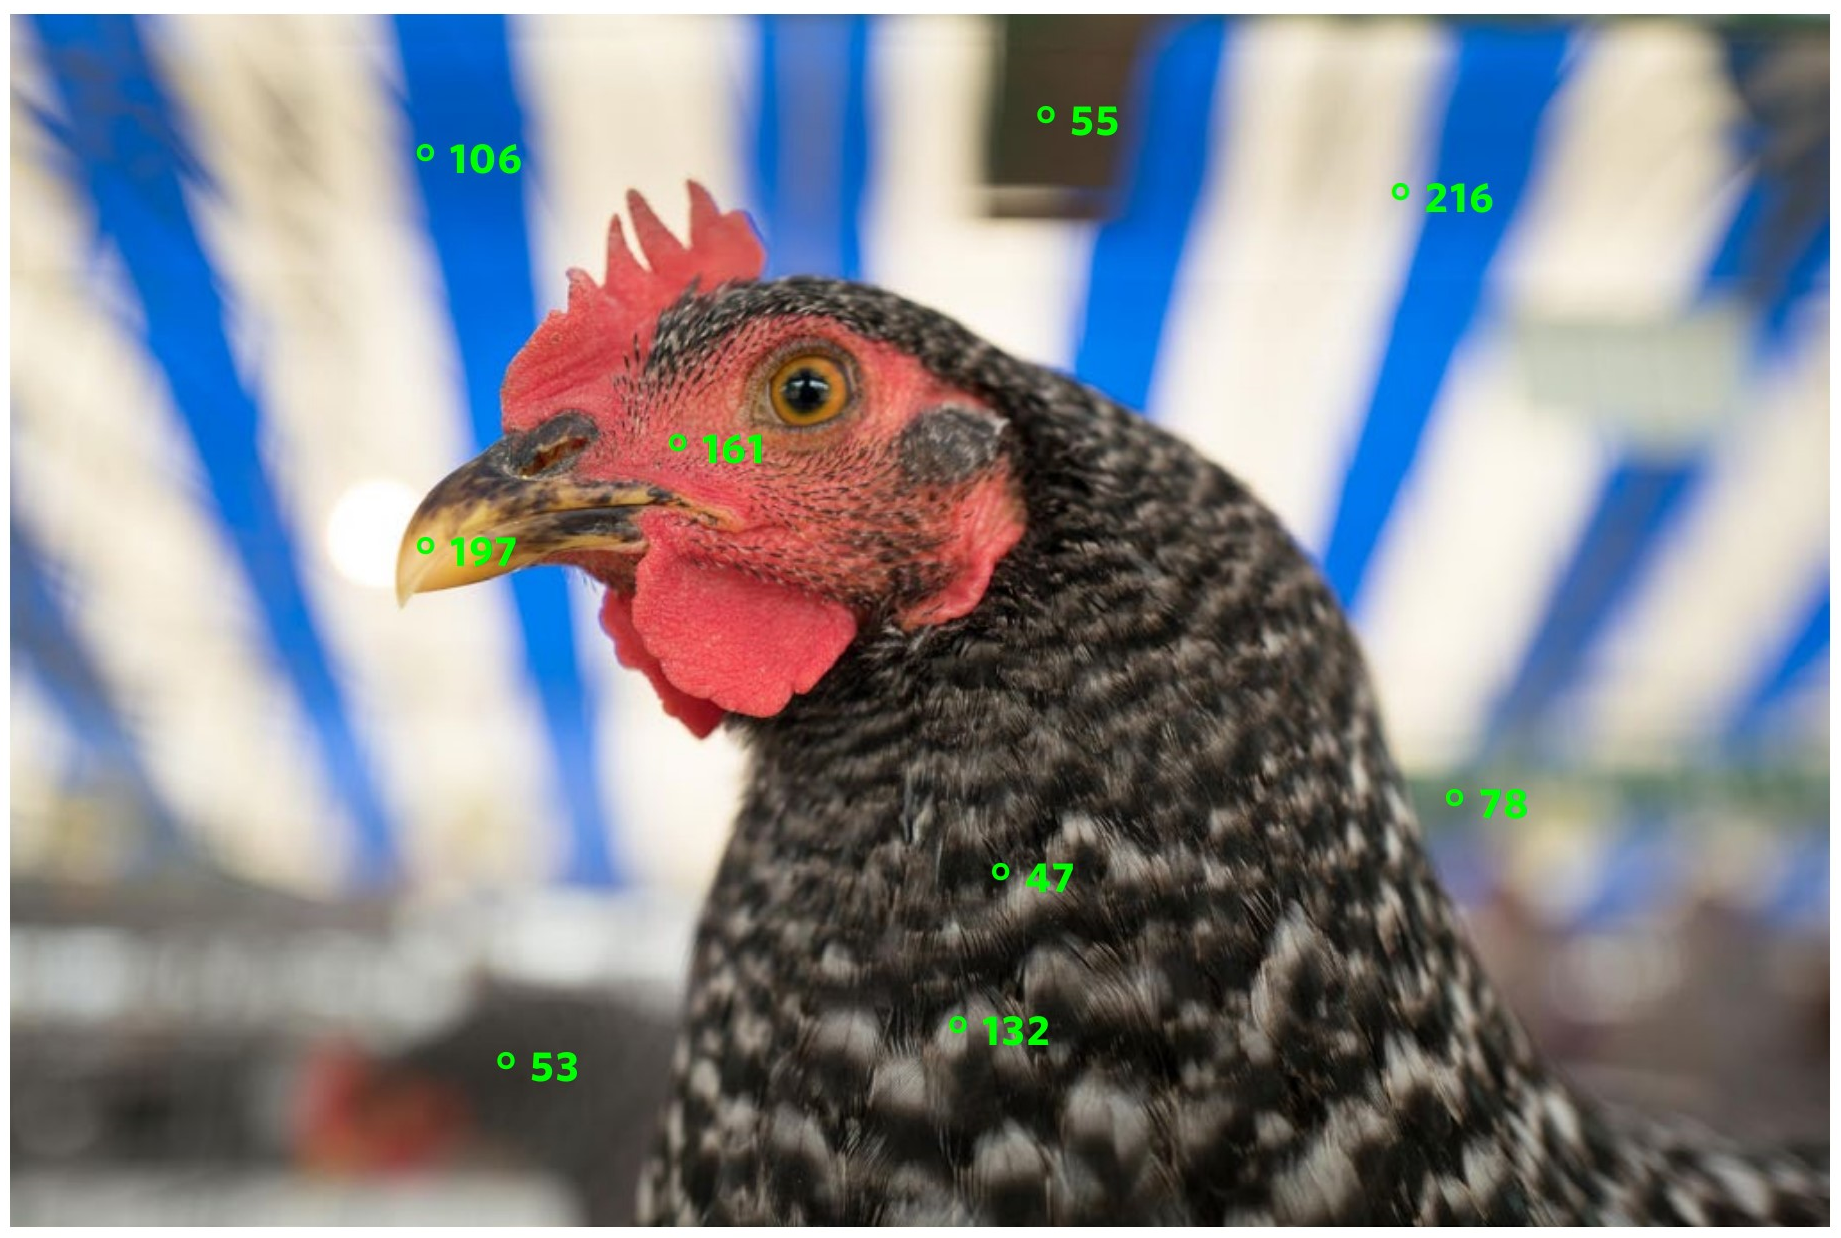
There is no metering system in the world that would know that the hens in the foreground should be dark and the people in the background should be properly exposed. The EV compensation for this image was -2 EV.
|
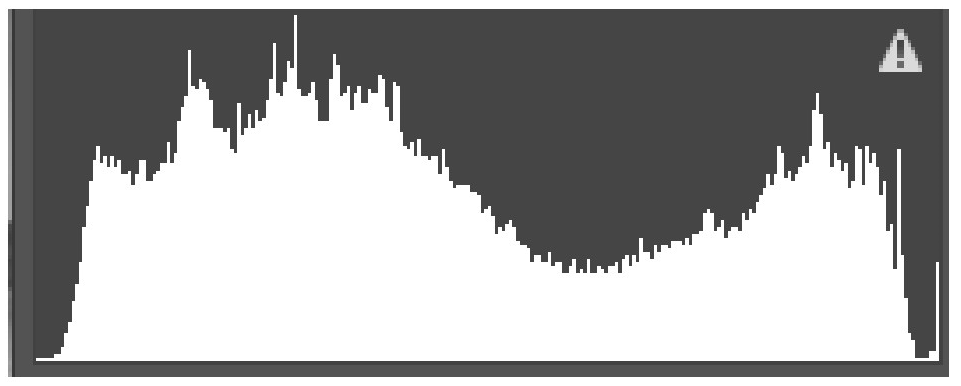
The histogram of this image shows a lot of very dark areas (large hill on the left of the graph).
|

|
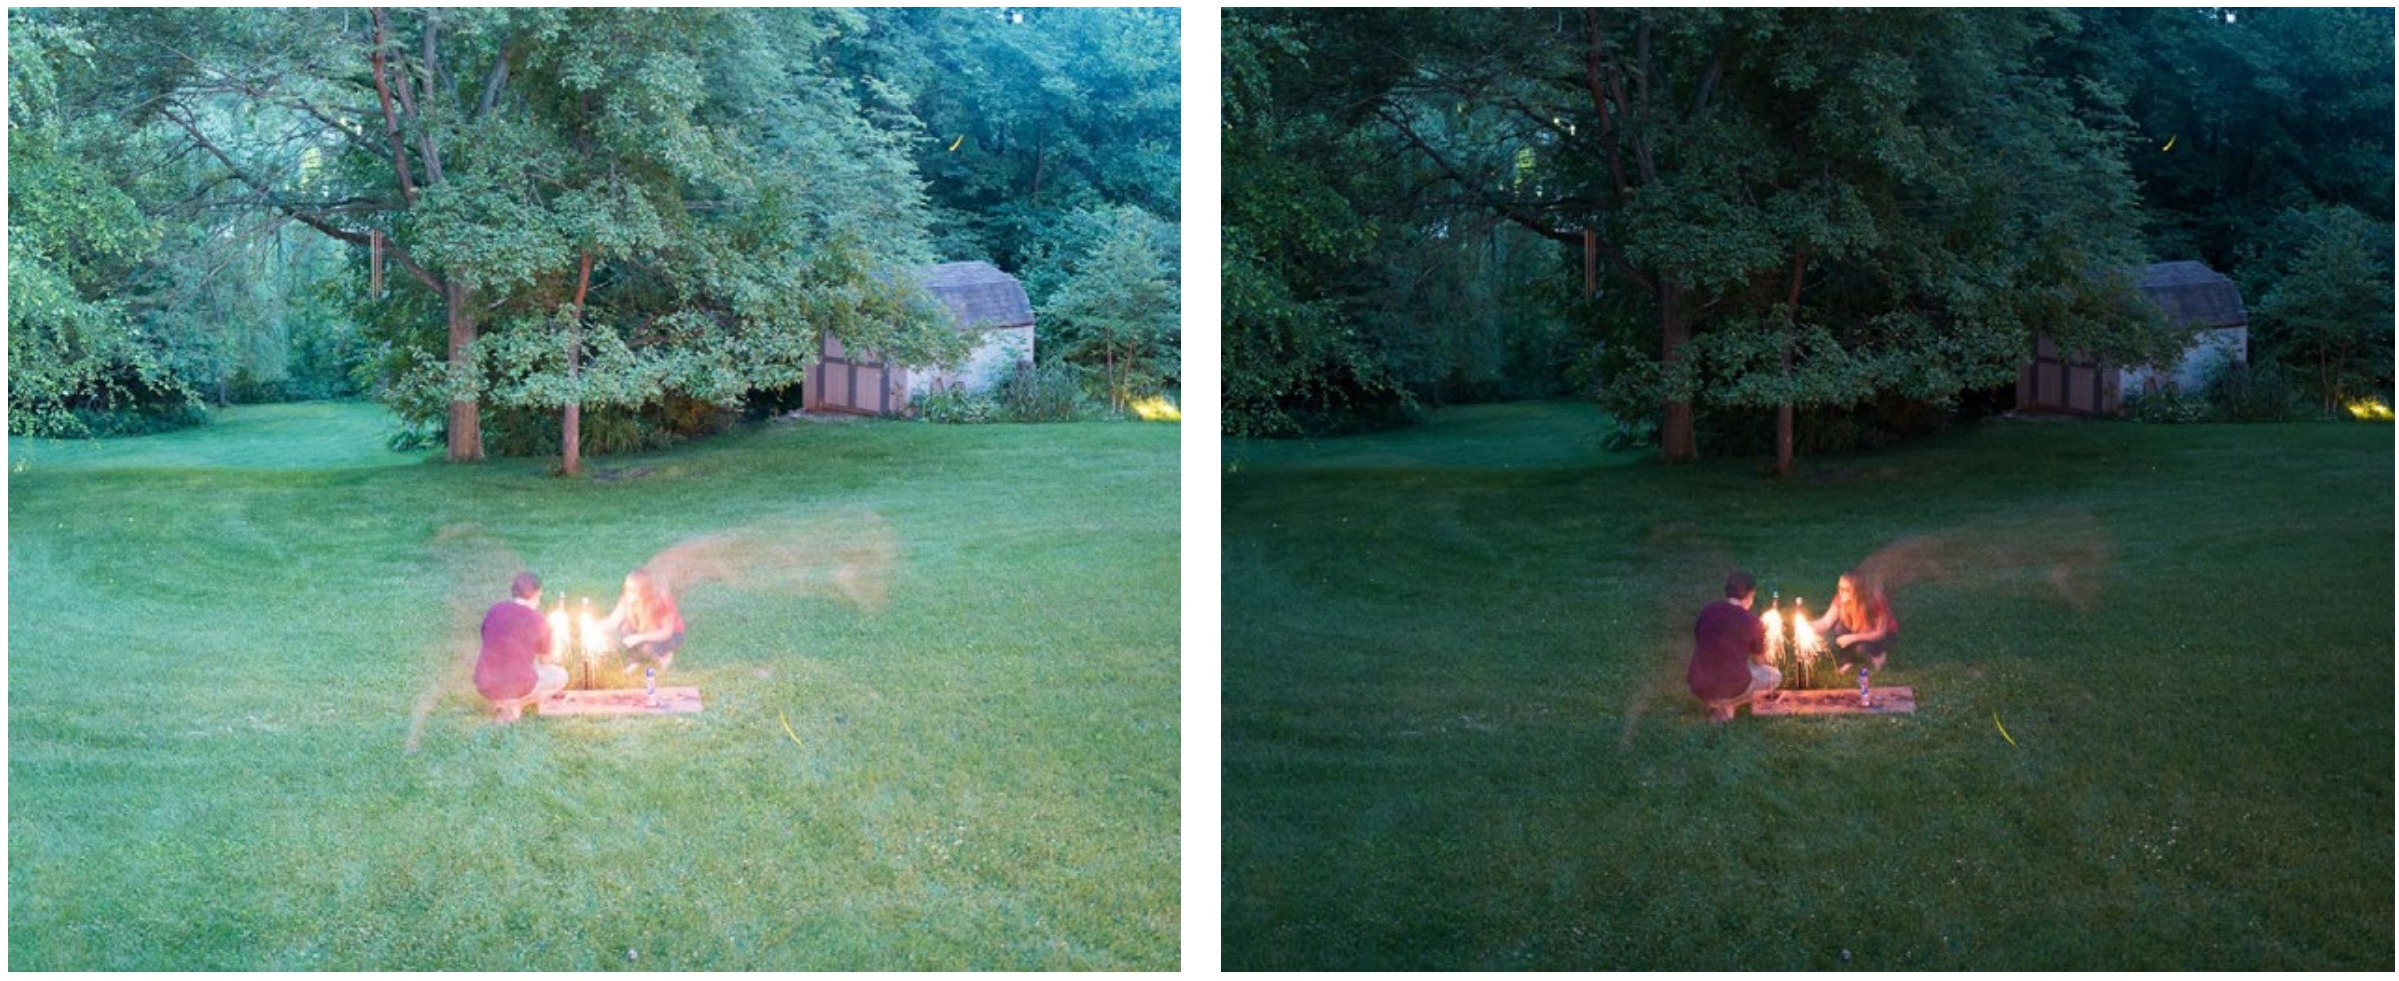
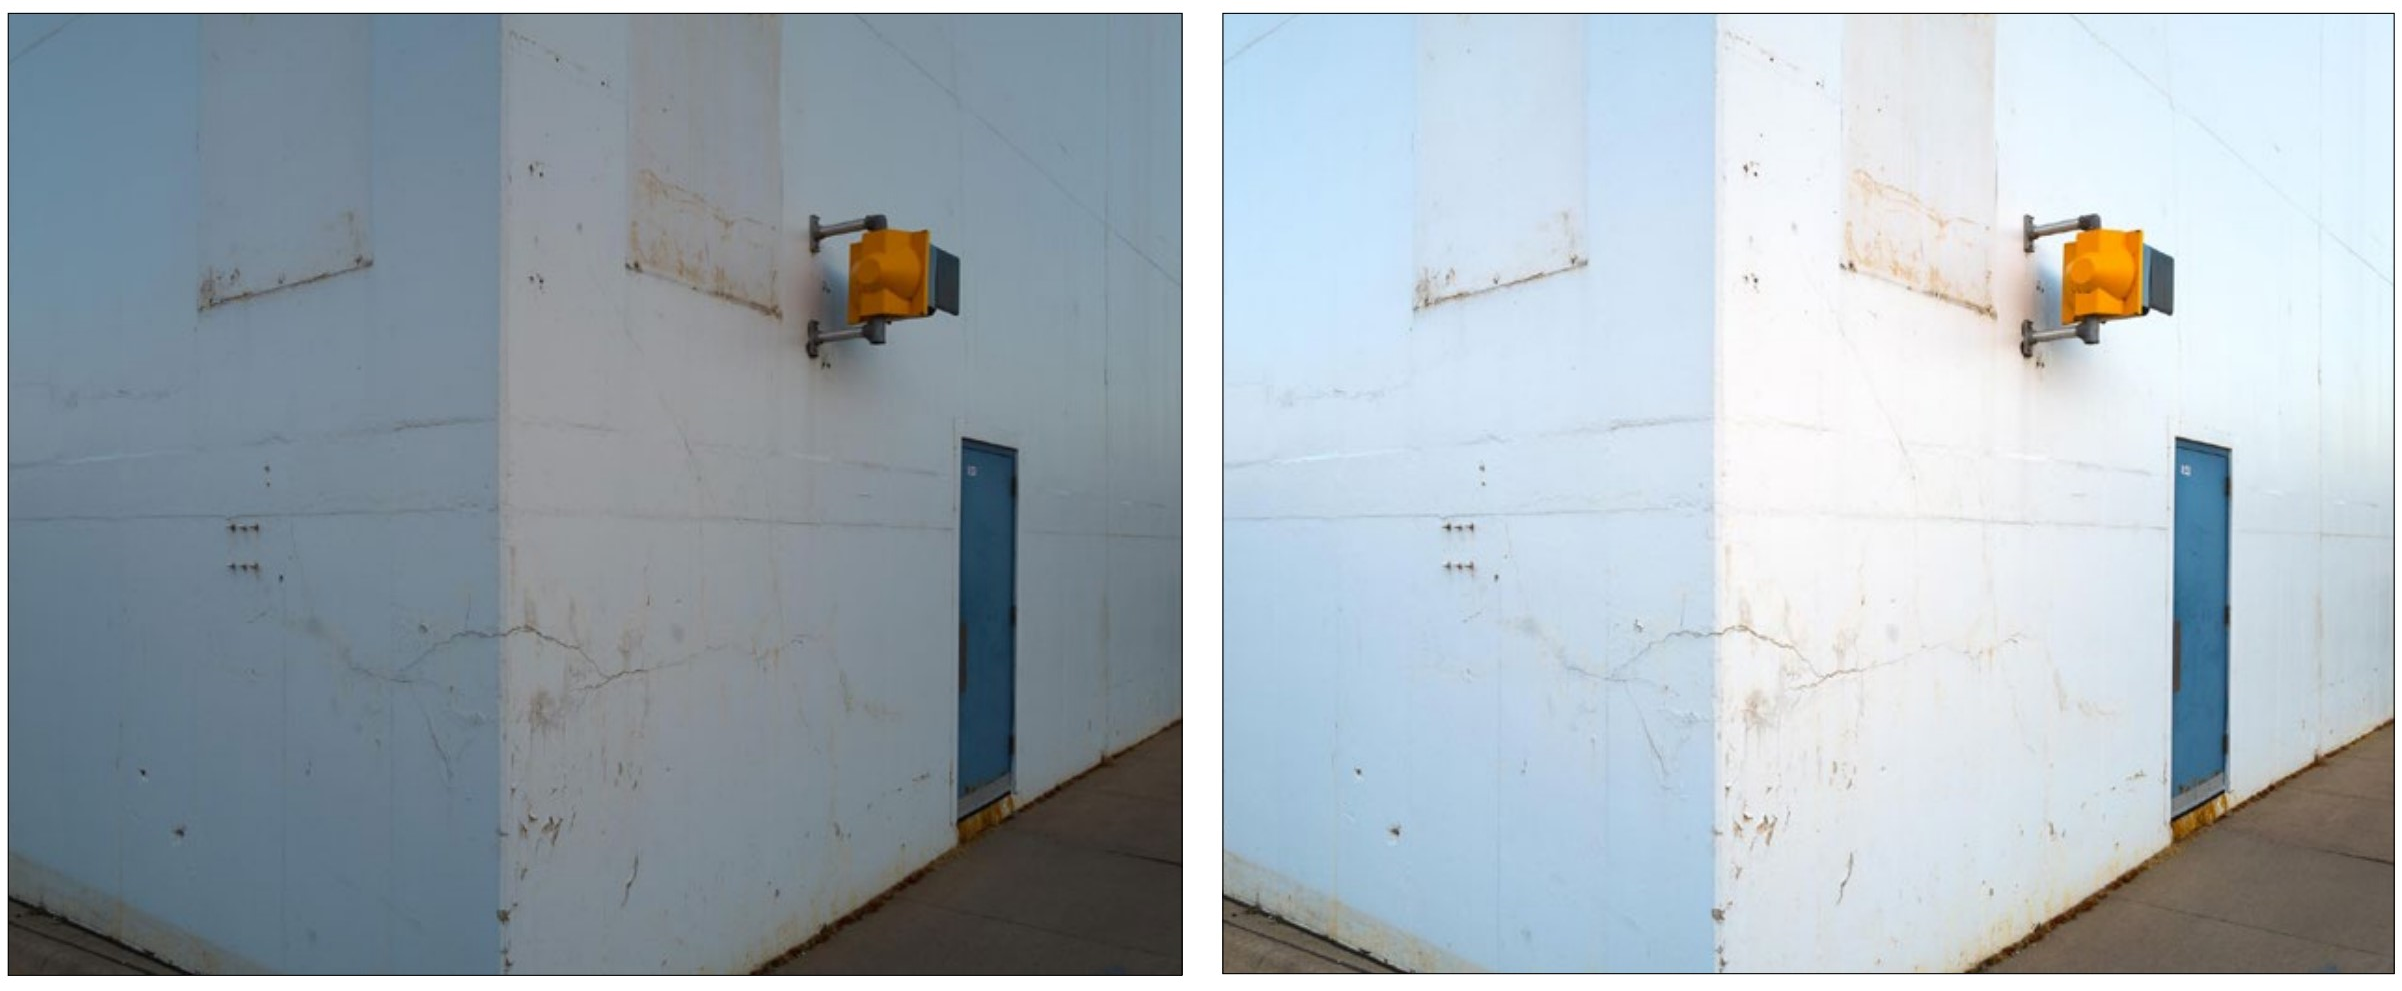
High contrast scenes, like the images below, are impossible for a camera meter to figure out, although you might luck out and the image will be correctly exposed. If you are not lucky, you have to guess at an EV setting and then try different ones based on your image review and histogram. |
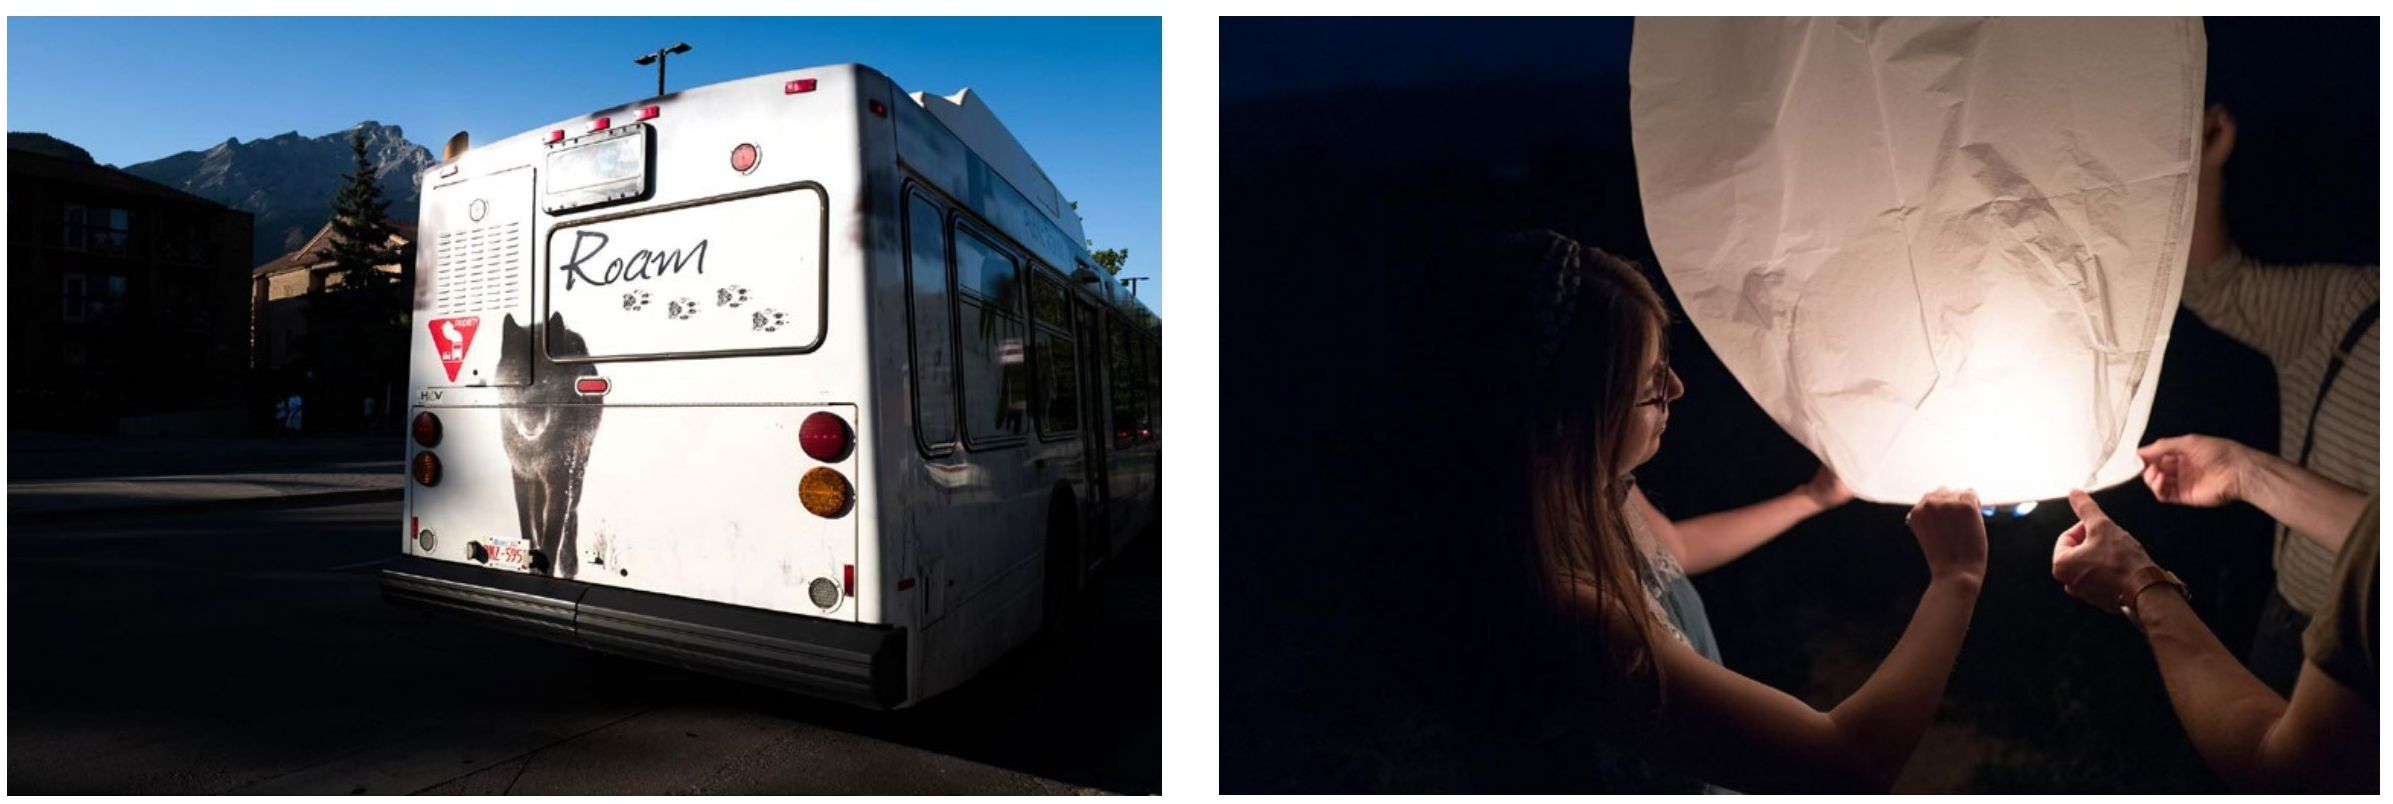
|
The left image is without EV adjustment (taken as the camera meters it). The meter sees a lot of dark and so makes the image lighter. The right image is corrected with EV-2. |
|
The left image is without EV adjustment (taken as the camera meters it). It sees all the light and so makes the image darker. The right image is corrected with EV+2. |
RAW Files
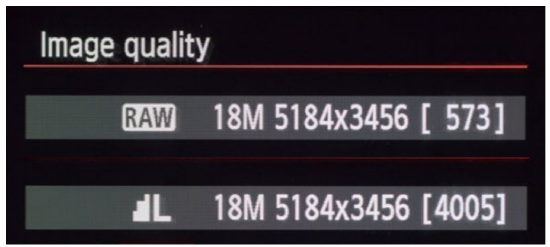
All this about getting the correct exposure takes us back to RAW format files described in the Sensor chapter. When your camera is set to save images in RAW, you actually do get some tonality before and after the tones on the histogram (0–255). How much tonality you get and the quality of that tonality depends on your camera model.
The earlier bracketing example is a bit of a fake. The image was not bracketed in the camera (it was shot at EV-1), but depended on the RAW format to simulate bracketing in
Photoshop (the clue is that bracketed photographs can’t be taken that fast, nor will strangers freeze mid-stride while multiple photographs are taken). But the effect is visually identical to having bracketed the images in the camera.
If you can correct exposure in an image editing application, why bother with it in the camera? There are several reasons, which can be distilled in one statement (leaving out the complicated ifs, ands, or buts): The best image quality will be found with the tones that are within the histogram. Tones (and colors) outside the histogram are just not as accurate.
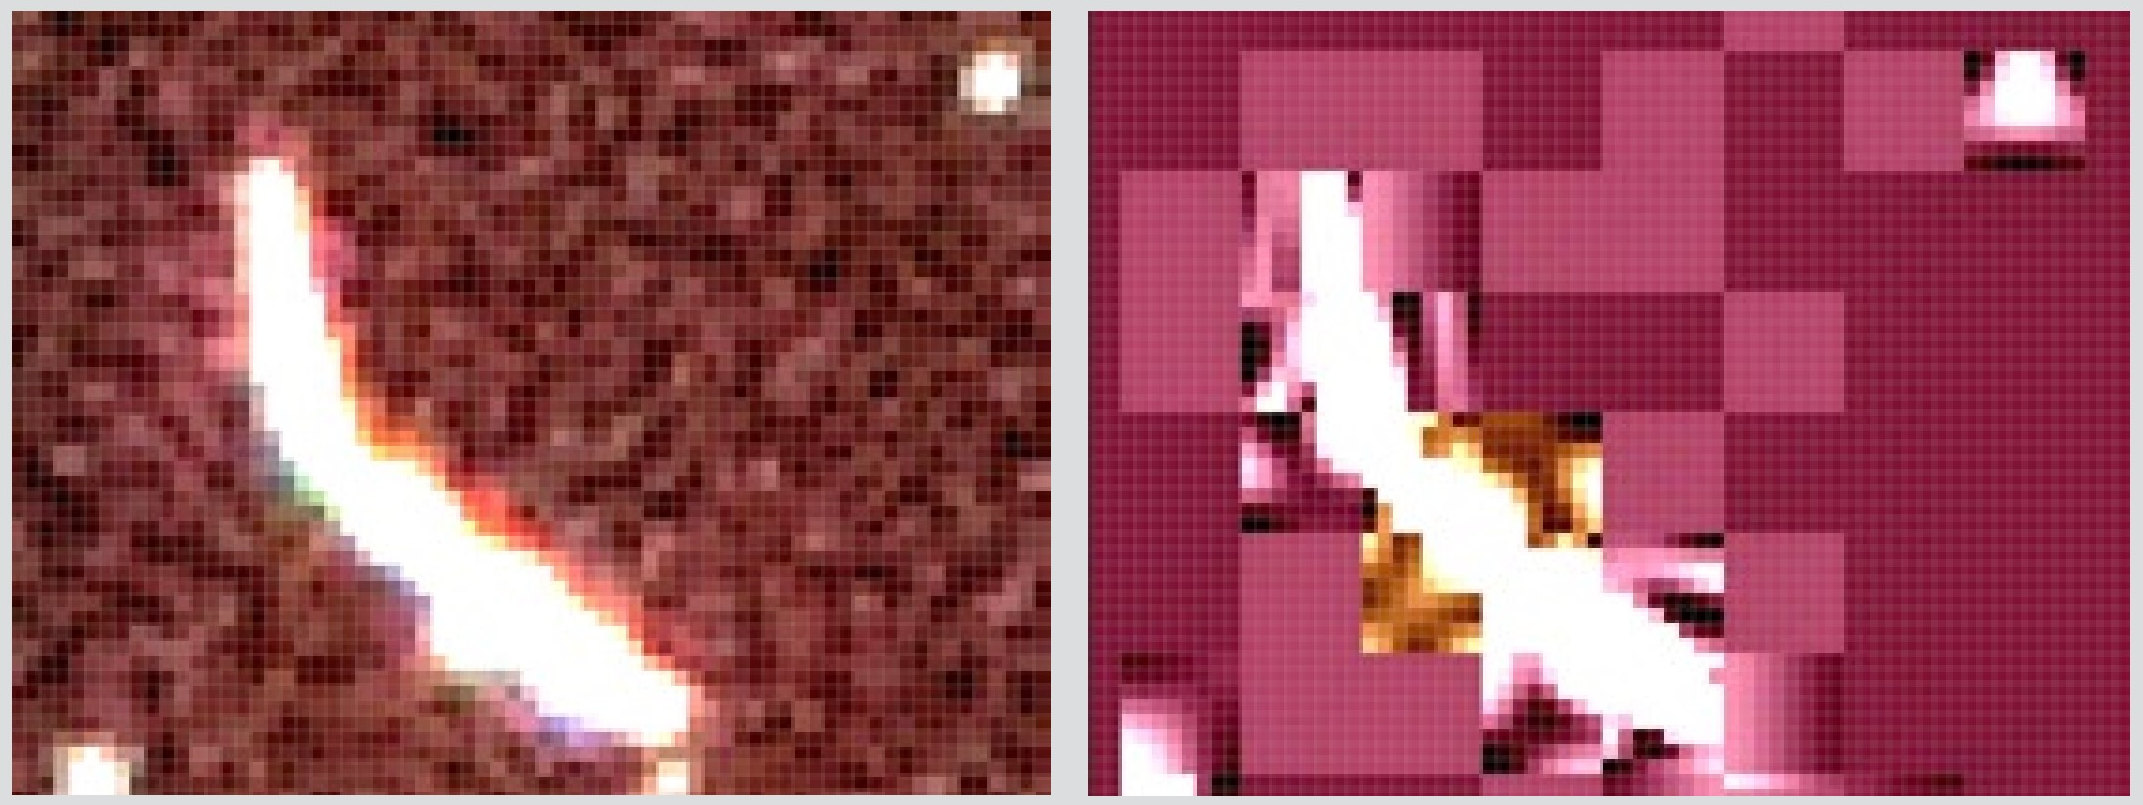
THE LIMITS OF RAW
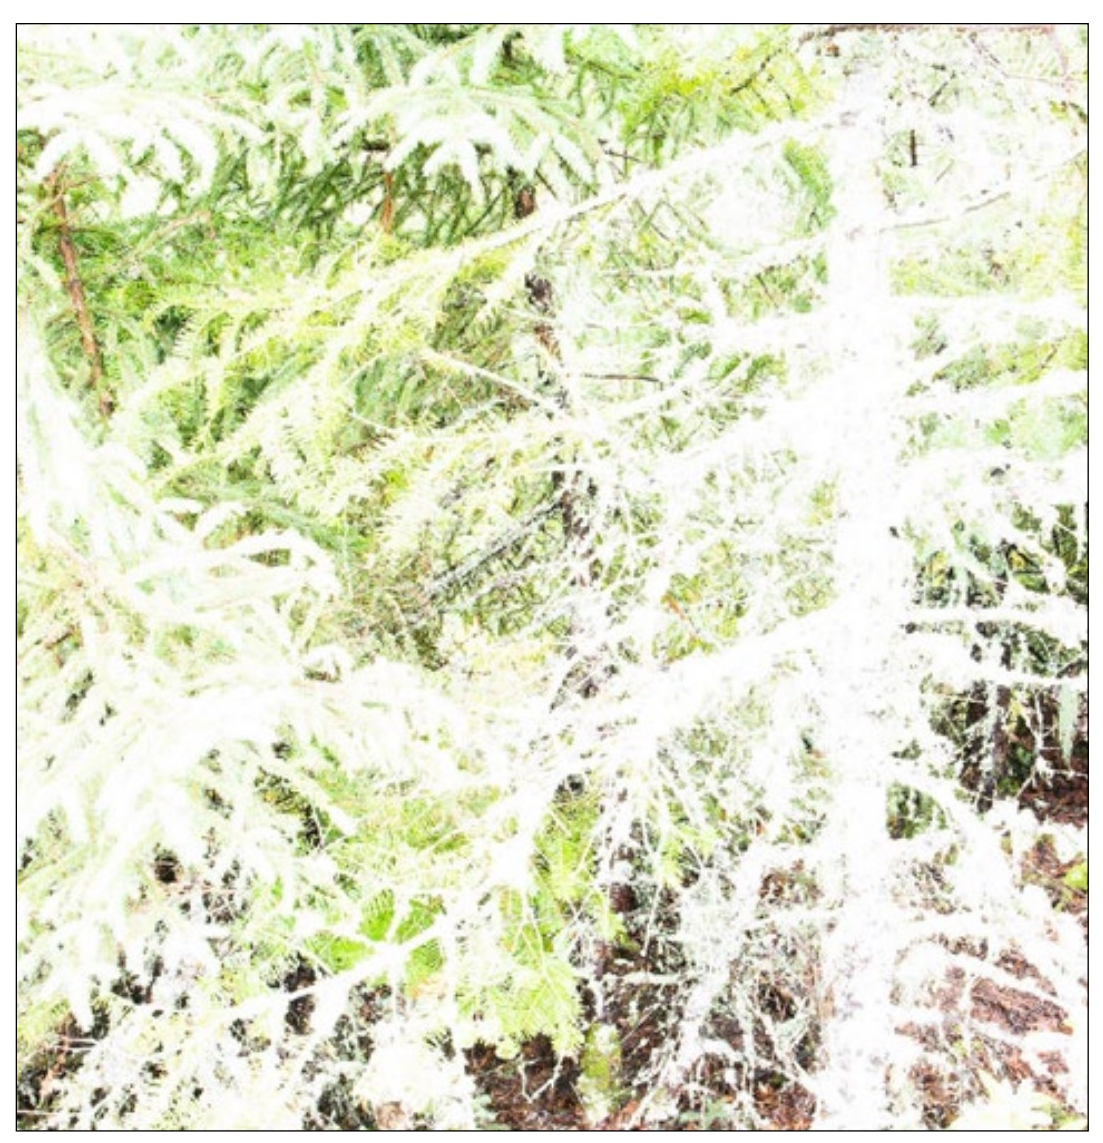
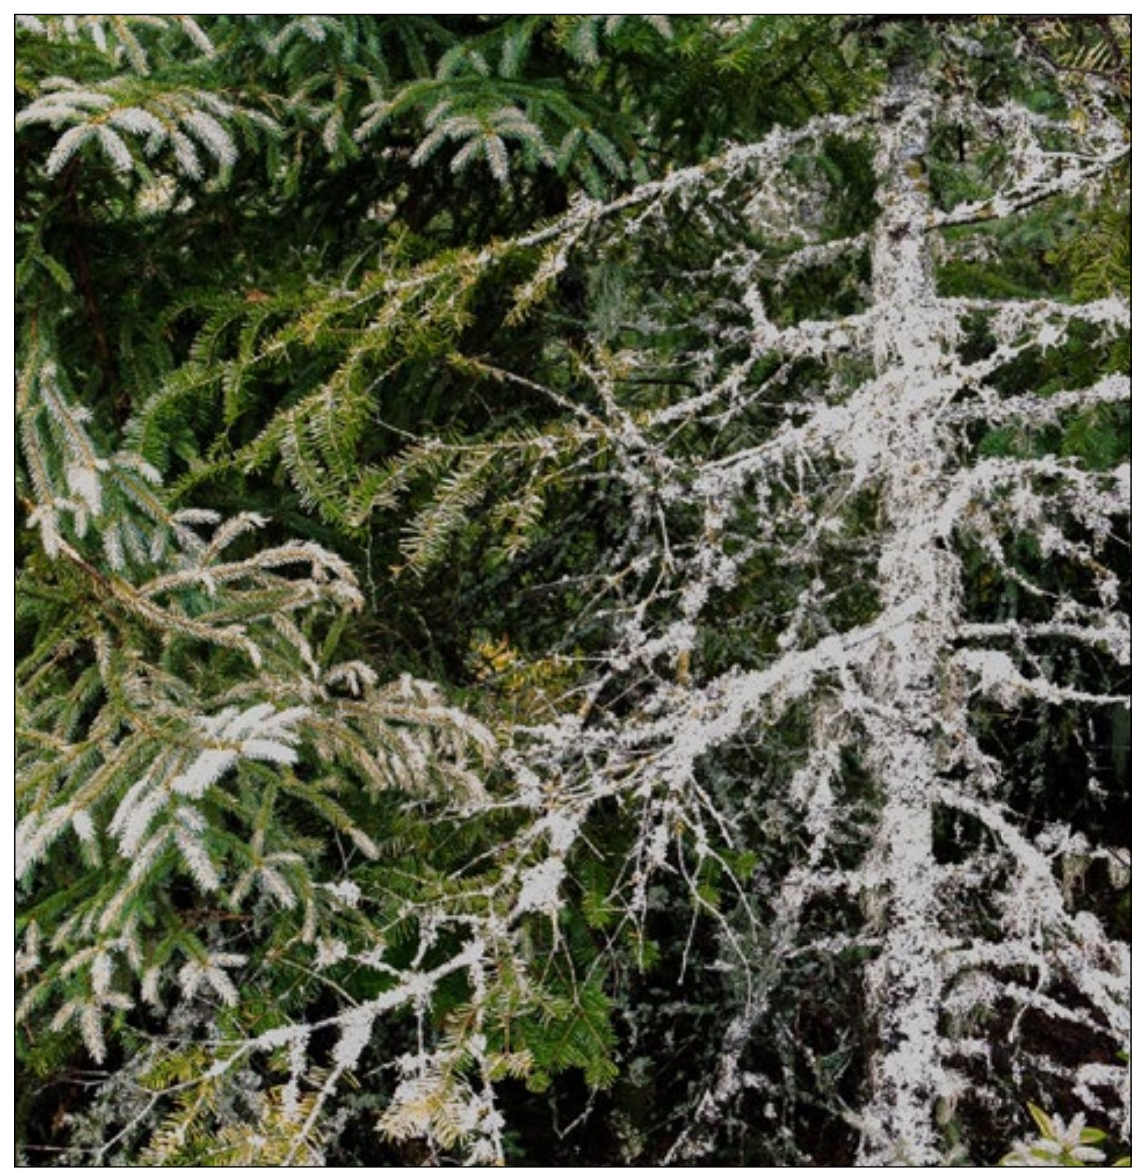
The two images on the left are uncorrected details of RAW images. The top image is overexposed and the bottom image is correctly exposed. In the bottom right image the exposure of the overexposed image has been corrected in Photoshop Camera Raw. Notice that this corrected image has severe tonality problems in both the lightest areas and the color of all areas of higher brightness. This is an extreme example, but the moral of the story is that the best exposure is the one that needs the least correction in processing. Even with RAW images.
Correctly exposed
Over-exposed, then corrected |

RAW v JPEG
Just the fact that you can adjust the exposure to some extent with RAW files is a compelling reason to use RAW format. But also remember that white balance can be done after the fact with RAW images, but not with JPEG. These are the reasons RAW has been discussed in this text several times and the primary reason I am repeating it here.
But, there are still reasons to sometimes use JPEG. JPEG files are much smaller than RAW, so you can fit many more on a memory card. This might be useful if you are taking a picture sequence which includes hundreds of photographs or making quick images that do not need much quality.
If you are using your camera to communicate with your phone over WiFi, most phone and tablet applications use smaller JPEGs to ferry images back and forth. This is a reason most cameras have the ability to save both a RAW and a JPEG together on the memory card.
Also, if you want to put images directly from the camera into a word processing program or social media you need JPEGs. RAW format requires a photo editing application that can decode the RAW information, so saving as JPEG (or RAW+ JPEG) will allow you to skip the middle-man application.
My suggestion is to always save your camera images in RAW, since you can easily generate a JPEG if you need it. If you find you need JPEG earlier in the process (such as directly from the camera), use RAW+JPEG.
One final note on RAW format files. They can be edited in many different applications, from Apple Photos to Affinity Photo. But each of these applications include the edit instructions in different ways, so you cannot transfer your RAW files from one application to another and retain the changes. Even a change in Apple Photos will not be shown if you view the image in Preview or in the Mac Finder as thumbnails.
LatitudeHow many tones lie outside the histogram with RAW files is called exposure latitude. In general, dark tones beyond the left side of the histogram will get noisier if they are recovered, and tones beyond the right side of the histogram start to shift colors and develop uneven tonal transitions. How much and at what point these effects happen and how many tones can be recovered is dependent on the model of the camera. |
|
The number in brackets is the approximate number of photographs that can be shot on a specific memory card. With the JPEG setting at the bottom (same image size), that same card will hold about seven times more images. |
The exception to this is with Adobe Photoshop Camera RAW and Adobe Lightroom. These two programs use the same language to describe RAW changes, and are synchronized with every update to have exactly the same features. Make a change in Camera Raw, and those same changes will be shown in Adobe Lightroom and mobile versions of Lightroom. The changes will even be shown when viewing images using Adobe Bridge.
JPEG Images
Even if you don’t save JPEGs directly from your camera, you will obviously be using them at some point. JPEG is the format for communicating on the screen. The file sizes are small and the images can be placed in any application, saved to social media or emailed. Many of the images in this book were resaved as JPEG.
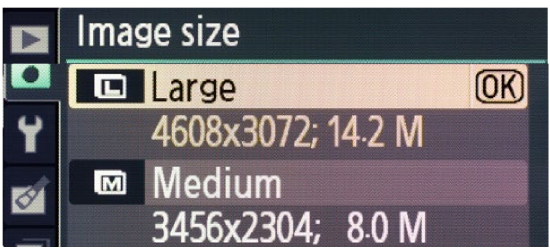
Resolution
If you set your camera to save JPEGs, one of two options is how many pixels the image will have, or its resolution. The more pixels you save the image with, the more you can enlarge it (either on the screen on in print). Resolution in this case is sometimes stated as image size.
When saving a JPEG from an image editing application you have this same control over resolution using the image size menu. Many images in this book were saved at 2000 pixels wide. They were then automatically resized to an optimum resolution when the book was converted to the PDF you are now viewing.
Compression
The other control with JPEGs is compression, which is also called quality. When you save an image as a JPEG in your camera, it reduces the file size by discarding image information that is less important in viewing. Less compression (higher quality) means less information thrown out.
|
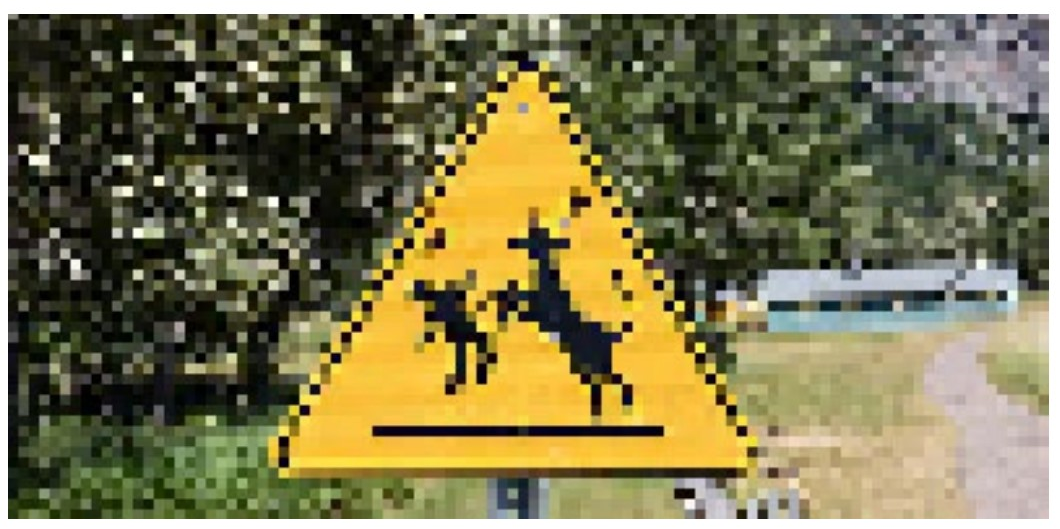
Person dancing with a deer. Original image resized to a resolution of 400 pixels across. |
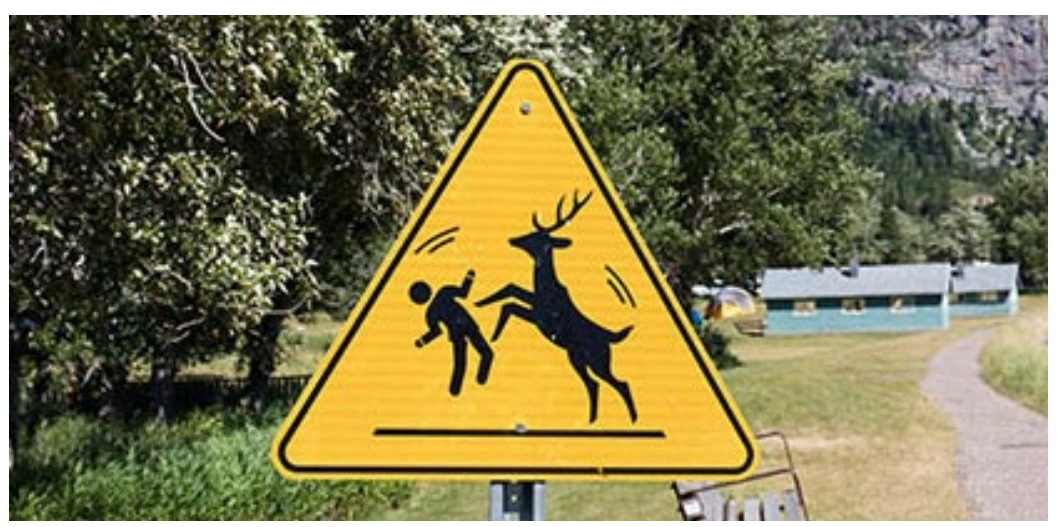
|
Resolution set to 100 pixels across (not enough!) |
Publishing ResolutionWhen preparing for a printed publication, many people will specify image files that are 300 pixels per inch (ppi). This means that if an image is going to be printed 10 inches wide it should be 3000 pixels wide (10 inches X 300 pixels). |
More compression (lower quality) means more information will be thrown out.
In an image editing program you can also choose how much compression you apply to a JPEG file when saving.
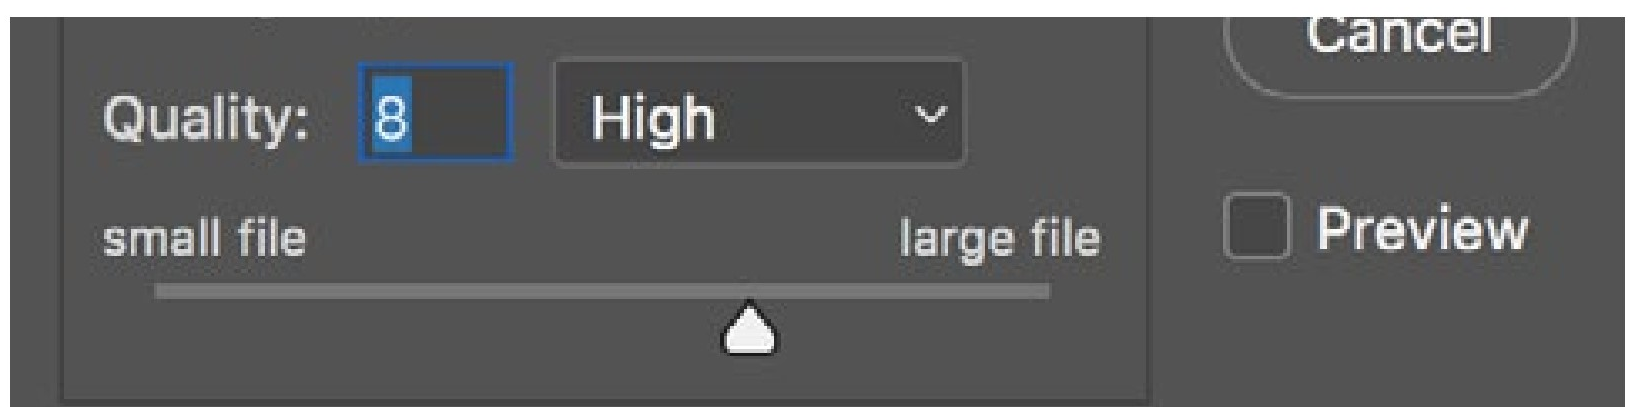
Generally this is with a slider that goes from low quality (small file size) to high quality (larger file size). High quality is indistinguishable from a file without any compression, but since every re-save of an image adds to the loss of quality you should save images you are working on in a format that does not discard information, like...
Photoshop Format
Although cameras do not save images in Adobe Photoshop format, it is a good format to save edited images in, especially if you import them into other Adobe applications such as Illustrator or InDesign.
Unlike JPEG, the Photoshop format will not decrease quality even after multiple resaves, and it will retain features such as layers and transparency that you may introduce using Photoshop (not the Camera Raw part of it) to edit your images. Of course, these abilities come with a drawback, which is larger file size.
|
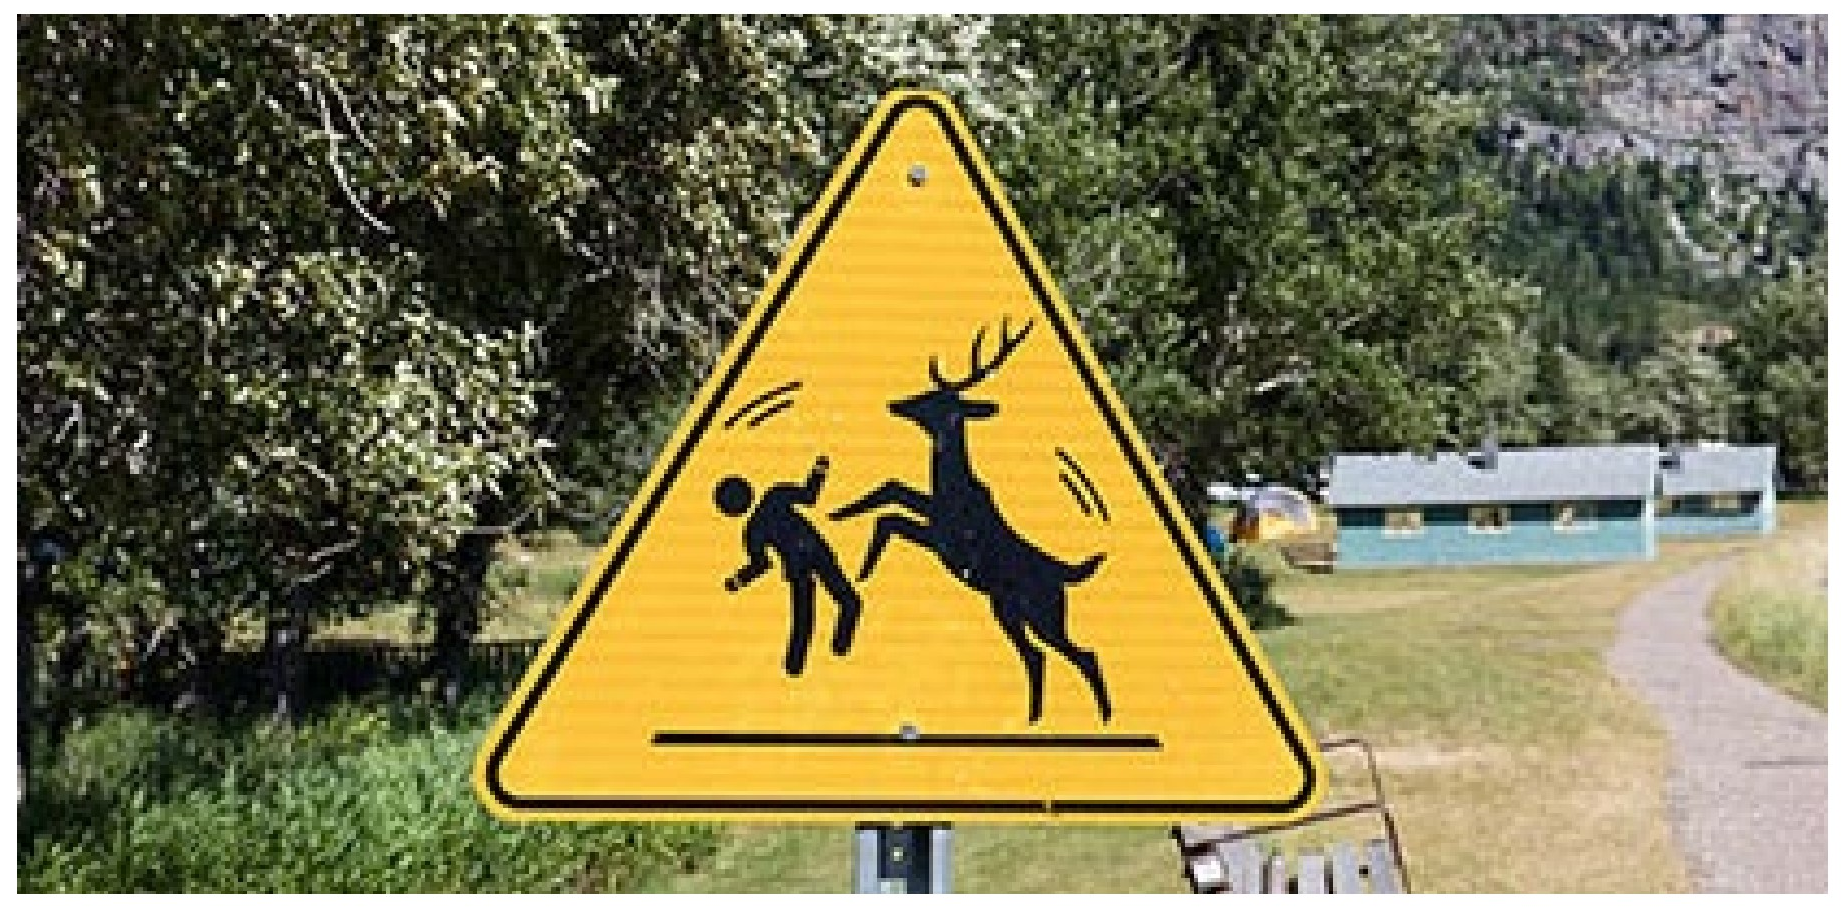
Original image as seen on previous page |
|
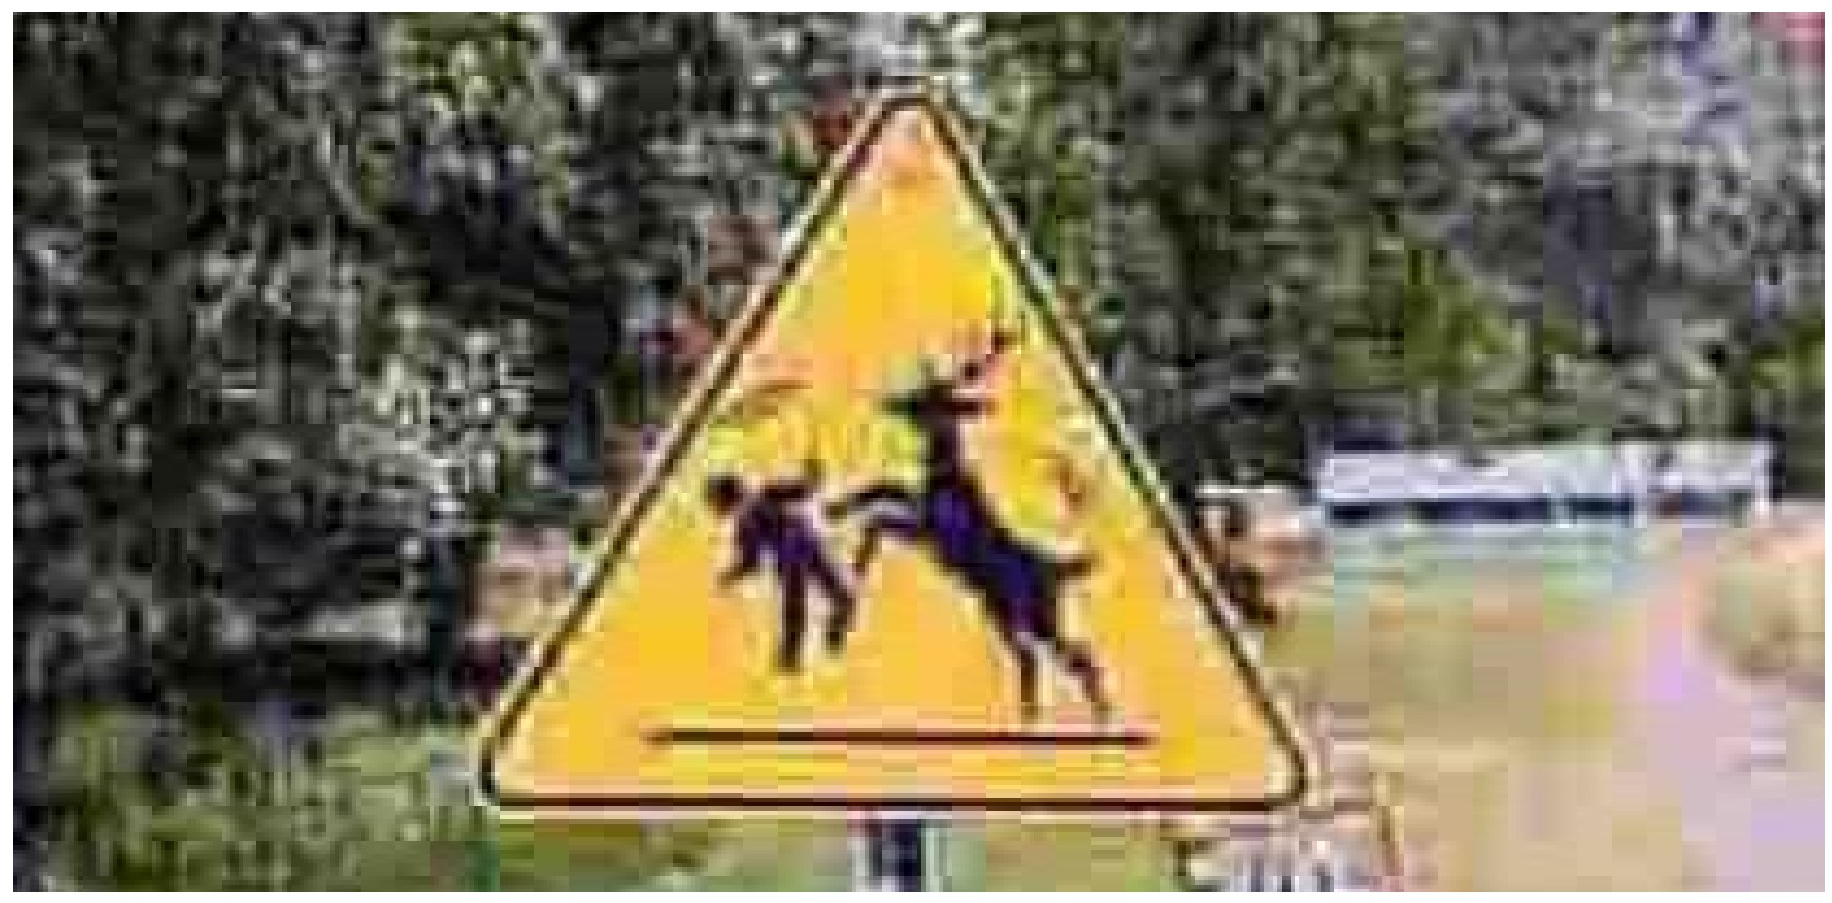
The image re-saved multiple times in JPEG with a lot of compression to clearly show what JPEG compression can do to an image. |
Lossy CompressionJPEGs are amazingly good at reducing the file size of images by discarding information that is not readily seen. For instance, JPEG discards more information in the dark areas of an image because that is where the human eye sees less detail. Since information is lost in the saving of the image, it is called lossy compression. Photoshop format also compresses the information in images, but no information is thrown out in the process, so it is called lossless compression. JPEG compresses by first dividing the image into 8 pixel squares then evaluating the information in these squares. You might have seen these squares in over-compressed images. You can also see them subtly swimming around dark areas in movies on your TV. A common movie format, MPEG, uses the same compression scheme.
Detail of a dark area in an image (lightened and highly magnified) showing image before and after JPEG saving on low quality. The larger blocks on the right are not pixels, but the 8x8 pixel squares. |
Three Useful Image Formats
| RAW (.CR2, .NEF, etc.) | JPEG (.jpg, .JPG) | Photoshop (.psd) | |
| USE | Photographing | Photographing & saving from applications | Saving from Photoshop |
| WHERE | Camera only | Camera & apps on computer | Image processing apps like Photoshop |
| QUALITY | Best of all formats | Variable, usually lower, especially when resaving | Very good, no loss of image quality when resaving |
| FLEXIBILITY | Only open in a few apps | Open in virtually any app | Opens in some apps |
| ABILITY | Cannot save over original file | Saves only image information & metadata | Saves all Photoshop data, including layers and transparency. |
| FILE SIZE | Largest | Smallest (variable) | Medium |
| ADVANTAGE | Best way to save images in camera, since it saves many tones, and some even outside of image limits (after white, before black) | Best for final images needing small file sizes or ability to be opened in many applications, i.e. edited images to be sent to others, included on web page, or placed in another application (such as word processing) | Best for images that will be edited in Photoshop, sometimes best for images to be placed in other Adobe applications, such as InDesign (since Adobe programs can read things like transparency) |
Some Other Image FormatsTIFF An old standard for any desktop publishing application GIF useful for animations or images that do not need a lot of tones or colors PNG is actually several formats in one that replaces JPEG and GIF in many uses, particularly the web, and has a few advantages PDF for sending to someone who wants a PDF (not much utility for images alone). There are many other image formats for special uses, such as HEIF and HEIC formats that some cameraphones use. |
Now Go Shoot
Before you photograph, figure out how to how to activate the histogram on your camera, either while taking the image or reviewing it. Look at it with different scenes, and figure out what the histogram is telling you.
Take some photographs of mostly light and mostly dark subjects. See if you can start to predict how the camera will interpret the scenes tonally.
Review your images and the histograms after you shoot. Can you understand what is happening? Could the photographs been exposed better?
Try different EV compensations. Understand how a stop of exposure translates into the tones you see.
Choose a metering mode that seems to make sense for you, and keep it there. Then try changing it to another mode. Are your photographs exposed better?
Try filling the image frame with an evenly-toned subject such as an overcast sky. Is it rendered neutral gray as described in this chapter?
Perhaps try to intentionally underexpose and overexpose some images, such as in the following experiment. Can you make under and overexposed images as good as the correctly exposed images when adjusting them at the computer? What are the limits for the RAW images your camera produces?
EXPERIMENT
Even though you may never feel the need to bracket exposures you take, this is a good exercise that will help you remember how to change the EV settings on your camera (something you should be doing!). It should also help you see how much change a stop makes.
With your camera set on P, you will find exposure (EV) settings that go -2, -1, 0, +1, +2 (there may be more).
Take the exact same photograph at different full stop settings (whole numbers). If you can’t find your EV settings, you may be looking too far—they are very easy to change on all cameras.
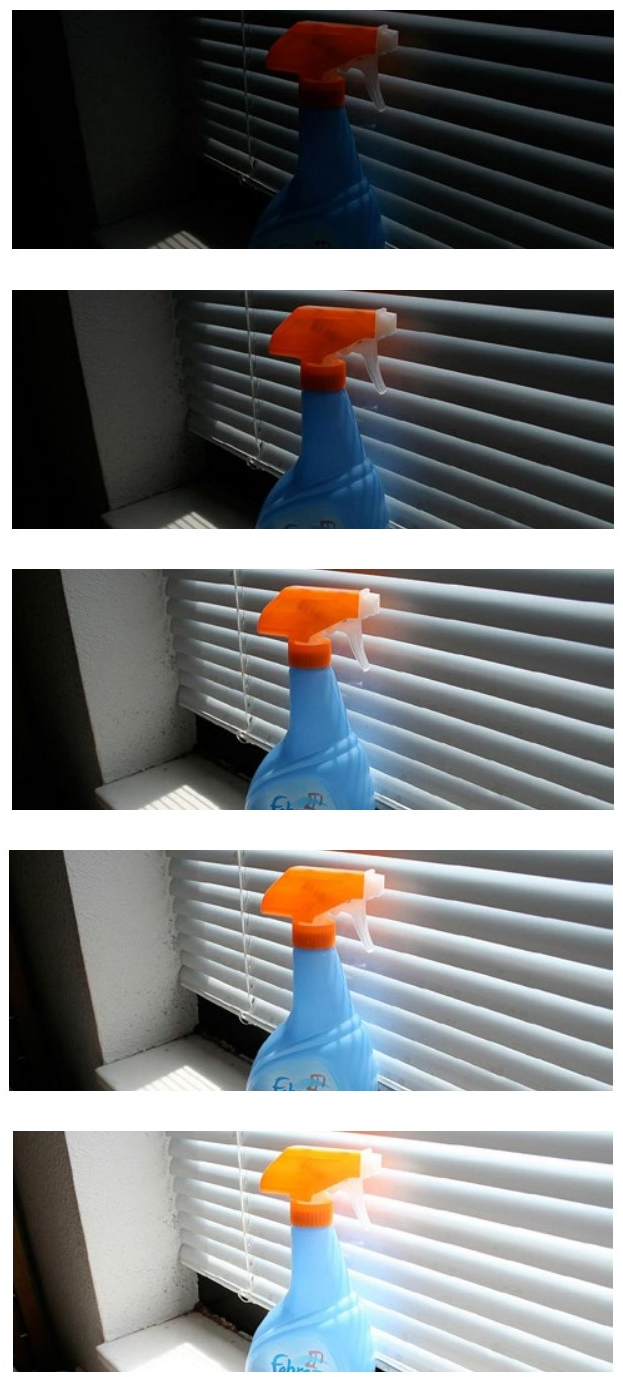
Your bracketing sequence should show exposure changes in the same way as the images at right.
|
Ayako Shimizu, bracketing sequence from EV-2 on the top to EV+2 on the bottom (details) |
Exposure Questions
What is the graph that shows the values of the pixels in an image or scene?
What are the numerical brightnesses in an image or histogram called?
What number (level) is registered by the sensor for no amount of light? For the maximum amount of light?
A histogram with the hills to the far left means the image is what? If the hills are to the far right?
What are the lighter areas of an image called? The darker areas?Highlight clipping can be indicated by what in the image review?
A photograph of a snowy scene with the default camera settings will be underexposed, overexposed, or correctly exposed?
What gray does the camera average all brightnesses to be when metering?
Why might you want to take another photograph after reviewing the image in your camera?
What is the setting you use to correct the exposure when taking a photograph?
What are the increments the EV scale uses?
What is the technique of taking the same scene at several different EV values called?
What device that measures light is incorporated into cameras? What metering mode tries to figure out what your subject is?
What metering mode mostly evaluates light in the center of the camera frame?
Which is the best type of metering mode? (trick question)
What file type gives you tonality beyond the limits of the histogram?
Where are the best tones or colors to be found relative to the histogram?
What file format saves the smallest files?
What file format will almost all applications recognize?
What term refers to the number of pixels in an image?
What term refers to the quality of the pixels in an image?
Besides RAW, what other file format does not decrease the image quality when saving?
