
3: Lens
- Page ID
- 90592
\( \newcommand{\vecs}[1]{\overset { \scriptstyle \rightharpoonup} {\mathbf{#1}} } \)
\( \newcommand{\vecd}[1]{\overset{-\!-\!\rightharpoonup}{\vphantom{a}\smash {#1}}} \)
\( \newcommand{\dsum}{\displaystyle\sum\limits} \)
\( \newcommand{\dint}{\displaystyle\int\limits} \)
\( \newcommand{\dlim}{\displaystyle\lim\limits} \)
\( \newcommand{\id}{\mathrm{id}}\) \( \newcommand{\Span}{\mathrm{span}}\)
( \newcommand{\kernel}{\mathrm{null}\,}\) \( \newcommand{\range}{\mathrm{range}\,}\)
\( \newcommand{\RealPart}{\mathrm{Re}}\) \( \newcommand{\ImaginaryPart}{\mathrm{Im}}\)
\( \newcommand{\Argument}{\mathrm{Arg}}\) \( \newcommand{\norm}[1]{\| #1 \|}\)
\( \newcommand{\inner}[2]{\langle #1, #2 \rangle}\)
\( \newcommand{\Span}{\mathrm{span}}\)
\( \newcommand{\id}{\mathrm{id}}\)
\( \newcommand{\Span}{\mathrm{span}}\)
\( \newcommand{\kernel}{\mathrm{null}\,}\)
\( \newcommand{\range}{\mathrm{range}\,}\)
\( \newcommand{\RealPart}{\mathrm{Re}}\)
\( \newcommand{\ImaginaryPart}{\mathrm{Im}}\)
\( \newcommand{\Argument}{\mathrm{Arg}}\)
\( \newcommand{\norm}[1]{\| #1 \|}\)
\( \newcommand{\inner}[2]{\langle #1, #2 \rangle}\)
\( \newcommand{\Span}{\mathrm{span}}\) \( \newcommand{\AA}{\unicode[.8,0]{x212B}}\)
\( \newcommand{\vectorA}[1]{\vec{#1}} % arrow\)
\( \newcommand{\vectorAt}[1]{\vec{\text{#1}}} % arrow\)
\( \newcommand{\vectorB}[1]{\overset { \scriptstyle \rightharpoonup} {\mathbf{#1}} } \)
\( \newcommand{\vectorC}[1]{\textbf{#1}} \)
\( \newcommand{\vectorD}[1]{\overrightarrow{#1}} \)
\( \newcommand{\vectorDt}[1]{\overrightarrow{\text{#1}}} \)
\( \newcommand{\vectE}[1]{\overset{-\!-\!\rightharpoonup}{\vphantom{a}\smash{\mathbf {#1}}}} \)
\( \newcommand{\vecs}[1]{\overset { \scriptstyle \rightharpoonup} {\mathbf{#1}} } \)
\(\newcommand{\longvect}{\overrightarrow}\)
\( \newcommand{\vecd}[1]{\overset{-\!-\!\rightharpoonup}{\vphantom{a}\smash {#1}}} \)
\(\newcommand{\avec}{\mathbf a}\) \(\newcommand{\bvec}{\mathbf b}\) \(\newcommand{\cvec}{\mathbf c}\) \(\newcommand{\dvec}{\mathbf d}\) \(\newcommand{\dtil}{\widetilde{\mathbf d}}\) \(\newcommand{\evec}{\mathbf e}\) \(\newcommand{\fvec}{\mathbf f}\) \(\newcommand{\nvec}{\mathbf n}\) \(\newcommand{\pvec}{\mathbf p}\) \(\newcommand{\qvec}{\mathbf q}\) \(\newcommand{\svec}{\mathbf s}\) \(\newcommand{\tvec}{\mathbf t}\) \(\newcommand{\uvec}{\mathbf u}\) \(\newcommand{\vvec}{\mathbf v}\) \(\newcommand{\wvec}{\mathbf w}\) \(\newcommand{\xvec}{\mathbf x}\) \(\newcommand{\yvec}{\mathbf y}\) \(\newcommand{\zvec}{\mathbf z}\) \(\newcommand{\rvec}{\mathbf r}\) \(\newcommand{\mvec}{\mathbf m}\) \(\newcommand{\zerovec}{\mathbf 0}\) \(\newcommand{\onevec}{\mathbf 1}\) \(\newcommand{\real}{\mathbb R}\) \(\newcommand{\twovec}[2]{\left[\begin{array}{r}#1 \\ #2 \end{array}\right]}\) \(\newcommand{\ctwovec}[2]{\left[\begin{array}{c}#1 \\ #2 \end{array}\right]}\) \(\newcommand{\threevec}[3]{\left[\begin{array}{r}#1 \\ #2 \\ #3 \end{array}\right]}\) \(\newcommand{\cthreevec}[3]{\left[\begin{array}{c}#1 \\ #2 \\ #3 \end{array}\right]}\) \(\newcommand{\fourvec}[4]{\left[\begin{array}{r}#1 \\ #2 \\ #3 \\ #4 \end{array}\right]}\) \(\newcommand{\cfourvec}[4]{\left[\begin{array}{c}#1 \\ #2 \\ #3 \\ #4 \end{array}\right]}\) \(\newcommand{\fivevec}[5]{\left[\begin{array}{r}#1 \\ #2 \\ #3 \\ #4 \\ #5 \\ \end{array}\right]}\) \(\newcommand{\cfivevec}[5]{\left[\begin{array}{c}#1 \\ #2 \\ #3 \\ #4 \\ #5 \\ \end{array}\right]}\) \(\newcommand{\mattwo}[4]{\left[\begin{array}{rr}#1 \amp #2 \\ #3 \amp #4 \\ \end{array}\right]}\) \(\newcommand{\laspan}[1]{\text{Span}\{#1\}}\) \(\newcommand{\bcal}{\cal B}\) \(\newcommand{\ccal}{\cal C}\) \(\newcommand{\scal}{\cal S}\) \(\newcommand{\wcal}{\cal W}\) \(\newcommand{\ecal}{\cal E}\) \(\newcommand{\coords}[2]{\left\{#1\right\}_{#2}}\) \(\newcommand{\gray}[1]{\color{gray}{#1}}\) \(\newcommand{\lgray}[1]{\color{lightgray}{#1}}\) \(\newcommand{\rank}{\operatorname{rank}}\) \(\newcommand{\row}{\text{Row}}\) \(\newcommand{\col}{\text{Col}}\) \(\renewcommand{\row}{\text{Row}}\) \(\newcommand{\nul}{\text{Nul}}\) \(\newcommand{\var}{\text{Var}}\) \(\newcommand{\corr}{\text{corr}}\) \(\newcommand{\len}[1]{\left|#1\right|}\) \(\newcommand{\bbar}{\overline{\bvec}}\) \(\newcommand{\bhat}{\widehat{\bvec}}\) \(\newcommand{\bperp}{\bvec^\perp}\) \(\newcommand{\xhat}{\widehat{\xvec}}\) \(\newcommand{\vhat}{\widehat{\vvec}}\) \(\newcommand{\uhat}{\widehat{\uvec}}\) \(\newcommand{\what}{\widehat{\wvec}}\) \(\newcommand{\Sighat}{\widehat{\Sigma}}\) \(\newcommand{\lt}{<}\) \(\newcommand{\gt}{>}\) \(\newcommand{\amp}{&}\) \(\definecolor{fillinmathshade}{gray}{0.9}\)Since the lens does the work of forming the image, it stands to reason that it is important. Although the first part of this chapter might seem a little like inapplicable theory, it is important to know what is happening in a lens. And it really isn’t difficult to understand.
A camera lens is actually a group of lenses which together form a coherent image on the sensor. If you look into your lens you will find a group of reflections—each reflection signifies the surface of a lens element, or basically a magnifying glass. To understand how a lens works, it helps to understand the history of image-forming devices. We start at the beginning.
Pinhole Lens
Since before Ancient Rome it has been known that simply a hole in a surface can form an image. If you block all the light coming into a room, then put a small hole in a wall, an image of the outdoors will be projected on the opposite wall (illustration at far right). That hole in the wall is called a pinhole lens, and while not technically a lens (it is just a hole), it forms an image, so it is informally called a lens.
The room this pinhole uses to project the image (the Latin for room is camera) can be as large as an airplane hanger or smaller than a shoebox. You may have even made a pinhole camera by simply poking a hole in a sheet of foil to view the image of a solar eclipse.
To understand how a pinhole lens works, a few illustrations will help:
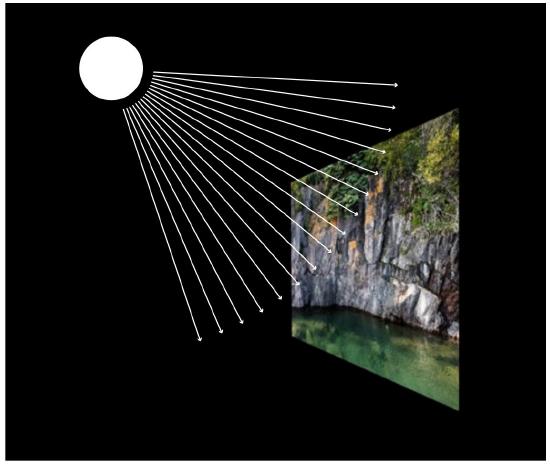
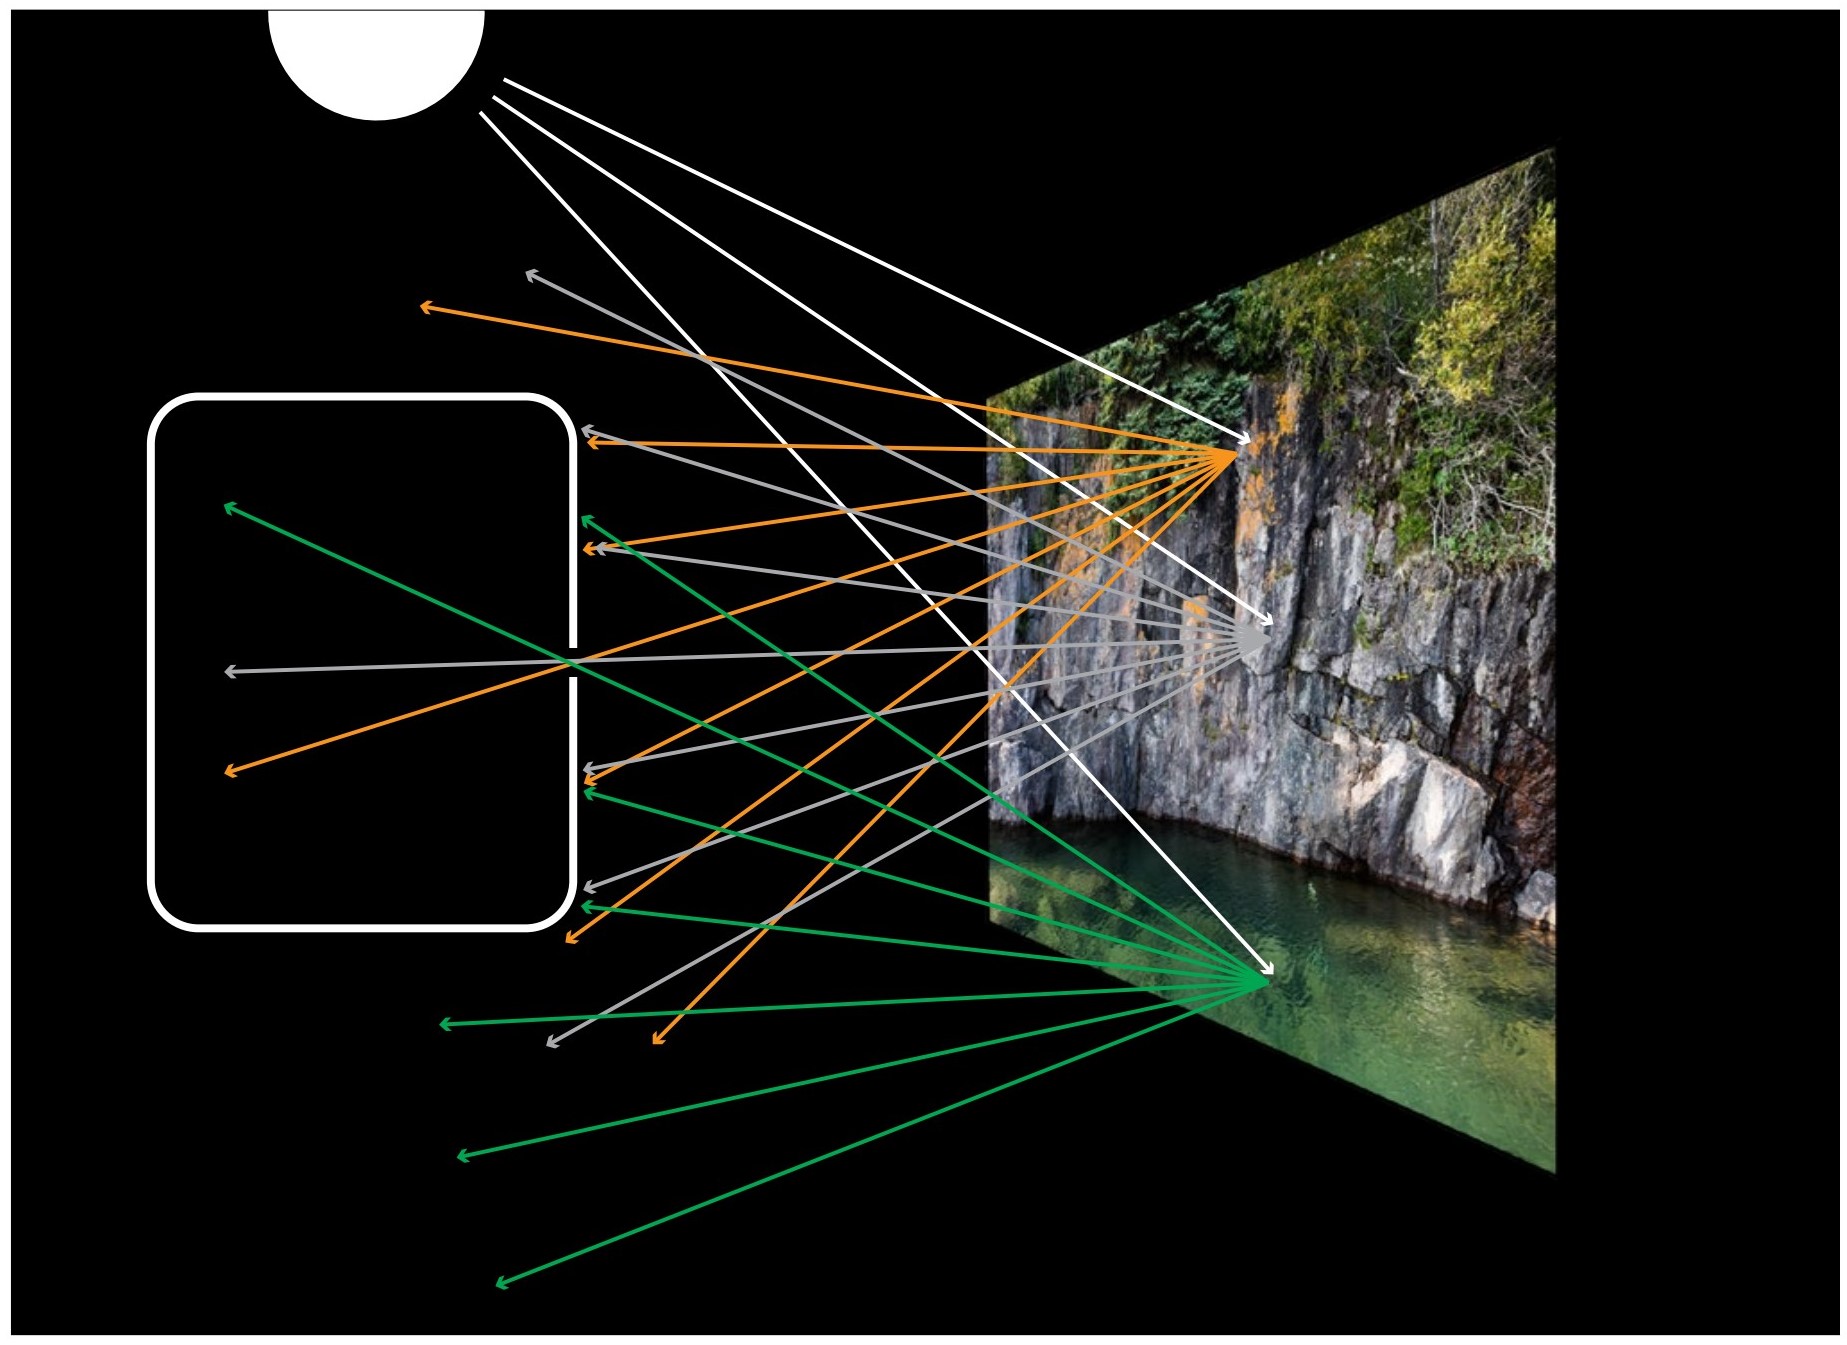
1. Above, the white circle is the sun, with light rays hitting a subject, in this case a coming off the sun in all directions, and some of them strike the cliff. There is more to light than rays, but unless you keen on the physics of light, using rays to describe light is accurate.
|
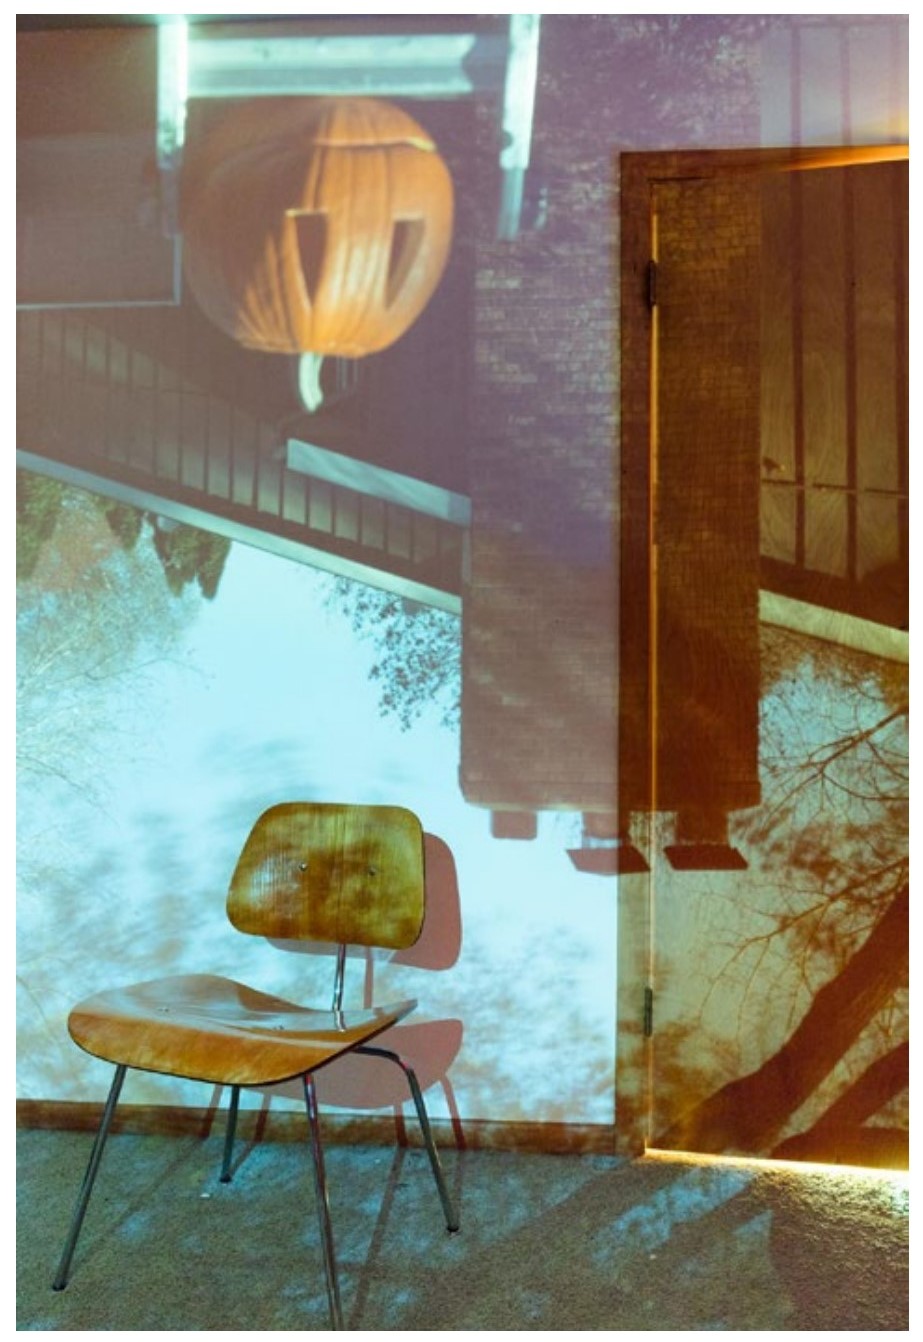
This top image is of a wall lit by a window on the opposite wall. In the bottom image that window is covered with foil except for a penny-size hole. This pinhole forms an image of the neighbor’s chimney with a pumpkin in the foreground. This room is now a pinhole camera. The photograph of this dim image took about three minutes to expose using a digital camera.
|

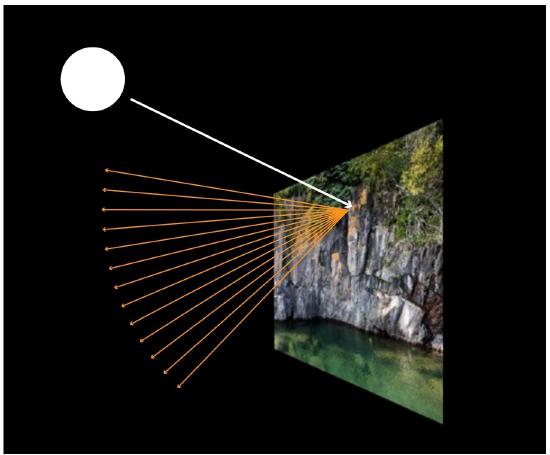
2. Turn you attention to just one ray of the sun. When it hits a colored object, it reflects only that color in all directions.
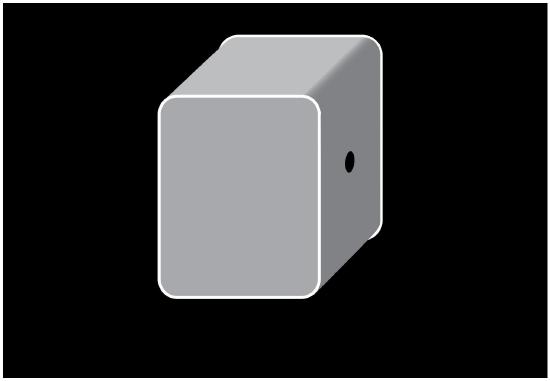
3. Somehow those light rays need to be captured. A small box with a hole in the front like the one above of it will do this. The next illustrations show a cut-away view of the box to see inside.
|
Cut-away view of a camera capturing light rays. The actual size of the hole needed is smaller than shown in the illustration. |
4. This box is put in front of the subject as shown above. Of course there are many rays of light hitting the subject, and many rays of different colors reflecting off the subject. But only a few rays of light get into the box through the little hole in the front. Notice how the rays from the top of the subject land lower in the box than the other rays.
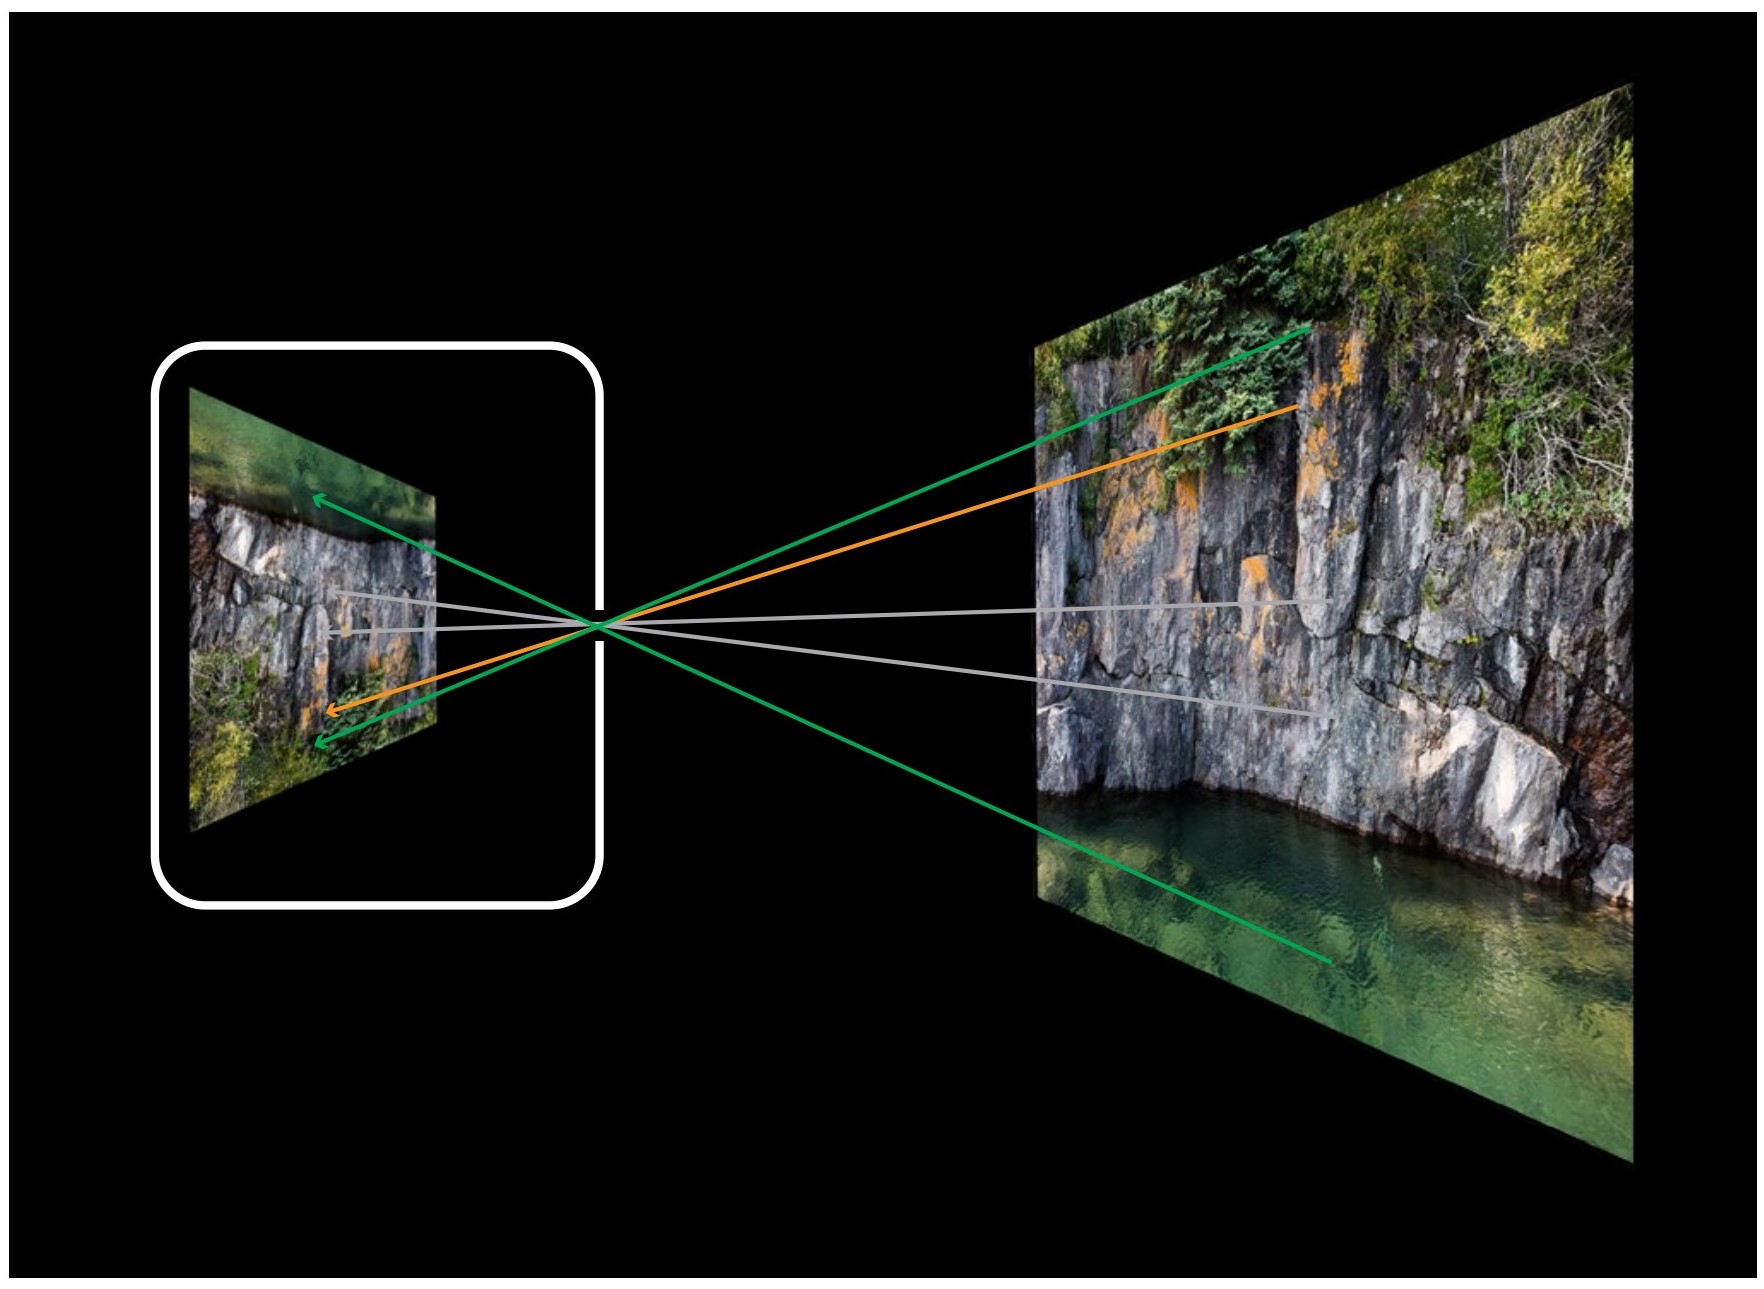
5. To simplify the illustration, the parts of this phenomenon that don’t matter right now are omitted and a few more light rays are shown. Imagine this with many more light rays and in three dimensions. You can see how an (upside down!) image is formed on the back of the box.
This box is a pinhole camera. All that is needed to make a photograph is something sensitive to light (like photographic film or a sensor) to record the projected image on the back of the box.
The illustration at the beginning of this chapter shows an image projected in a pinhole camera that was as big as a room (well, it was a room). The photograph at right was taken with a pinhole camera as big as a digital camera (it was one).
|
This pinhole photograph was made using a digital camera (5 second exposure). The pinhole used is shown in the sidebar on the next page.
|

There are several unique qualities of a pinhole lens. First, nothing is very sharp in the image it produces. Second, everything is in equal focus, which is called unlimited depth of field. So, an object very close to the camera will be just as in focus as an object far away. Both of these qualities can be seen in the photograph on the preceding page.
Third, the image produced by a pinhole is very very (very) dim. If you were to project one upon your camera sensor, it would take at least a few seconds for the pinhole to let in enough light to make an image (even with a rather large hole which would make a very unsharp image).
To eliminate these deficiencies, especially the lack of sharpness and brightness, a glass lens can replace the pinhole.
Simple Lens
Actual lenses are made of clear glass with two convex sides. Light rays normally travel in a straight line, but the lens bends them. Any density change will bend light rays, and glass is denser than the air around it.
Lenses are all around us, and they are similarly shaped. Examples of lenses include magnifying glasses and eye glasses. You can even see light bending from the lens of a clear glass of water.
As a matter of fact, you have a couple of lenses that you take with you everywhere you go. They bend light before it gets to the back of your eyes. Back to the camera illustrations now.
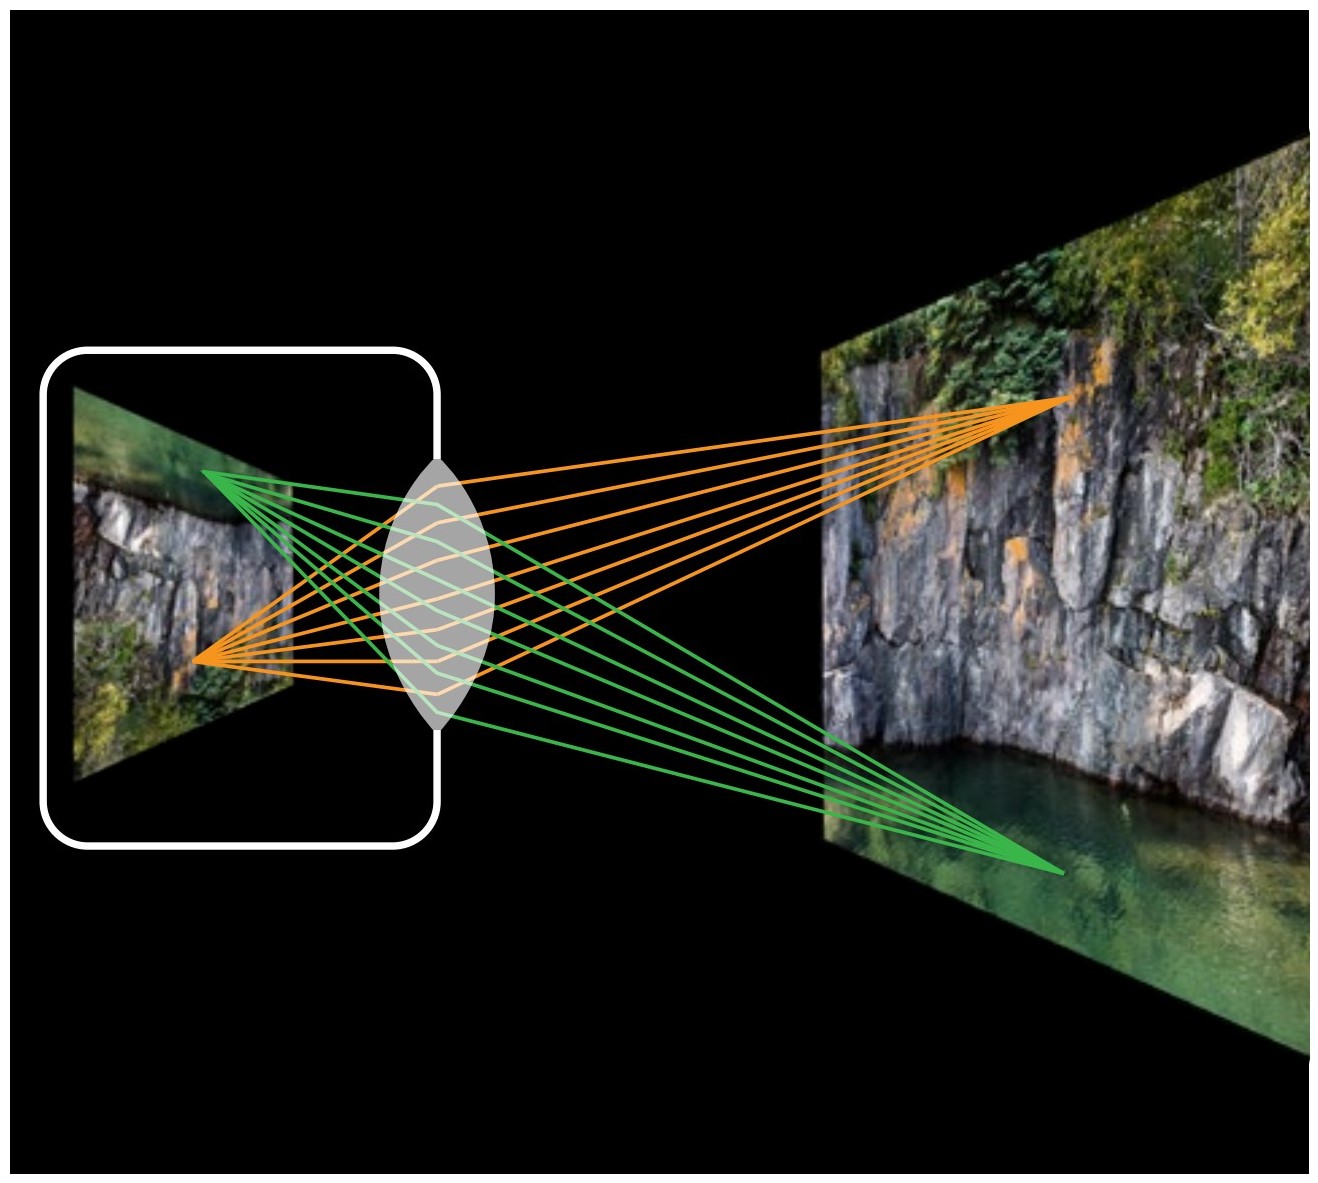
1. If the pinhole in a camera is replaced with a glass lens as illustrated above, it can gather a much greater number of light rays from each point of the subject and hence make the image much brighter. In other words, a lens is much more efficient than a pinhole at gathering light.
|
Dried lentil beans. Common lenses are the same shape, hence the name lens. |

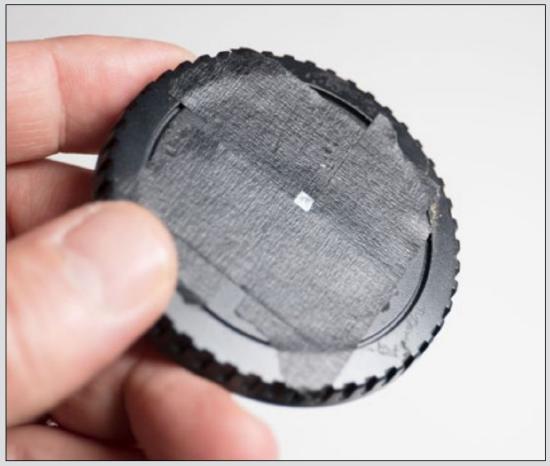
Pinhole LensTo make a pinhole lens, take the body cap that came with your camera and drill a hole in the center. Tape some aluminum foil (thinner is better) over this hole, then with a sewing needle pierce a hole in the foil. Put this ‘lens’ on your camera and go take pictures!
|
|
While the background of the image is sharp, the closer statue (depicted with white light rays) is sharp at a point past the sensor (notice that the white lines do not come to a point on the sensor). Moving the sensor back would make the statue sharp, but of course the background would then be blurry since the other rays will be past their points of focus. |
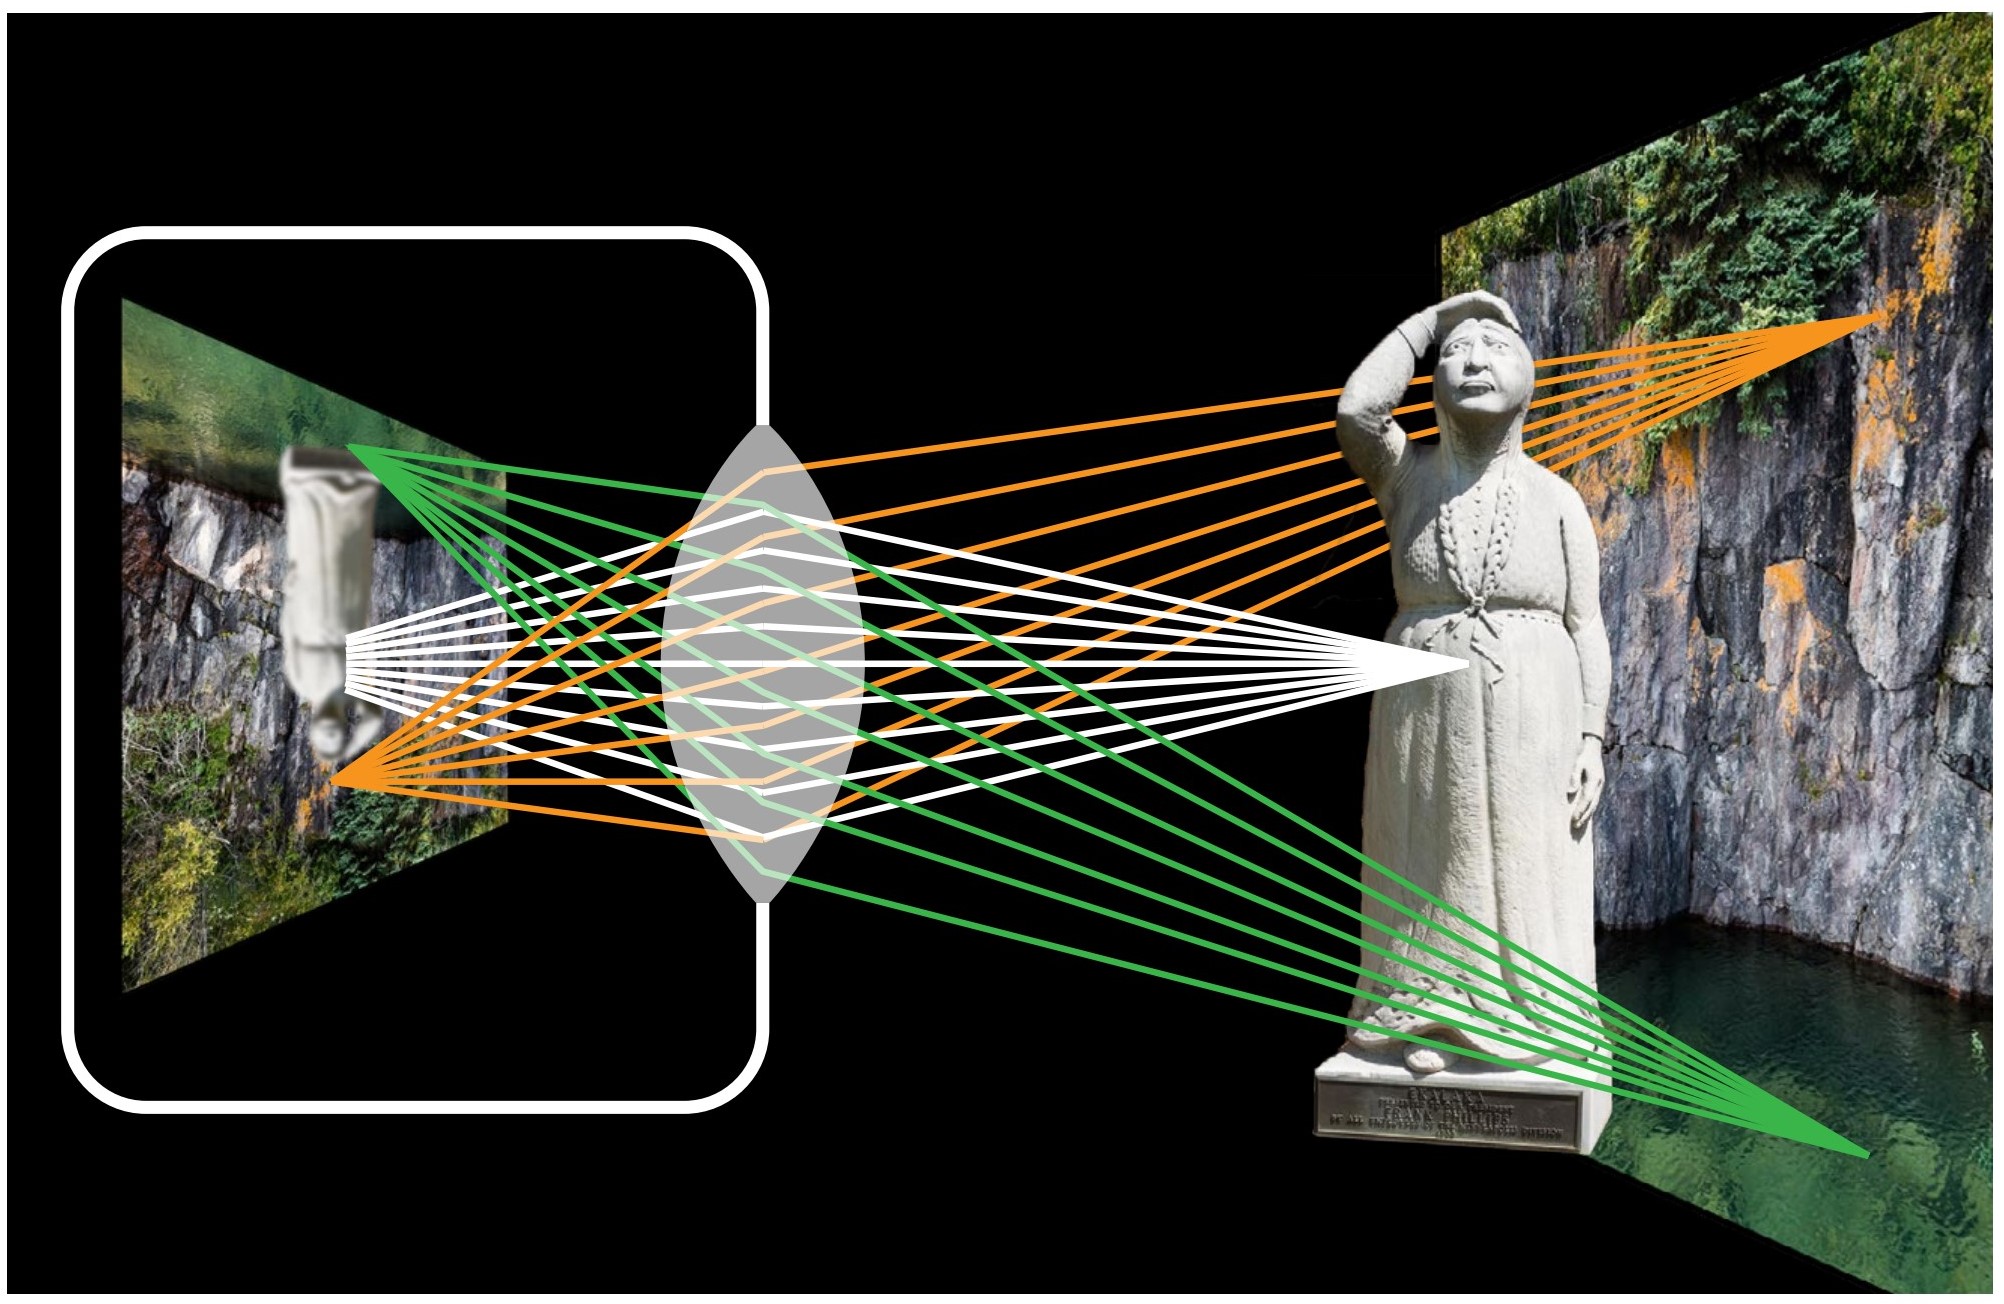
2. One problem (above) that comes with using a lens instead of a pinhole is that everything is no longer in equal focus. Lenses bend light coming from a single point in the environment and then focus it on a single point in the camera. If the sensor is either in front or in back of that focused point of light, things will appear blurry.
This is why camera lenses must be focused. Focusing a camera lens is simply changing the distance from the lens to the sensor. Another way of thinking about it is moving the sensor back and forth to find the spot where those light rays come to a focused point.
This single lens, called a simple lens, is better than pinhole lens, but it still has its faults, for example: light of different colors focus at slightly different points, and points of focus are not equal across the entire sensor area.
|
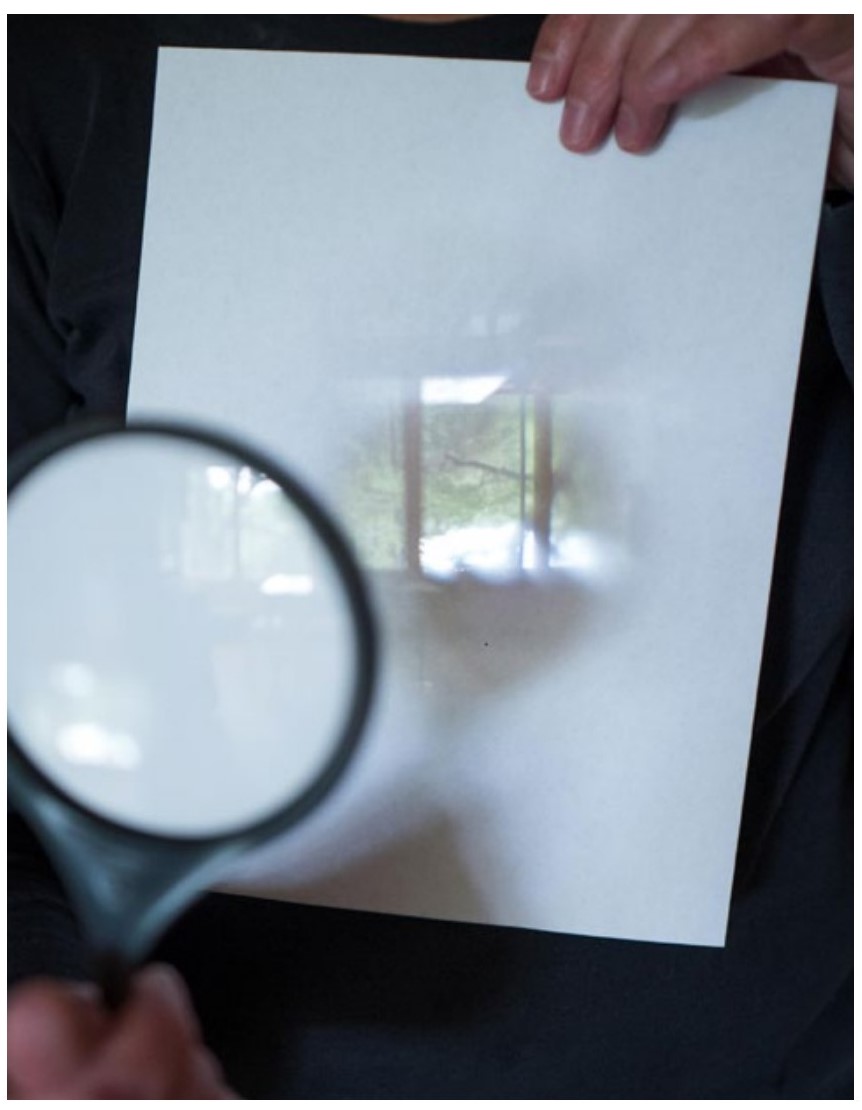
A magnifying glass is a good example of a simple lens. All you need to reproduce this example is a magnifier and a sheet of paper. |
|
Cat photographed using a simple lens. In this case the lens is a magnifying glass taped to the front of the camera. It is shown in the sidebar on the next page.
|
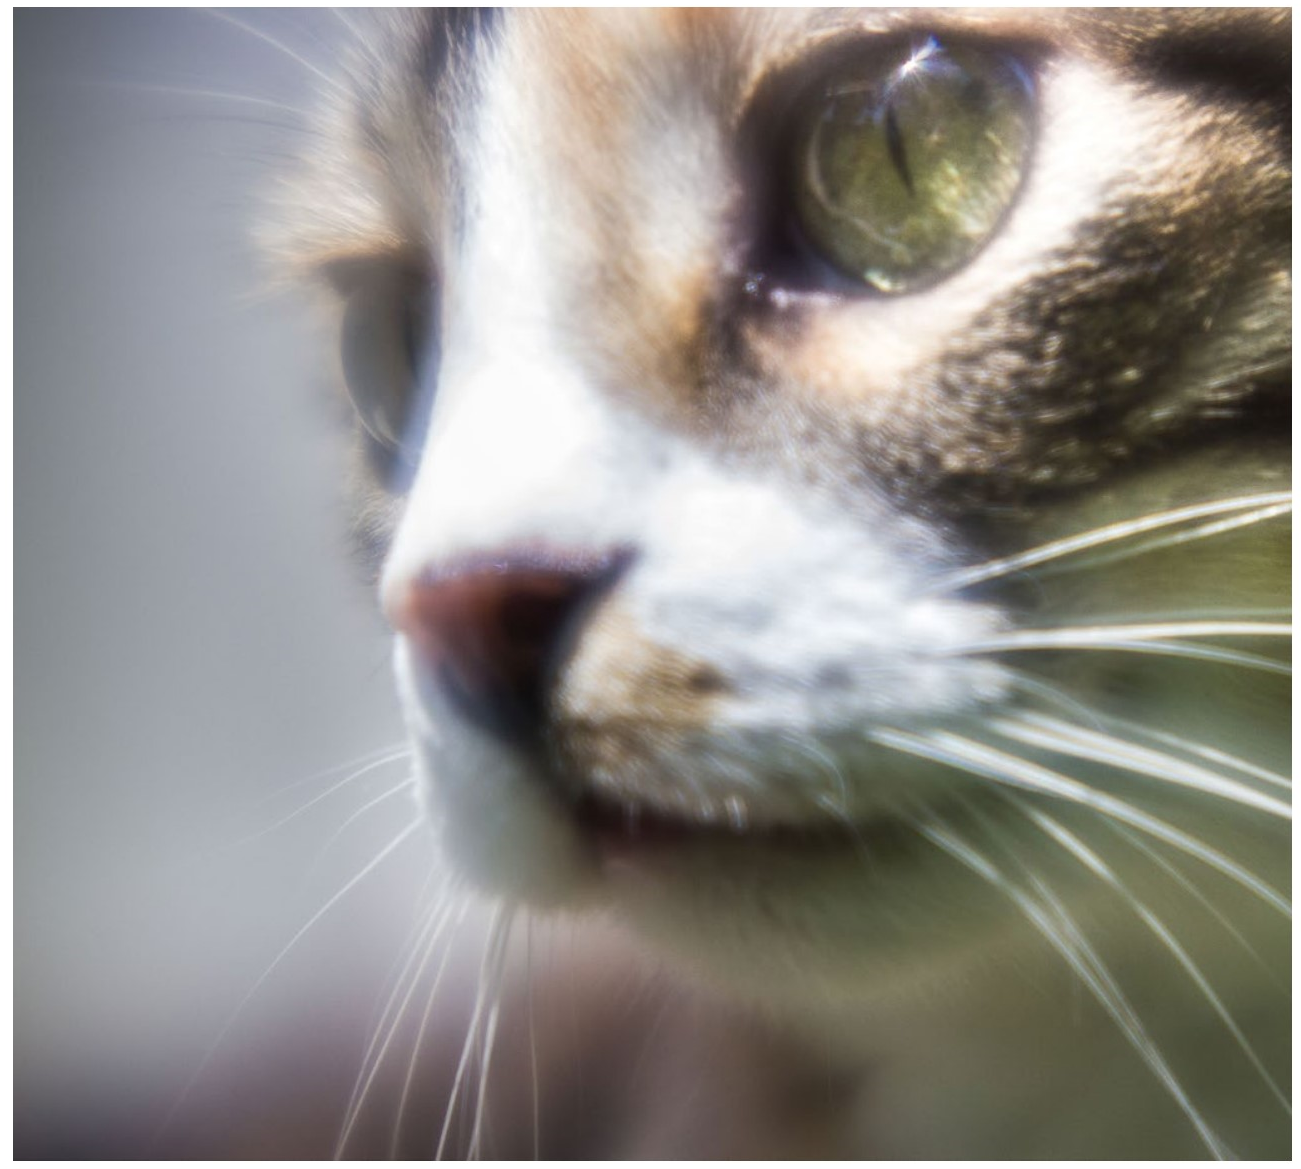
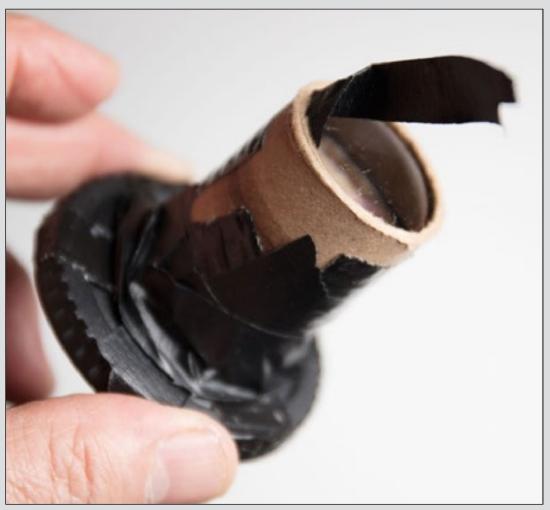
Bad LensesIn the discussion on lenses, optically precise lenses are defined as better. This is an oversimplification. Sometimes the best lens for what you are doing is not optically precise. You can buy imprecise lenses (such as a LensBaby Spark, which is less than a hundred dollars) or you can easily make one yourself. For the picture of the cat on the preceding page, ten minutes was spent making the lens from a kitchen wrap tube, body cap, magnifying lens, and plenty of tape. And more tape to make a focus mechanism (a pull-tab). Not every magnifying glass comes into focus at the same distance, so this could present a construction problem.
|
Complex Lens
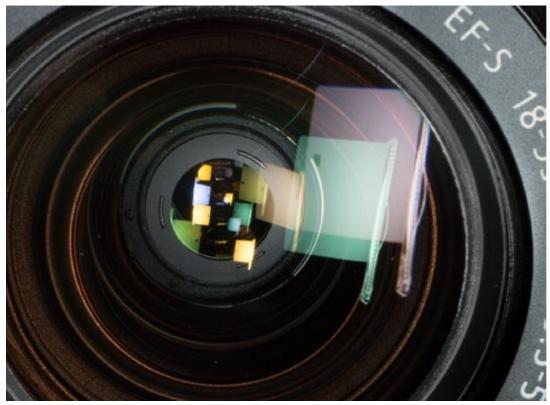
For lens designers, the solution to the problems inherent in a simple lens is to stack several lenses together to form groups of lenses. Used in all modern cameras, these complex lenses are composed of several lenses, but function as one lens. This is why you see multiple reflections as you look into your lens. It is like correcting the lenses of your eyes with the additional lenses in glasses.
While the optical quality of a lens is important, there are also other factors which govern the cost of a lens. Some lenses are built to withstand rugged use and some are built to withstand rain. Very expensive lenses are individually tested to ensure their quality.
Image Stabilization
Everybody moves constantly, even if they are not shaky people. When you are holding your camera still, it is actually always moving along with small movements your body makes.
Many lenses now have image stabilizers that can be turned on or off. Image Stabilization (IS) is also called other things, such as Vibration Reduction (VR). Stabilization involves a lens element (or lens group) that floats to oppose small movements the camera makes as it is held.
|
Each reflection in a complex lens is the surface of a simple lens.
|
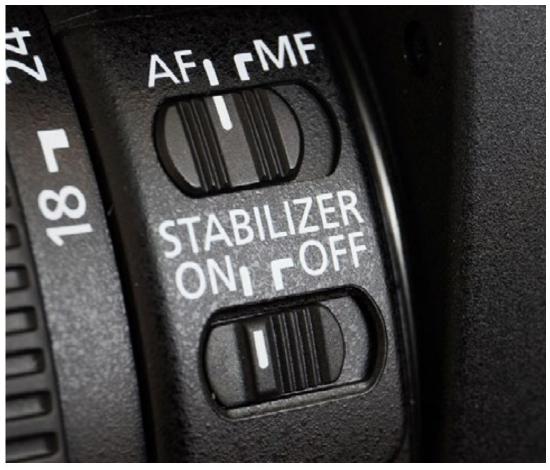
You can verify that this works by looking through your camera with the shutter button lightly pressed. Hold your camera so that something very distinct is near the edge of the frame. Try this with image stabilization off, then on. You should notice a big difference in movement through the viewfinder. Image stabilization will not help sharpness with a subject that is moving, but it will help with camera movement that may cause unsharp images.
Always leave IS (or VR or OS or whatever it is called) on... unless you are taking photographs using a tripod or other sturdy support. In that case, any movement of the floating lens element can actually cause blur.
|
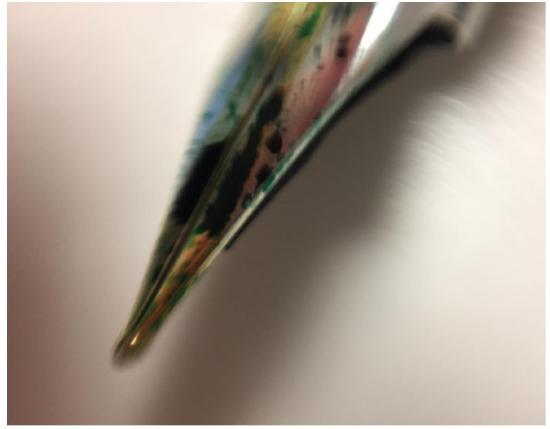
Like all modern cameras, cellphone cameras use complex lenses. For this photograph of a fountain pen nib, one extra lens was added to the cellphone lens in the form of a drop of water. This new lens design allows very close images with (of course) a loss of sharpness. You can easily reproduce this example yourself. |
Lens ShapeLenses shaped like lentil beans are called bi-convex, since both (bi) sides bulge out (convex). Lens sides that are flat are called plano, and lenses that are curved in are called concave. So, a plano-concave lens would be one where one side is flat and the other side is curved in. Aspheric lens elements have a curved surface in which the angle of the curve changes over the surface of the lens. Lenses designed with these can get expensive. Complex lenses use different types of elements to correct image flaws. Lens design often takes many things under consideration, such as the potential use for the lens (such as how much light it needs to gather) and how much it costs to build. |
Focus
Cameras used to be focused by moving the lens in and out wtih a threaded ring. Now cameras have autofocus which does this automatically. You can still switch your camera to manual focus and turn a ring on the lens to focus, but with newer viewing systems it can be difficult to see exactly what is in focus.
As mentioned before, lightly pushing the shutter button on your camera activates the automatic focusing mechanism. When your camera finds something to focus on, it locks in that distance until you release the button or take the picture. If lightly holding the shutter down doesn’t lock the focus, you should search your camera instructions for the way to disable continuous focus.
The most important thing to understand about focusing is that it is achieved at a given distance. So, if you focus on something ten feet away, lock your focus by continuing to lightly hold the shutter button, then point at different things, any of those things that are ten feet away will be in focus when you take the picture.
So, if you want something behind a close object to be in focus, you need to focus on something further away by turning your camera away. You then lock your focus by continuously holding the shutter button lightly down. Now turn your camera back and compose and shoot the scene without letting up on the shutter button. For some people it is a little awkward to keep the button lightly held.
|
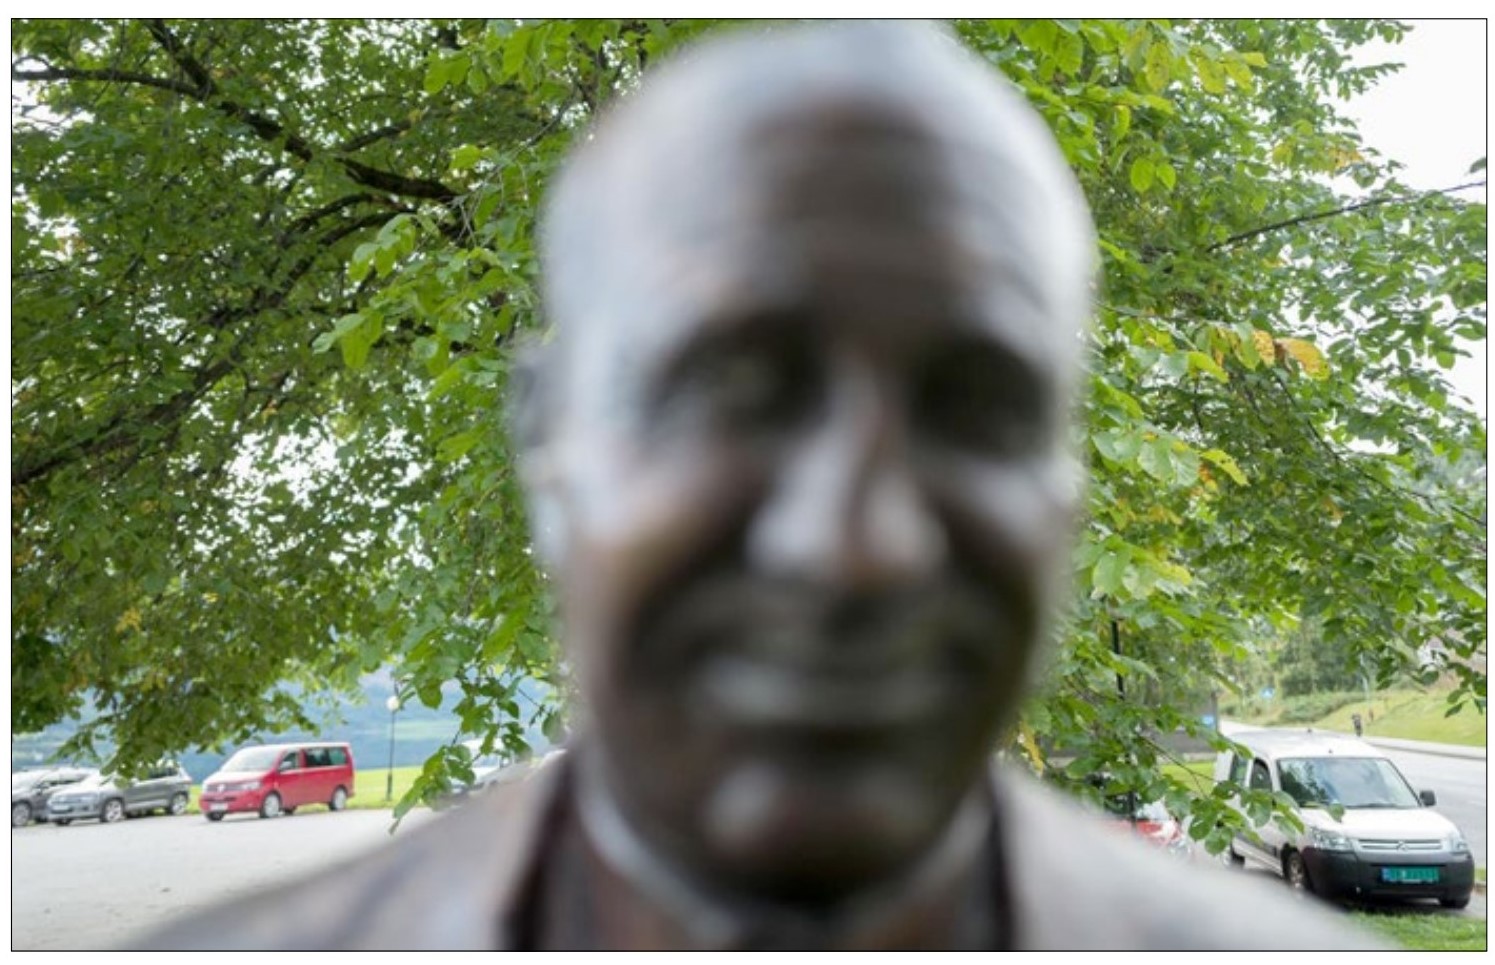
Knute in Knorway. The focus was locked at about 30 feet (by keeping the shutter lightly pressed), then the subject was reframed and taken before letting up on the shutter button. |
EyesThe lenses of your eyes are very much like camera lenses, and you are already familiar with their convex shape (at least on the outside!). The image from that lens is projected onto to back of your eye (the retina) to form an image which is sent to your brain. So, your eye is just like a little camera. The image is even upside down (our brain flips it back). Focus with your eyes is done a bit differently than with a camera lens. Instead of the lens moving back and forth, muscles bend the lens to bring the light rays into focus. A camera lens could also focus that way if were made of a flexible substance instead of glass. Speaking of flexible substances, the lenses of eyes start losing their flexibility when they are somewhere around forty years old. At that point additional lenses (glasses) are needed to help bring the light rays to a point on the retina. |
It may be easier to instead focus on something the same distance from you as what you want in focus, then temporarily lock that focus by switching to manual focus (using a switch on or near the lens).
Focus Areas
When you use automatic focus and your camera finds something to focus on, a rectangle or oval appears (or changes color) over what it found. This shape represents a focus area. There are a number of these in different places in the viewfinder, and they generally fill a large portion of the frame. Your camera will focus on the closest object that corresponds with a focus area.
But what if you want to focus on something that is not the closest to you? You can use the preceding technique, but often it is difficult to keep the focus areas from finding closer objects and focusing on them. Even cellphone cameras allow you to manually pick an object to focus on.
|
Camera frame showing typical focus areas. With all the spots activated (the default for most cameras), the camera would not let you focus on the chair since the stairs are closer. With only the center focusing area activated you can focus on the chair, lock the focus, then move the camera slightly to frame it. |
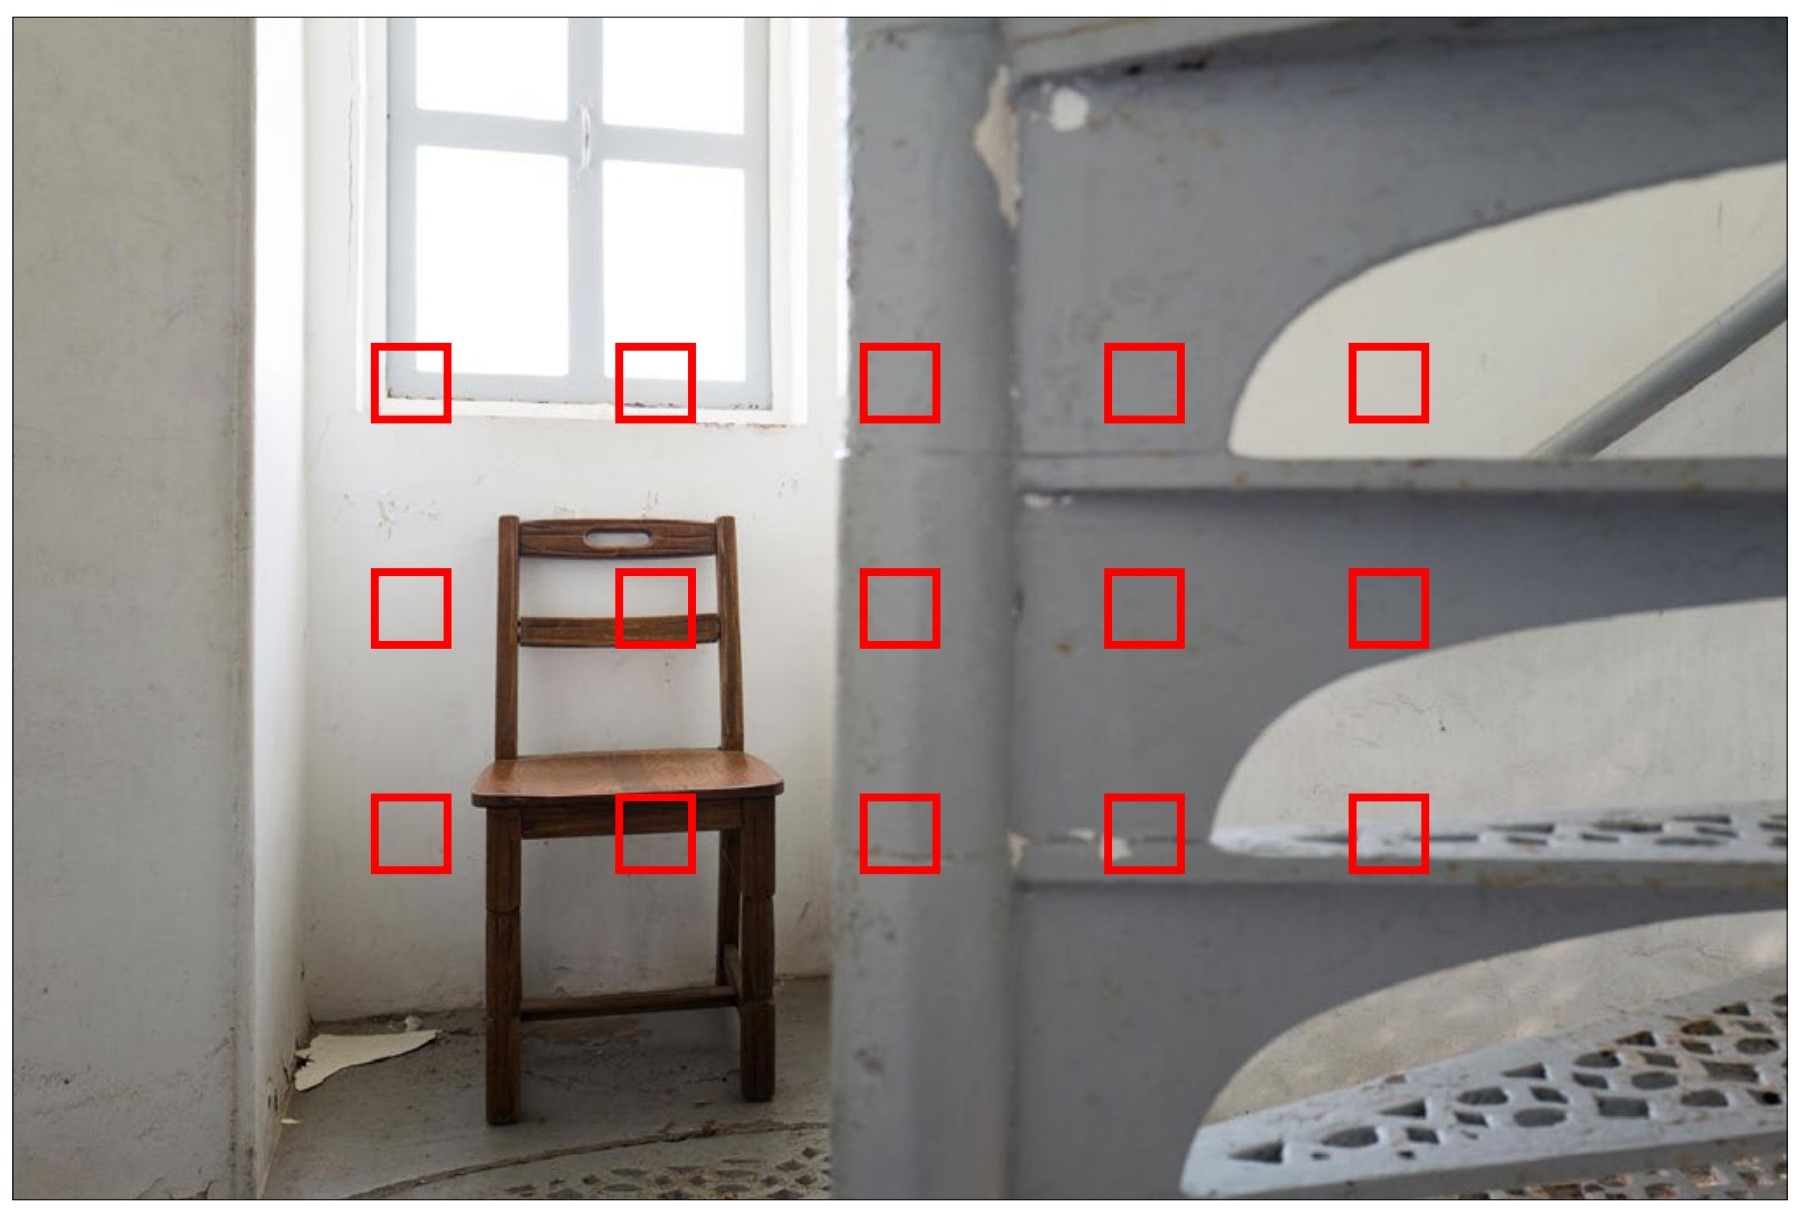
 Cameras let you specify that only the center focus spot activates. Cameras let you specify that only the center focus spot activates. |
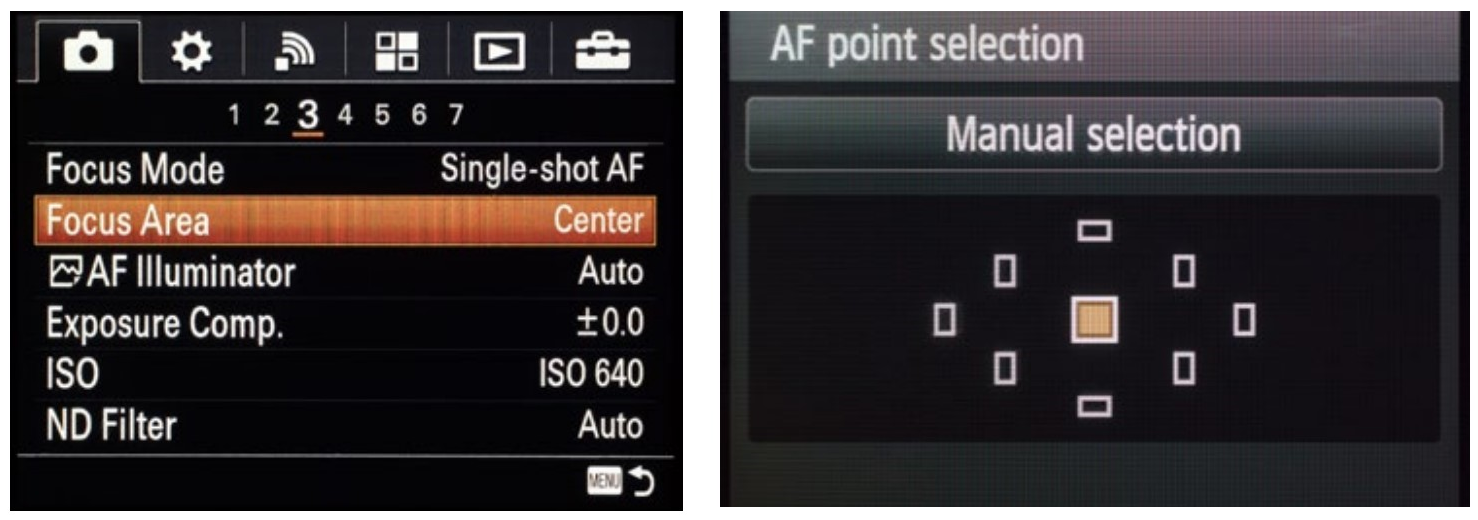
With DSLR and mirrorless cameras, there are workarounds to let you pick different areas to focus with, but this is the best solution: In your camera’s menus, turn off all of the focus areas except for the one in the center. How you do this varies with different cameras, so you may need to refer to your camera instructions.
Using only the center focus area makes focusing and framing a two-step process, but gives you the control you need. The first step is to center the area in the scene you want in focus, then lightly hold down the shutter button. The second step is to compose the image with the shutter still held lightly down as discussed before. Often this does not involve moving the camera at all between the focus and the shoot, and it will make focusing much easier, more precise, and more controllable.
Finding Focus
Different cameras find a point to focus on at different speeds. Newer cameras are much faster at focusing than older cameras, and mirrorless cameras are generally slower, although some of the newer ones are so fast you would never notice. DSLRs focus faster when you use the viewfinder instead of the viewing screen.
All cameras have problems focusing in low light situations. Many have a small light built in to help them focus closer objects by shining a light on the objects.
Cameras also have a difficult time focusing on areas in which there is no clearly defined detail in a focus area, such as the photograph below. In situations such as this you can aim at something with hard-edge detail to use as a point to focus on. Anything is easier for the camera to focus on than a bare wall or an even sky.
|
With this scene the the light fixture in the lower left was focused on and the focus was locked. The image was then composed and shot.
|

Infinity and Before
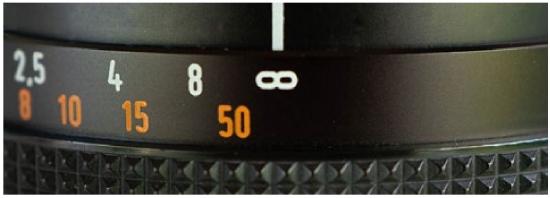
As objects get farther from the camera, eventually everything is in focus at the same time. This distance this happens at is called infinity, and is designated with an sideways figure eight (∞) on lenses that have a focus scale. This distance changes with different zoom settings or lenses.
As you focus closer on closer objects, less and less is in focus at different distances and careful focusing becomes more important.
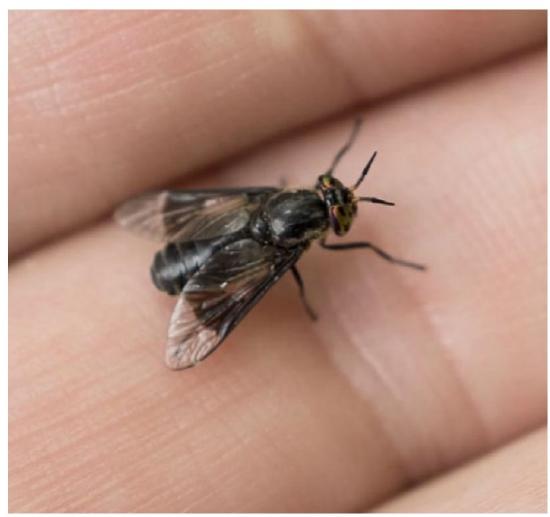
At very close distances careful focus is crucial since very little is in focus. This can be seen in the image below where even the end of fly’s legs are out of focus.
|
Temporary pet. When taking very close images it is sometimes easier to set the focus manually, then move the camera back and forth to finely focus. |

|
With the lens that was used to take this image infinity is at about 15 feet, so all of the people in the photograph are in focus. In other words, all of these people are optically the same distance away since they are all farther away than 15 feet. If the lens was instead focused at a distance before infinity, perhaps on something 3 feet away, all the people here would be out of focus the same amount. Below is a lens in which infinity lies farther—beyond 50 feet (15 meters) in this case. Your lens may not have a distance scale such as this, but it works the same way.
|
Other Lenses
There are many special purpose lenses. To give you an idea, here are a few examples:
A fish-eye lens is traditionally a lens than is so wide angle (180 degrees or more) that is difficult not to get your feet in the frame.
Close-up or macro lenses (not to be confused with the macro setting on some lenses) have much better overall focus for close-up photography and also excel in getting all parts of a flat subject (such as copies of paintings or paperwork) sharp. Some macro lenses also allow you to enlarge very small subjects.
|
RaeAnna Zinniel. Many modern lenses get as close as in this image without needing a macro lens. Macro lenses allow you to get even closer. |

Fast lenses are ones capable of letting a lot of light through the lens. These may be big and heavy with large lens elements and prices to match.
Telephoto lenses make distant things appear closer. As with most things here, fast lenses and telephotos will be described in more detail later in this text.
Flair
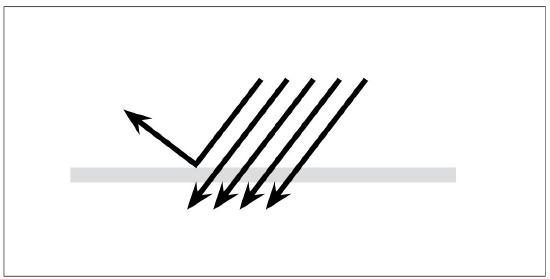
When light hits any glass surface, a large percentage of that light is transmitted through the glass, and bent according to the curvature of the glass. But a certain percentage of the light is reflected back from the surface of the glass. You have seen the light reflecting back if you have ever seen a reflection on a window.
The light that is transmitted through a camera lens (instead of reflected) is what makes the image. The light that is reflected from all those elements in your lens just bounces willy-nilly around in there and obscures the image with lower contrast (haziness) and various kinds of repeating spots.
|
Any surface reflects light. Clear substances, like glass, transmit (let through) most light, but still reflects a portion of that light. |
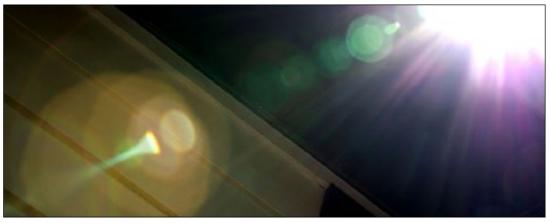
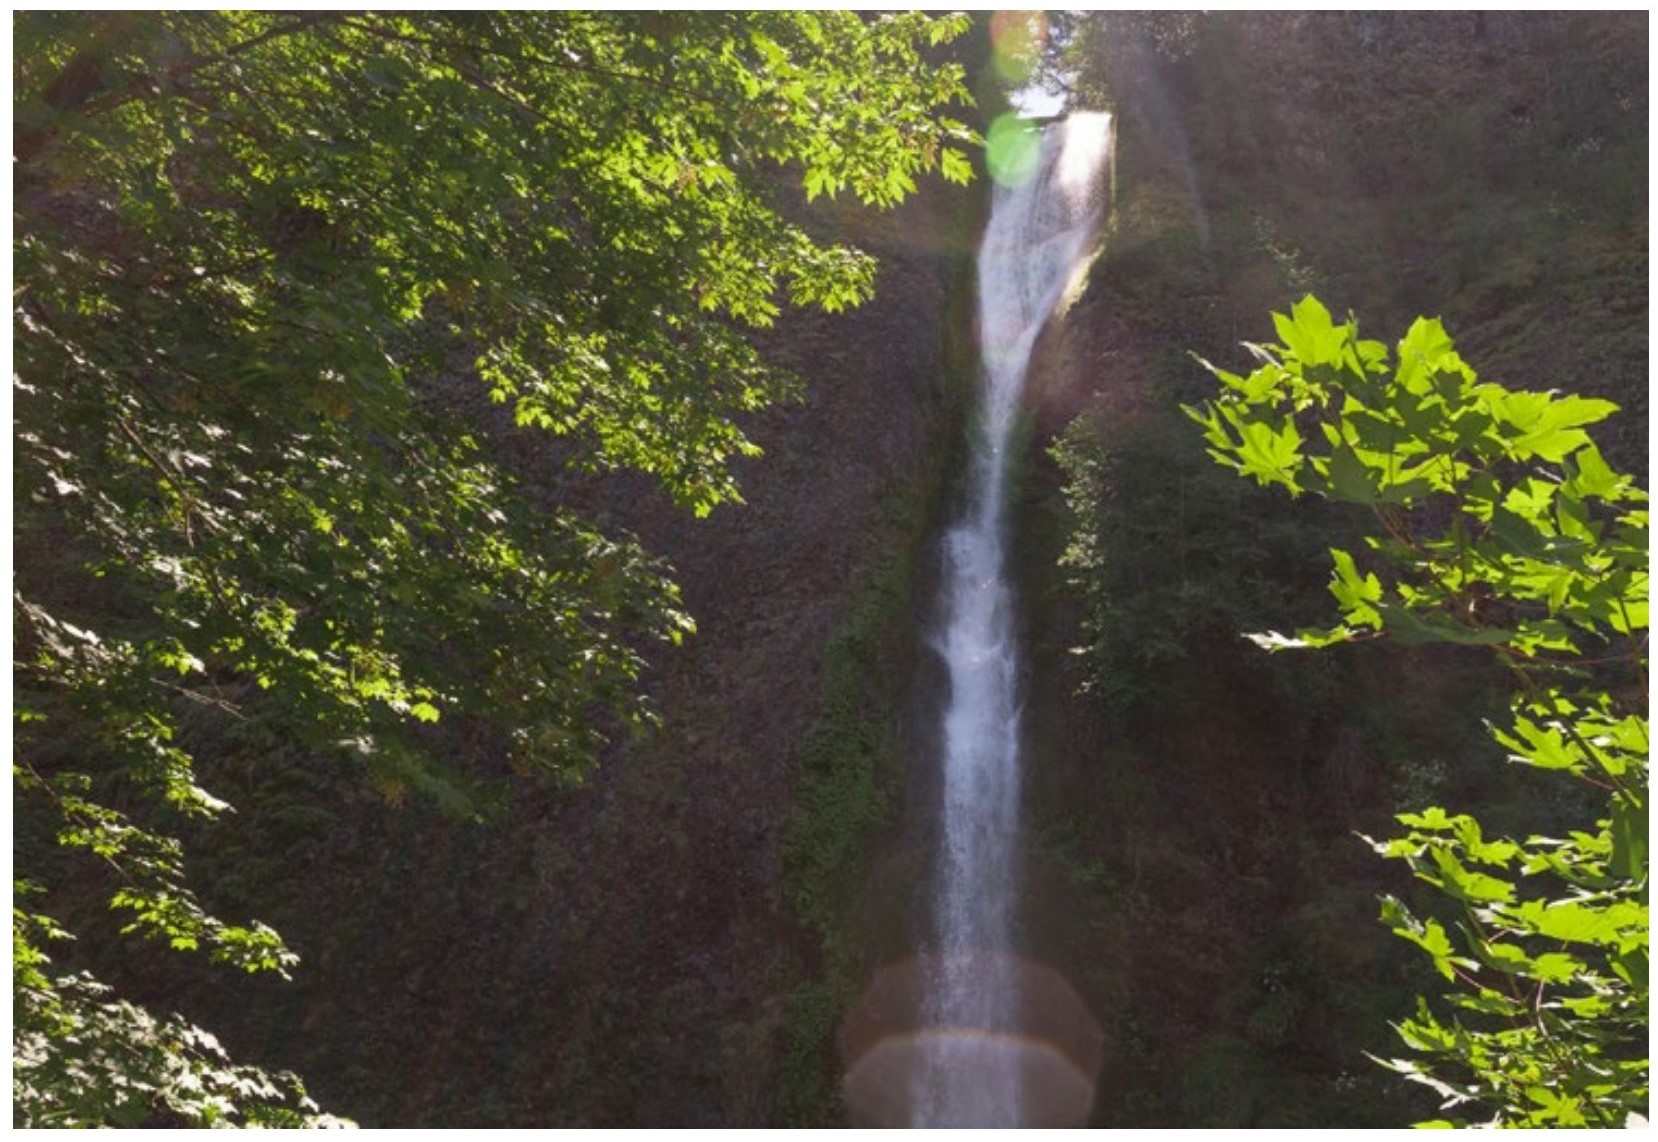
Lenses are coated to keep these reflections to an unnoticeable level, but what if a very bright subject, like the sun, hits the lens? Marauders take over your lens, and you will see lower contrast (think driving into the sun with a dirty windshield), and probably circular or funny-shaped spots radiating from the sun. Both of these things are symptoms of flair.
If the sun (or bright light) is in your image or very close to it, about all you can do to minimize flair is have a very clean lens. And then decide that those flair spots are actually kind of cool.
|
Flair (spots and reduction of contrast) caused by sun hitting the lens. |
|
Here the lens was shaded from the sun. Notice the absence of the two symptoms of flair that are visible in the image above. |
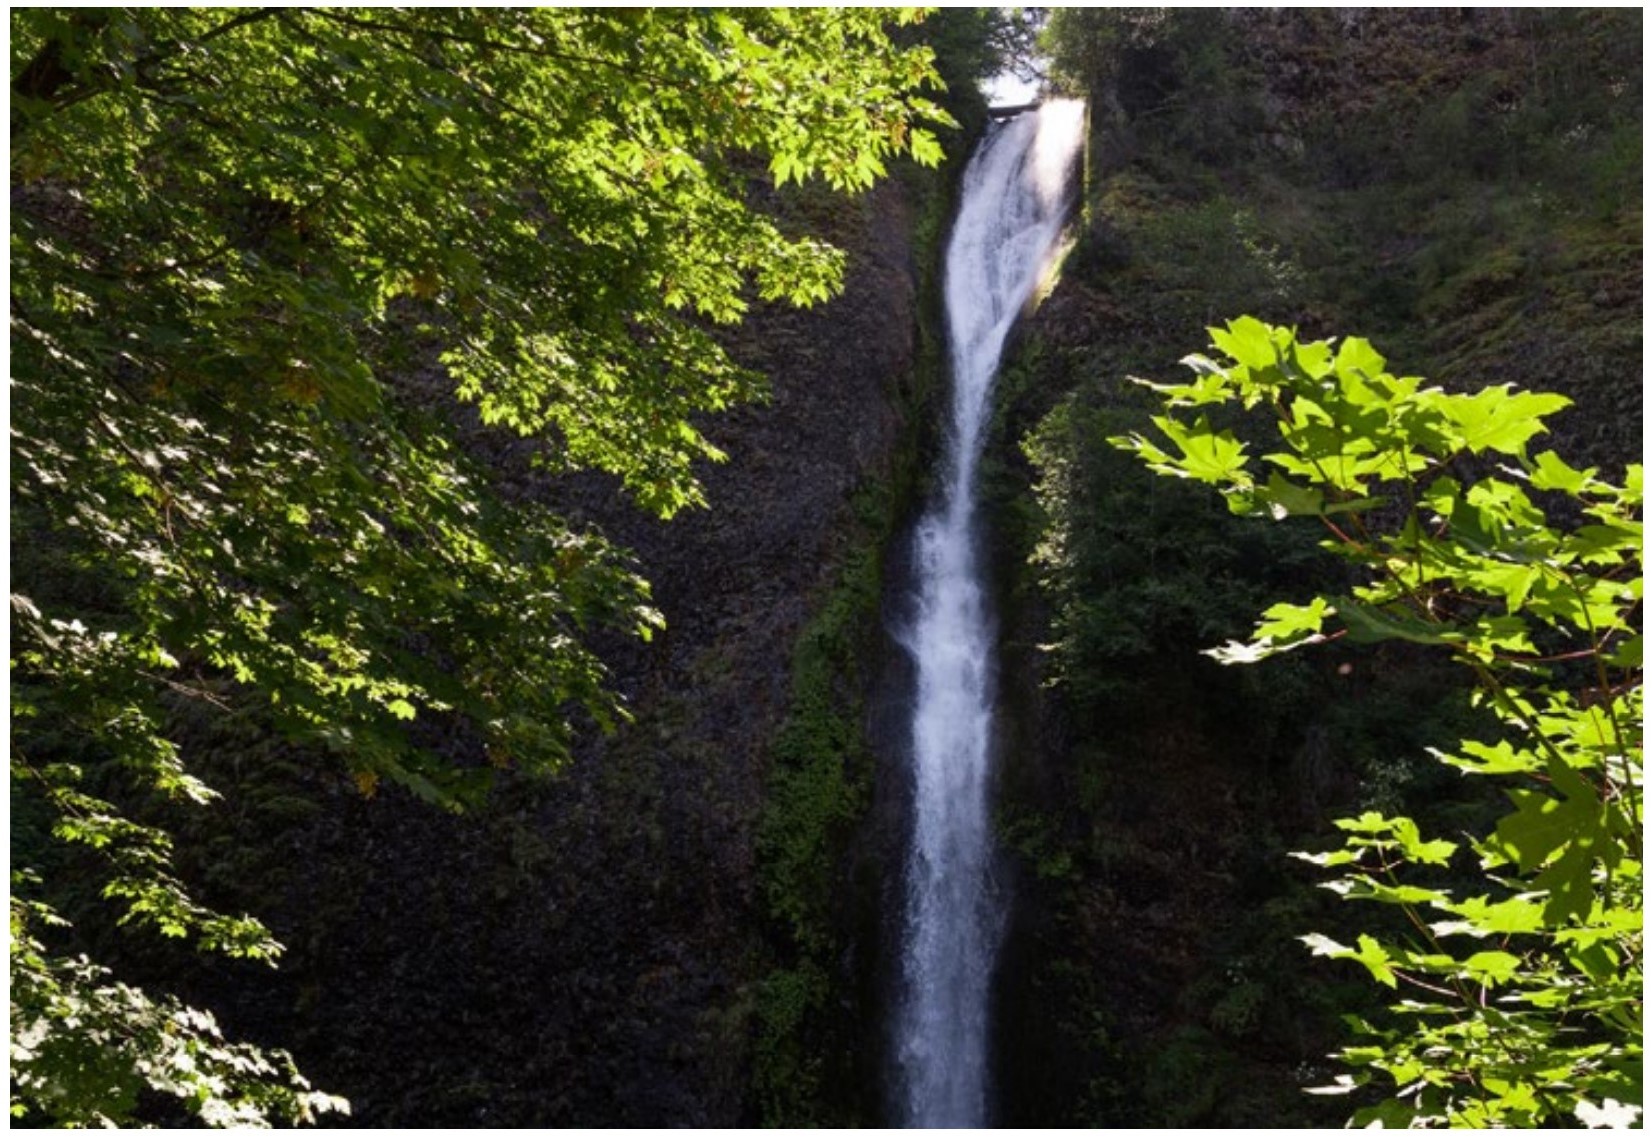
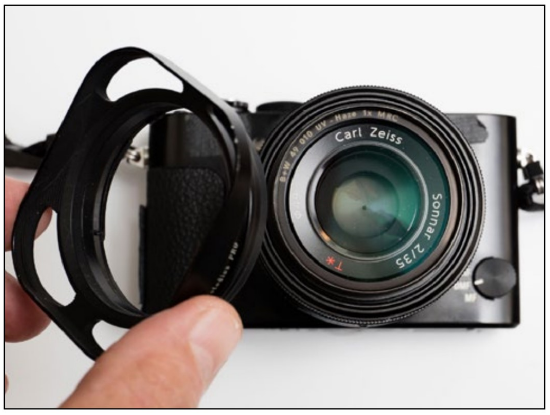
But if the sun is hitting your lens from outside the image area, you can (and in most instances should) do something about it. The cure is basically a baseball cap for your lens. This is called a lens hood, and it shades the lens from light much the same way a visor does for those two lenses in your head.
A lens hood will make your lens a bit longer, and can get in the way, so I wouldn’t blame you for leaving yours at home sometimes. If you do, and you are pointed into the sun, you can shade the lens the same way as you do your eyes when you forget your hat. Just hold your hand over and in front of the lens so that it shades the sun from it. You will see the flair being reduced as you do this. Your images will be free of the flair spots and the contrast will be crisp.
|
This lens hood has holes in the back corners where the sun does not need shading. Lens hoods also help keep your fingerprints off the lens and offer some protection against accidental collisions. |
|
|

Now Go Shoot
Before you actually go interpret the world around you with a camera, turn off all of your focus areas except the one in the middle. While this might feel like climbing out of an fighter jet and into a Buick, it will help you intentionally focus. If you find that for some reason you hate using the middle focus area you can always change it back later.
While you are photographing, think about the lens and see how it focuses. Try taking some photographs out of focus. Try including things very close and very far away in one image. Try using manual focus. Practice locking your focus and then composing the image.
See how close your camera will allow you to focus. Does this change with the zoom setting?
Look at reflections. Look at where the light is coming from in relation to the subject and the camera. Take some images with the light behind you and then some pointing into the light. What is the difference? Look for signs of flair if you are pointing near the light (both spots and reduction of contrast). Can you get rid of it? Do you want flair?
EXPERIMENT
One of the best ways of examining controls on your camera is to do some small and easy experiments such as these at the end of most chapters in this text.
For this experiment, take two photographs of exactly the same subject and framing. Find a scene in which something in the frame is close to the camera and another thing is farther away.
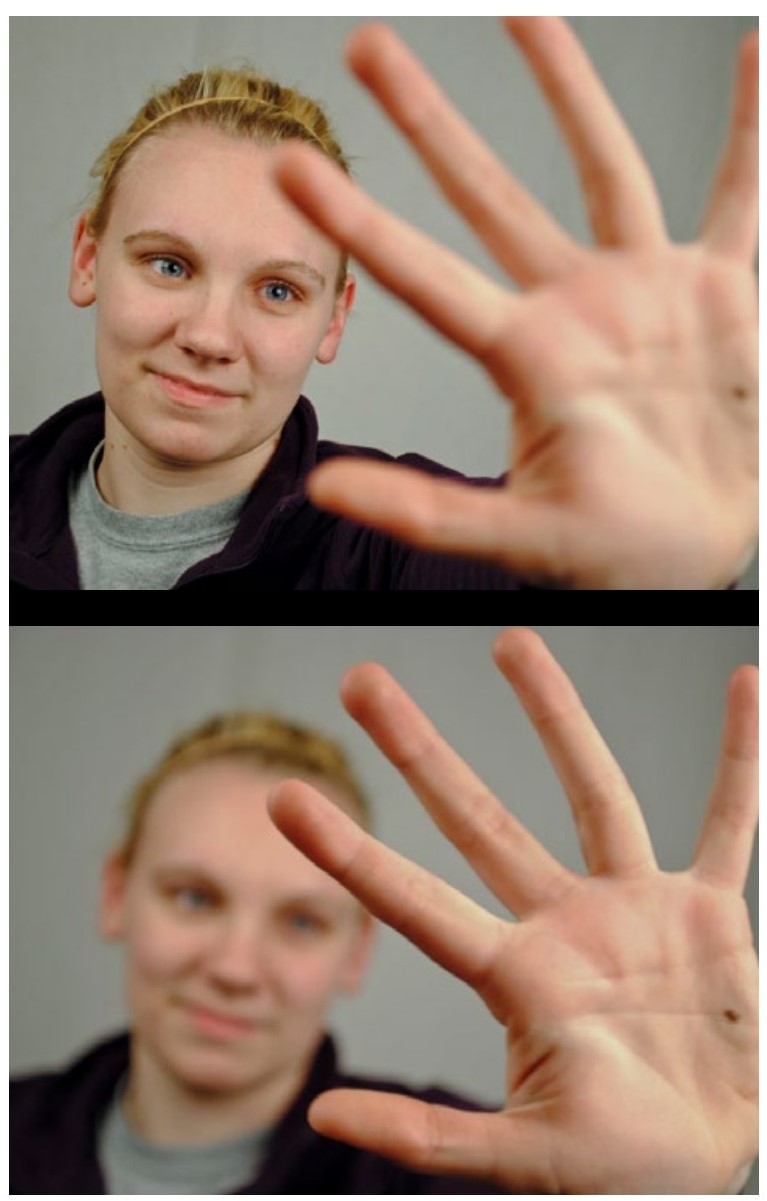
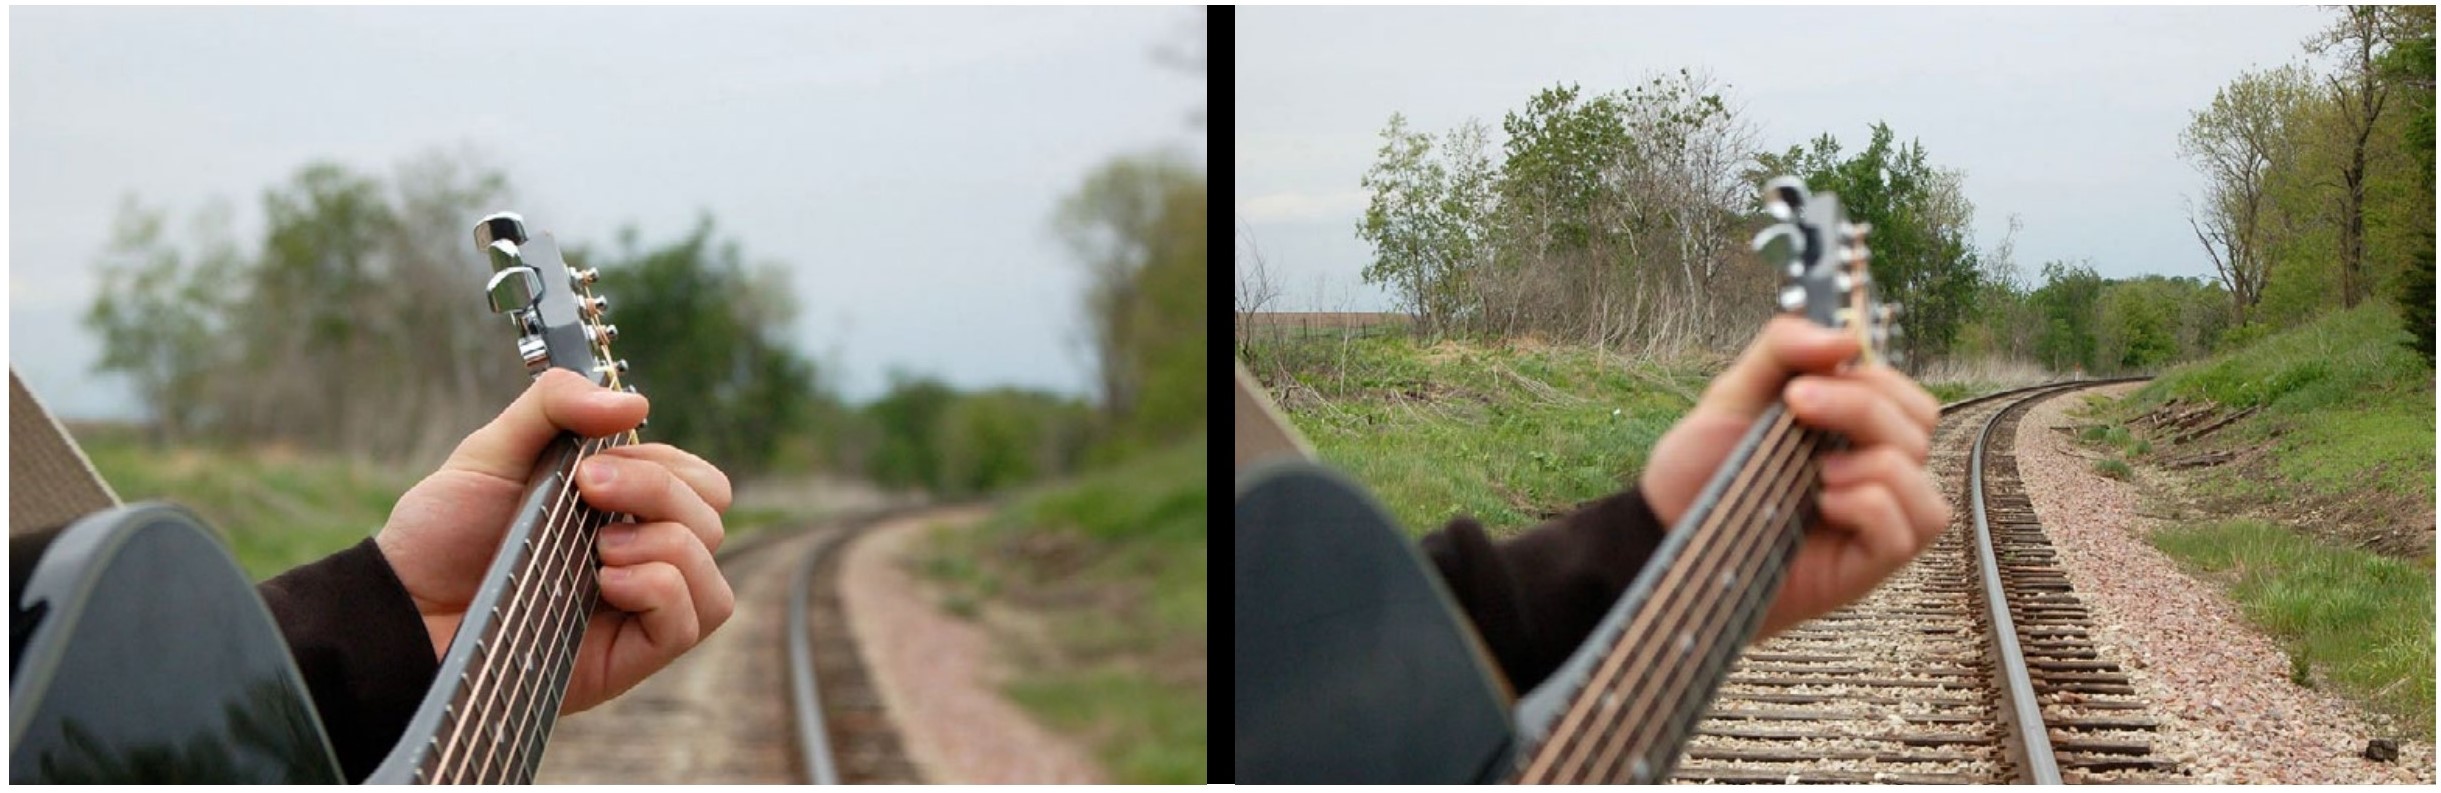
In one image the foreground object should be in focus, and in the other the background object should be. This can be done by locking your focus as described.
The foreground should be close enough for you to see the difference. With some cameras this may mean getting very close to the foreground object.
What this experiment should do is familiarize you with focusing on different things using auto-focus. It should also very clearly show you the control you have with intentional focus.
What you are really after here is learning how to use focus, so the quality of the image doesn’t really matter.
But don’t just stop trying this after the experiment. Intentionally focus all your photographs.
|
Haley Flores, background and then foreground in focus
|
|
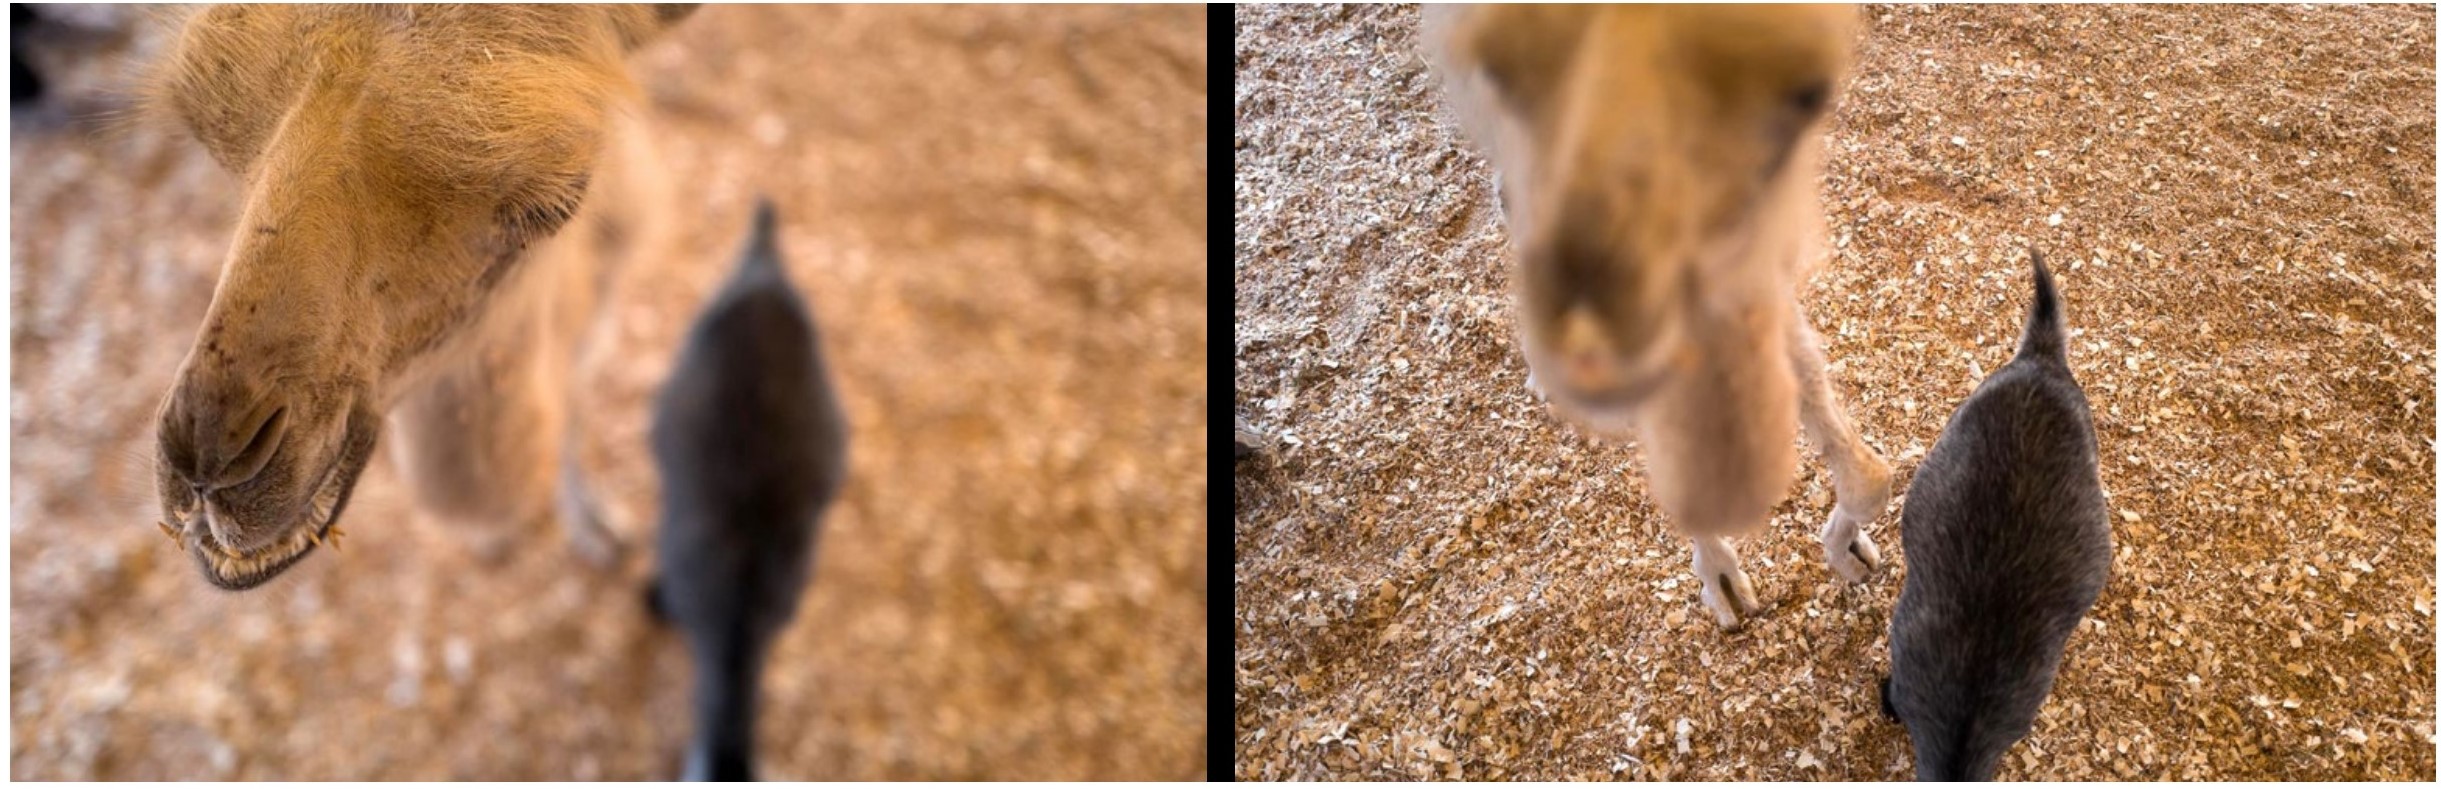
TOP Mackenzy Voltmer BOTTOM Camel or goat focus decisions |
Lens Questions
Since when has the pinhole lens been known (very approximately)?
How big is a pinhole camera? (trick question)
What is one potential advantage of a pinhole lens? A disadvantage?
What object has the capability of bending light?
What does moving a lens back and forth relative to the sensor do?
What is a disadvantage of a simple lens?
What kind of lens is used in all modern cameras?
What is a lens made up of several lenses (lens elements) called?
What camera feature helps minimize blur from a shaking camera?
Which button is lightly pressed to activate automatic focus on a camera?
How do you lock a focusing distance using automatic focus?What focus area setting gives you the most versatility?
What should you focus on when your camera cannot find focus?What is the distance at which one focus will cover any distance?How many feet away is infinity? (trick question)
What type of lens is capable of letting in a lot of light?
What are two ways flair can be seen in photographs?
What device minimizes flair?
