
5.4: Understanding Atmospheric Perspective
- Page ID
- 341405
\( \newcommand{\vecs}[1]{\overset { \scriptstyle \rightharpoonup} {\mathbf{#1}} } \)
\( \newcommand{\vecd}[1]{\overset{-\!-\!\rightharpoonup}{\vphantom{a}\smash {#1}}} \)
\( \newcommand{\dsum}{\displaystyle\sum\limits} \)
\( \newcommand{\dint}{\displaystyle\int\limits} \)
\( \newcommand{\dlim}{\displaystyle\lim\limits} \)
\( \newcommand{\id}{\mathrm{id}}\) \( \newcommand{\Span}{\mathrm{span}}\)
( \newcommand{\kernel}{\mathrm{null}\,}\) \( \newcommand{\range}{\mathrm{range}\,}\)
\( \newcommand{\RealPart}{\mathrm{Re}}\) \( \newcommand{\ImaginaryPart}{\mathrm{Im}}\)
\( \newcommand{\Argument}{\mathrm{Arg}}\) \( \newcommand{\norm}[1]{\| #1 \|}\)
\( \newcommand{\inner}[2]{\langle #1, #2 \rangle}\)
\( \newcommand{\Span}{\mathrm{span}}\)
\( \newcommand{\id}{\mathrm{id}}\)
\( \newcommand{\Span}{\mathrm{span}}\)
\( \newcommand{\kernel}{\mathrm{null}\,}\)
\( \newcommand{\range}{\mathrm{range}\,}\)
\( \newcommand{\RealPart}{\mathrm{Re}}\)
\( \newcommand{\ImaginaryPart}{\mathrm{Im}}\)
\( \newcommand{\Argument}{\mathrm{Arg}}\)
\( \newcommand{\norm}[1]{\| #1 \|}\)
\( \newcommand{\inner}[2]{\langle #1, #2 \rangle}\)
\( \newcommand{\Span}{\mathrm{span}}\) \( \newcommand{\AA}{\unicode[.8,0]{x212B}}\)
\( \newcommand{\vectorA}[1]{\vec{#1}} % arrow\)
\( \newcommand{\vectorAt}[1]{\vec{\text{#1}}} % arrow\)
\( \newcommand{\vectorB}[1]{\overset { \scriptstyle \rightharpoonup} {\mathbf{#1}} } \)
\( \newcommand{\vectorC}[1]{\textbf{#1}} \)
\( \newcommand{\vectorD}[1]{\overrightarrow{#1}} \)
\( \newcommand{\vectorDt}[1]{\overrightarrow{\text{#1}}} \)
\( \newcommand{\vectE}[1]{\overset{-\!-\!\rightharpoonup}{\vphantom{a}\smash{\mathbf {#1}}}} \)
\( \newcommand{\vecs}[1]{\overset { \scriptstyle \rightharpoonup} {\mathbf{#1}} } \)
\(\newcommand{\longvect}{\overrightarrow}\)
\( \newcommand{\vecd}[1]{\overset{-\!-\!\rightharpoonup}{\vphantom{a}\smash {#1}}} \)
\(\newcommand{\avec}{\mathbf a}\) \(\newcommand{\bvec}{\mathbf b}\) \(\newcommand{\cvec}{\mathbf c}\) \(\newcommand{\dvec}{\mathbf d}\) \(\newcommand{\dtil}{\widetilde{\mathbf d}}\) \(\newcommand{\evec}{\mathbf e}\) \(\newcommand{\fvec}{\mathbf f}\) \(\newcommand{\nvec}{\mathbf n}\) \(\newcommand{\pvec}{\mathbf p}\) \(\newcommand{\qvec}{\mathbf q}\) \(\newcommand{\svec}{\mathbf s}\) \(\newcommand{\tvec}{\mathbf t}\) \(\newcommand{\uvec}{\mathbf u}\) \(\newcommand{\vvec}{\mathbf v}\) \(\newcommand{\wvec}{\mathbf w}\) \(\newcommand{\xvec}{\mathbf x}\) \(\newcommand{\yvec}{\mathbf y}\) \(\newcommand{\zvec}{\mathbf z}\) \(\newcommand{\rvec}{\mathbf r}\) \(\newcommand{\mvec}{\mathbf m}\) \(\newcommand{\zerovec}{\mathbf 0}\) \(\newcommand{\onevec}{\mathbf 1}\) \(\newcommand{\real}{\mathbb R}\) \(\newcommand{\twovec}[2]{\left[\begin{array}{r}#1 \\ #2 \end{array}\right]}\) \(\newcommand{\ctwovec}[2]{\left[\begin{array}{c}#1 \\ #2 \end{array}\right]}\) \(\newcommand{\threevec}[3]{\left[\begin{array}{r}#1 \\ #2 \\ #3 \end{array}\right]}\) \(\newcommand{\cthreevec}[3]{\left[\begin{array}{c}#1 \\ #2 \\ #3 \end{array}\right]}\) \(\newcommand{\fourvec}[4]{\left[\begin{array}{r}#1 \\ #2 \\ #3 \\ #4 \end{array}\right]}\) \(\newcommand{\cfourvec}[4]{\left[\begin{array}{c}#1 \\ #2 \\ #3 \\ #4 \end{array}\right]}\) \(\newcommand{\fivevec}[5]{\left[\begin{array}{r}#1 \\ #2 \\ #3 \\ #4 \\ #5 \\ \end{array}\right]}\) \(\newcommand{\cfivevec}[5]{\left[\begin{array}{c}#1 \\ #2 \\ #3 \\ #4 \\ #5 \\ \end{array}\right]}\) \(\newcommand{\mattwo}[4]{\left[\begin{array}{rr}#1 \amp #2 \\ #3 \amp #4 \\ \end{array}\right]}\) \(\newcommand{\laspan}[1]{\text{Span}\{#1\}}\) \(\newcommand{\bcal}{\cal B}\) \(\newcommand{\ccal}{\cal C}\) \(\newcommand{\scal}{\cal S}\) \(\newcommand{\wcal}{\cal W}\) \(\newcommand{\ecal}{\cal E}\) \(\newcommand{\coords}[2]{\left\{#1\right\}_{#2}}\) \(\newcommand{\gray}[1]{\color{gray}{#1}}\) \(\newcommand{\lgray}[1]{\color{lightgray}{#1}}\) \(\newcommand{\rank}{\operatorname{rank}}\) \(\newcommand{\row}{\text{Row}}\) \(\newcommand{\col}{\text{Col}}\) \(\renewcommand{\row}{\text{Row}}\) \(\newcommand{\nul}{\text{Nul}}\) \(\newcommand{\var}{\text{Var}}\) \(\newcommand{\corr}{\text{corr}}\) \(\newcommand{\len}[1]{\left|#1\right|}\) \(\newcommand{\bbar}{\overline{\bvec}}\) \(\newcommand{\bhat}{\widehat{\bvec}}\) \(\newcommand{\bperp}{\bvec^\perp}\) \(\newcommand{\xhat}{\widehat{\xvec}}\) \(\newcommand{\vhat}{\widehat{\vvec}}\) \(\newcommand{\uhat}{\widehat{\uvec}}\) \(\newcommand{\what}{\widehat{\wvec}}\) \(\newcommand{\Sighat}{\widehat{\Sigma}}\) \(\newcommand{\lt}{<}\) \(\newcommand{\gt}{>}\) \(\newcommand{\amp}{&}\) \(\definecolor{fillinmathshade}{gray}{0.9}\)The visual characteristics of atmospheric perspective include decreased contrast, a shift in color towards cooler tones, and a reduction in detail and texture as objects recede into the background. By studying these characteristics, artists can effectively mimic the natural phenomena that create a sense of depth in a scene. For instance, in landscapes, artists often use atmospheric perspective to represent distant hills and mountains with less detail and cooler colors compared to the foreground.
Landscape Composition
The principles of landscape composition are essential in creating visually compelling artworks. This section will guide you through the basics of object placement, arrangement, grouping, and spatial relationships within the picture plane. By understanding and applying these principles, artists can select and arrange elements to enhance the visual interest and depth of their landscape compositions. Techniques such as the rule of thirds, leading lines, and focal points will be used to help create balanced and dynamic compositions. The role of lighting is also crucial; by carefully positioning light sources, artists can highlight forms, cast realistic shadows, and emphasize the three dimensionality of the scene.
Rendering Form and Texture
Rendering three-dimensional forms and textures accurately is essential for achieving realism in art. This section introduces various techniques, including shading, modeling, cross-contour lines, and stippling, to help artists capture the tactile qualities of different materials.
- Shading involves creating gradients of light and dark to suggest volume and depth, while modeling refers to the use of light and shadow to enhance the three-dimensionality of objects.
- Modeling is the process of using light and shadow to give form and volume to an object, making it appear three-dimensional. This technique involves careful observation of how light falls on an object and how shadows are cast, allowing artists to depict the nuances of shape and contour.
- Cross-contour lines follow an object's contours to depict its form, and stippling uses small dots to build up texture and value.
By closely observing and analyzing objects' surface qualities, artists can learn to render subtle variations in value and texture, adding a sense of realism and depth to their drawings. For example, accurately depicting the reflective surface of water or the rough texture of tree bark requires careful observation and application of these techniques.
Applying Atmospheric Perspective
Case studies of historical and contemporary artworks will illustrate these techniques in practice, revealing their emotional and symbolic potential. For example, analyzing works by Leonardo da Vinci, J.M.W. Turner, and other masters who employed atmospheric perspective to create depth and realism can provide valuable insights. Contemporary artists, too, use atmospheric perspective in digital art, photography, and film to achieve similar effects. Furthermore, exploring how atmospheric perspective can convey emotional tones or symbolic meanings, such as using misty, indistinct backgrounds to evoke a sense of mystery, can deepen an artist's understanding of this technique.
Applying atmospheric perspective effectively can transform a flat composition into a vivid, immersive scene. This section provides step-by-step demonstrations for creating depth in various settings, from rural landscapes to urban scenes and fantastical worlds. By following these steps, artists can enhance their compositions, making them more dynamic and realistic.

Step-by-Step Instructions:
- Preparing Your Composition
- Choose Your Scene: Decide whether you will create a rural landscape, an urban scene, or a fantastical world. Gather reference images if needed.
- Sketch the Outline: Lightly sketch the basic outline of your composition, including key elements like mountains, buildings, or fantastical structures.
- Establishing the Foreground
- Vibrant Colors: Start with the foreground elements. Use vibrant, saturated colors to bring these objects to life.
- Example: Paint the grass and trees in rich greens and browns for a rural landscape. In an urban scene, use vivid colors for nearby buildings and streets.
- Detail and Texture: Add detailed textures and sharp contrasts to foreground elements.
- Example: In a rural scene, individual leaves on a tree and blades of grass should be visible. In an urban scene, show detailed brickwork or windows.
- Vibrant Colors: Start with the foreground elements. Use vibrant, saturated colors to bring these objects to life.
- Transitioning to the Middle Ground
- Gradual Shift: Gradually reduce the saturation and contrast as you move to the middle ground.
- Example: In a landscape, the forest and trees in the middle ground should be painted with slightly muted greens and fewer details.
- Example: In an urban scene, buildings should have less vibrant colors and softer edges.
- Simplified Detail: Begin to simplify textures and details in the middle ground elements. For example:
- Example: In a landscape, Forest Trees might be represented by general shapes rather than individual leaves
- Example: In an urban scene, buildings might be represented by simplified forms.

- "Forest Landscape" AI-generated image, DALL-E 4.0, 2024, by Kristen R. Kennedy
- Gradual Shift: Gradually reduce the saturation and contrast as you move to the middle ground.
- Creating the Background
- Cooler Colors: Use cooler, desaturated colors for the background elements to create a sense of depth.
- Example: In a landscape, distant hills and mountains can be painted in soft grey hues.
- Example: The far-off buildings can be rendered in light blue or gray tones in an urban scene.
- Minimal Detail: Reduce the level of detail significantly in the background.
- Example: Distant mountains should have smooth, simplified shapes.
- Example: Basic silhouettes should represent city skylines.
- Cooler Colors: Use cooler, desaturated colors for the background elements to create a sense of depth.
- Enhancing Depth with Linear Perspective
- Horizon Line and Vanishing Points: Establish a horizon line and vanishing points to guide the placement of objects. This step is crucial for both rural and urban scenes.
- Example: In a cityscape, use vanishing points to ensure that all buildings and streets converge correctly, reinforcing the sense of depth.
- Align Elements: Ensure all elements align with the established perspective lines.
- Example: Roads, rivers, and pathways should follow perspective lines, getting narrower as they approach the vanishing point.
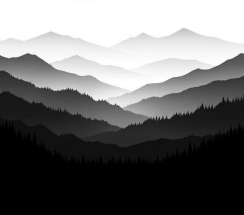
- "Atmospheric Perspective Values" AI-generated image, DALL-E 4.0, 2024, by Kristen R. Kennedy
- Horizon Line and Vanishing Points: Establish a horizon line and vanishing points to guide the placement of objects. This step is crucial for both rural and urban scenes.
- Adding Atmospheric Effects
- Haze and Fog: Incorporate atmospheric effects like haze or fog to enhance the sense of distance.
- Example: Add a light mist over distant hills in a rural scene. In an urban scene, apply a hazy overlay to distant skyscrapers.
- Softening Edges: Use soft brushes or blending techniques to soften the edges of distant objects.
- Example: The edges of mountains or distant buildings should be blurred to mimic thescattering effect of the atmosphere.

- "Urban Scene with Atmospheric Perspective" AI-generated image, DALL-E 4.0, 2024, by Kristen R. Kennedy
- Haze and Fog: Incorporate atmospheric effects like haze or fog to enhance the sense of distance.
- Final Adjustments and Details
- Refine Transitions: Ensure smooth transitions between the foreground, middle ground, and background. Adjust color gradients and blend as needed.
- Highlight Key Areas: Add highlights or focal points in the foreground to draw the viewer’s eye.
- Example: In a rural landscape, a brightly colored flower in the foreground can serve as a focal point. In an urban scene, a well-lit streetlamp can attract attention.
Example Demonstrations
Urban Scene:
- Foreground: Use vivid hues for nearby buildings and detailed street textures.
- Middle Ground: Shift to less vibrant colors and softer edges for mid-distance buildings.
- Background: Render far-off skyscrapers in light blue tones with simplified shapes.
- Final Touches: Apply a hazy effect to the skyline and ensure proper alignment with perspective lines.
Rural Landscape:
- Foreground: Start with vibrant green grass and detailed trees.
- Middle Ground: Transition to muted greens and simplified tree shapes.
- Background: Paint distant hills in soft blues and grays with minimal detail.
- Final Touches: Add a light mist over the hills and ensure smooth transitions.

Fantastical World:
- Foreground: Start with bright, saturated colors and detailed fantastical structures or flora.
- Middle Ground: Use muted, cooler colors and simplified forms for mid-distance elements.
- Background: Paint distant fantastical elements in very soft, ethereal tones with minimal detail.
- Final Touches: Add an exaggerated atmospheric effect like glowing mist or magical fog to enhance the otherworldly feel.
By following these steps, artists can effectively apply atmospheric perspective to create depth and dimension in their compositions, transforming flat images into immersive visual experiences. Whether depicting a serene rural landscape, a bustling urban scene, or an imaginative fantastical world, these techniques will enhance the realism and emotional impact of the artwork.
Atmospheric Perspective Tutorial Videos
• YouTube Video:
• YouTube Video:
• YouTube Video:
• YouTube Video: