
13.2: Sequencing
- Page ID
- 381981

\( \newcommand{\vecs}[1]{\overset { \scriptstyle \rightharpoonup} {\mathbf{#1}} } \)
\( \newcommand{\vecd}[1]{\overset{-\!-\!\rightharpoonup}{\vphantom{a}\smash {#1}}} \)
\( \newcommand{\dsum}{\displaystyle\sum\limits} \)
\( \newcommand{\dint}{\displaystyle\int\limits} \)
\( \newcommand{\dlim}{\displaystyle\lim\limits} \)
\( \newcommand{\id}{\mathrm{id}}\) \( \newcommand{\Span}{\mathrm{span}}\)
( \newcommand{\kernel}{\mathrm{null}\,}\) \( \newcommand{\range}{\mathrm{range}\,}\)
\( \newcommand{\RealPart}{\mathrm{Re}}\) \( \newcommand{\ImaginaryPart}{\mathrm{Im}}\)
\( \newcommand{\Argument}{\mathrm{Arg}}\) \( \newcommand{\norm}[1]{\| #1 \|}\)
\( \newcommand{\inner}[2]{\langle #1, #2 \rangle}\)
\( \newcommand{\Span}{\mathrm{span}}\)
\( \newcommand{\id}{\mathrm{id}}\)
\( \newcommand{\Span}{\mathrm{span}}\)
\( \newcommand{\kernel}{\mathrm{null}\,}\)
\( \newcommand{\range}{\mathrm{range}\,}\)
\( \newcommand{\RealPart}{\mathrm{Re}}\)
\( \newcommand{\ImaginaryPart}{\mathrm{Im}}\)
\( \newcommand{\Argument}{\mathrm{Arg}}\)
\( \newcommand{\norm}[1]{\| #1 \|}\)
\( \newcommand{\inner}[2]{\langle #1, #2 \rangle}\)
\( \newcommand{\Span}{\mathrm{span}}\) \( \newcommand{\AA}{\unicode[.8,0]{x212B}}\)
\( \newcommand{\vectorA}[1]{\vec{#1}} % arrow\)
\( \newcommand{\vectorAt}[1]{\vec{\text{#1}}} % arrow\)
\( \newcommand{\vectorB}[1]{\overset { \scriptstyle \rightharpoonup} {\mathbf{#1}} } \)
\( \newcommand{\vectorC}[1]{\textbf{#1}} \)
\( \newcommand{\vectorD}[1]{\overrightarrow{#1}} \)
\( \newcommand{\vectorDt}[1]{\overrightarrow{\text{#1}}} \)
\( \newcommand{\vectE}[1]{\overset{-\!-\!\rightharpoonup}{\vphantom{a}\smash{\mathbf {#1}}}} \)
\( \newcommand{\vecs}[1]{\overset { \scriptstyle \rightharpoonup} {\mathbf{#1}} } \)
\(\newcommand{\longvect}{\overrightarrow}\)
\( \newcommand{\vecd}[1]{\overset{-\!-\!\rightharpoonup}{\vphantom{a}\smash {#1}}} \)
\(\newcommand{\avec}{\mathbf a}\) \(\newcommand{\bvec}{\mathbf b}\) \(\newcommand{\cvec}{\mathbf c}\) \(\newcommand{\dvec}{\mathbf d}\) \(\newcommand{\dtil}{\widetilde{\mathbf d}}\) \(\newcommand{\evec}{\mathbf e}\) \(\newcommand{\fvec}{\mathbf f}\) \(\newcommand{\nvec}{\mathbf n}\) \(\newcommand{\pvec}{\mathbf p}\) \(\newcommand{\qvec}{\mathbf q}\) \(\newcommand{\svec}{\mathbf s}\) \(\newcommand{\tvec}{\mathbf t}\) \(\newcommand{\uvec}{\mathbf u}\) \(\newcommand{\vvec}{\mathbf v}\) \(\newcommand{\wvec}{\mathbf w}\) \(\newcommand{\xvec}{\mathbf x}\) \(\newcommand{\yvec}{\mathbf y}\) \(\newcommand{\zvec}{\mathbf z}\) \(\newcommand{\rvec}{\mathbf r}\) \(\newcommand{\mvec}{\mathbf m}\) \(\newcommand{\zerovec}{\mathbf 0}\) \(\newcommand{\onevec}{\mathbf 1}\) \(\newcommand{\real}{\mathbb R}\) \(\newcommand{\twovec}[2]{\left[\begin{array}{r}#1 \\ #2 \end{array}\right]}\) \(\newcommand{\ctwovec}[2]{\left[\begin{array}{c}#1 \\ #2 \end{array}\right]}\) \(\newcommand{\threevec}[3]{\left[\begin{array}{r}#1 \\ #2 \\ #3 \end{array}\right]}\) \(\newcommand{\cthreevec}[3]{\left[\begin{array}{c}#1 \\ #2 \\ #3 \end{array}\right]}\) \(\newcommand{\fourvec}[4]{\left[\begin{array}{r}#1 \\ #2 \\ #3 \\ #4 \end{array}\right]}\) \(\newcommand{\cfourvec}[4]{\left[\begin{array}{c}#1 \\ #2 \\ #3 \\ #4 \end{array}\right]}\) \(\newcommand{\fivevec}[5]{\left[\begin{array}{r}#1 \\ #2 \\ #3 \\ #4 \\ #5 \\ \end{array}\right]}\) \(\newcommand{\cfivevec}[5]{\left[\begin{array}{c}#1 \\ #2 \\ #3 \\ #4 \\ #5 \\ \end{array}\right]}\) \(\newcommand{\mattwo}[4]{\left[\begin{array}{rr}#1 \amp #2 \\ #3 \amp #4 \\ \end{array}\right]}\) \(\newcommand{\laspan}[1]{\text{Span}\{#1\}}\) \(\newcommand{\bcal}{\cal B}\) \(\newcommand{\ccal}{\cal C}\) \(\newcommand{\scal}{\cal S}\) \(\newcommand{\wcal}{\cal W}\) \(\newcommand{\ecal}{\cal E}\) \(\newcommand{\coords}[2]{\left\{#1\right\}_{#2}}\) \(\newcommand{\gray}[1]{\color{gray}{#1}}\) \(\newcommand{\lgray}[1]{\color{lightgray}{#1}}\) \(\newcommand{\rank}{\operatorname{rank}}\) \(\newcommand{\row}{\text{Row}}\) \(\newcommand{\col}{\text{Col}}\) \(\renewcommand{\row}{\text{Row}}\) \(\newcommand{\nul}{\text{Nul}}\) \(\newcommand{\var}{\text{Var}}\) \(\newcommand{\corr}{\text{corr}}\) \(\newcommand{\len}[1]{\left|#1\right|}\) \(\newcommand{\bbar}{\overline{\bvec}}\) \(\newcommand{\bhat}{\widehat{\bvec}}\) \(\newcommand{\bperp}{\bvec^\perp}\) \(\newcommand{\xhat}{\widehat{\xvec}}\) \(\newcommand{\vhat}{\widehat{\vvec}}\) \(\newcommand{\uhat}{\widehat{\uvec}}\) \(\newcommand{\what}{\widehat{\wvec}}\) \(\newcommand{\Sighat}{\widehat{\Sigma}}\) \(\newcommand{\lt}{<}\) \(\newcommand{\gt}{>}\) \(\newcommand{\amp}{&}\) \(\definecolor{fillinmathshade}{gray}{0.9}\)The Coverage Pyramid
Sequencing just means establishing an order to your coverage shots. You will want to shoot with editing in mind, and a variety of shot types ensures post-production latitude. One approach to sequencing is to go from a wide shot to a close-up, from context to intimacy:
- Establishing = Orientation - Grounds the audience in a place and orients them into the story world
- Long = Context - creates more context of where the subject is in relation to the environment
- Medium = Interaction - shows relationships and activities and keeps the story moving
- Close-up = Emotion/Detail - connects audience to subjects' feelings and specifics
This approach will take the viewer from a contextual understanding of the scene, through the long and establishing shots, to intimacy with the subject, through the medium and close-ups.
However, this can be reversed to start with an abstract close-up and use multiple shots to reveal the context of a scene, from abstract detail to orientation:
- Close-up = Emotion/Detail
- Medium = Interaction
- Long = Context
- Establishing = Orientation
You're free, however, to arrange the shots in any order that feels compelling. The approaches I suggest are options or starting points. You can edit your scene both ways and see which produces more emotional impact. You might also decide to break from these smooth shot-to-shot transitions and create a unique sequence.
High and Low Angle Shots
So far, we've been looking at shot distances. What follows is a handful of ideas to add interest and a whole new dimension, and help convey character to the audience in a more engaging way.
Framing Shots to Support the Content
Your audience already brings an interpretation of how your shots are arranged, which can be very useful when you're aiming to visually reinforce the themes of your sequence. For example, if you want your subject to seem more vulnerable, a high-angle shot can make them look smaller and as if they’re being watched (Figure \(\PageIndex{1}\)). Conversely, a low-angle shot can make your subject appear more heroic (Figure \(\PageIndex{2}\)). As you capture your B-roll, keep in mind how each shot can best support the message you're conveying in that part. The two shots below are from the same documentary, "Never Too Late," about one of the oldest women in California undergoing gender-affirming surgery. As your story evolves, your shots need to evolve to support it. This is why you see a variety of shots and angles in documentaries.


Low Angle Shots - Subject seems powerful
A low angle can be achieved by placing your camera on its back on the ground or by setting it on a stool or chair next to you while you stand. A low-angle shot is taken from below the subject, looking up at them. This shot is often used to make the person or object appear more powerful and dominant. The low-angle shot creates an illusion of height, making people or objects seem taller than they truly are.
Low-angle shots are known to create a sense of closeness in scenes where two characters are talking because they make them appear nearer on screen. This association with power has made them popular in action movies, especially in fight scenes between characters with a conflict.
High Angle Shots
The high camera angle offers great flexibility for filmmakers, who can use it for close-up, medium, or wide shots. It can create a visceral sense of danger, show that a character is weak, highlight details, or emphasize size and scope (Figure \(\PageIndex{3}\)). By depicting characters in relation to their surroundings, a high camera angle can evoke tension and danger. This is especially effective when highlighting great heights.

To perform a high-angle shot, use a tripod, apple box, or any object that can safely lift the camera slightly. If you’re shooting handheld or with a Steadicam, get creative by asking actors to sit or lie down to achieve an overhead perspective. Point the camera downward, using a higher angle than your subject, and shoot accordingly. Be sure to experiment with your high-angle shots: try the same scene with close, medium, and wide shots, and vary the elevation levels. Play with different angles, heights, and degrees of severity—for example, a softer angle might reduce the sense of urgency, while an eyeline shot can emphasize a character’s perspective. Consider what your story requires and how these shots will work together in the overall sequence. The possibilities are endless with this technique. Conduct multiple run-throughs and take time to perfect the look. Coverage is not merely technical insurance for editing.
Going Beyond Long, Medium, Close-up Shots
Think of a long-term goal of not just “getting enough shots,” but shaping viewer interpretation through visual perspective. In documentary filmmaking, coverage becomes a language of observation. Each shot choice communicates emotional distance, power relationships, intimacy, subjectivity, or authenticity.
That distinction helps students understand that documentary coverage is not just “getting enough shots,” but shaping viewer interpretation through visual perspective.
Insert Shot
An insert shot is a close shot of an object or detail connected to the scene. The two shots show one student showing another student where a camcorder menu item is (Figure \(\PageIndex{4}\)). On the insert shot (Figure \(\PageIndex{5}\)), we see what the student sees. Insert shots are especially useful in documentaries because they help cover interview edits while adding thematic detail.


Cutaway Shot
The cutaway cuts away from the primary action to something related nearby. These shots include audience reactions during a speech, someone listening during an interview, or environmental details during narration. Cutaways help smooth edits and create pacing flexibility in nonfiction storytelling.
Over-the-Shoulder Shot (OTS)
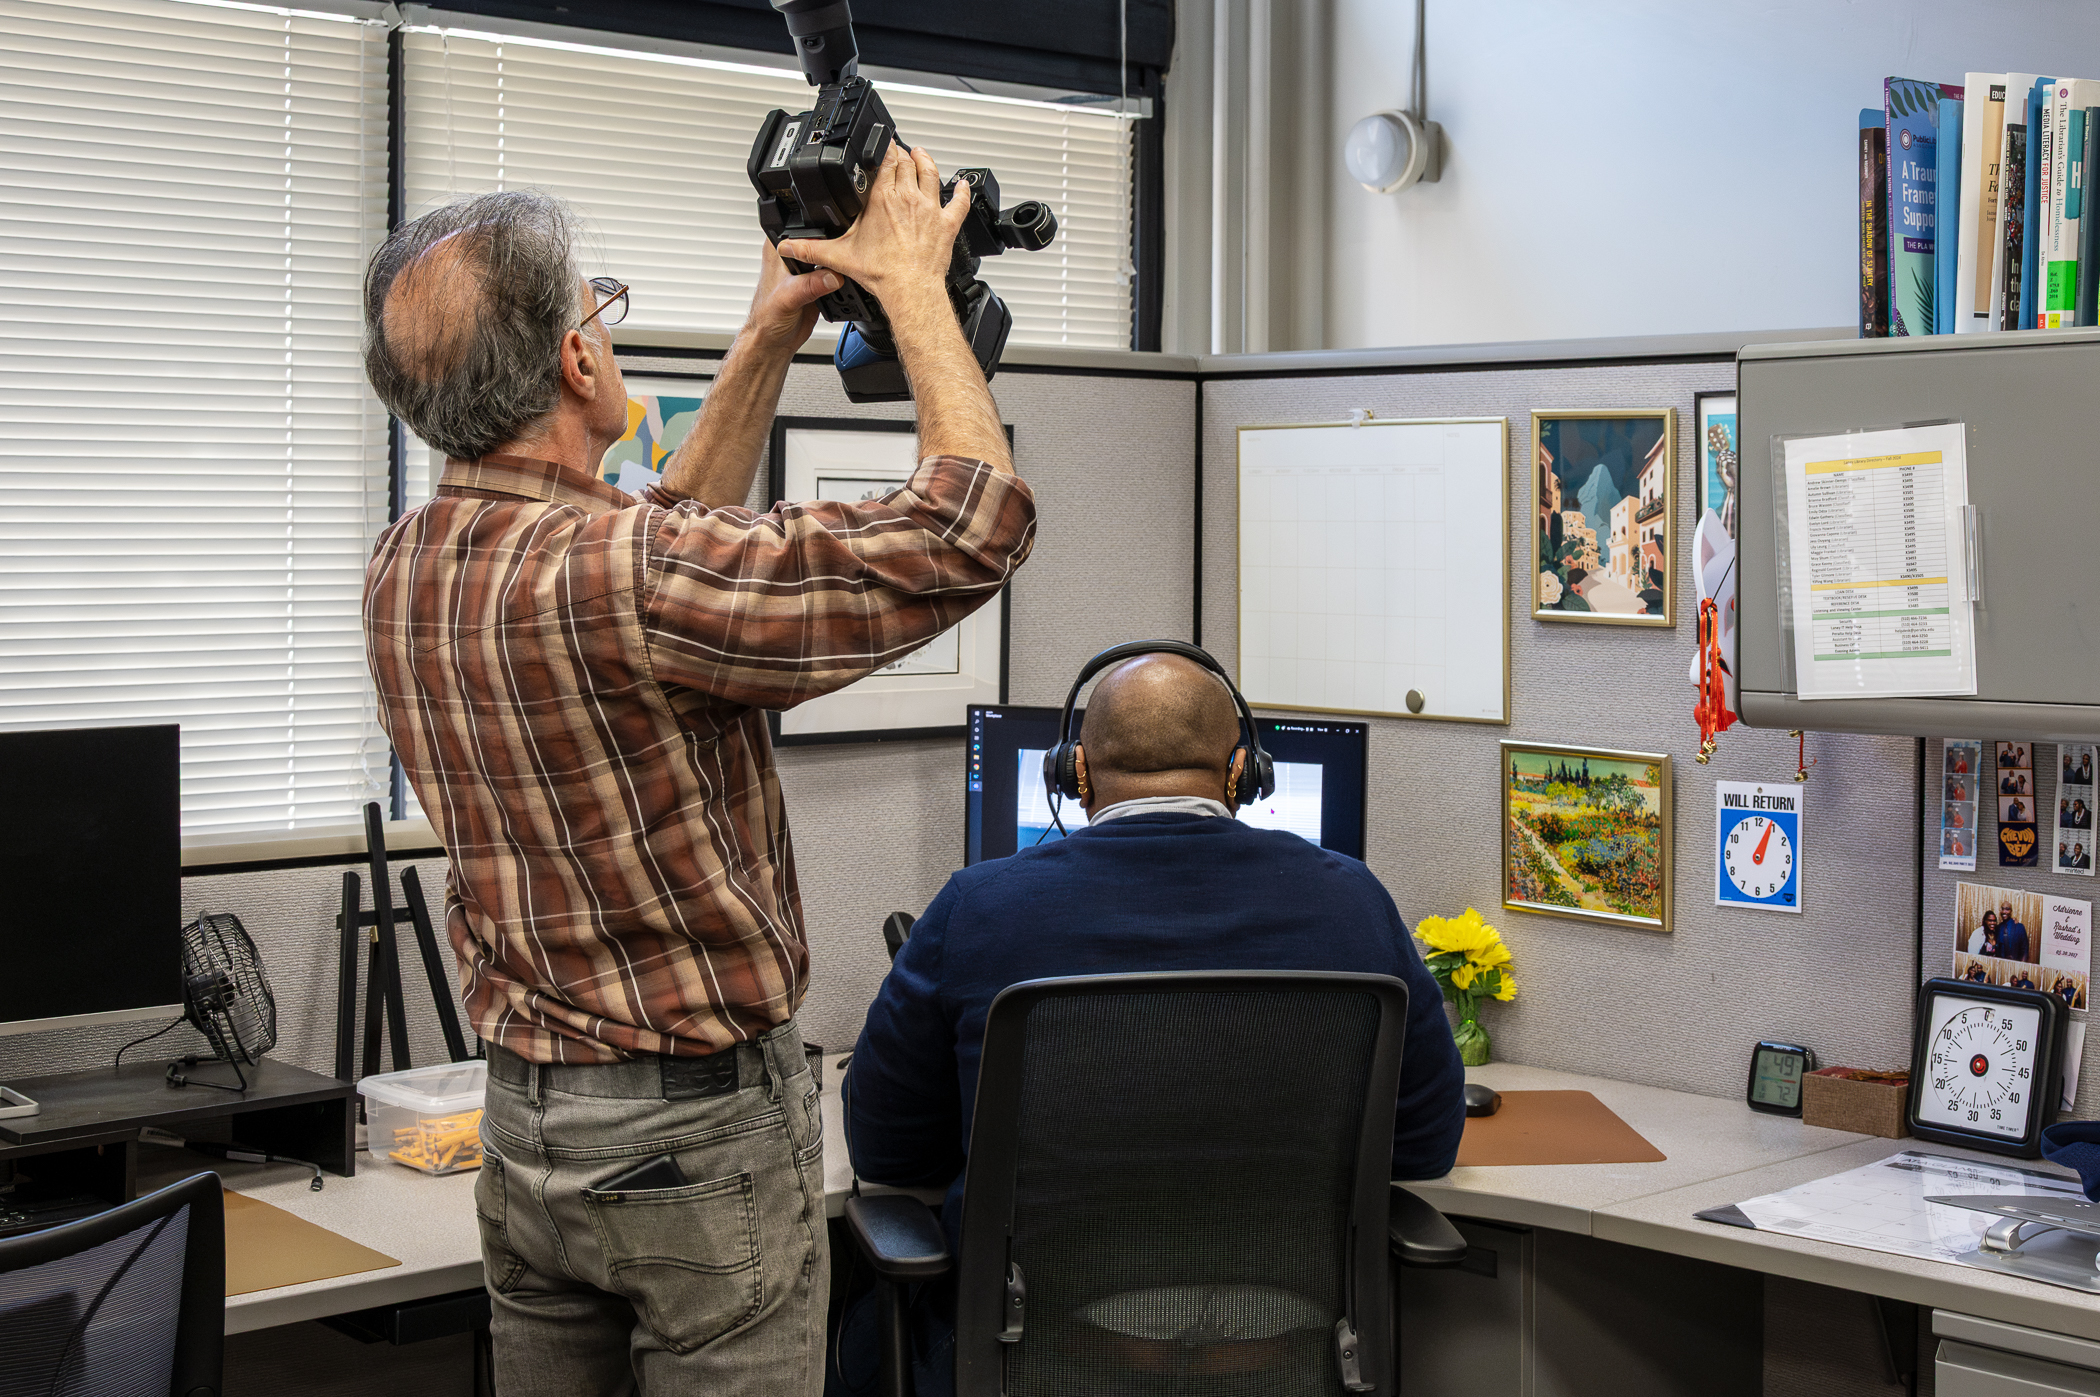
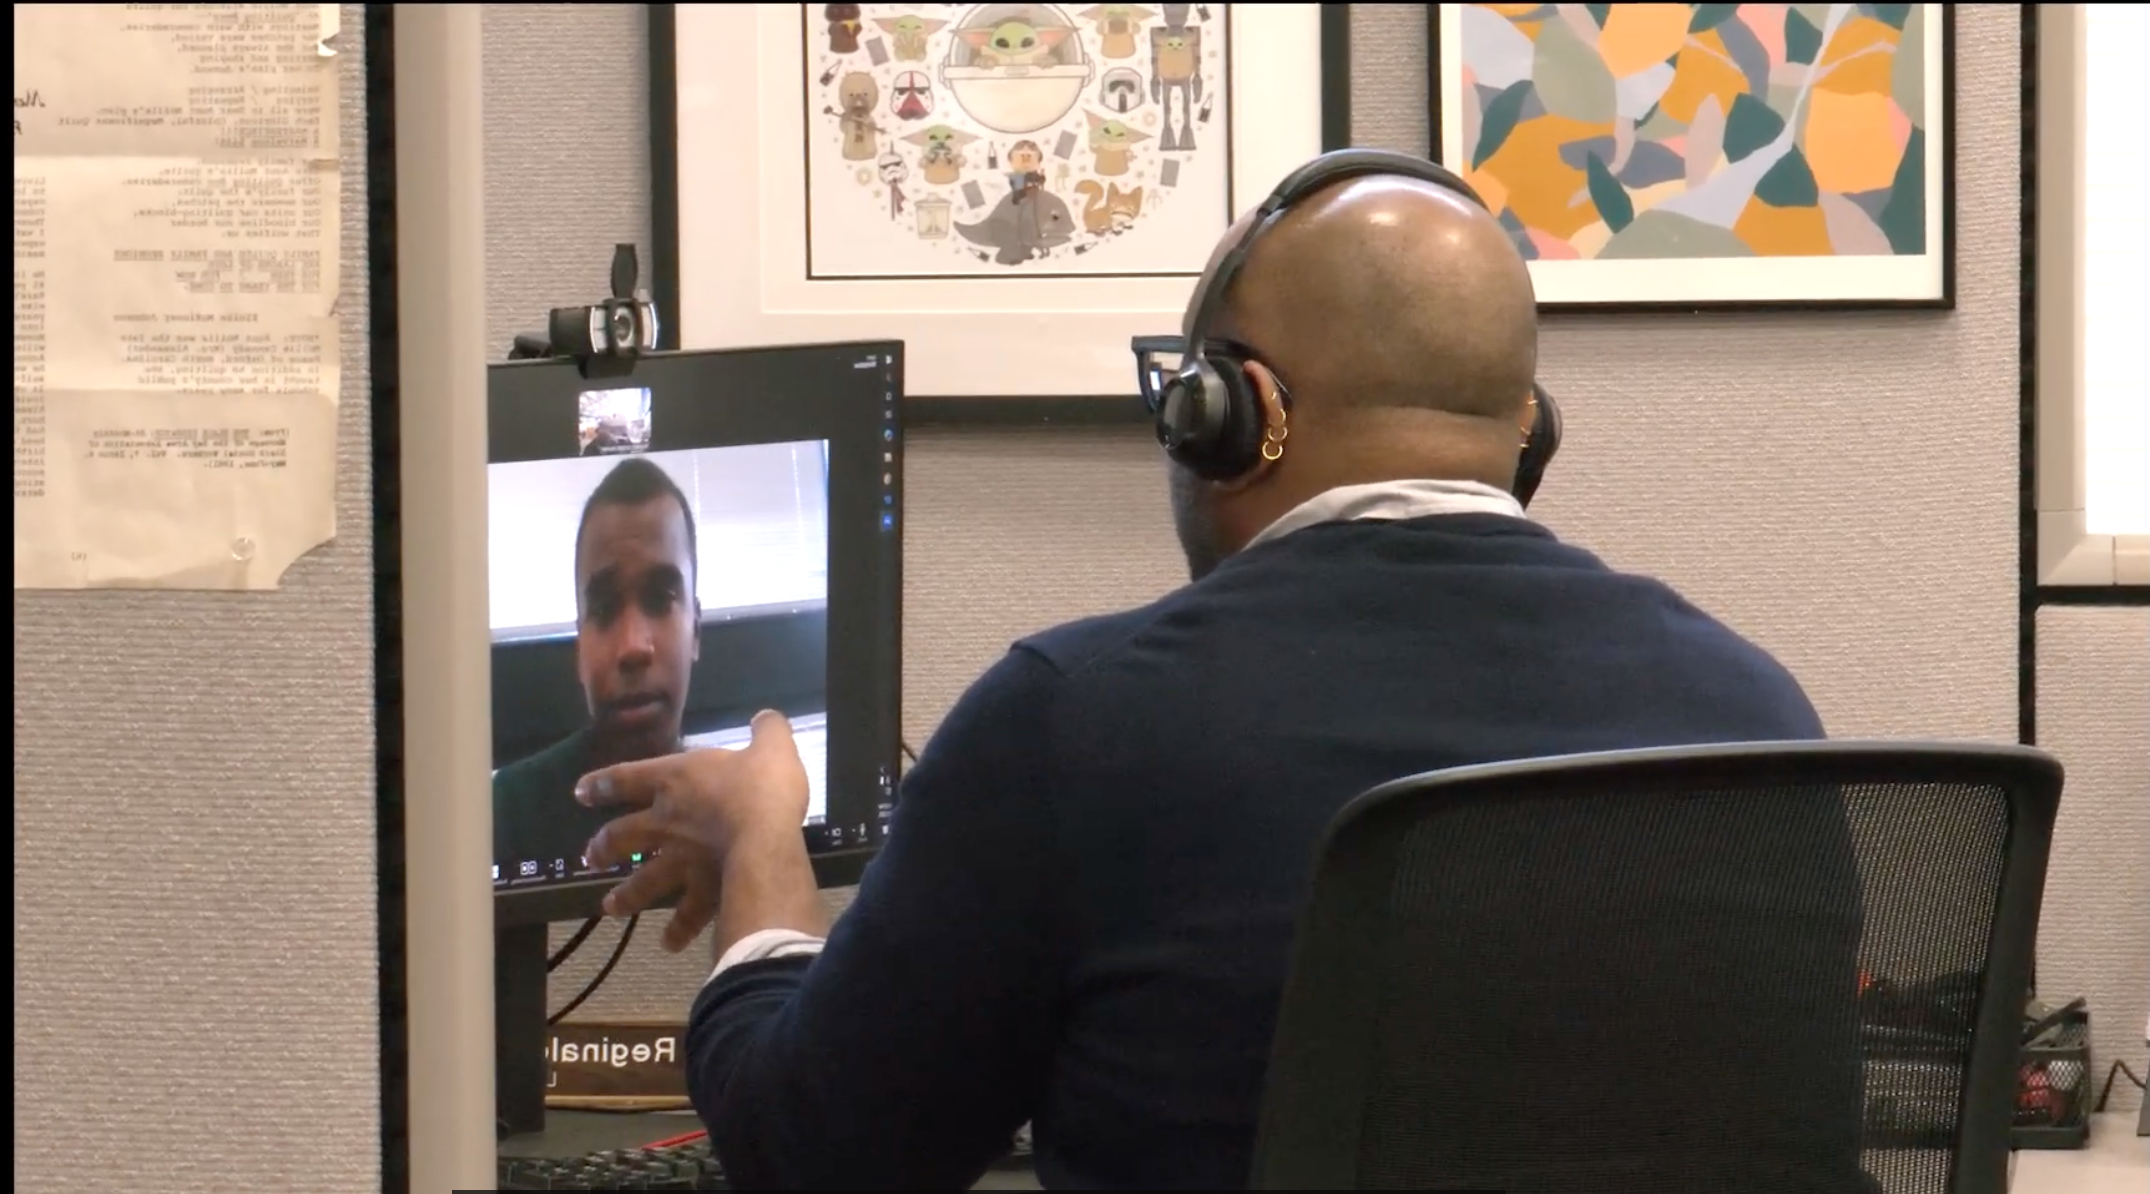
An over-the-shoulder shot frames a subject from behind another person’s shoulder, creating perspective and a sense of spatial connection. Observational conversations, interviews in progress, or vérité scenes where viewers feel included in the interaction. In Figure \(\PageIndex{6}\), an OTS shot connects the man's shoulder to the computer screen. We could have used an insert shot here, but revealing part of the man in the shot connects him to the screen.
Point-of-View Shot (POV)
A Point-of-View Shot (POV) offers a firsthand look into what the subject experiences, making us feel like we're right there with them. Imagine walking through a protest, driving a car, or wearing a camera—these scenes draw us closer to their genuine perspective. The camera acts like the subject's eyes, showing us exactly what they see. It’s a great little tool for adding variety to your scenes, especially when you want to switch things up from the usual LS, MS, and CU shots. Just remember not to overuse it, as staying too long in POV can lessen intimacy, restrict the view, and make the scene feel less personal.
Tracking / Following Shot
The camera physically moves with a subject. Whether it's walking interviews, following a character through a workspace, or capturing observational vérité, tracking shots help us feel more connected to and immersed in their world. This two-minute feature uses the standard sit-down interview, with a variety of tracking techniques for the b-roll. The camera moves in different ways, from behind, in front, and from the side to show. For the most part, the audience feels more connected to the subject because it feels as if we are walking with her around the Laney College campus in Oakland, California.
Rack Focus
A rack focus shifts between foreground and background subjects within the same shot. Directing viewer attention naturally during interviews or observational scenes. Rack focus is a change in the focus of the camera. This requires the manipulation of the depth of field. If person A is in focus and closer to the camera, person B can be placed further away from the camera and will appear out of focus. When you change the focus from person A to person B, that is a rack focus (See Figure \(\PageIndex{7}\)). After this movement, person B will be in focus while person A is out of focus. Any time you change which subjects are in focus it is called a rack focus.

Reflection Shot
Uses mirrors, windows, water, or reflective surfaces to create layered meaning. These shots can visually reinforce introspection, memory, duality, or emotional complexity. The effect can be a poetic rendering of the scene (Figure \(\PageIndex{8}\)) .
