1.11: Portraiture
- Page ID
- 67701
\( \newcommand{\vecs}[1]{\overset { \scriptstyle \rightharpoonup} {\mathbf{#1}} } \)
\( \newcommand{\vecd}[1]{\overset{-\!-\!\rightharpoonup}{\vphantom{a}\smash {#1}}} \)
\( \newcommand{\dsum}{\displaystyle\sum\limits} \)
\( \newcommand{\dint}{\displaystyle\int\limits} \)
\( \newcommand{\dlim}{\displaystyle\lim\limits} \)
\( \newcommand{\id}{\mathrm{id}}\) \( \newcommand{\Span}{\mathrm{span}}\)
( \newcommand{\kernel}{\mathrm{null}\,}\) \( \newcommand{\range}{\mathrm{range}\,}\)
\( \newcommand{\RealPart}{\mathrm{Re}}\) \( \newcommand{\ImaginaryPart}{\mathrm{Im}}\)
\( \newcommand{\Argument}{\mathrm{Arg}}\) \( \newcommand{\norm}[1]{\| #1 \|}\)
\( \newcommand{\inner}[2]{\langle #1, #2 \rangle}\)
\( \newcommand{\Span}{\mathrm{span}}\)
\( \newcommand{\id}{\mathrm{id}}\)
\( \newcommand{\Span}{\mathrm{span}}\)
\( \newcommand{\kernel}{\mathrm{null}\,}\)
\( \newcommand{\range}{\mathrm{range}\,}\)
\( \newcommand{\RealPart}{\mathrm{Re}}\)
\( \newcommand{\ImaginaryPart}{\mathrm{Im}}\)
\( \newcommand{\Argument}{\mathrm{Arg}}\)
\( \newcommand{\norm}[1]{\| #1 \|}\)
\( \newcommand{\inner}[2]{\langle #1, #2 \rangle}\)
\( \newcommand{\Span}{\mathrm{span}}\) \( \newcommand{\AA}{\unicode[.8,0]{x212B}}\)
\( \newcommand{\vectorA}[1]{\vec{#1}} % arrow\)
\( \newcommand{\vectorAt}[1]{\vec{\text{#1}}} % arrow\)
\( \newcommand{\vectorB}[1]{\overset { \scriptstyle \rightharpoonup} {\mathbf{#1}} } \)
\( \newcommand{\vectorC}[1]{\textbf{#1}} \)
\( \newcommand{\vectorD}[1]{\overrightarrow{#1}} \)
\( \newcommand{\vectorDt}[1]{\overrightarrow{\text{#1}}} \)
\( \newcommand{\vectE}[1]{\overset{-\!-\!\rightharpoonup}{\vphantom{a}\smash{\mathbf {#1}}}} \)
\( \newcommand{\vecs}[1]{\overset { \scriptstyle \rightharpoonup} {\mathbf{#1}} } \)
\(\newcommand{\longvect}{\overrightarrow}\)
\( \newcommand{\vecd}[1]{\overset{-\!-\!\rightharpoonup}{\vphantom{a}\smash {#1}}} \)
\(\newcommand{\avec}{\mathbf a}\) \(\newcommand{\bvec}{\mathbf b}\) \(\newcommand{\cvec}{\mathbf c}\) \(\newcommand{\dvec}{\mathbf d}\) \(\newcommand{\dtil}{\widetilde{\mathbf d}}\) \(\newcommand{\evec}{\mathbf e}\) \(\newcommand{\fvec}{\mathbf f}\) \(\newcommand{\nvec}{\mathbf n}\) \(\newcommand{\pvec}{\mathbf p}\) \(\newcommand{\qvec}{\mathbf q}\) \(\newcommand{\svec}{\mathbf s}\) \(\newcommand{\tvec}{\mathbf t}\) \(\newcommand{\uvec}{\mathbf u}\) \(\newcommand{\vvec}{\mathbf v}\) \(\newcommand{\wvec}{\mathbf w}\) \(\newcommand{\xvec}{\mathbf x}\) \(\newcommand{\yvec}{\mathbf y}\) \(\newcommand{\zvec}{\mathbf z}\) \(\newcommand{\rvec}{\mathbf r}\) \(\newcommand{\mvec}{\mathbf m}\) \(\newcommand{\zerovec}{\mathbf 0}\) \(\newcommand{\onevec}{\mathbf 1}\) \(\newcommand{\real}{\mathbb R}\) \(\newcommand{\twovec}[2]{\left[\begin{array}{r}#1 \\ #2 \end{array}\right]}\) \(\newcommand{\ctwovec}[2]{\left[\begin{array}{c}#1 \\ #2 \end{array}\right]}\) \(\newcommand{\threevec}[3]{\left[\begin{array}{r}#1 \\ #2 \\ #3 \end{array}\right]}\) \(\newcommand{\cthreevec}[3]{\left[\begin{array}{c}#1 \\ #2 \\ #3 \end{array}\right]}\) \(\newcommand{\fourvec}[4]{\left[\begin{array}{r}#1 \\ #2 \\ #3 \\ #4 \end{array}\right]}\) \(\newcommand{\cfourvec}[4]{\left[\begin{array}{c}#1 \\ #2 \\ #3 \\ #4 \end{array}\right]}\) \(\newcommand{\fivevec}[5]{\left[\begin{array}{r}#1 \\ #2 \\ #3 \\ #4 \\ #5 \\ \end{array}\right]}\) \(\newcommand{\cfivevec}[5]{\left[\begin{array}{c}#1 \\ #2 \\ #3 \\ #4 \\ #5 \\ \end{array}\right]}\) \(\newcommand{\mattwo}[4]{\left[\begin{array}{rr}#1 \amp #2 \\ #3 \amp #4 \\ \end{array}\right]}\) \(\newcommand{\laspan}[1]{\text{Span}\{#1\}}\) \(\newcommand{\bcal}{\cal B}\) \(\newcommand{\ccal}{\cal C}\) \(\newcommand{\scal}{\cal S}\) \(\newcommand{\wcal}{\cal W}\) \(\newcommand{\ecal}{\cal E}\) \(\newcommand{\coords}[2]{\left\{#1\right\}_{#2}}\) \(\newcommand{\gray}[1]{\color{gray}{#1}}\) \(\newcommand{\lgray}[1]{\color{lightgray}{#1}}\) \(\newcommand{\rank}{\operatorname{rank}}\) \(\newcommand{\row}{\text{Row}}\) \(\newcommand{\col}{\text{Col}}\) \(\renewcommand{\row}{\text{Row}}\) \(\newcommand{\nul}{\text{Nul}}\) \(\newcommand{\var}{\text{Var}}\) \(\newcommand{\corr}{\text{corr}}\) \(\newcommand{\len}[1]{\left|#1\right|}\) \(\newcommand{\bbar}{\overline{\bvec}}\) \(\newcommand{\bhat}{\widehat{\bvec}}\) \(\newcommand{\bperp}{\bvec^\perp}\) \(\newcommand{\xhat}{\widehat{\xvec}}\) \(\newcommand{\vhat}{\widehat{\vvec}}\) \(\newcommand{\uhat}{\widehat{\uvec}}\) \(\newcommand{\what}{\widehat{\wvec}}\) \(\newcommand{\Sighat}{\widehat{\Sigma}}\) \(\newcommand{\lt}{<}\) \(\newcommand{\gt}{>}\) \(\newcommand{\amp}{&}\) \(\definecolor{fillinmathshade}{gray}{0.9}\)Portraiture
https://www.tate.org.uk/art/art-terms/p/portrait
Art performs many functions. It can celebrate beauty, represent power and influence, document history, make us feel a variety of emotions, and inform us. Humans are the primary subjects in art, and portraits are a large part of that body of work. Prior to the invention of photography in the early 1800s, portraits of people were commissioned and created as drawings, paintings, and sculpture. The quality of the portrait was dependent on the skills of the artist, available materials, and the artist/patron interaction. Stylized portraits were often created in Ancient civilizations and often represented the power or status of the individual. By the height of the Roman Empire, realistic sculptural portrait busts were created showing every wart, scar, and wrinkle of the Republican patrons.
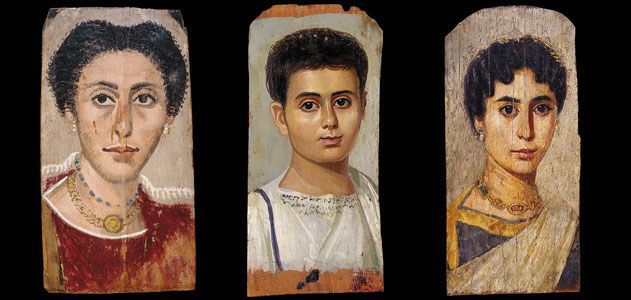
Paintings using the encaustic method (wax-based medium) on Egyptian caskets during the time of Roman governance are well-preserved and are quite beautiful portraits. The quality of both drawn and painted portraits will mirror the centuries-long struggle for stability after the gradual decline and fall of the Roman Empire. When people are struggling to survive, as Europeans were during the early Middle Ages, creating monumental art may not be a priority or even possible.
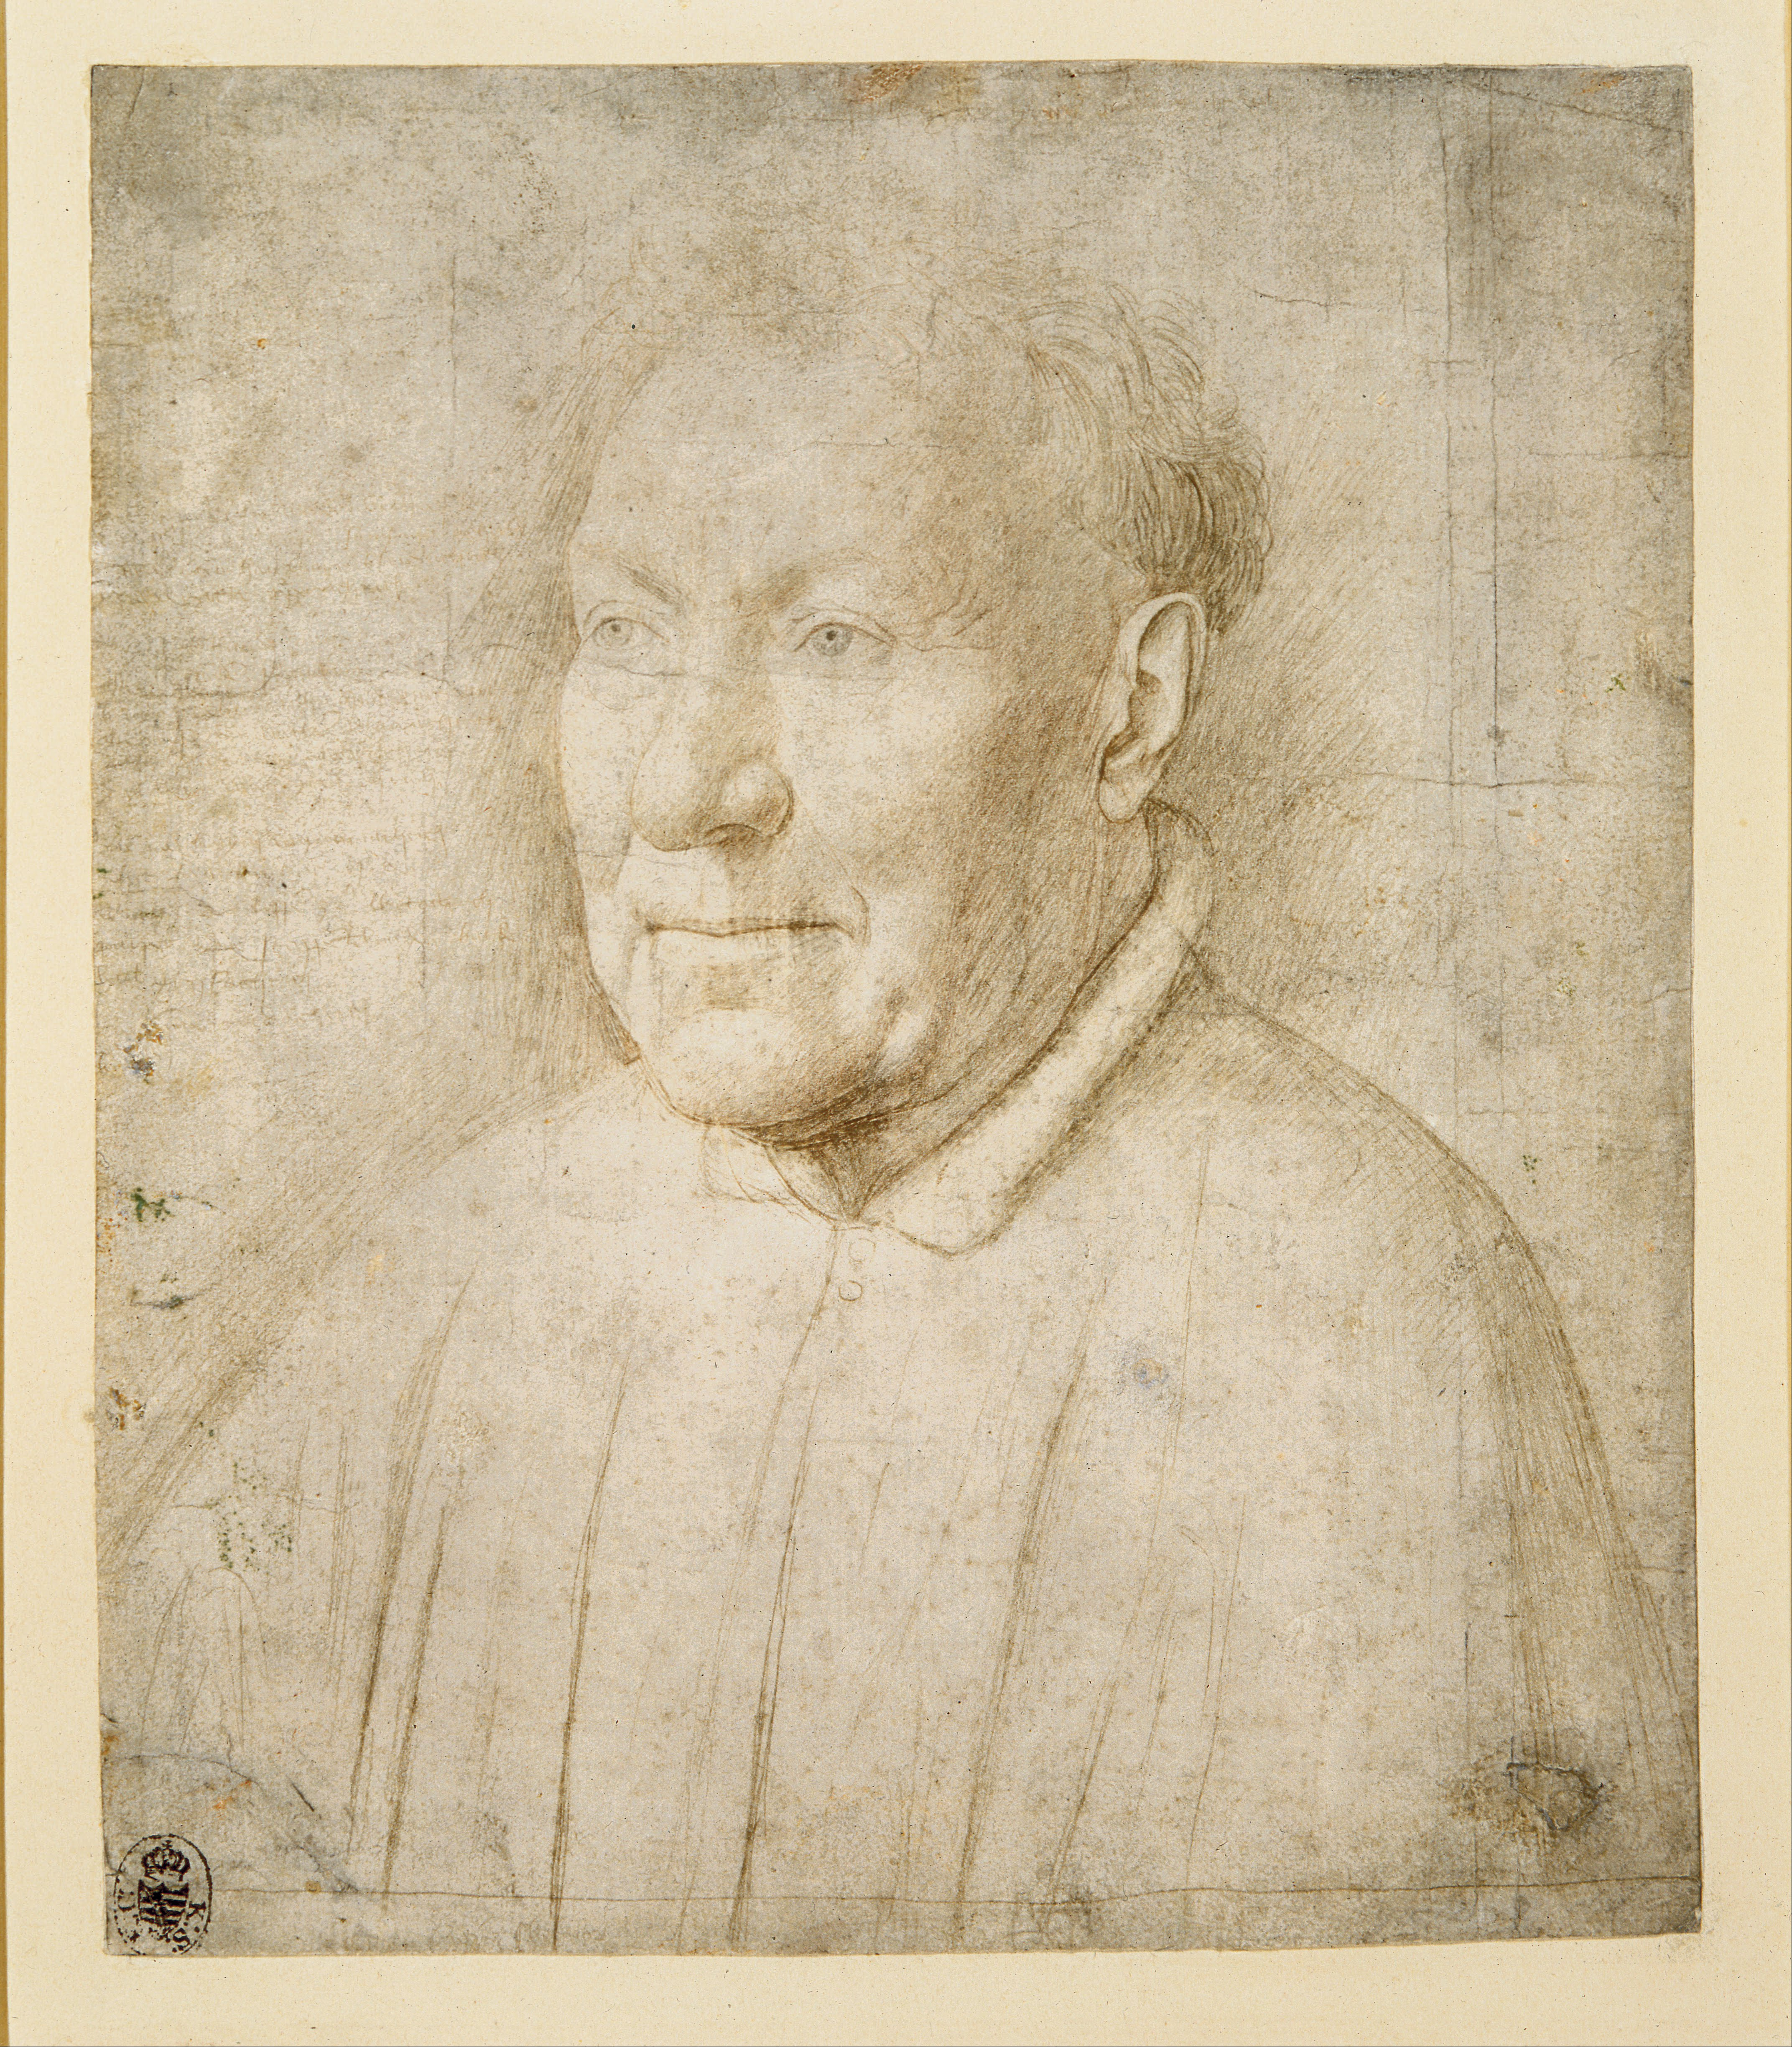
Jan van Eyck (Belgium, 1390 - 1441). Sitter: Cardinal Albergati. (silverpoint). Date: 1431
https://www.metmuseum.org/toah/hd/eyck/hd_eyck.htm
However, by the end of the Gothic Period, we see great portraiture emerging by Northern artists such as Robert Campin, Rogier van de Weyden, and Jan van Eyck. This was in the 1400s before the ideas and influence of the emerging Italian Renaissance were realized in Northern Europe.
https://www.nationalgallery.org.uk/paintings/jan-van-eyck-portrait-of-a-man-self-portrait
https://www.metmuseum.org/art/collection/search/470304
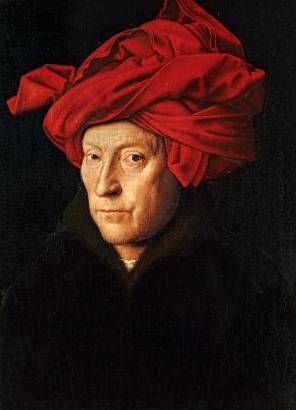

Man in a Red Turban, Jan van Eyck Portrait of a Woman, Rogier van de Weyden
Renaissance
Albecht Dürer twice traveled to Italy and experienced first-hand the Italian Renaissance. He brought back to Germany inspiration and new ideas from his travels, but also had a profound effect on many Italian artists. He is considered a fine artist, illustrator, accomplished printmaker, and a graphic designed as well as one of the first German Renaissance artists. In his self portrait he shows himself as a serious artist who merges both Northern Realism portrait techniques of Van Eyck, with its extreme attention to detail, dark backgrounds, and clarity, with a compositional style similar to that of da Vinci. Like da Vinci's Mona Lisa painted just several years later, parts of the torso, arm, and hand are included and the overall composition is in the shape of a pyramid or triangle, which is another favorite compositional device used by da Vinci.
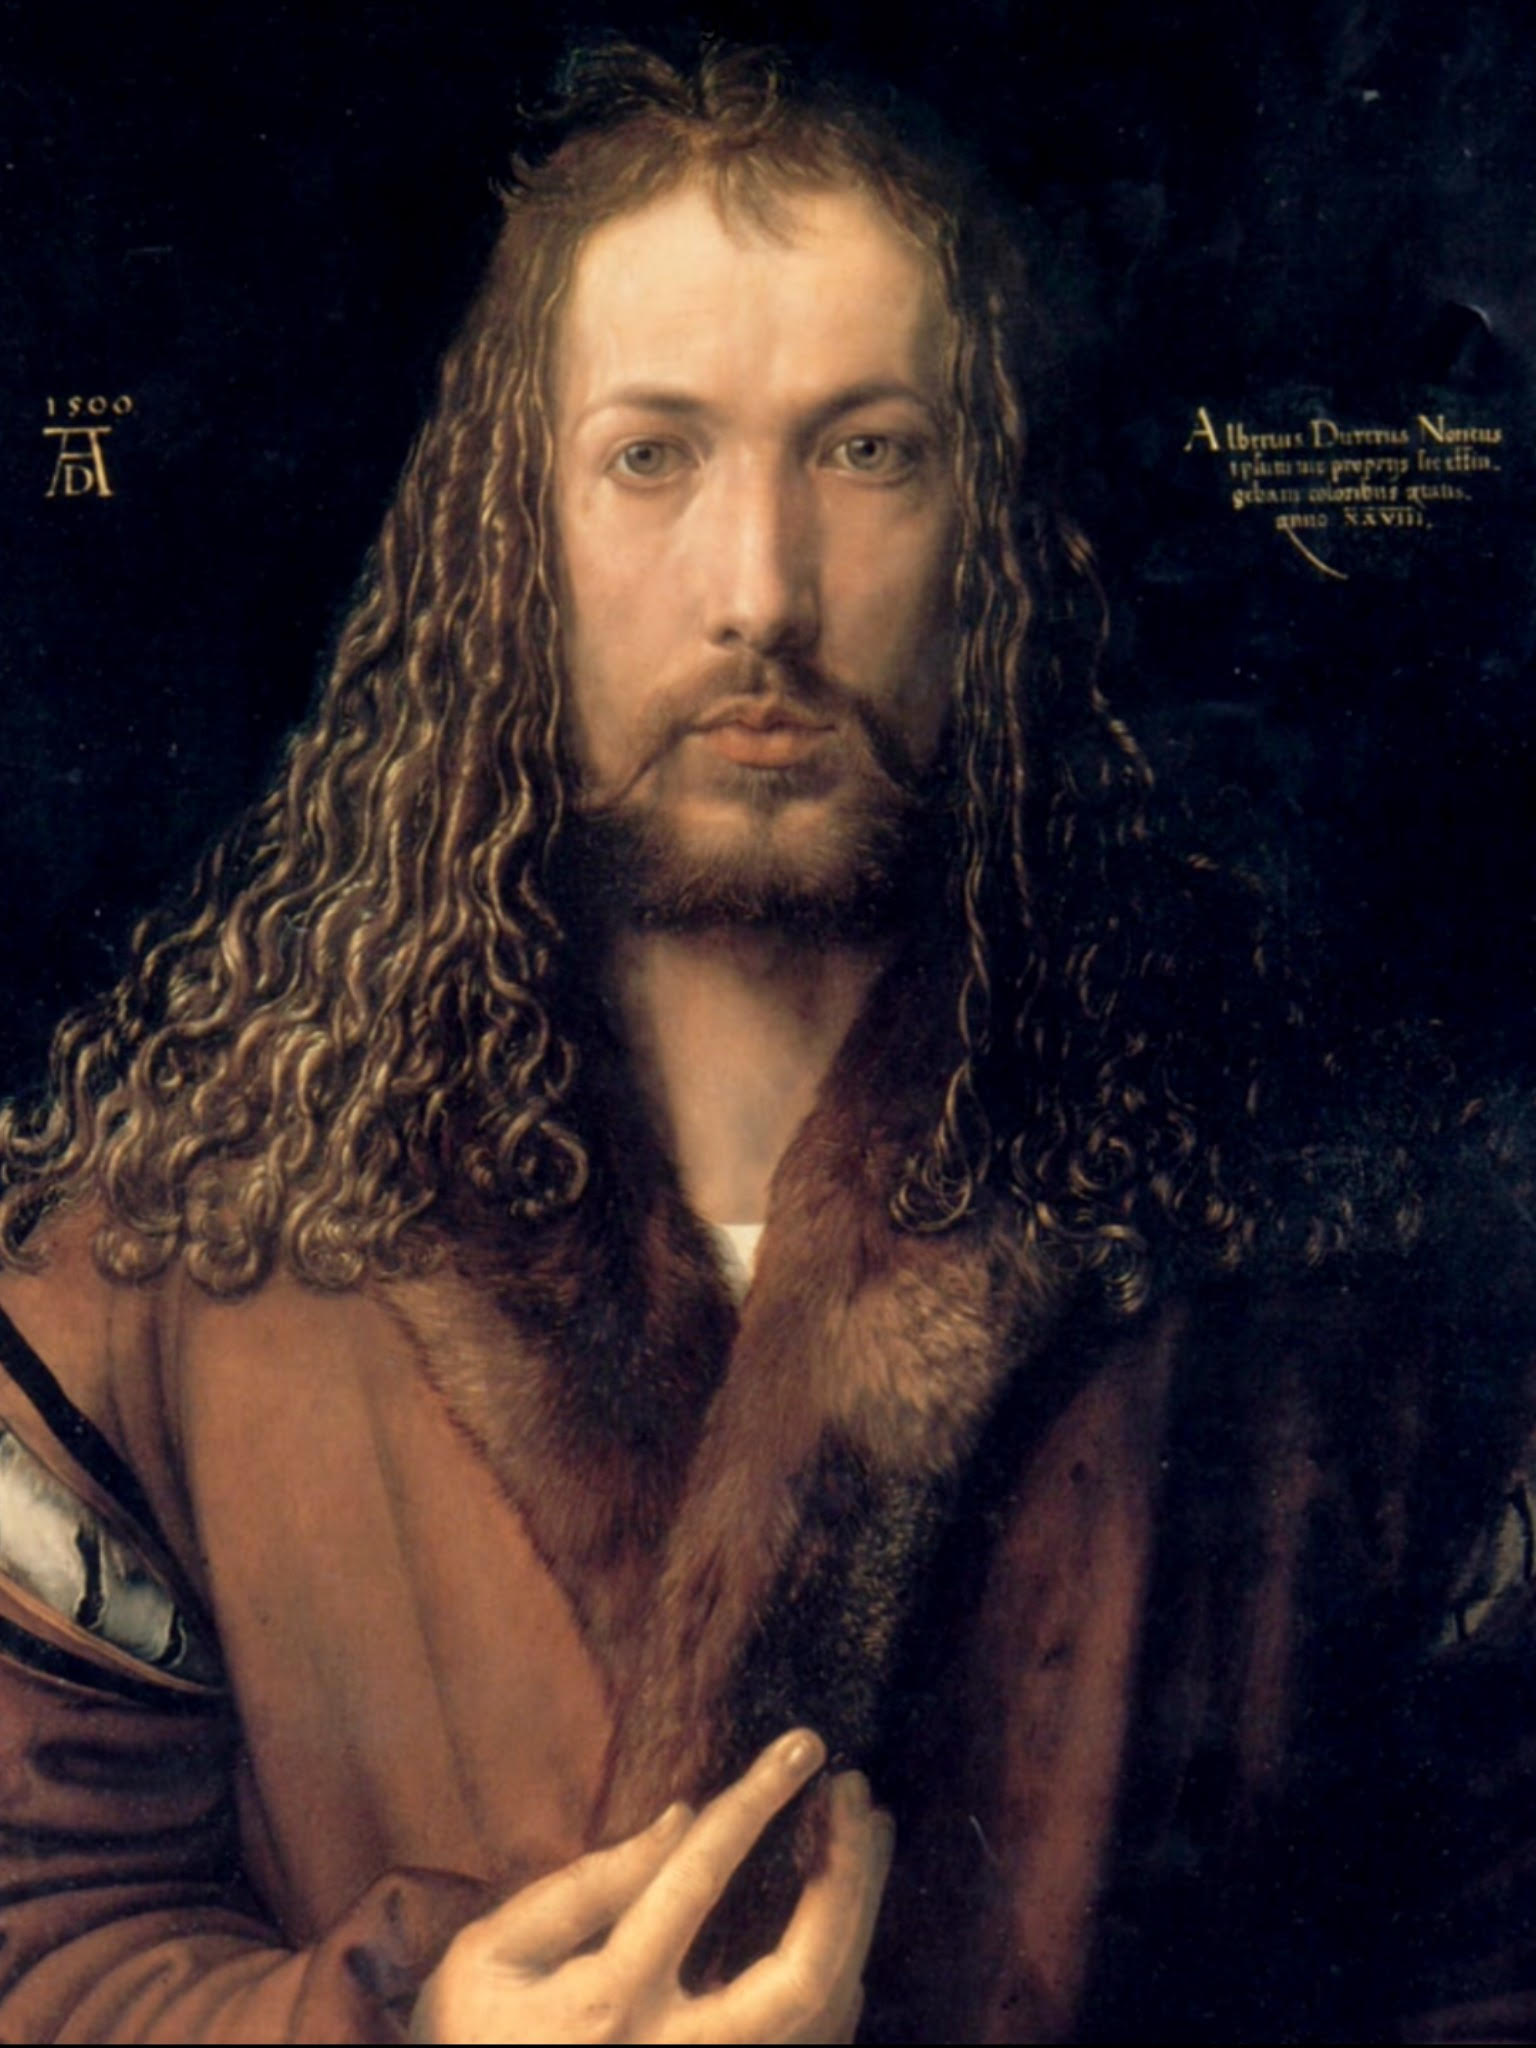
Self Portrait, 1500, Albrecht Dürer
https://lutheranreformation.org/history/albrecht-durer-man-behind-self-portrait/
https://www.nytimes.com/2007/05/18/arts/18iht-conway.1.5769292.html
The Italian Renaissance spanning over one hundred years saw several larger-than-life artists creating and advancing painting, sculpture, and architecture forward. With his famous painting, Mona Lisa, Leonardo da Vinci put his creative genius to work in a most magical way. He added a landscape of great depth and interest, turned her shoulders to her right, rotated her head to her left, and included her arms and folded hands. Revolutionary. That alone would not be enough if it wasn't for his use of sfumato, or haziness that envelopes the painting. Brushstrokes are not visible and his painting technique, which legend has it made Verrocchio put away his paint brushes for good, is still a mystery.
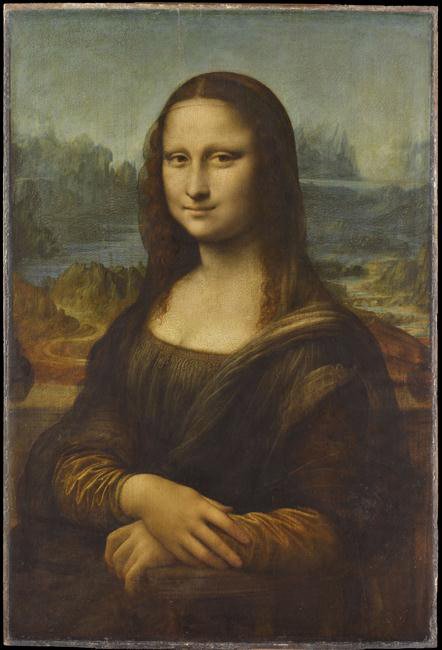
Mona Lisa – Portrait of Lisa Gherardini, wife of Francesco del Giocondo, 1506
Baroque
In Amsterdam, Rembrandt became a prominent portraitist, attracting attention with dramatic compositions like The Anatomy Lesson of Dr. Tulp (1632; Mauritshuis, The Hague). In securing commissions, the artist was assisted by the Mennonite art dealer Hendrick Uylenburgh, whose cousin Saskia married Rembrandt in 1634. The Mennonites advocated personal interpretation of scripture, which probably influenced Rembrandt’s subjective and often moving treatment of biblical subjects. The artist became highly successful in the 1630s, when he had several pupils and assistants, started his own art collection, and lived the life of a cultivated gentleman, especially in the impressive residence he purchased in 1639 (now the Rembrandt House Museum). Rembrandt exudes confidence and urbanity in his Self-Portrait of 1640 (National Gallery, London), which was modeled upon courtly portraits by Raphael and Titian. These artists probably also inspired his Amsterdam signature, “Rembrandt” (dropping “Van Rijn”).
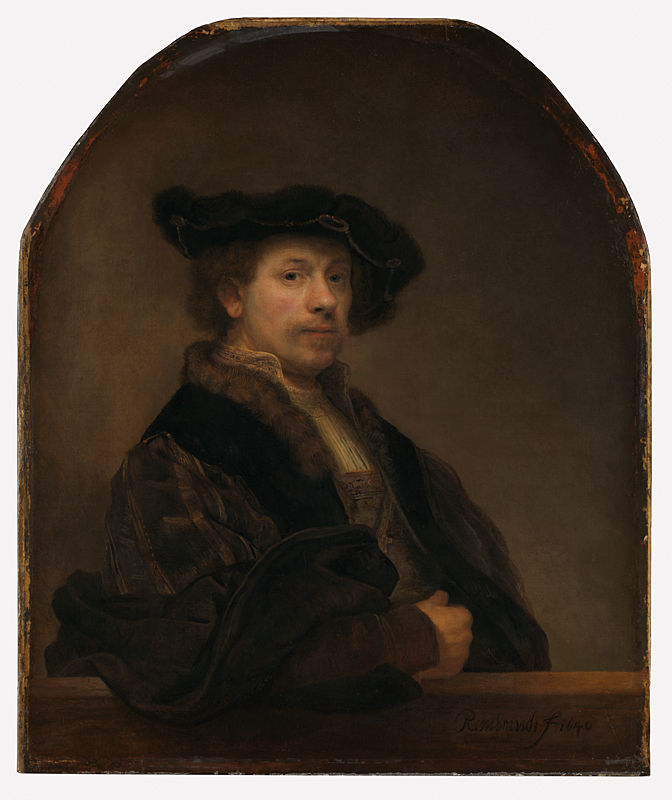
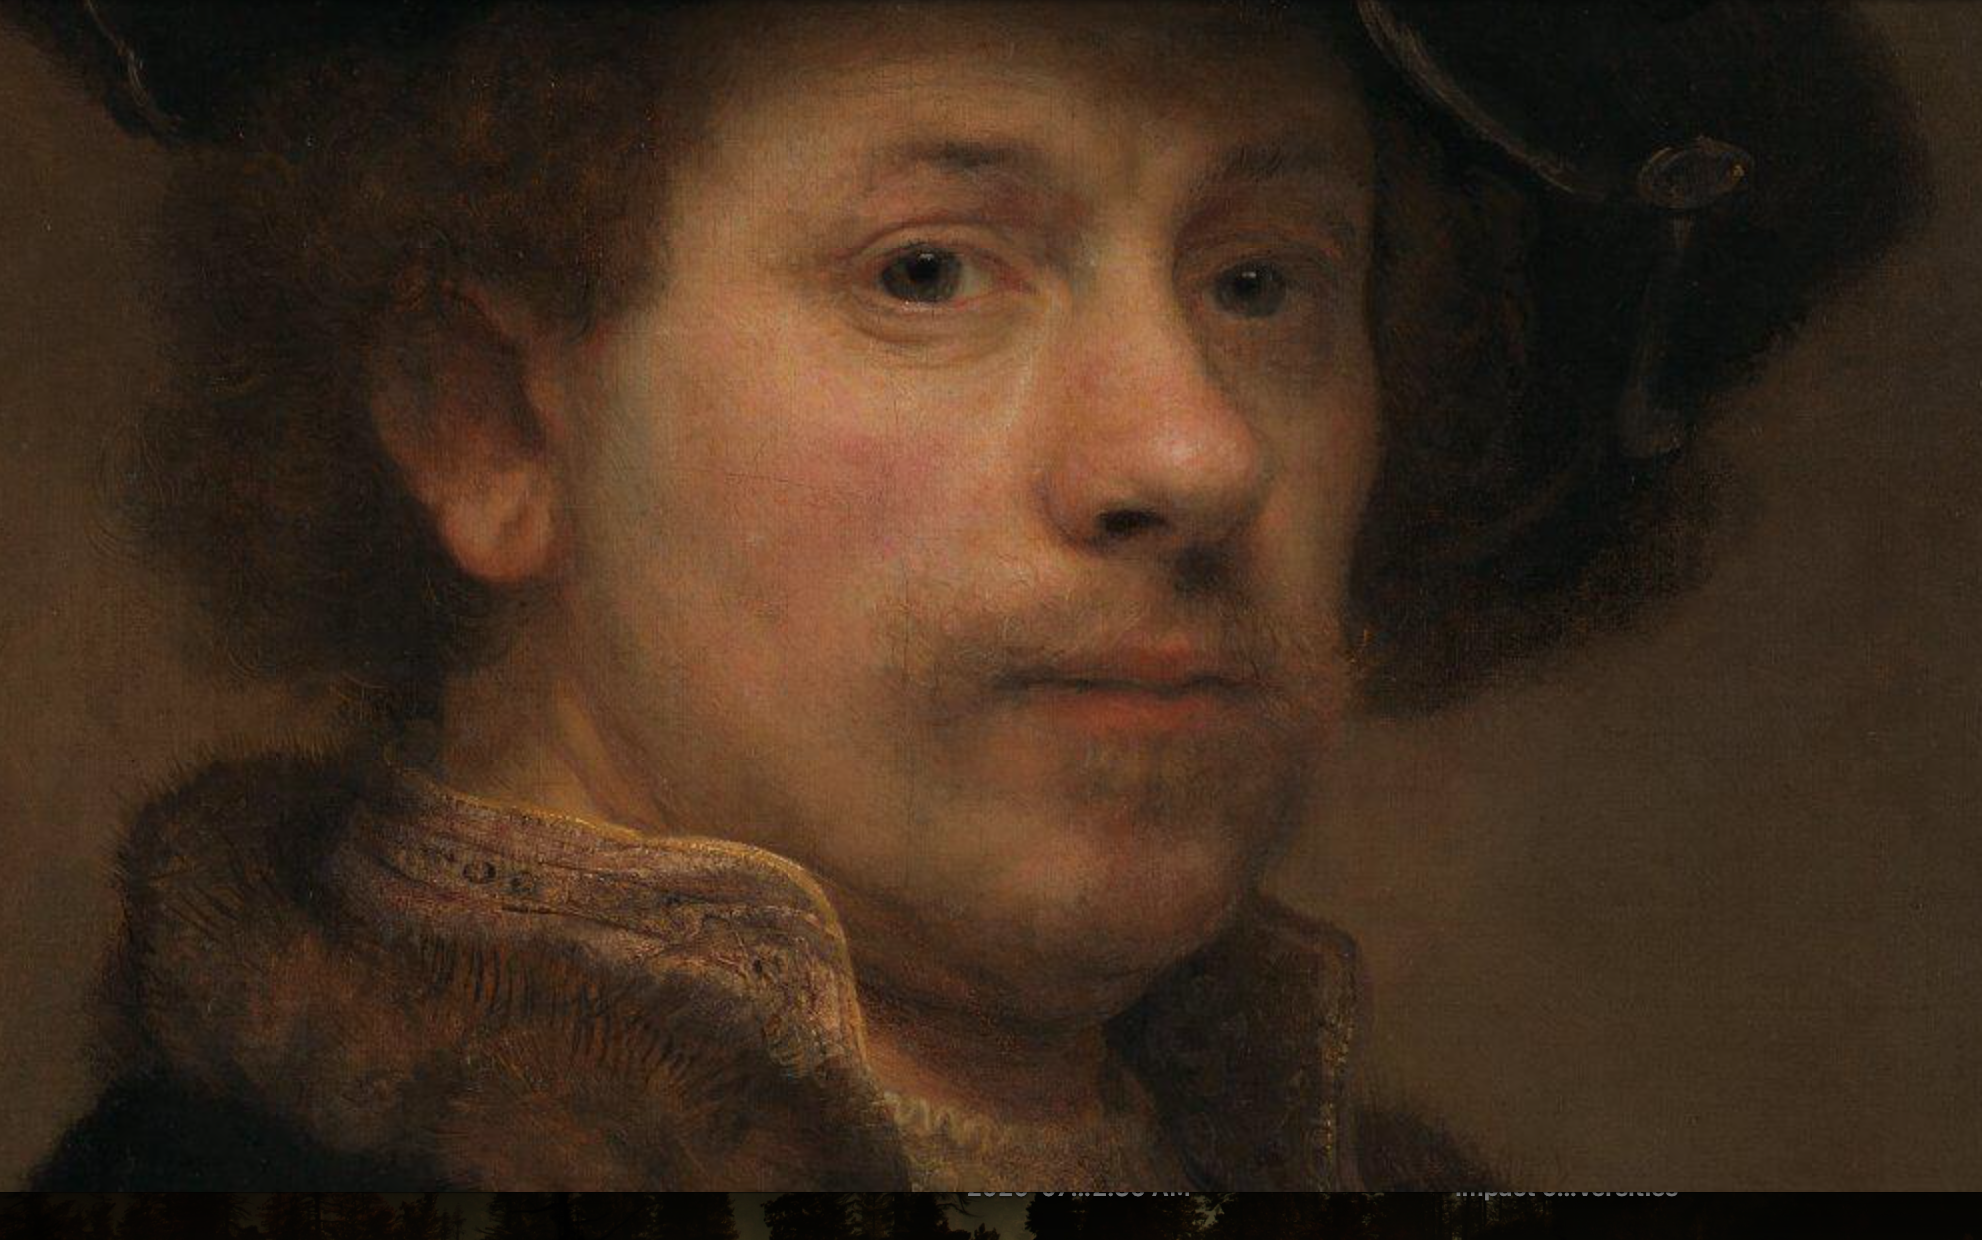
Self Portrait, 1640
https://www.nationalgallery.org.uk/paintings/rembrandt-self-portrait-at-the-age-of-34
Diego Velázquez, with a letter of introduction for the pope from the Spanish king, initially was denied audience with the pope. With time on his hands, he painted his assistant and companion, Juan de Pareja. The painting gained attention in Rome for its originality. Velásquez uses the chiaroscuro technique developed by da Vinci, as well as a composition similar to the Mona Lisa by including the torso, arm, and turned shoulders. However, what is new is the blurred painted background. When we focus on a person's face, the background cannot simultaneously be seen in sharp detail. Velázquez paints what the human eyes see naturally, and portraiture, as an art form, moves forward once again.
Velázquez most likely executed this portrait of his enslaved assistant in Rome during the early months of 1650. According to one of the artist's biographers, when this landmark of western portraiture was first put on display it "received such universal acclaim that in the opinion of all the painters of different nations everything else seemed like painting but this alone like truth." Months after depicting his sitter in such a proud and confident way, Velázquez signed a contract of manumission that would liberate him from bondage in 1654. From that point forward, Juan de Pareja worked as an independent painter in Madrid, producing portraits and large-scale religious subjects.
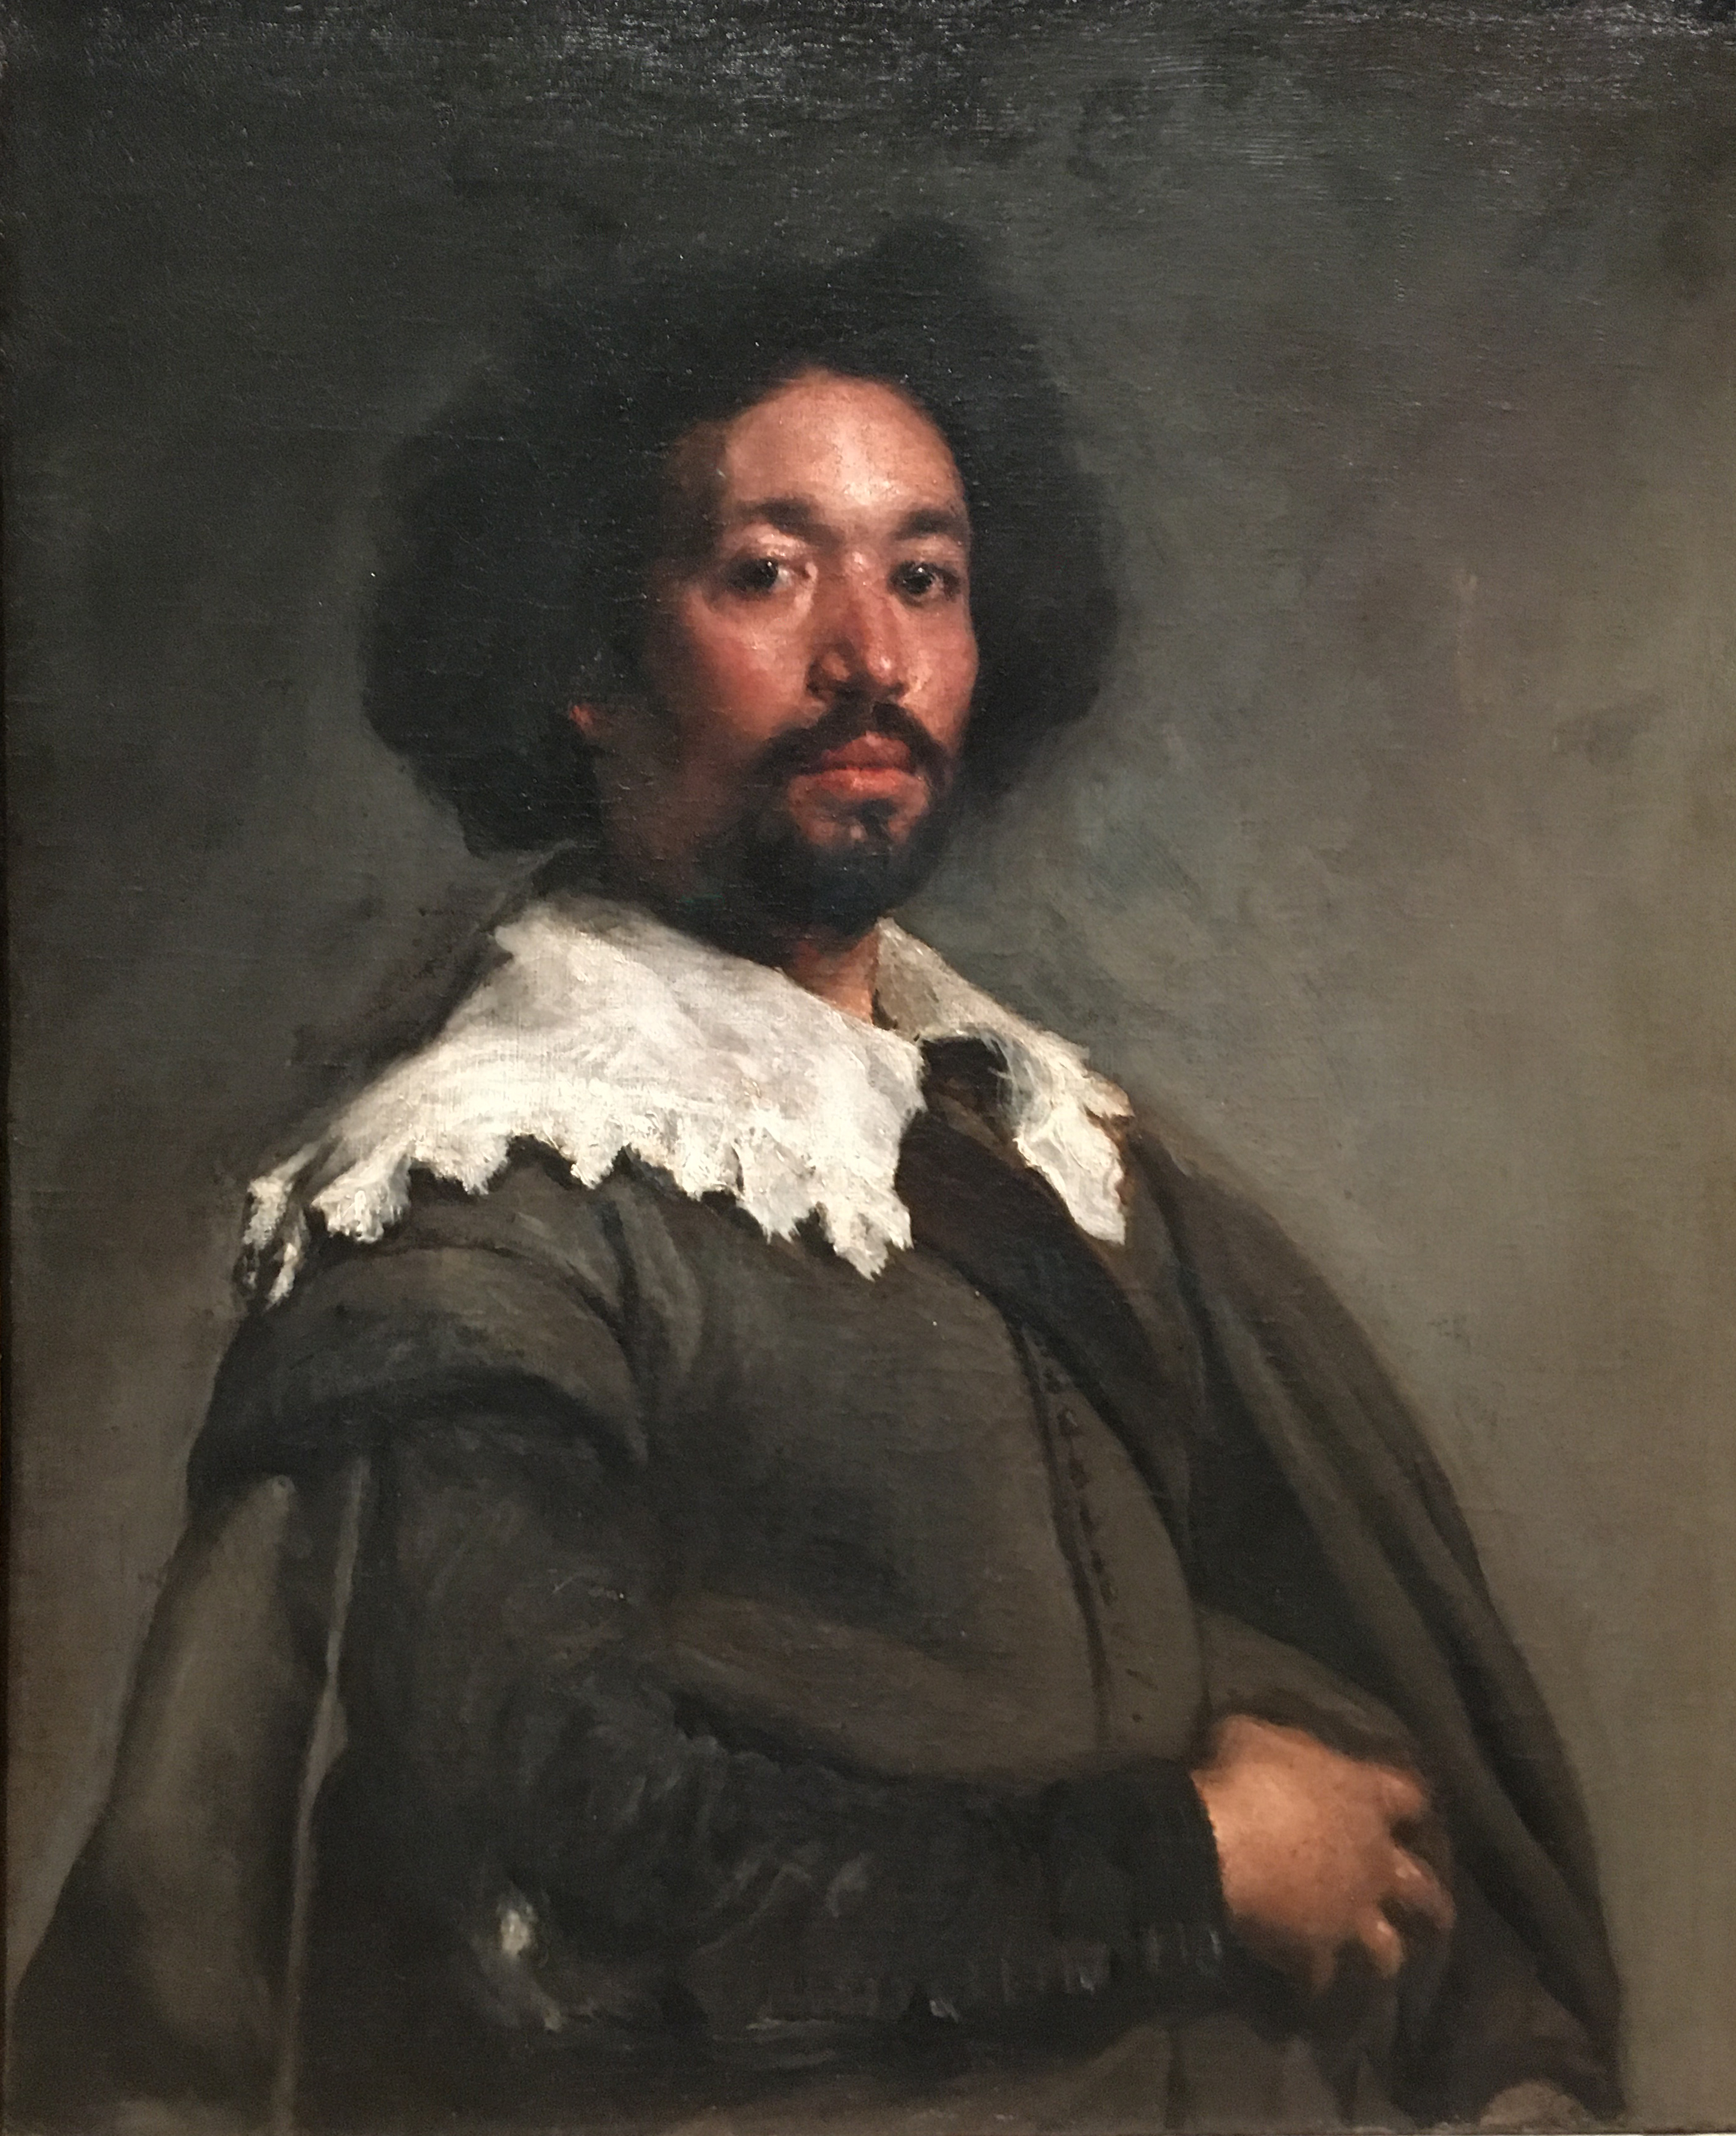
Juan de Pareja, 1650
https://www.metmuseum.org/art/collection/search/437869
British Portraiture
Sir Joshua Reynolds vs. Thomas Gainsborough
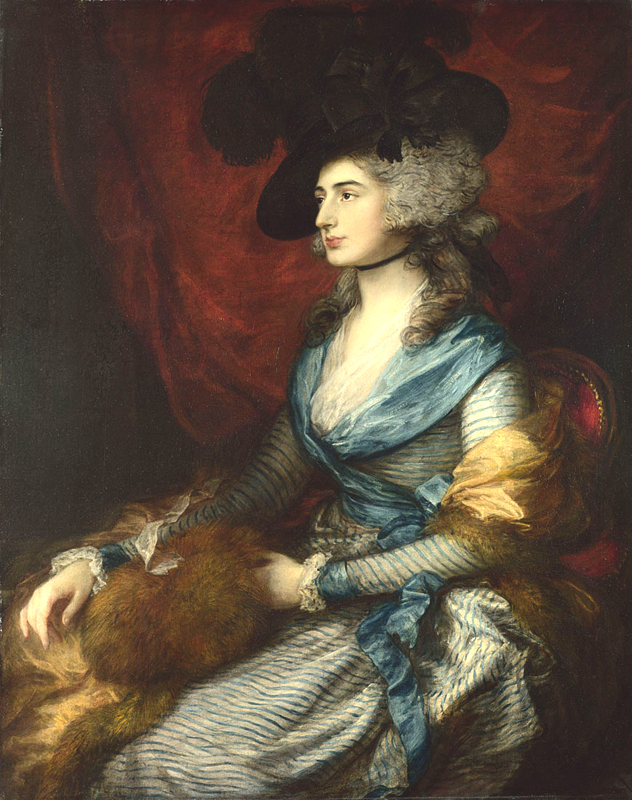
Thomas Gainsborough (British 1727 - 1788). Sitter: Mrs. Siddons (British 17--). Date: 1785
Gainsborough was, with Reynolds (his main rival), the leading portrait painter in England in the later 18th century. The feathery brushwork of his mature work and rich sense of colour contribute to the enduring popularity of his portraits. Unlike Reynolds, he avoids references to Italian Renaissance art or the Antique, and shows his sitters in fashionable contemporary dress. He was a founding member of the Royal Academy, though he later quarrelled with it over the hanging of his pictures. He became a favourite painter of George III and his family. He was born in Sudbury, Suffolk, the son of a wool manufacturer. He trained in London, and set up in practice in Ipswich about 1752. In 1759 he moved to Bath, a fashionable spa town, attracting many clients for his portraits. He settled in London in 1774. His private inclination was for landscape and rustic scenes, and his amusing letters record his impatience with his clients' demands for portraits.
https://www.nationalgallery.org.uk/artists/thomas-gainsborough
Reynolds was the leading English portraitist of the 18th century. Through study of ancient and Italian Renaissance art, and of the work of Rembrandt, Rubens and Van Dyck, he brought great variety and dignity to British portraiture.mReynolds was born at Plympton in Devon, the son of a headmaster and fellow of Balliol College, Oxford: a more educated background than that of most painters. He was apprenticed in 1740 to the fashionable London portraitist Thomas Hudson, who also trained Wright of Derby. He spent 1749-52 abroad, mainly in Italy, and set up practice in London shortly after his return. He soon established himself as the leading portrait painter, though he was never popular with George III. He was a key figure in the intellectual life of London, and a friend of Dr Johnson. When the Royal Academy was founded in 1768, Reynolds was elected its first President. Although believing that history painting was the noblest work of the painter, he had little opportunity to practise it, and his greatest works are his portraits.
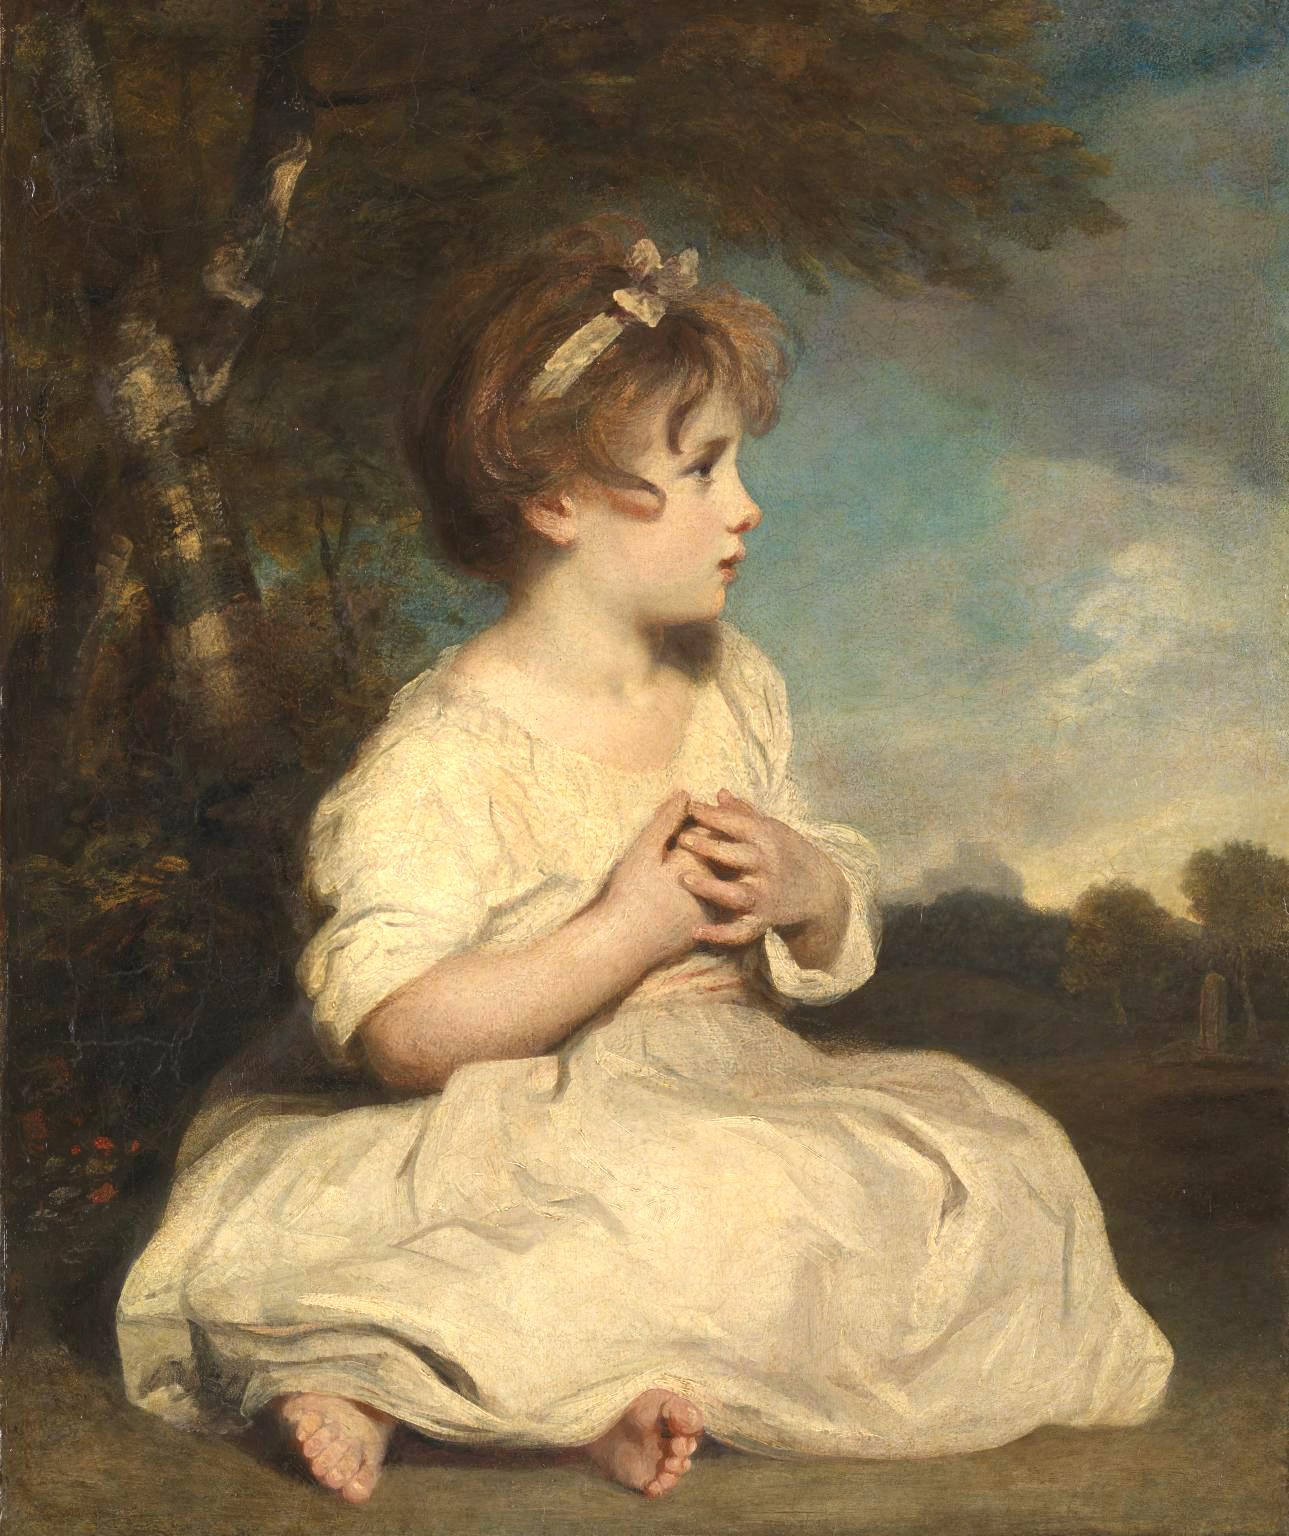
Sir Joshua Reynolds (British, 1723–1792). The Age of Innocence. Date: 1788
https://www.tate.org.uk/art/artists/sir-joshua-reynolds-444
https://www.nationalgallery.org.uk/artists/sir-joshua-reynolds
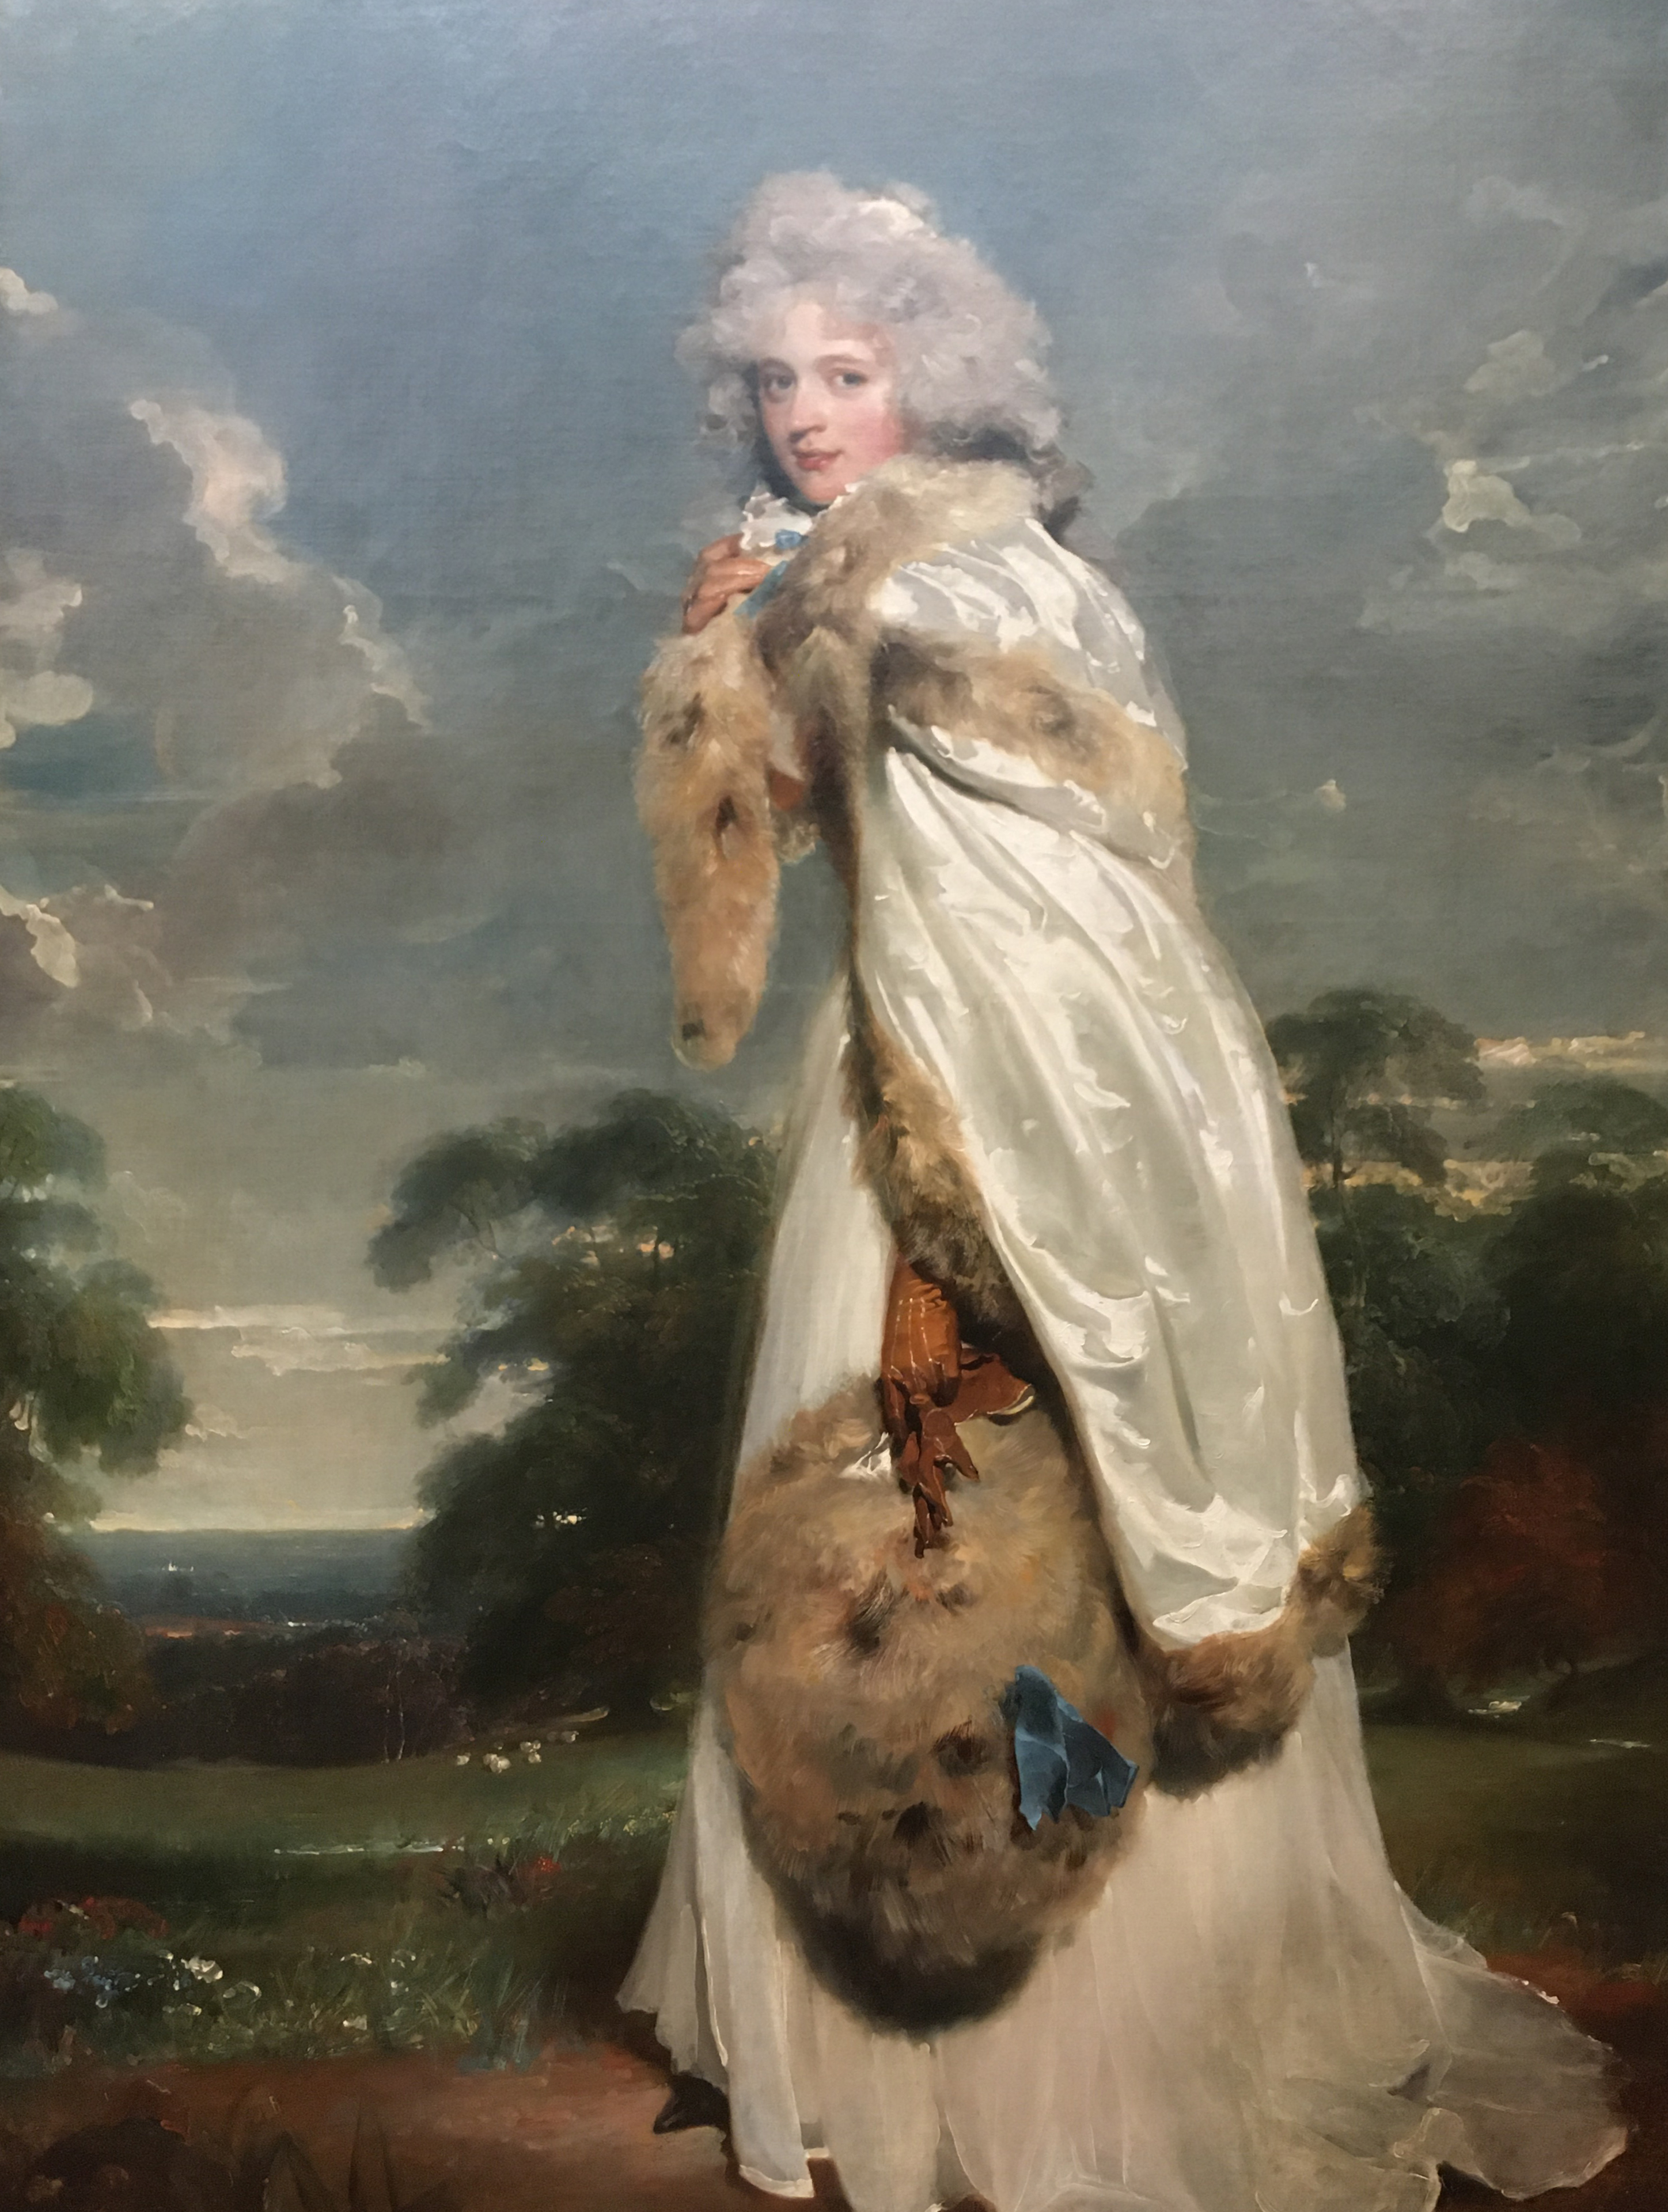
Sir Thomas Lawrence (British, Bristol 1769–1830 London). Sitter: Portrait of Elizabeth Farren, Countess of Derby (British, 1759?–1829). Date: 1792
https://www.nytimes.com/2011/04/24/nyregion/thomas-lawrence-regency-power-and-brilliance-review.html
Neoclassical
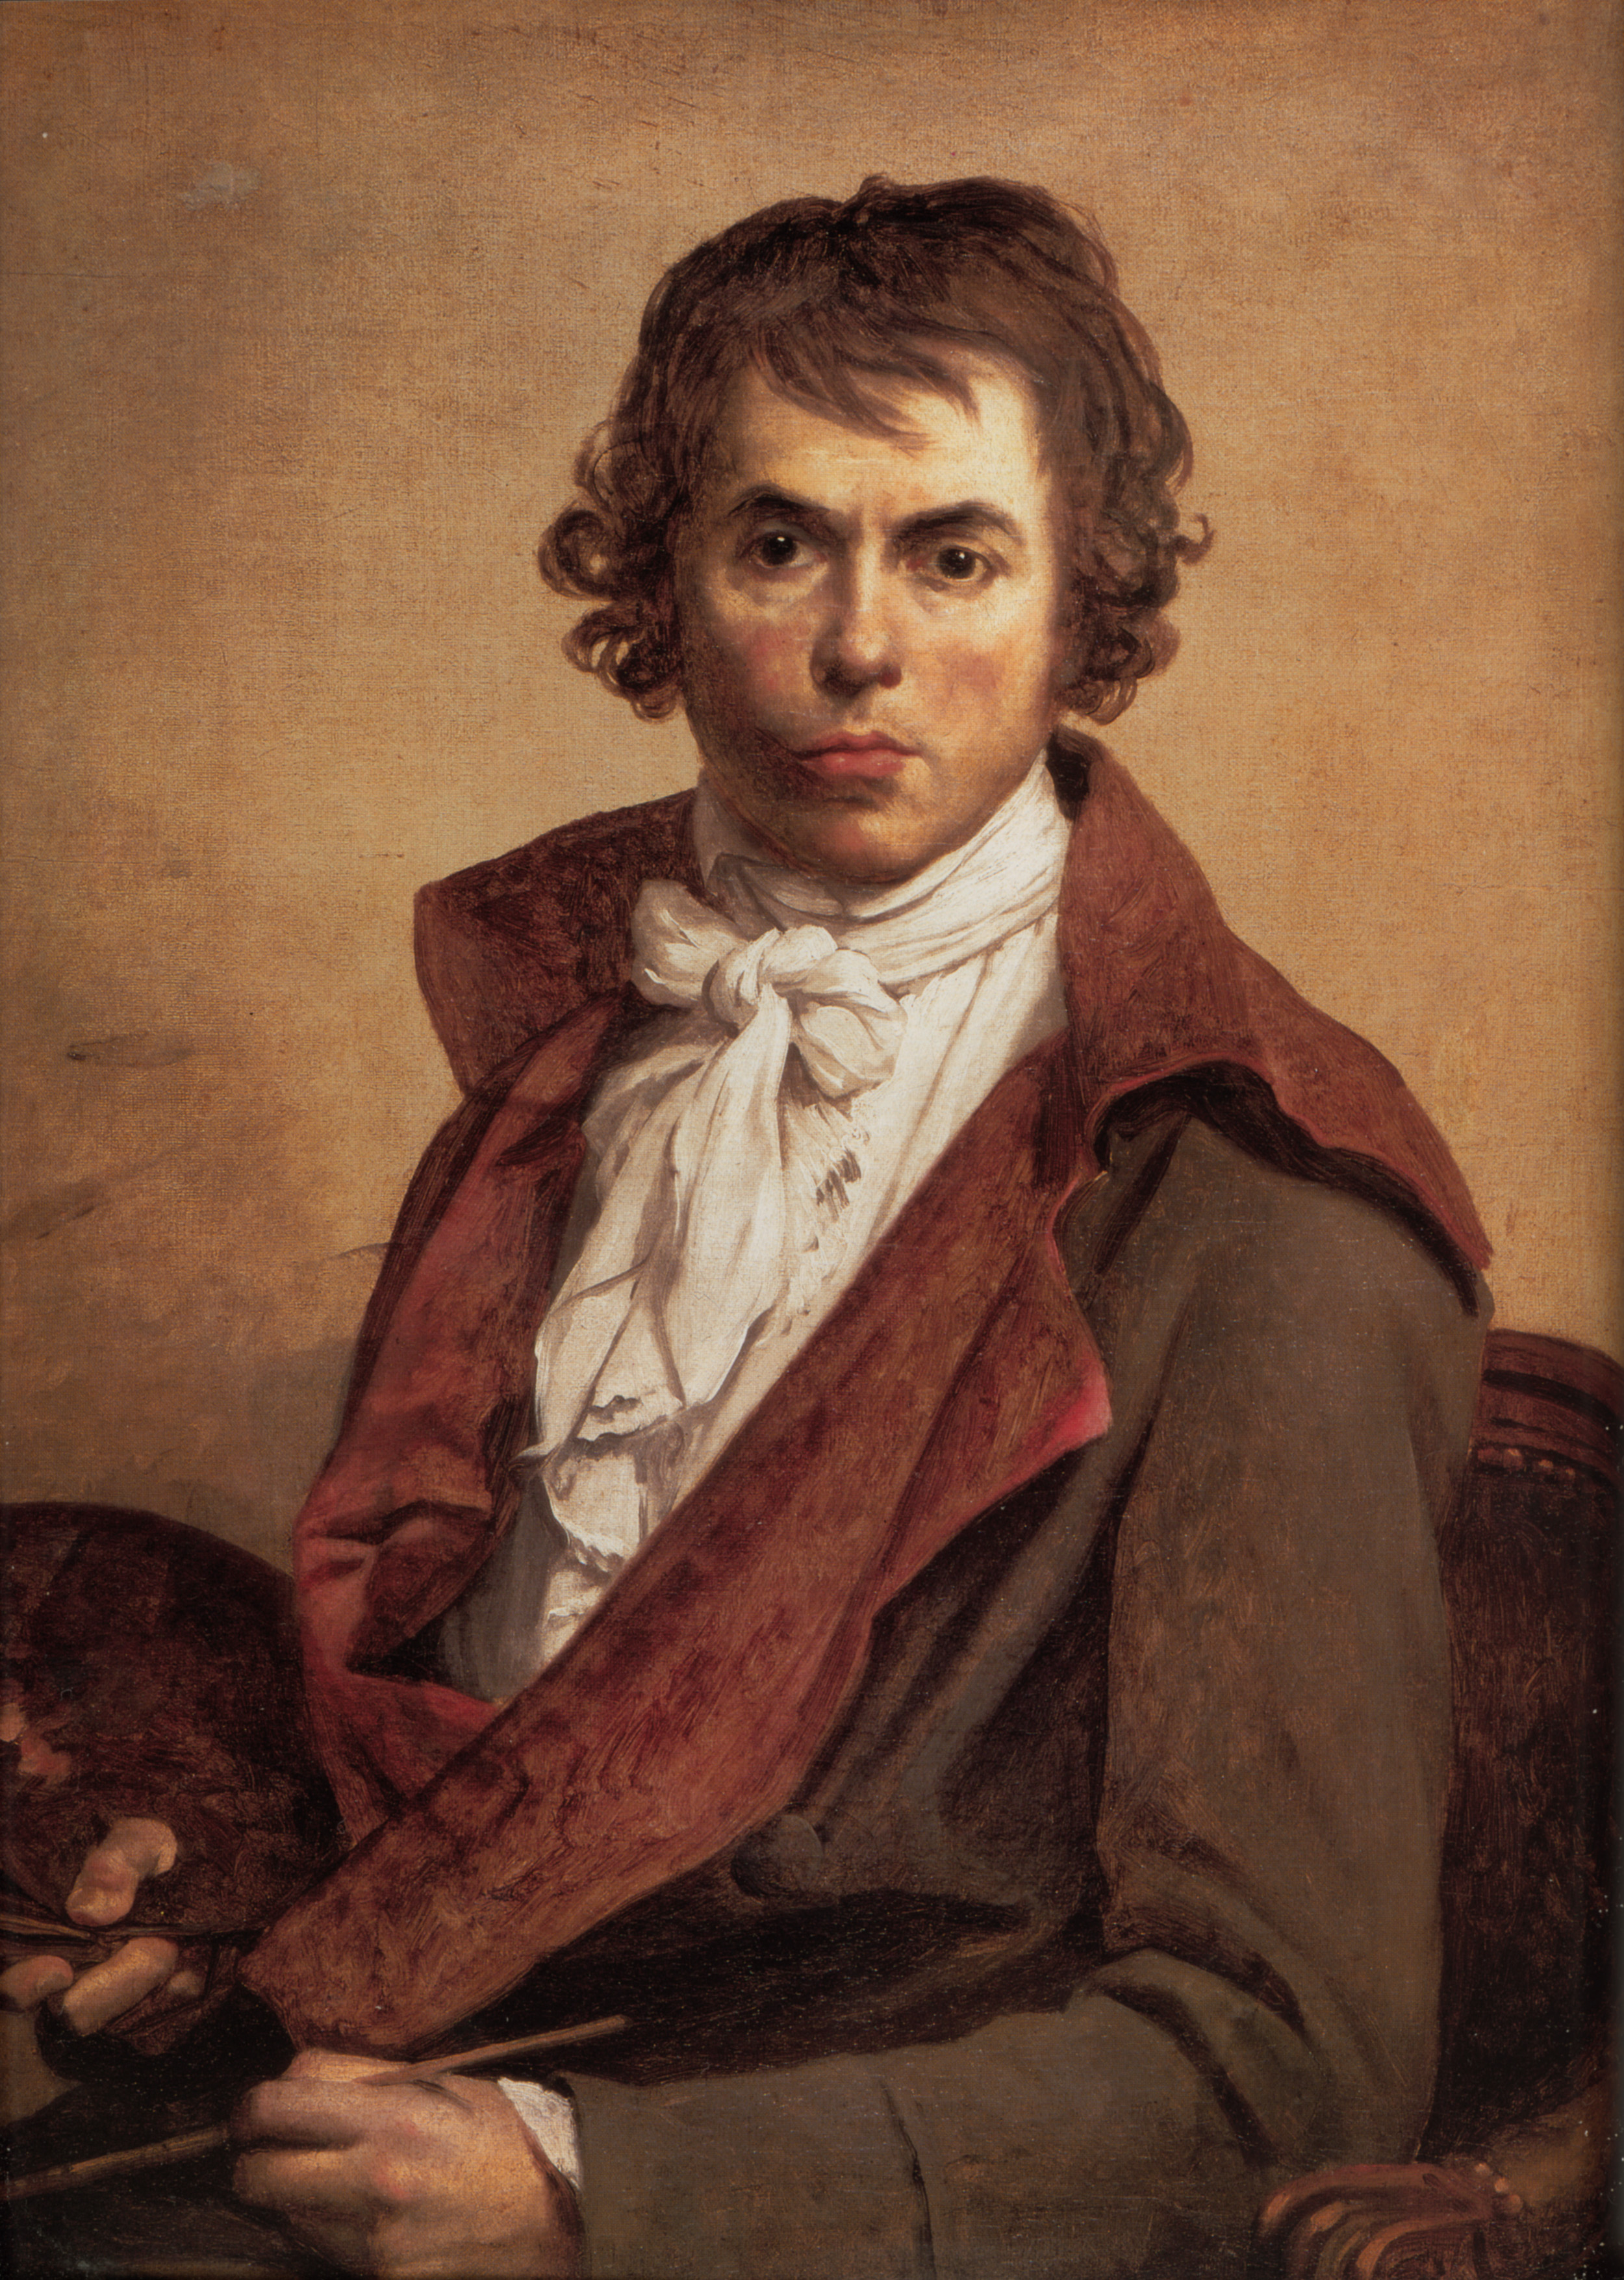
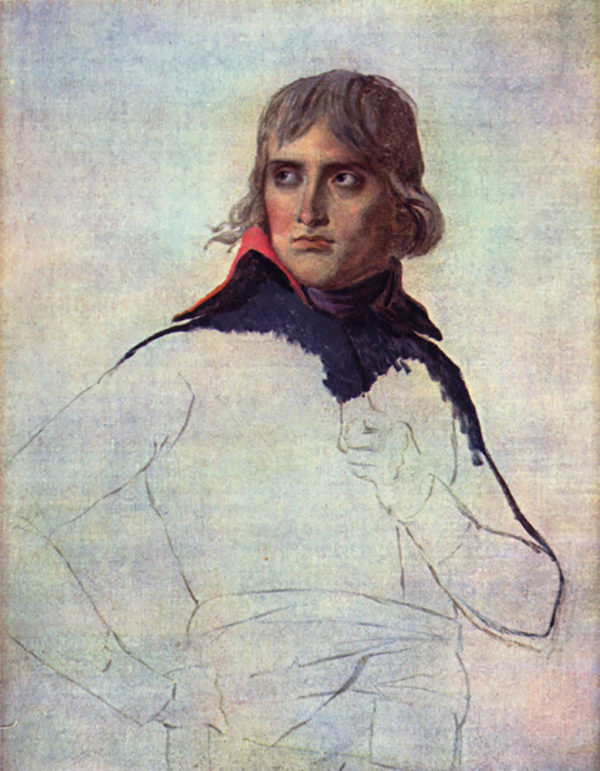
Jacques-Louis David
General Wolfe
Impressionist and Post-Impressionist
Manet
Van Gogh
John Singer Sargent
Modern
Becker
Wood
Portrait Drawing
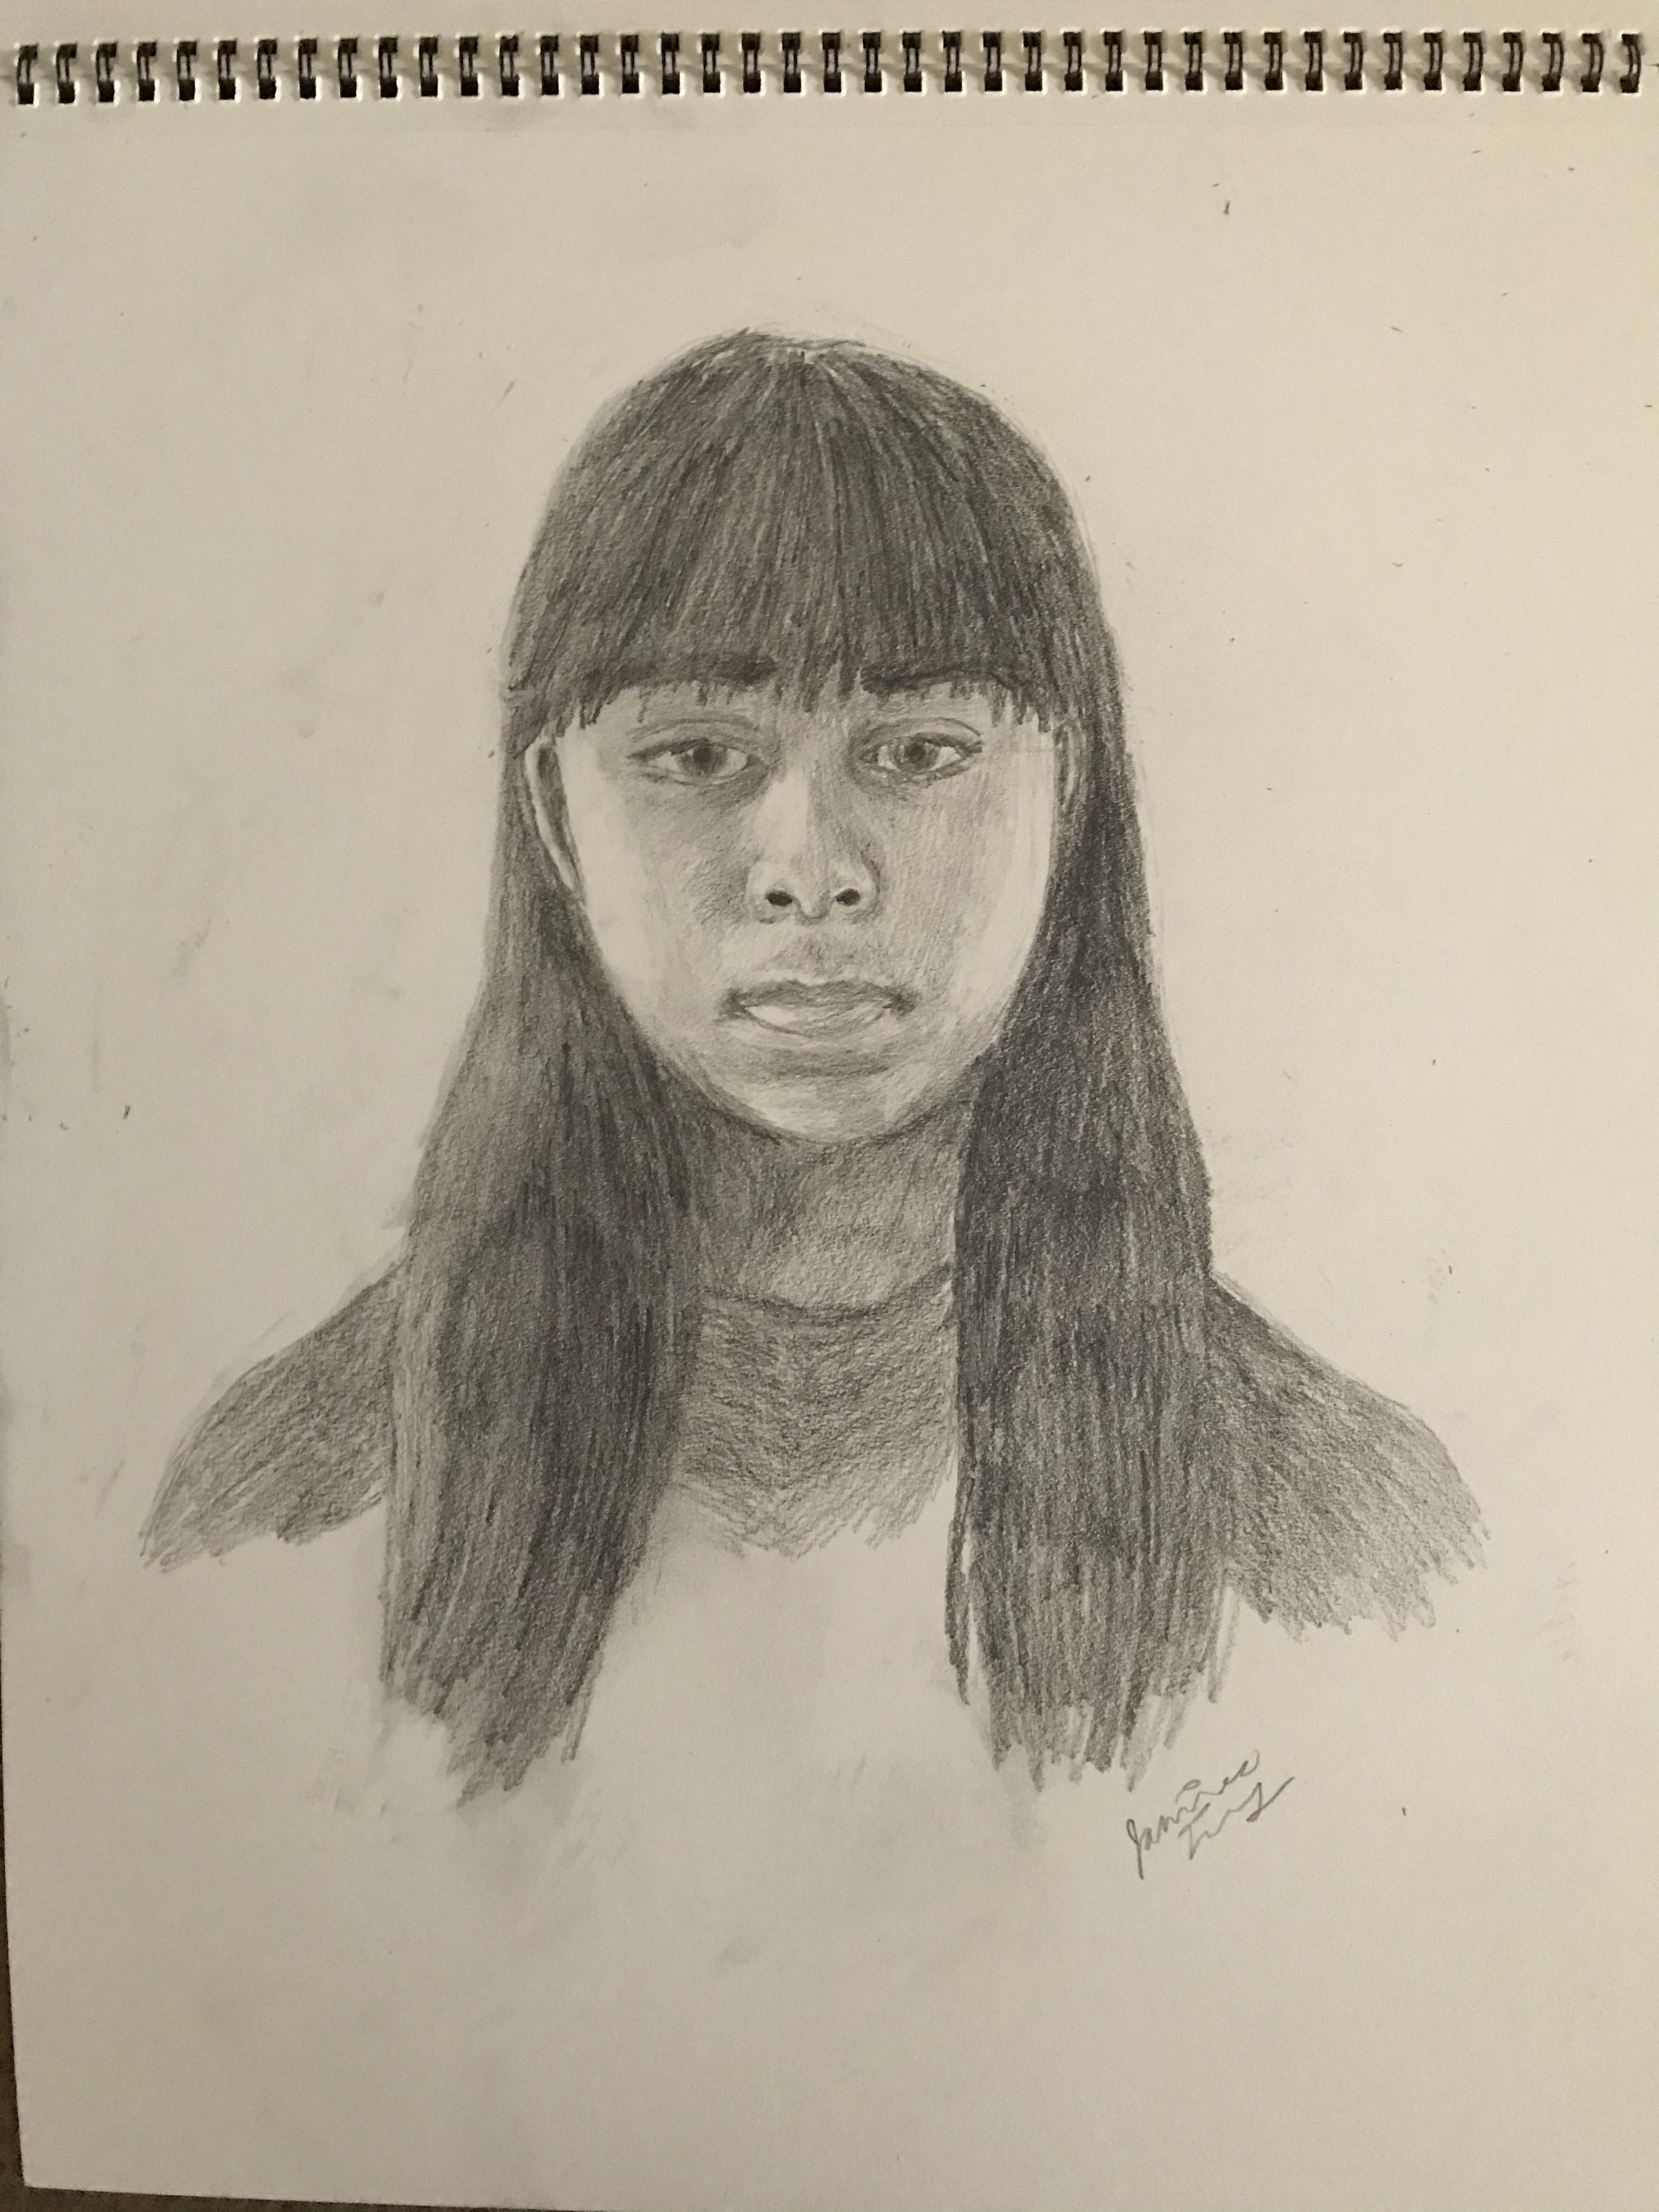
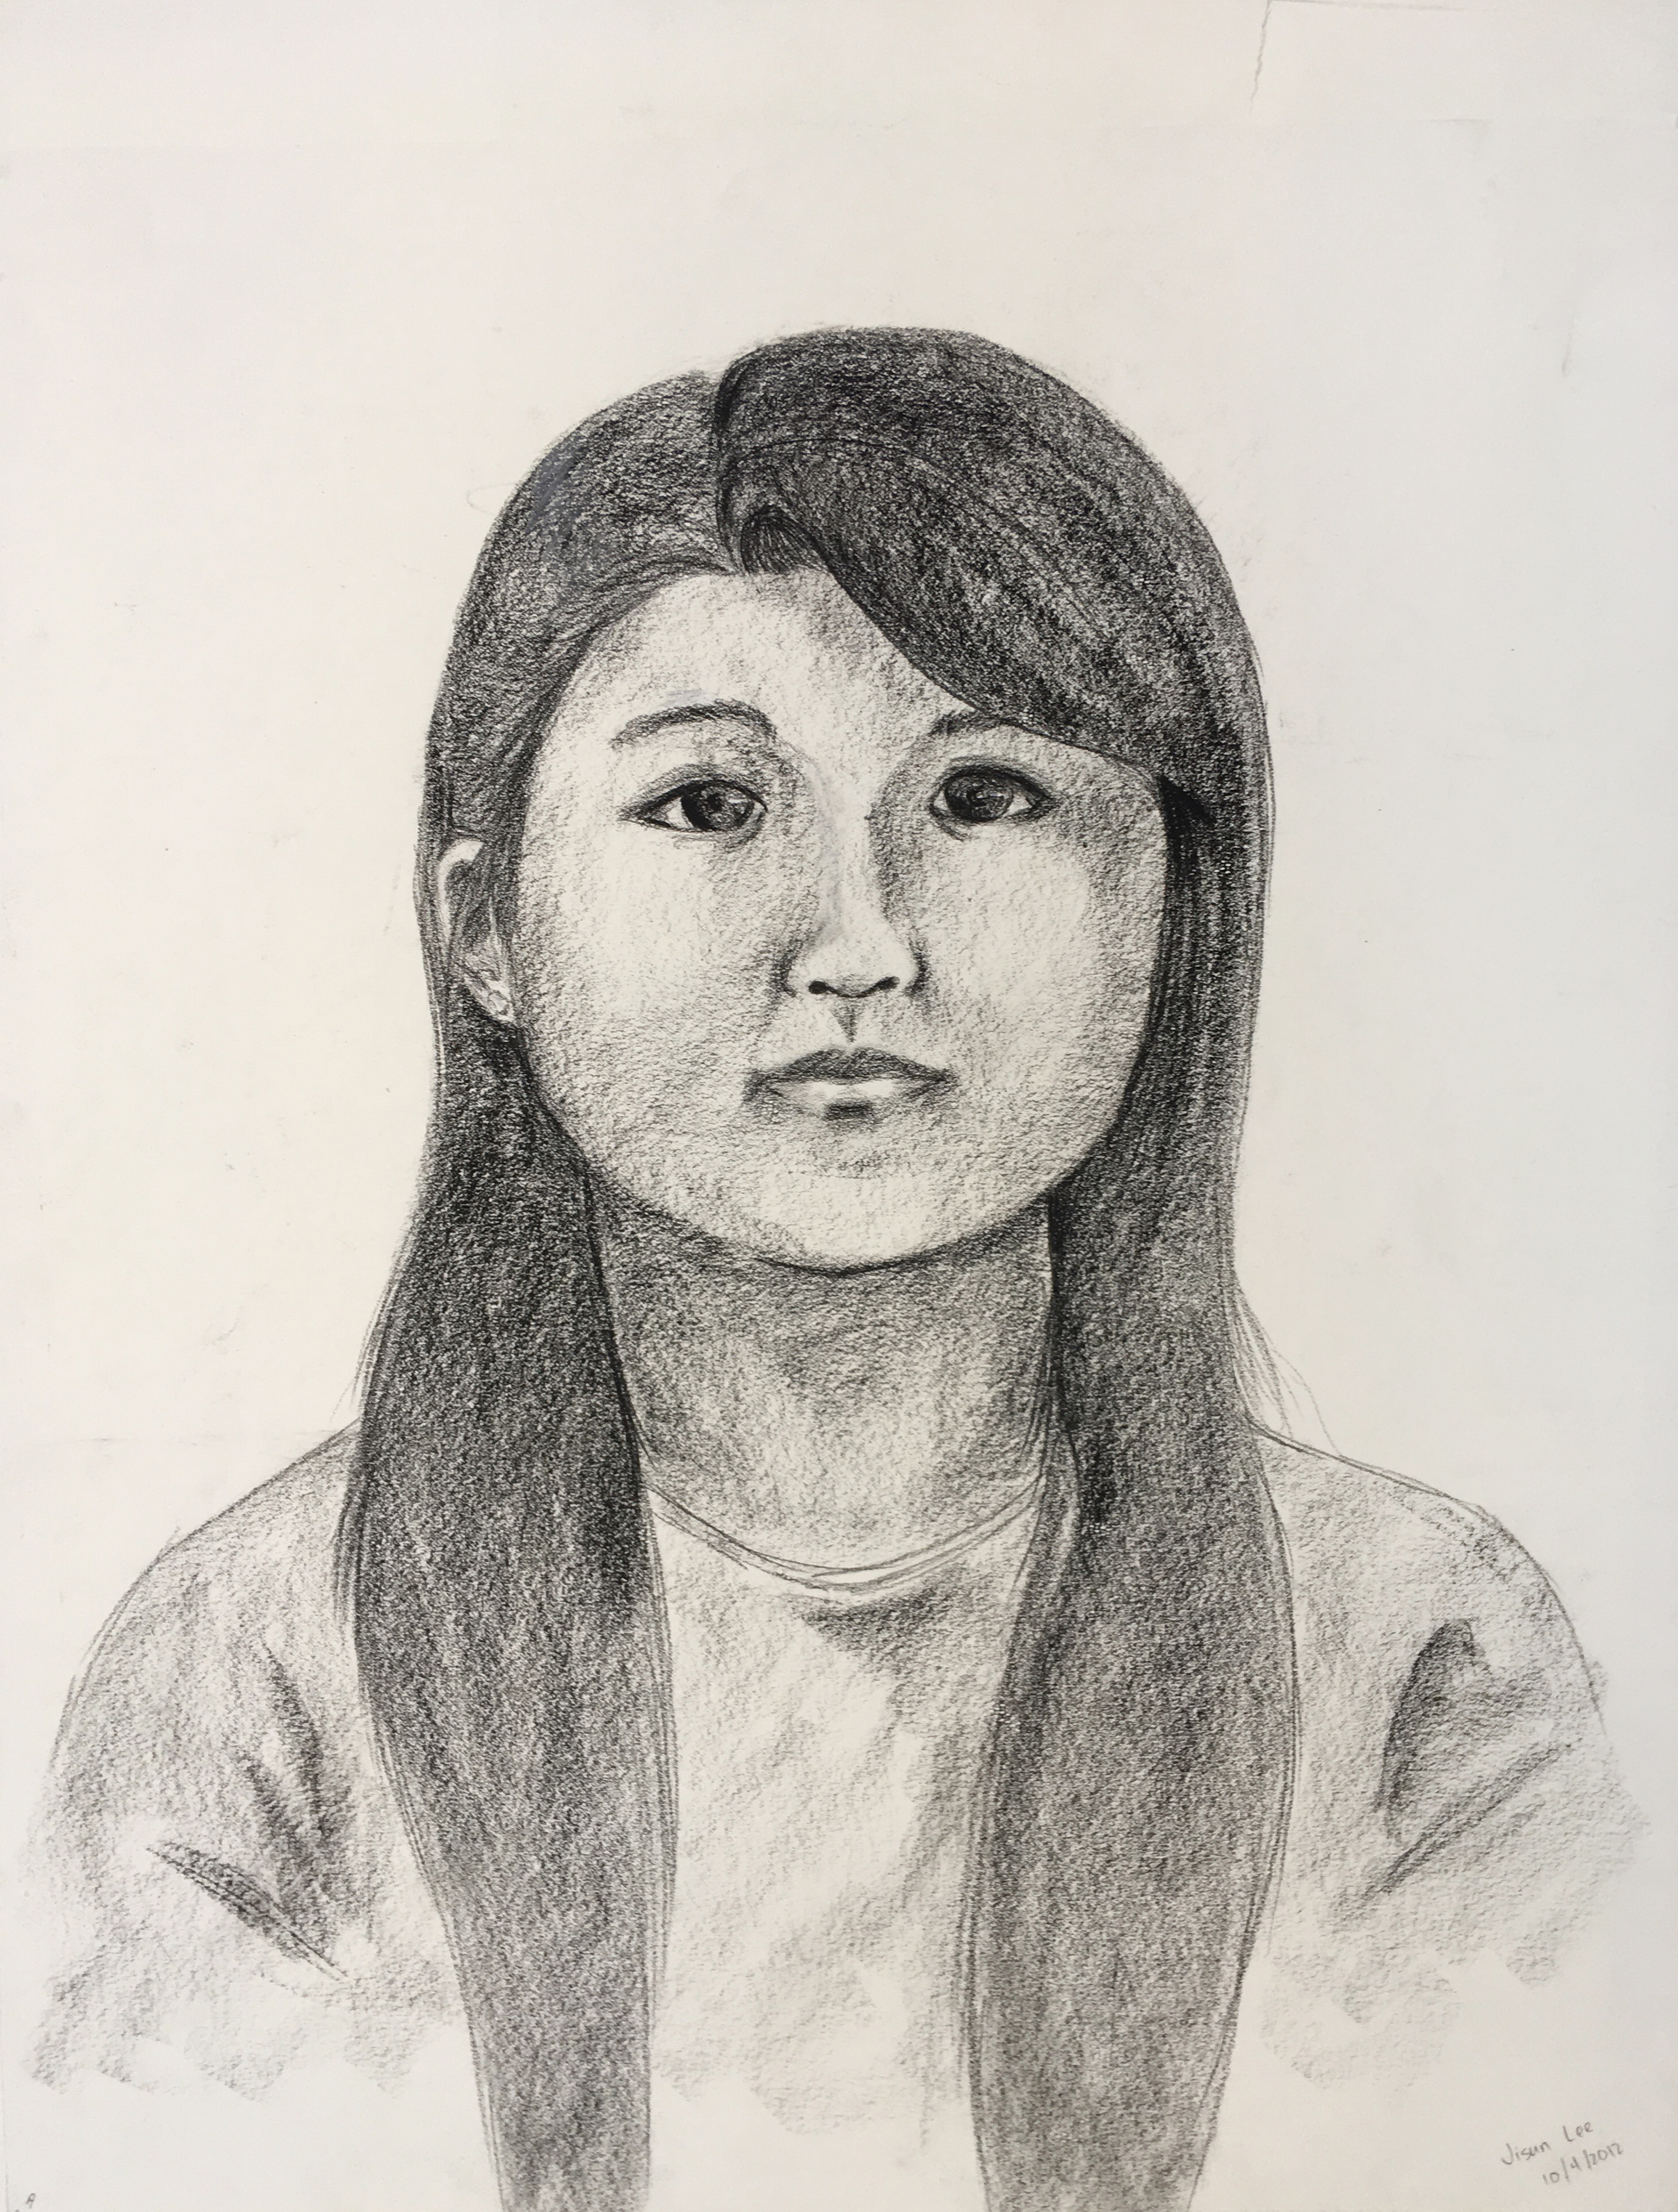
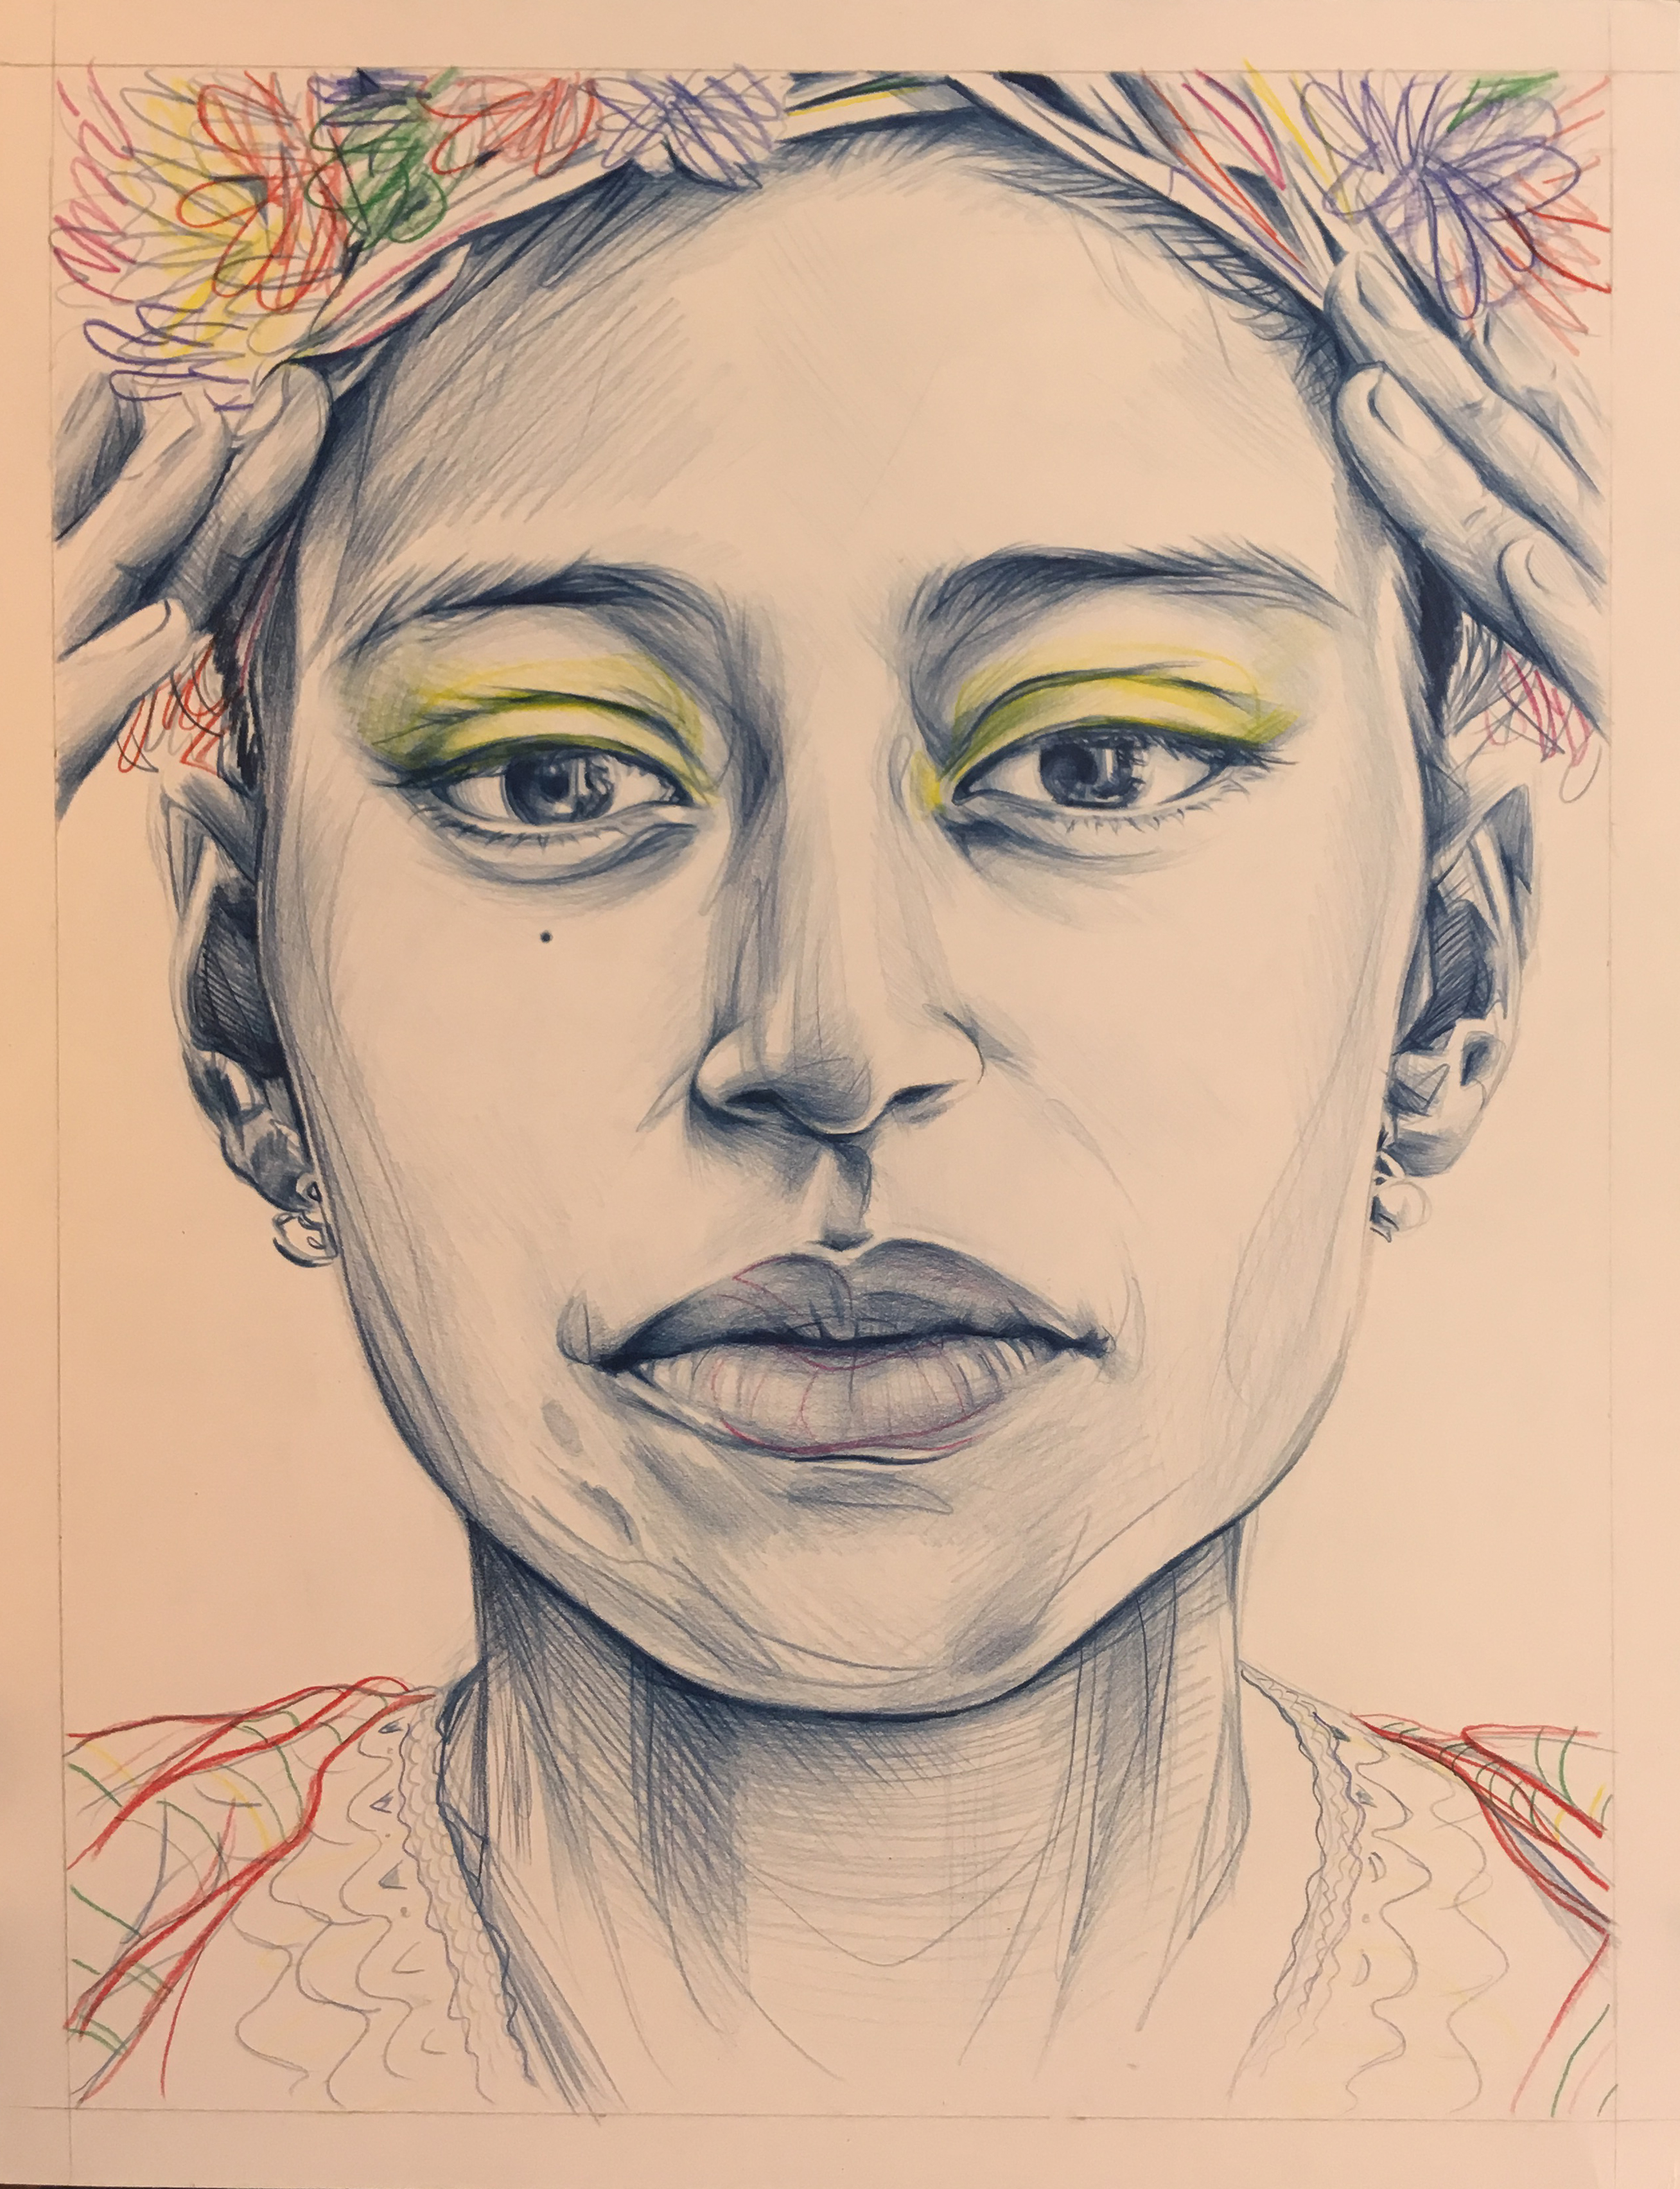
Drawing portraits from life is a difficult proposition for a beginning drawing student. However, the benefits outweigh the challenges posed by this drawing. Drawing a person from life allows the artist to infuse the artwork with the personality of the sitter. This is may feel awkward at first, especially with students more attuned to communicating with and navigating through the world using social media. Once past any awkwardness, students usually respond in a very positive way to this drawing assignment.
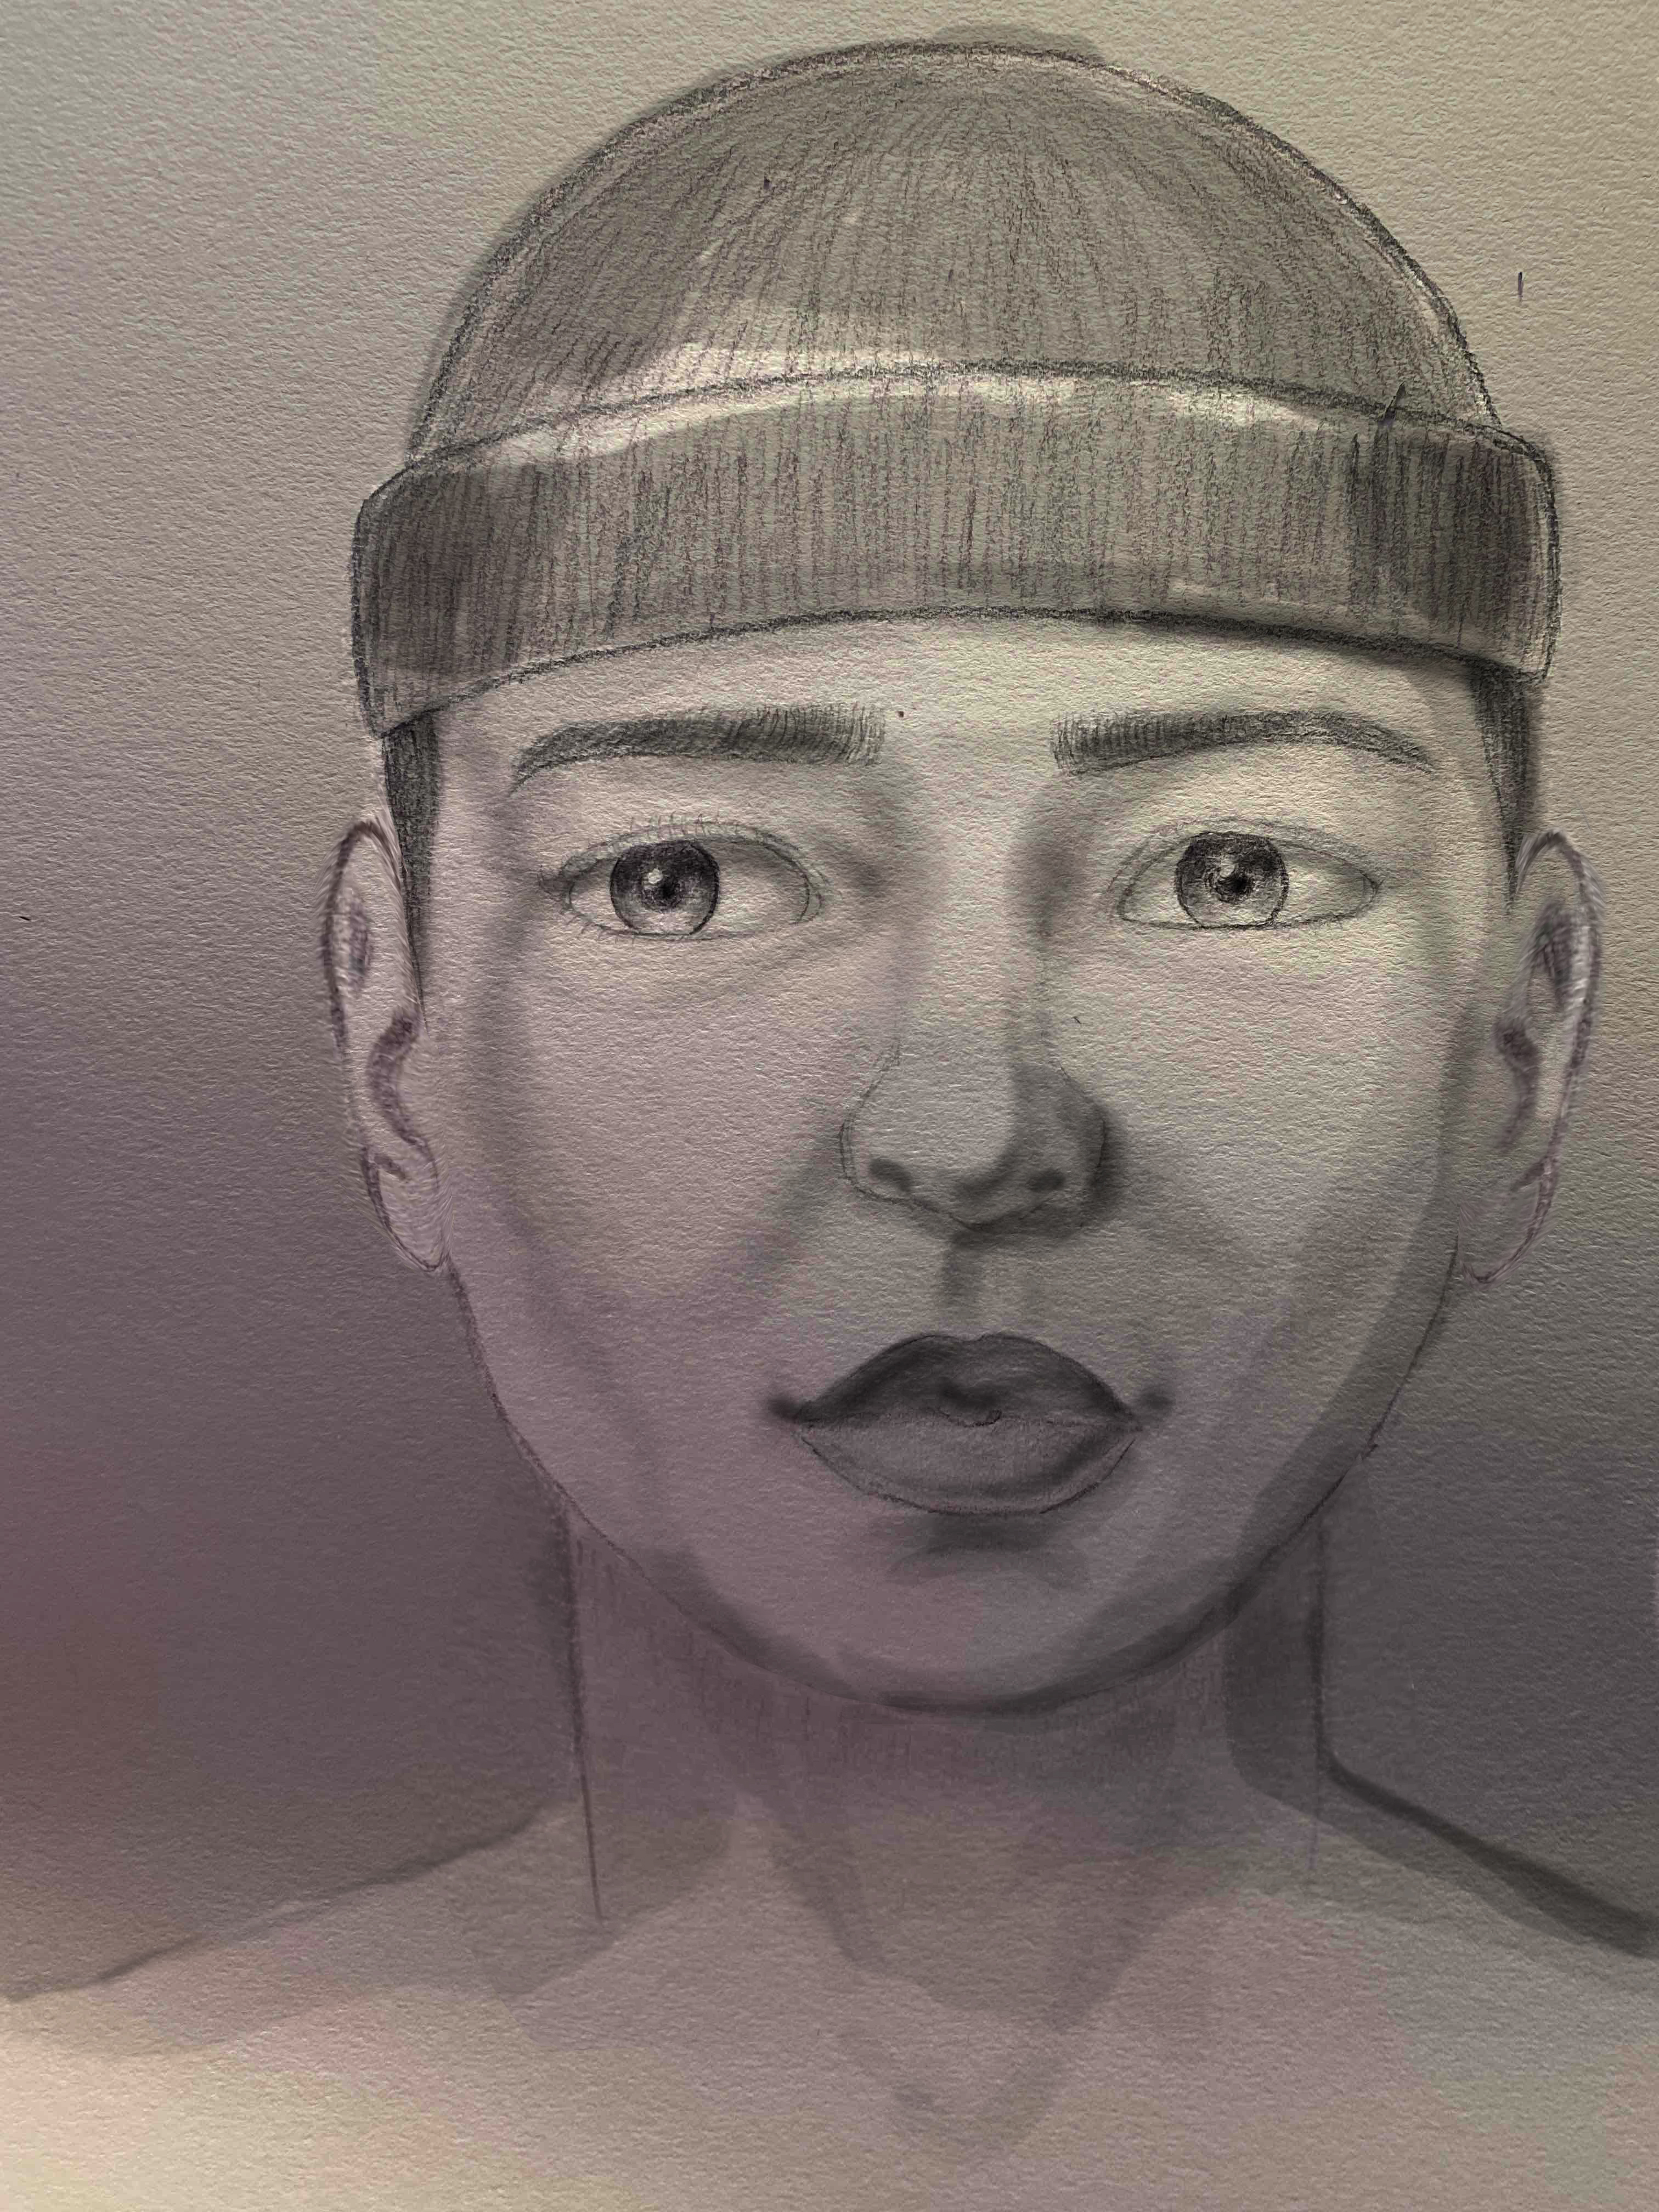
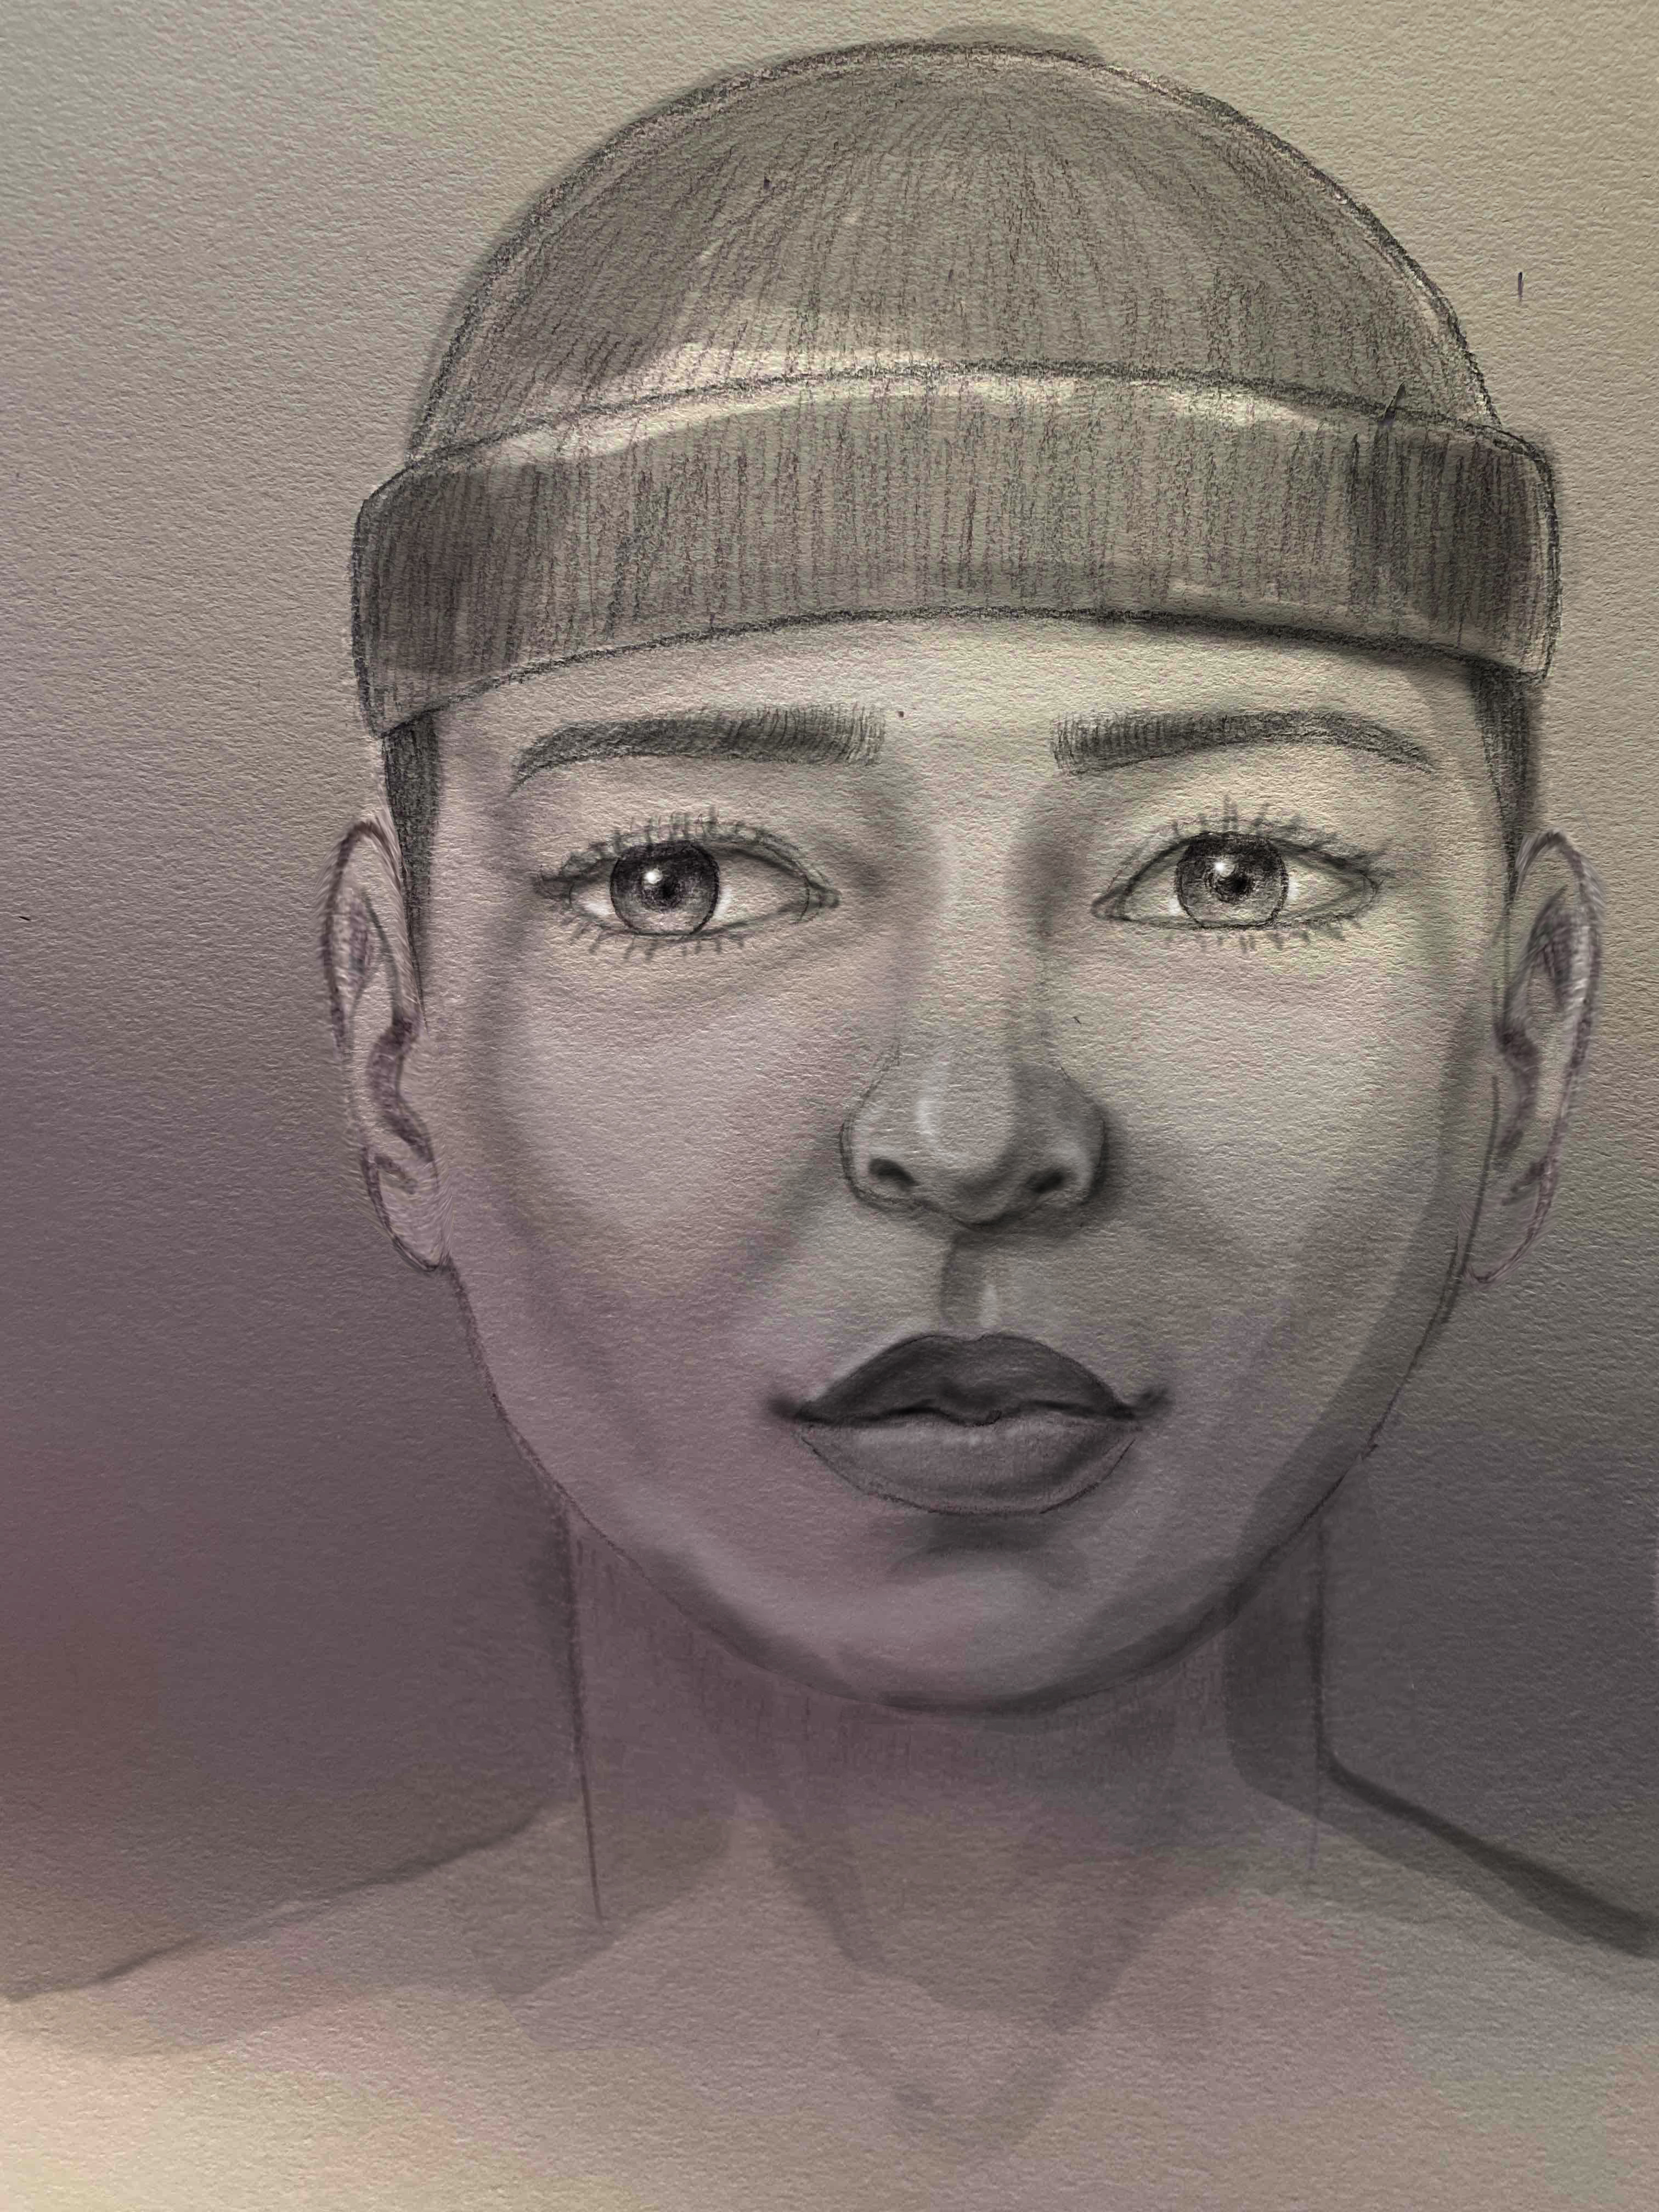
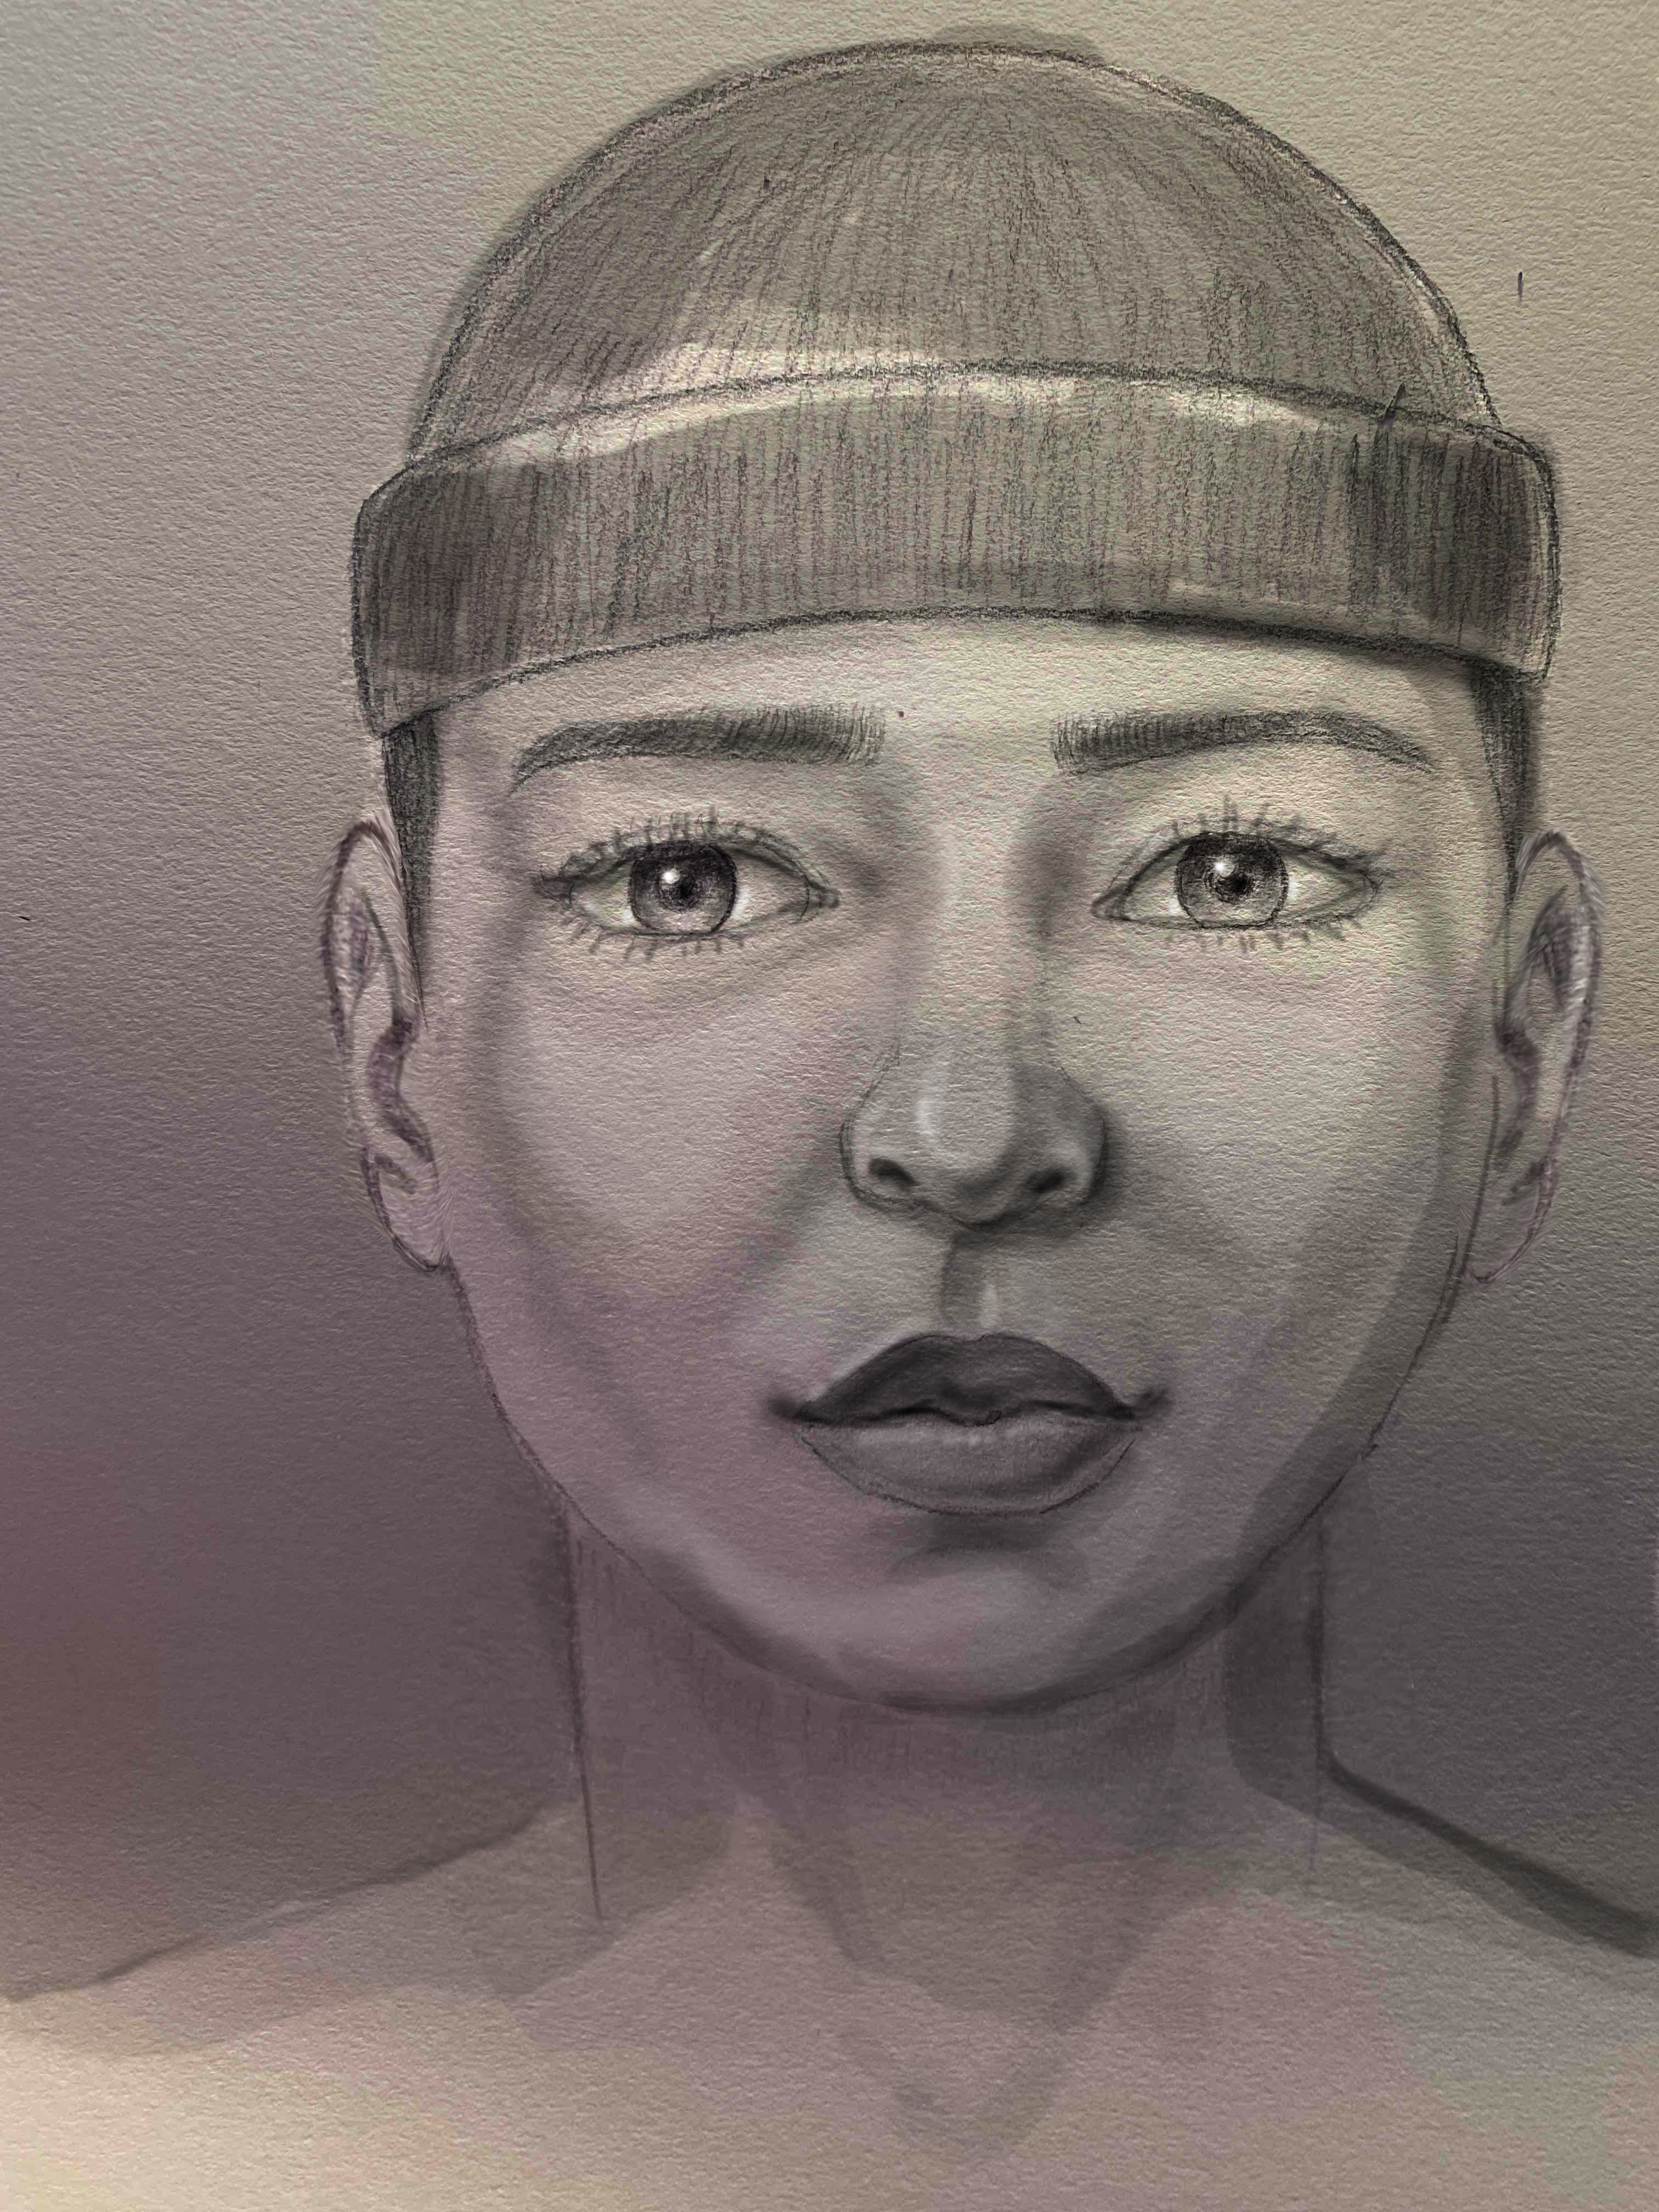
A basic template (Figure 1) is provided as a starting point and modifications are made to the template as close observations and sighting techniques are applied to the drawing of the sitter. As long as you possess a mirror, you always have a sitter available. Draw yourself as a last resort if you have difficulty having someone sit for you, or for your own reasons. Drawing self portraits is more than looking in the mirror as self-examination since you must slow down to really observe your facial features during the drawing process. Either way, if you draw another person, or yourself, to be successful you must really see by looking with intent and focus. By going step by step using the template and instructions I provide, you will have a plan to execute in the process of drawing the portrait.
Figure 1 Figure 2
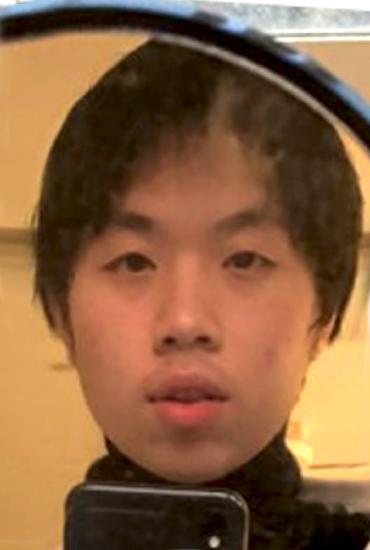
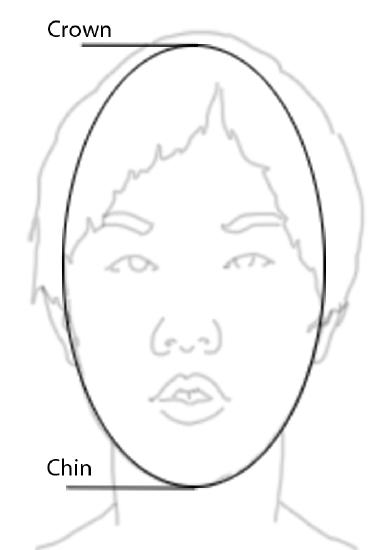
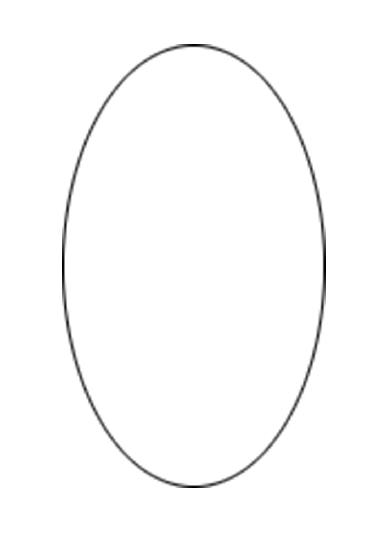
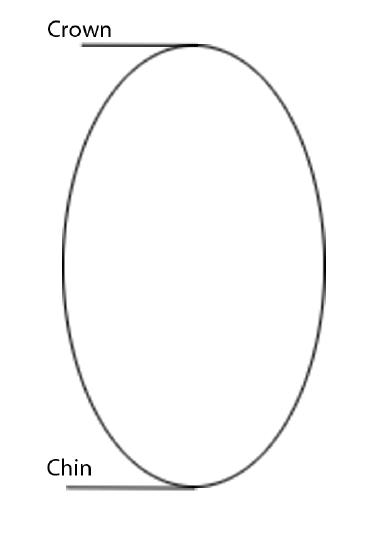
Figure 3a Figure 3b Figure 3c Figure 3d
Step 1:
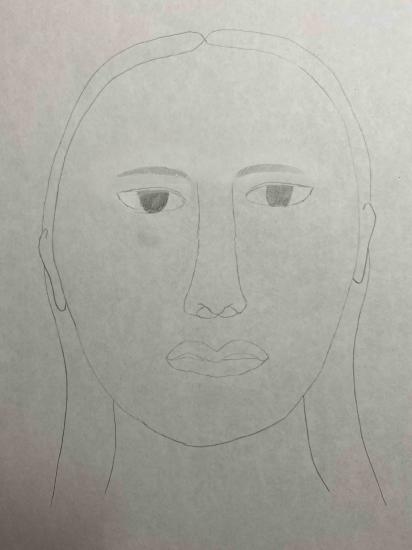
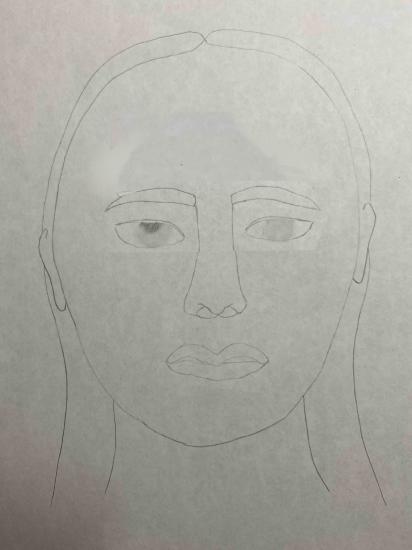
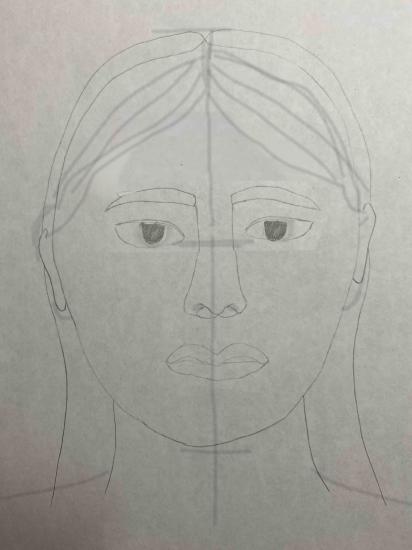
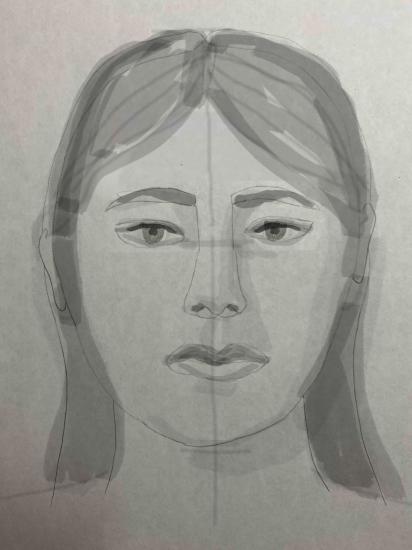
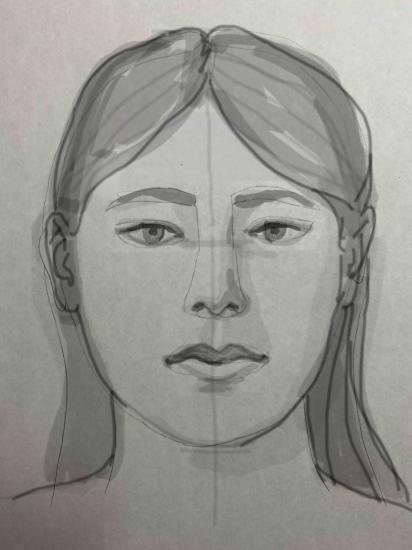
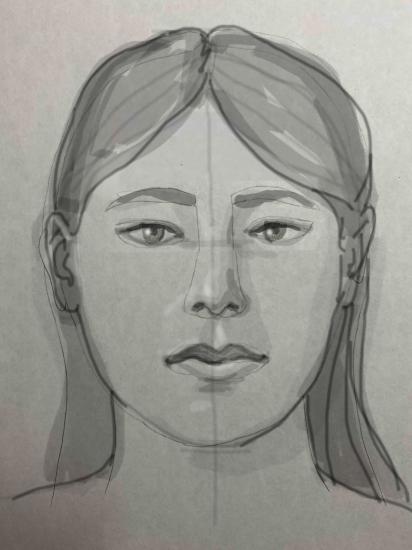
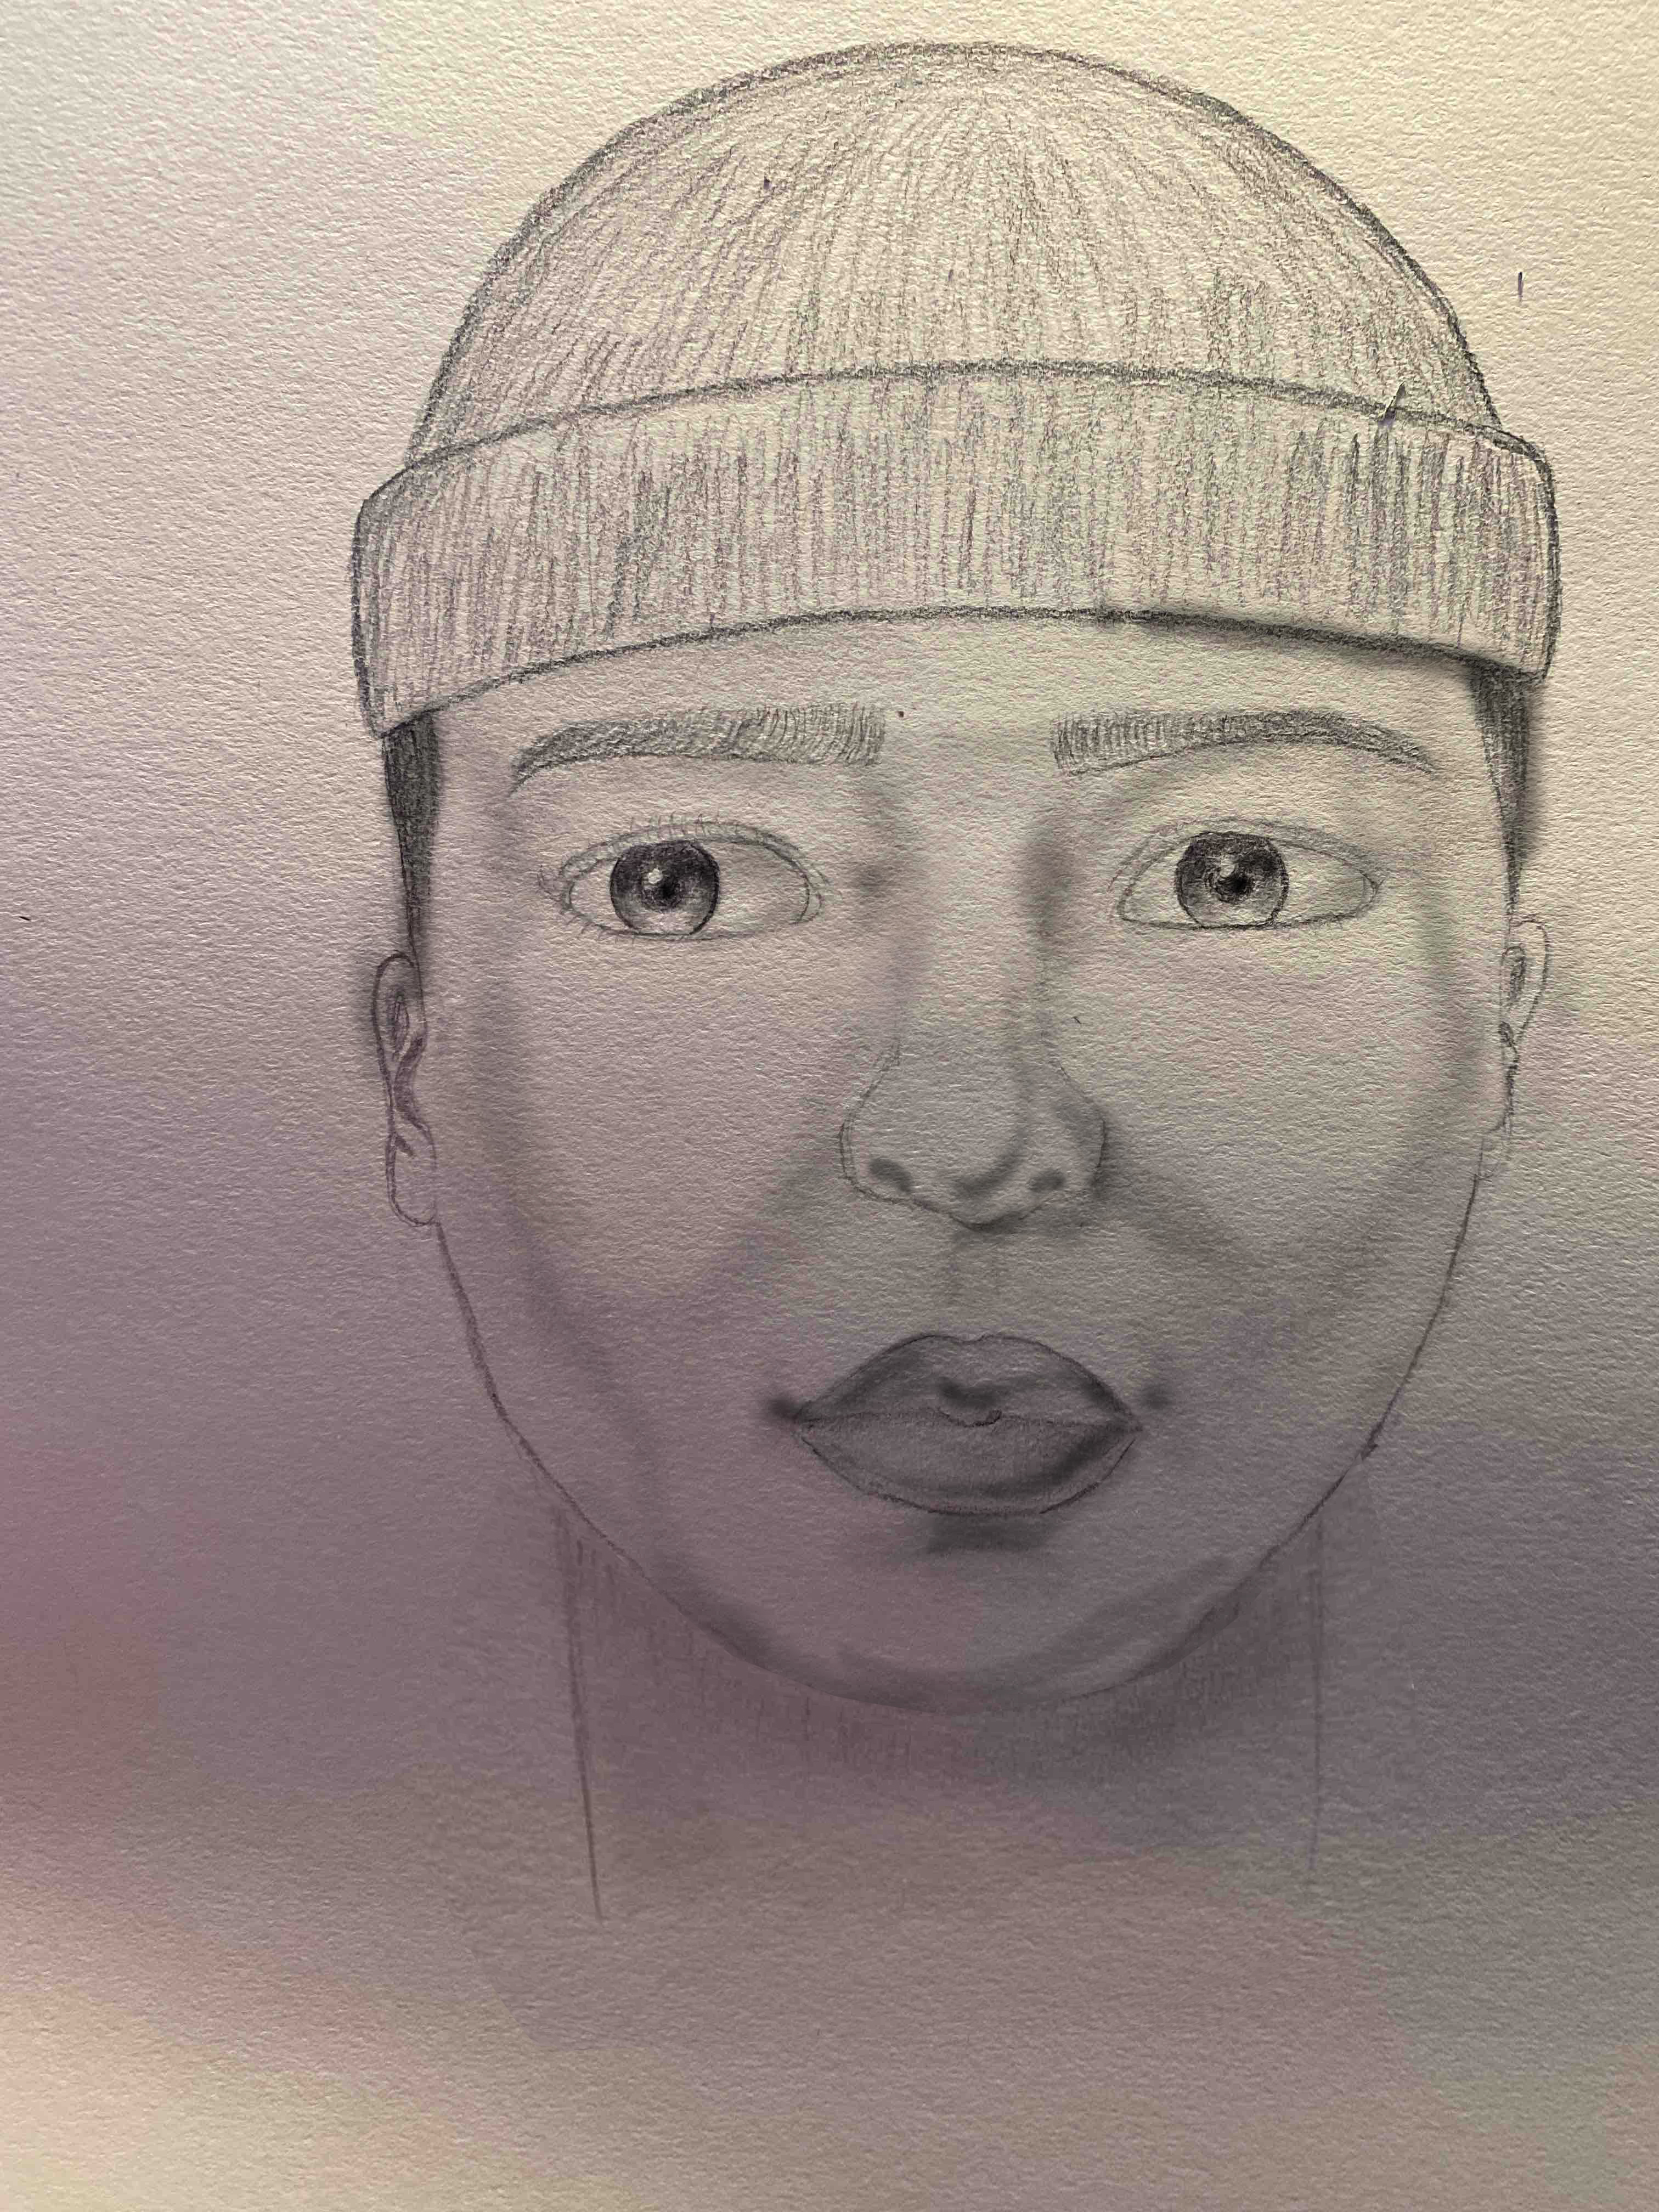
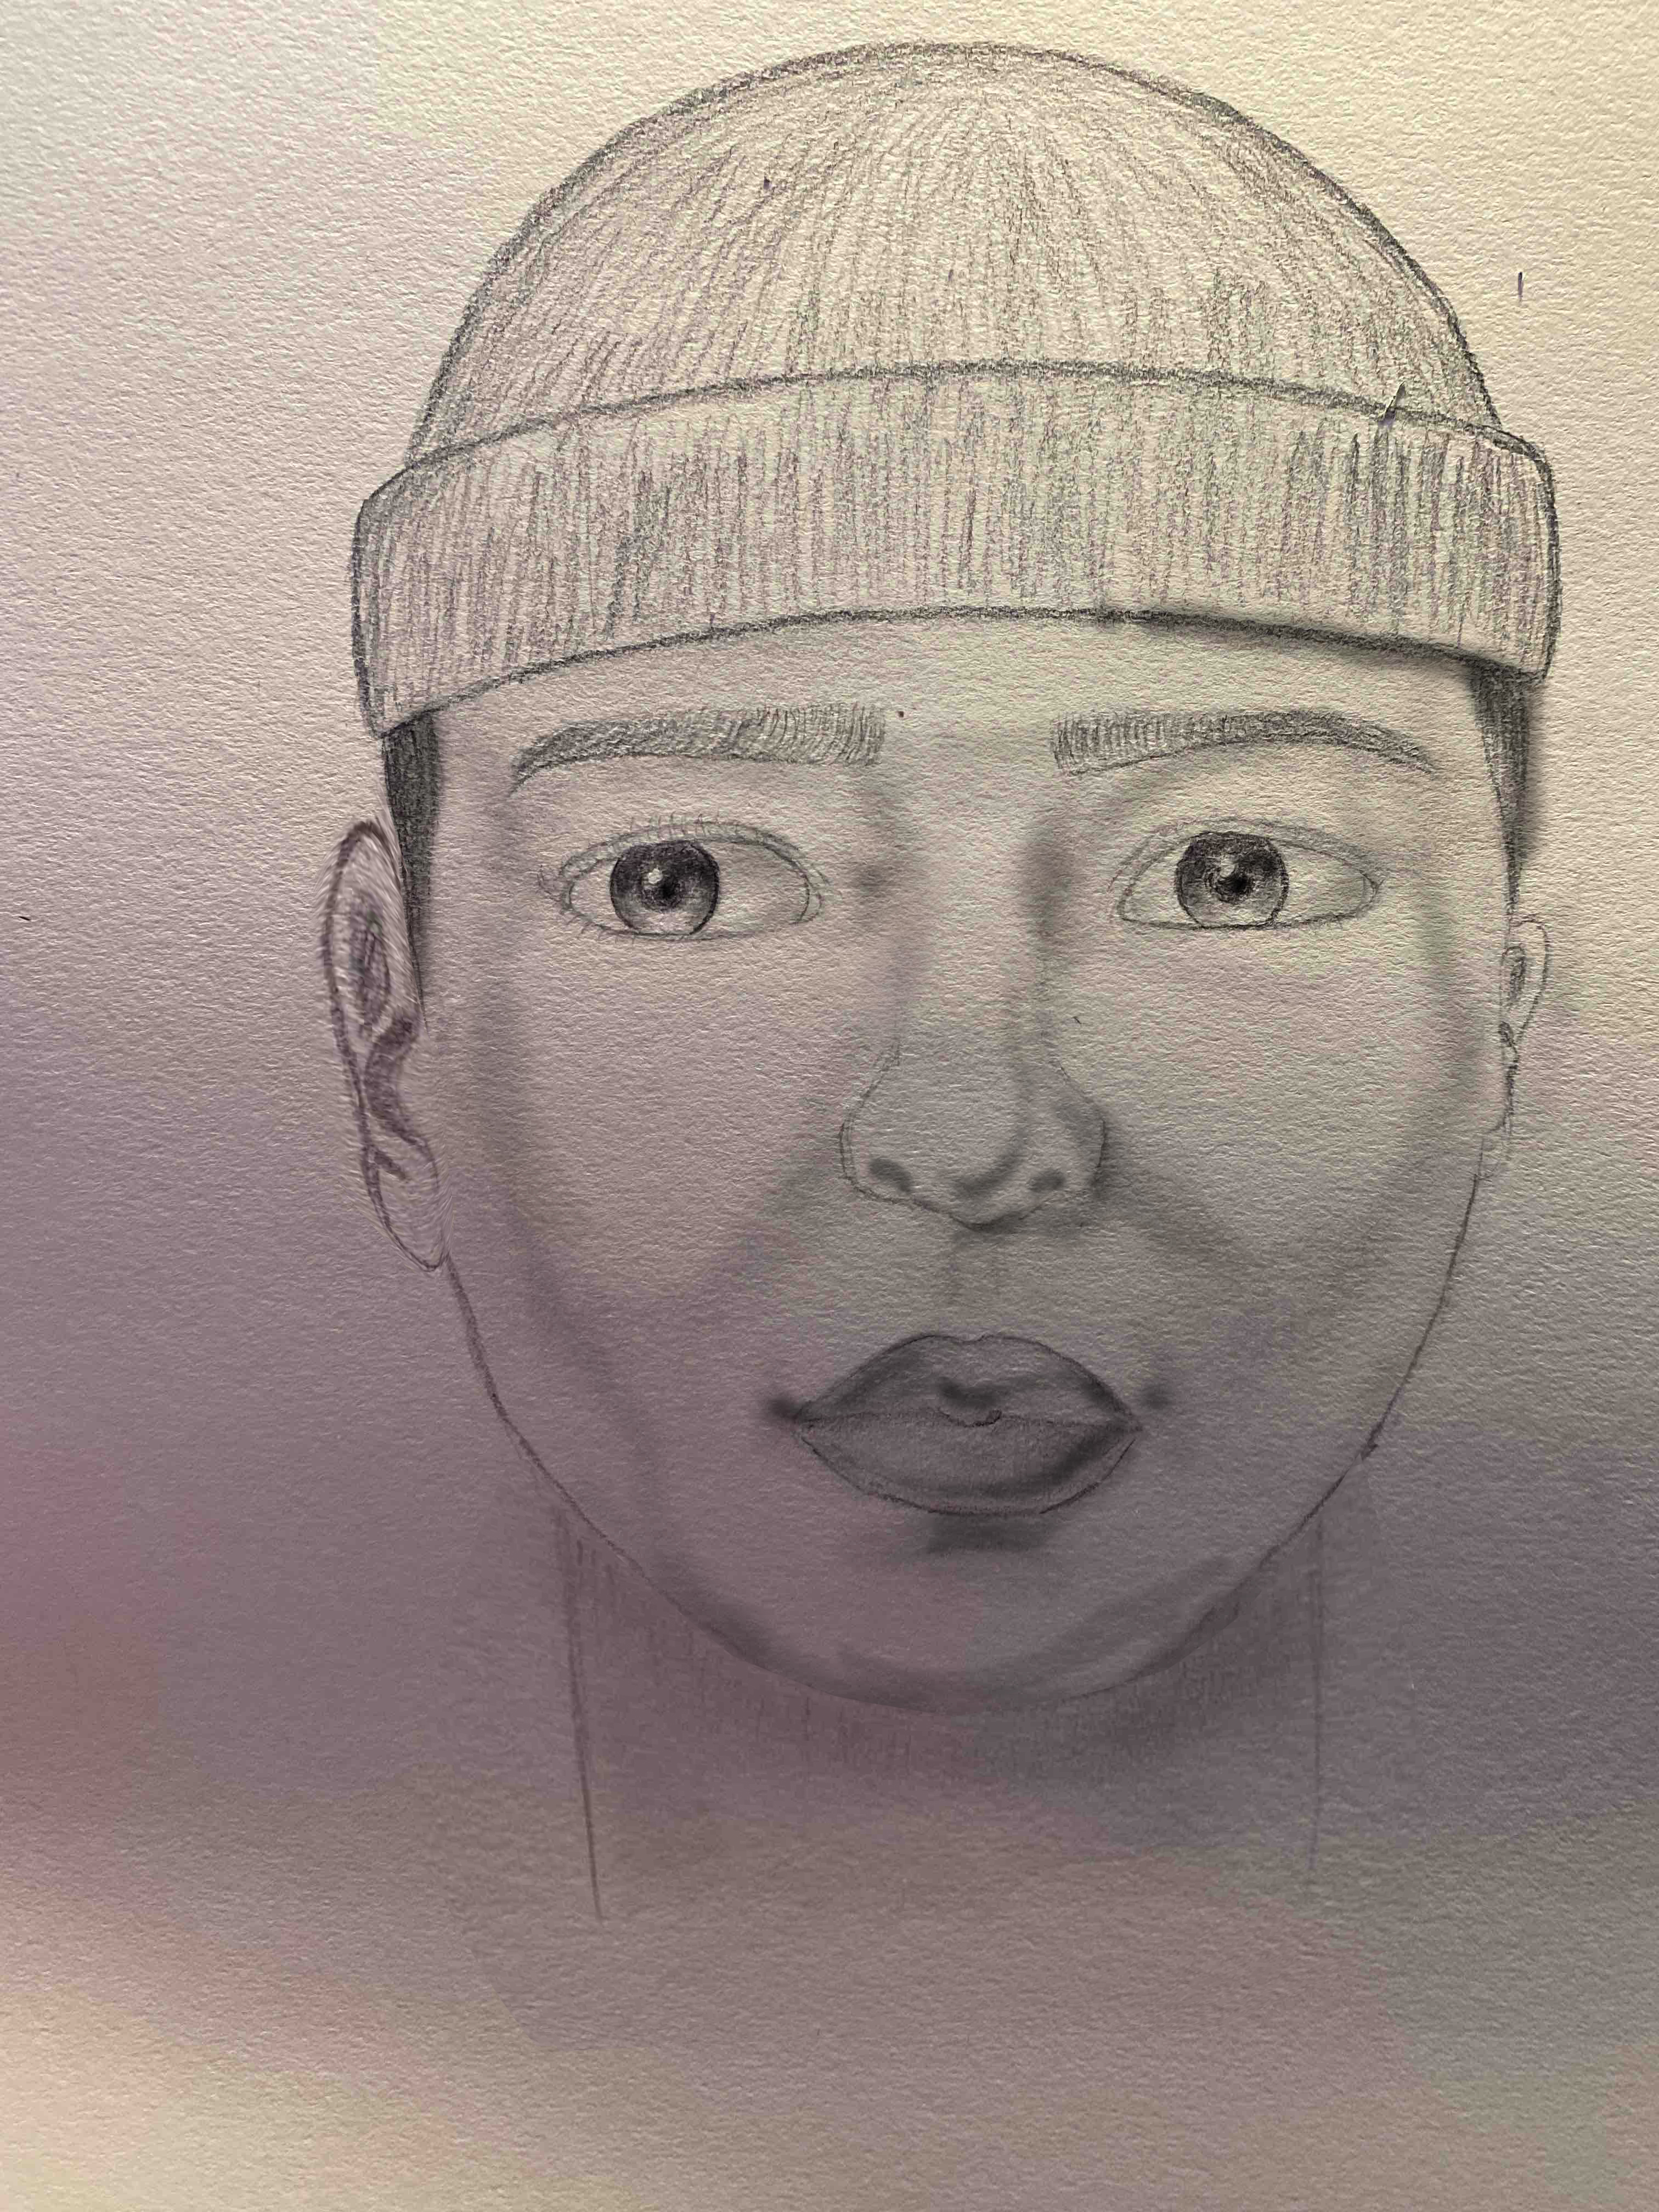
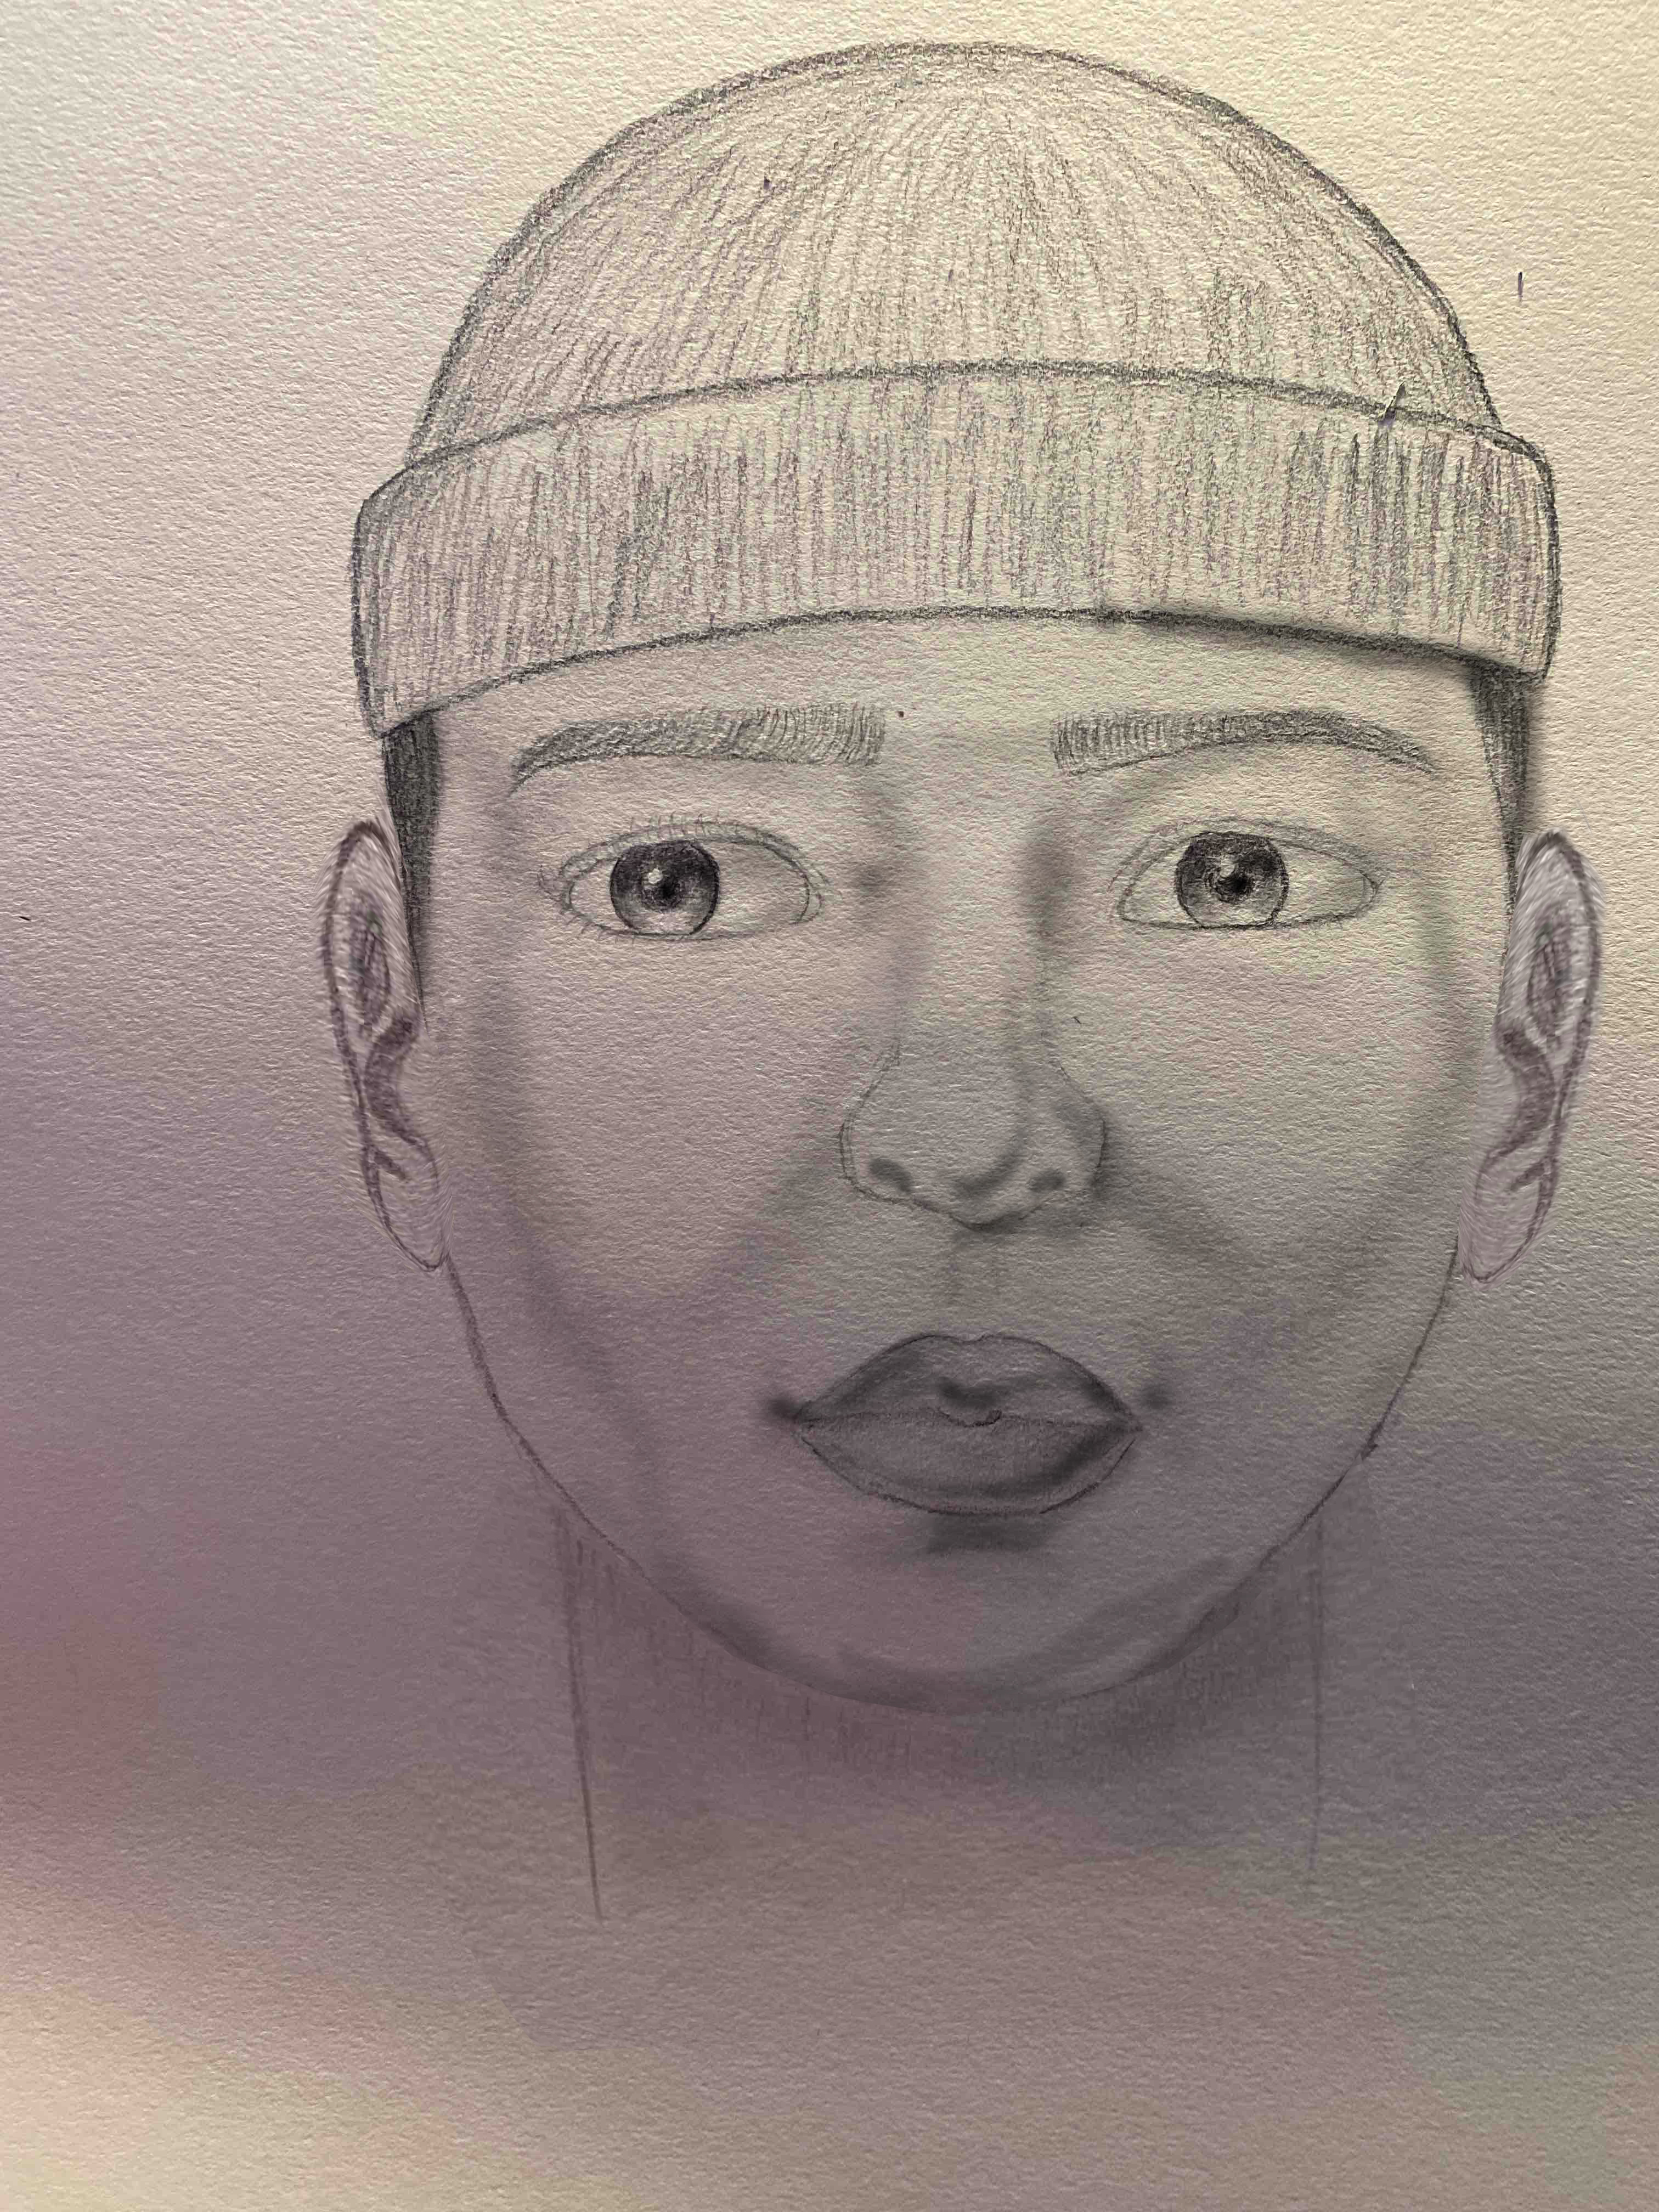
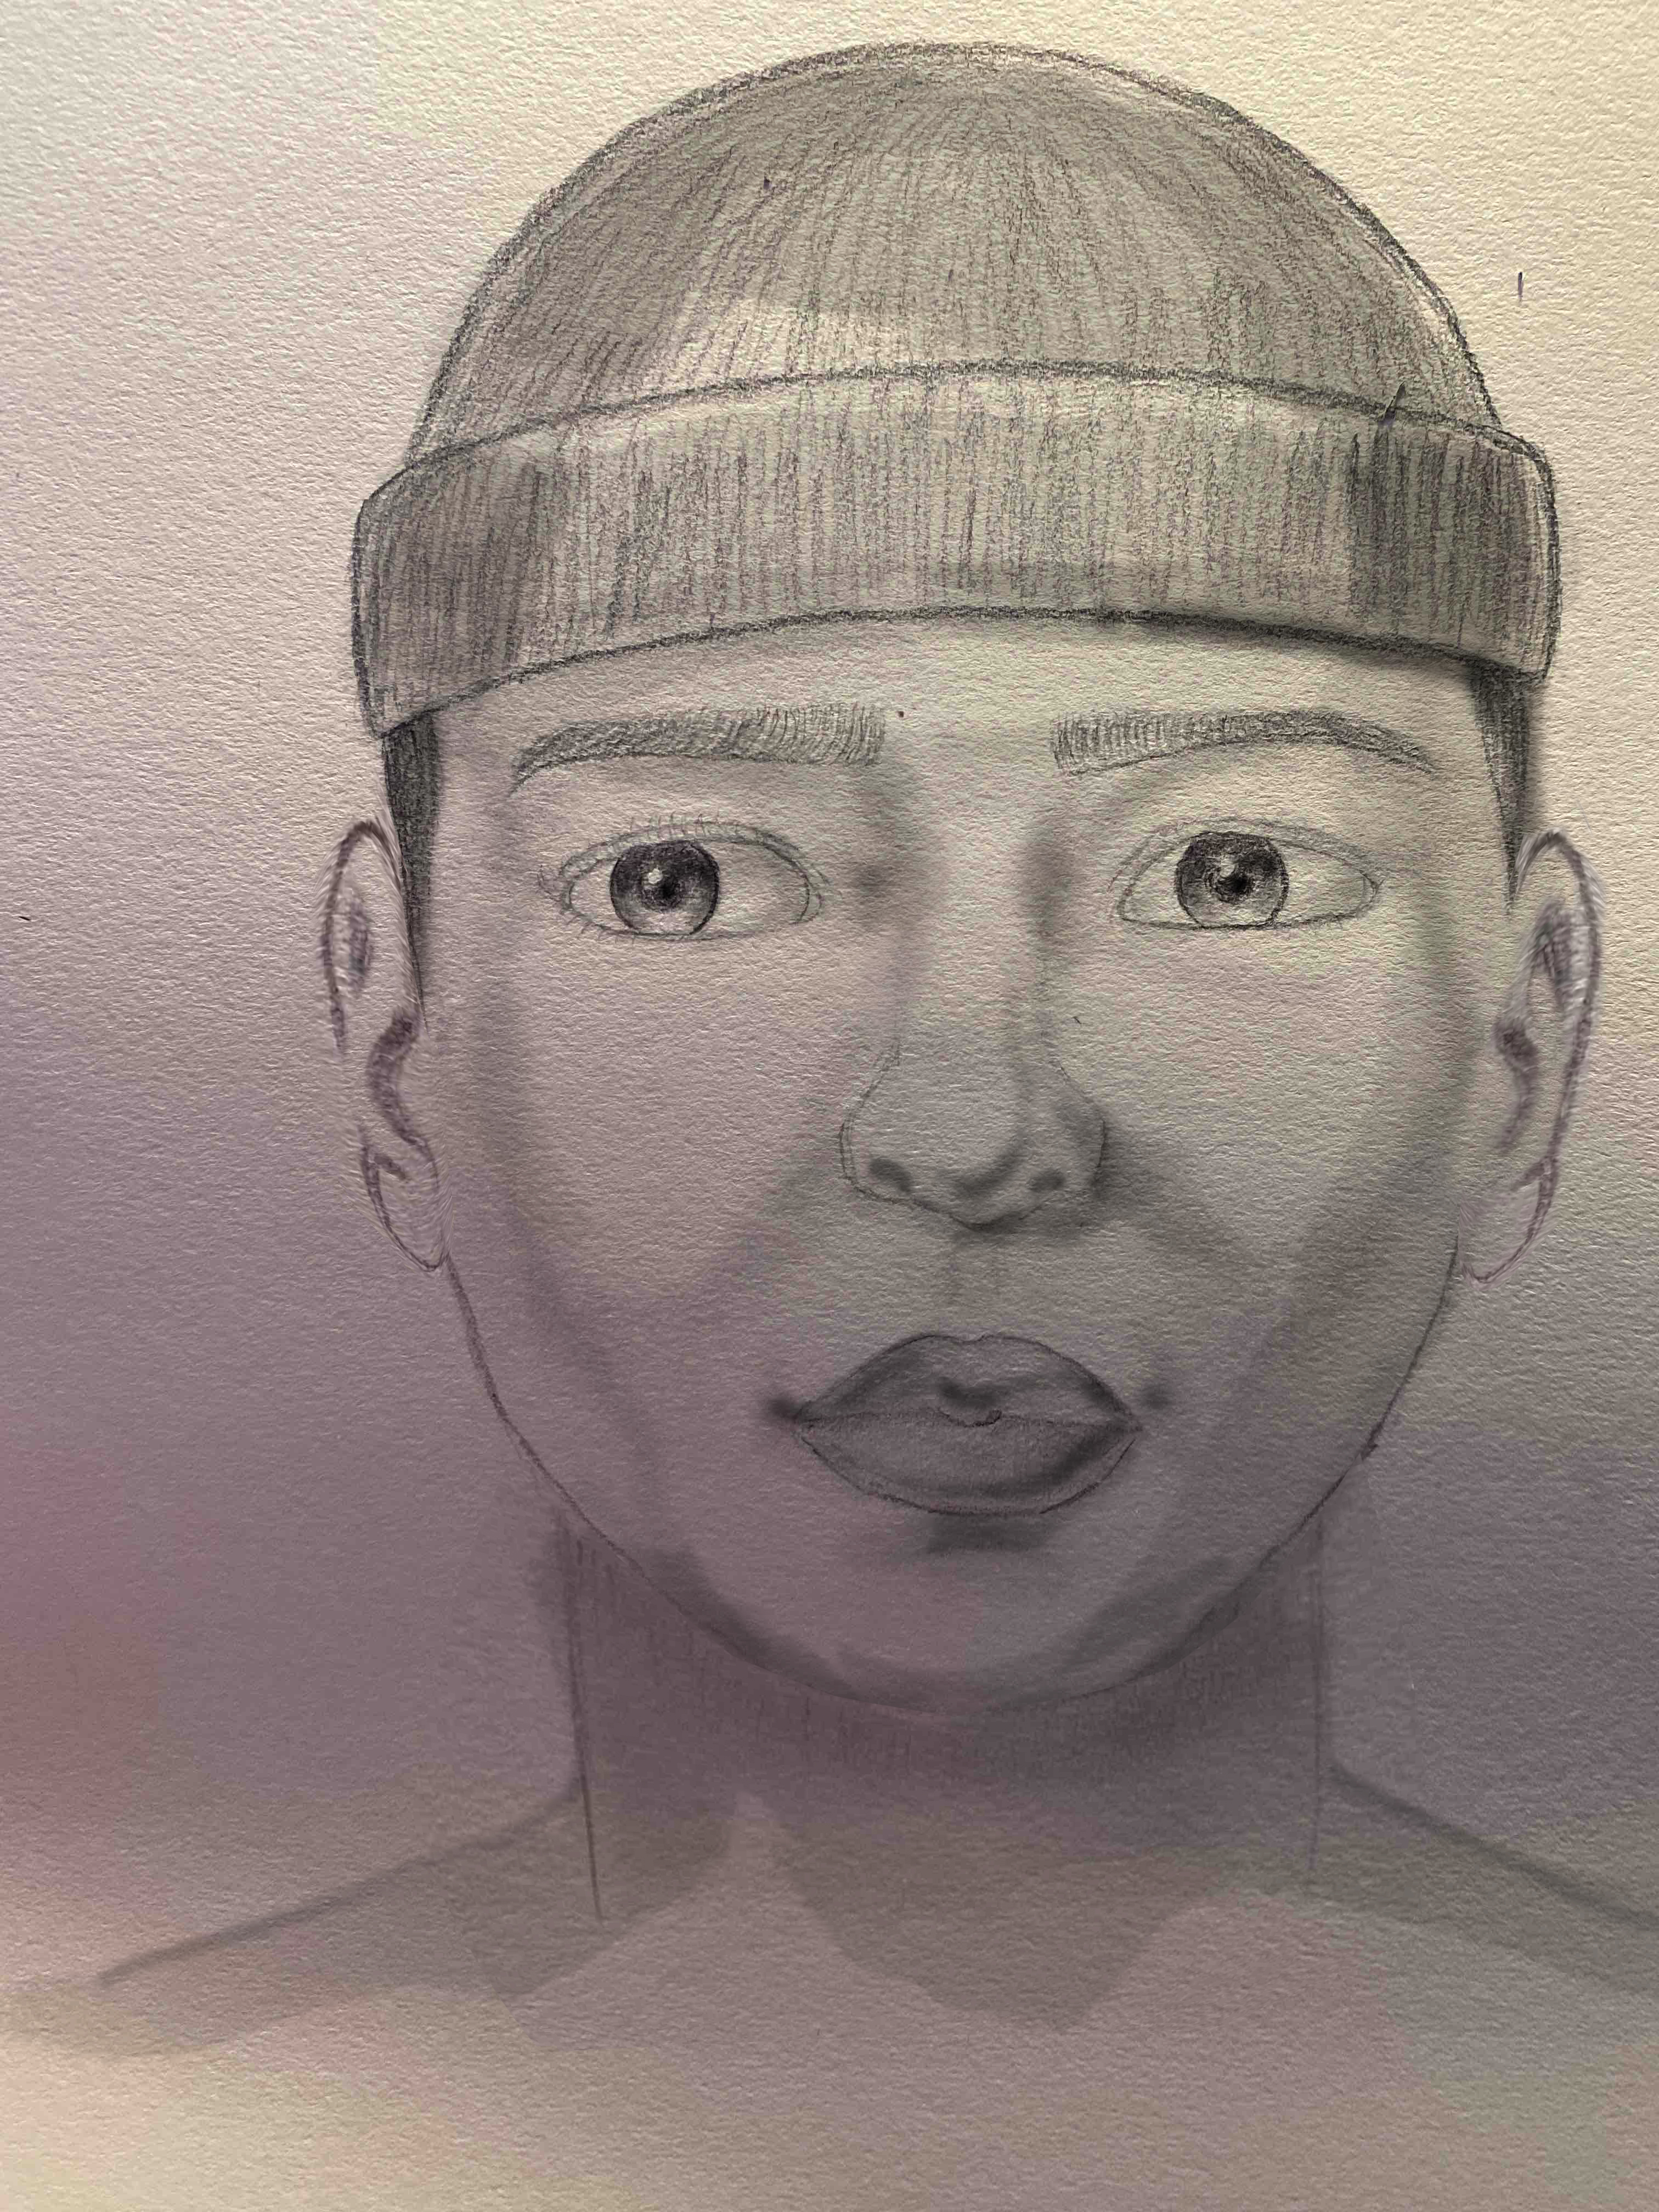
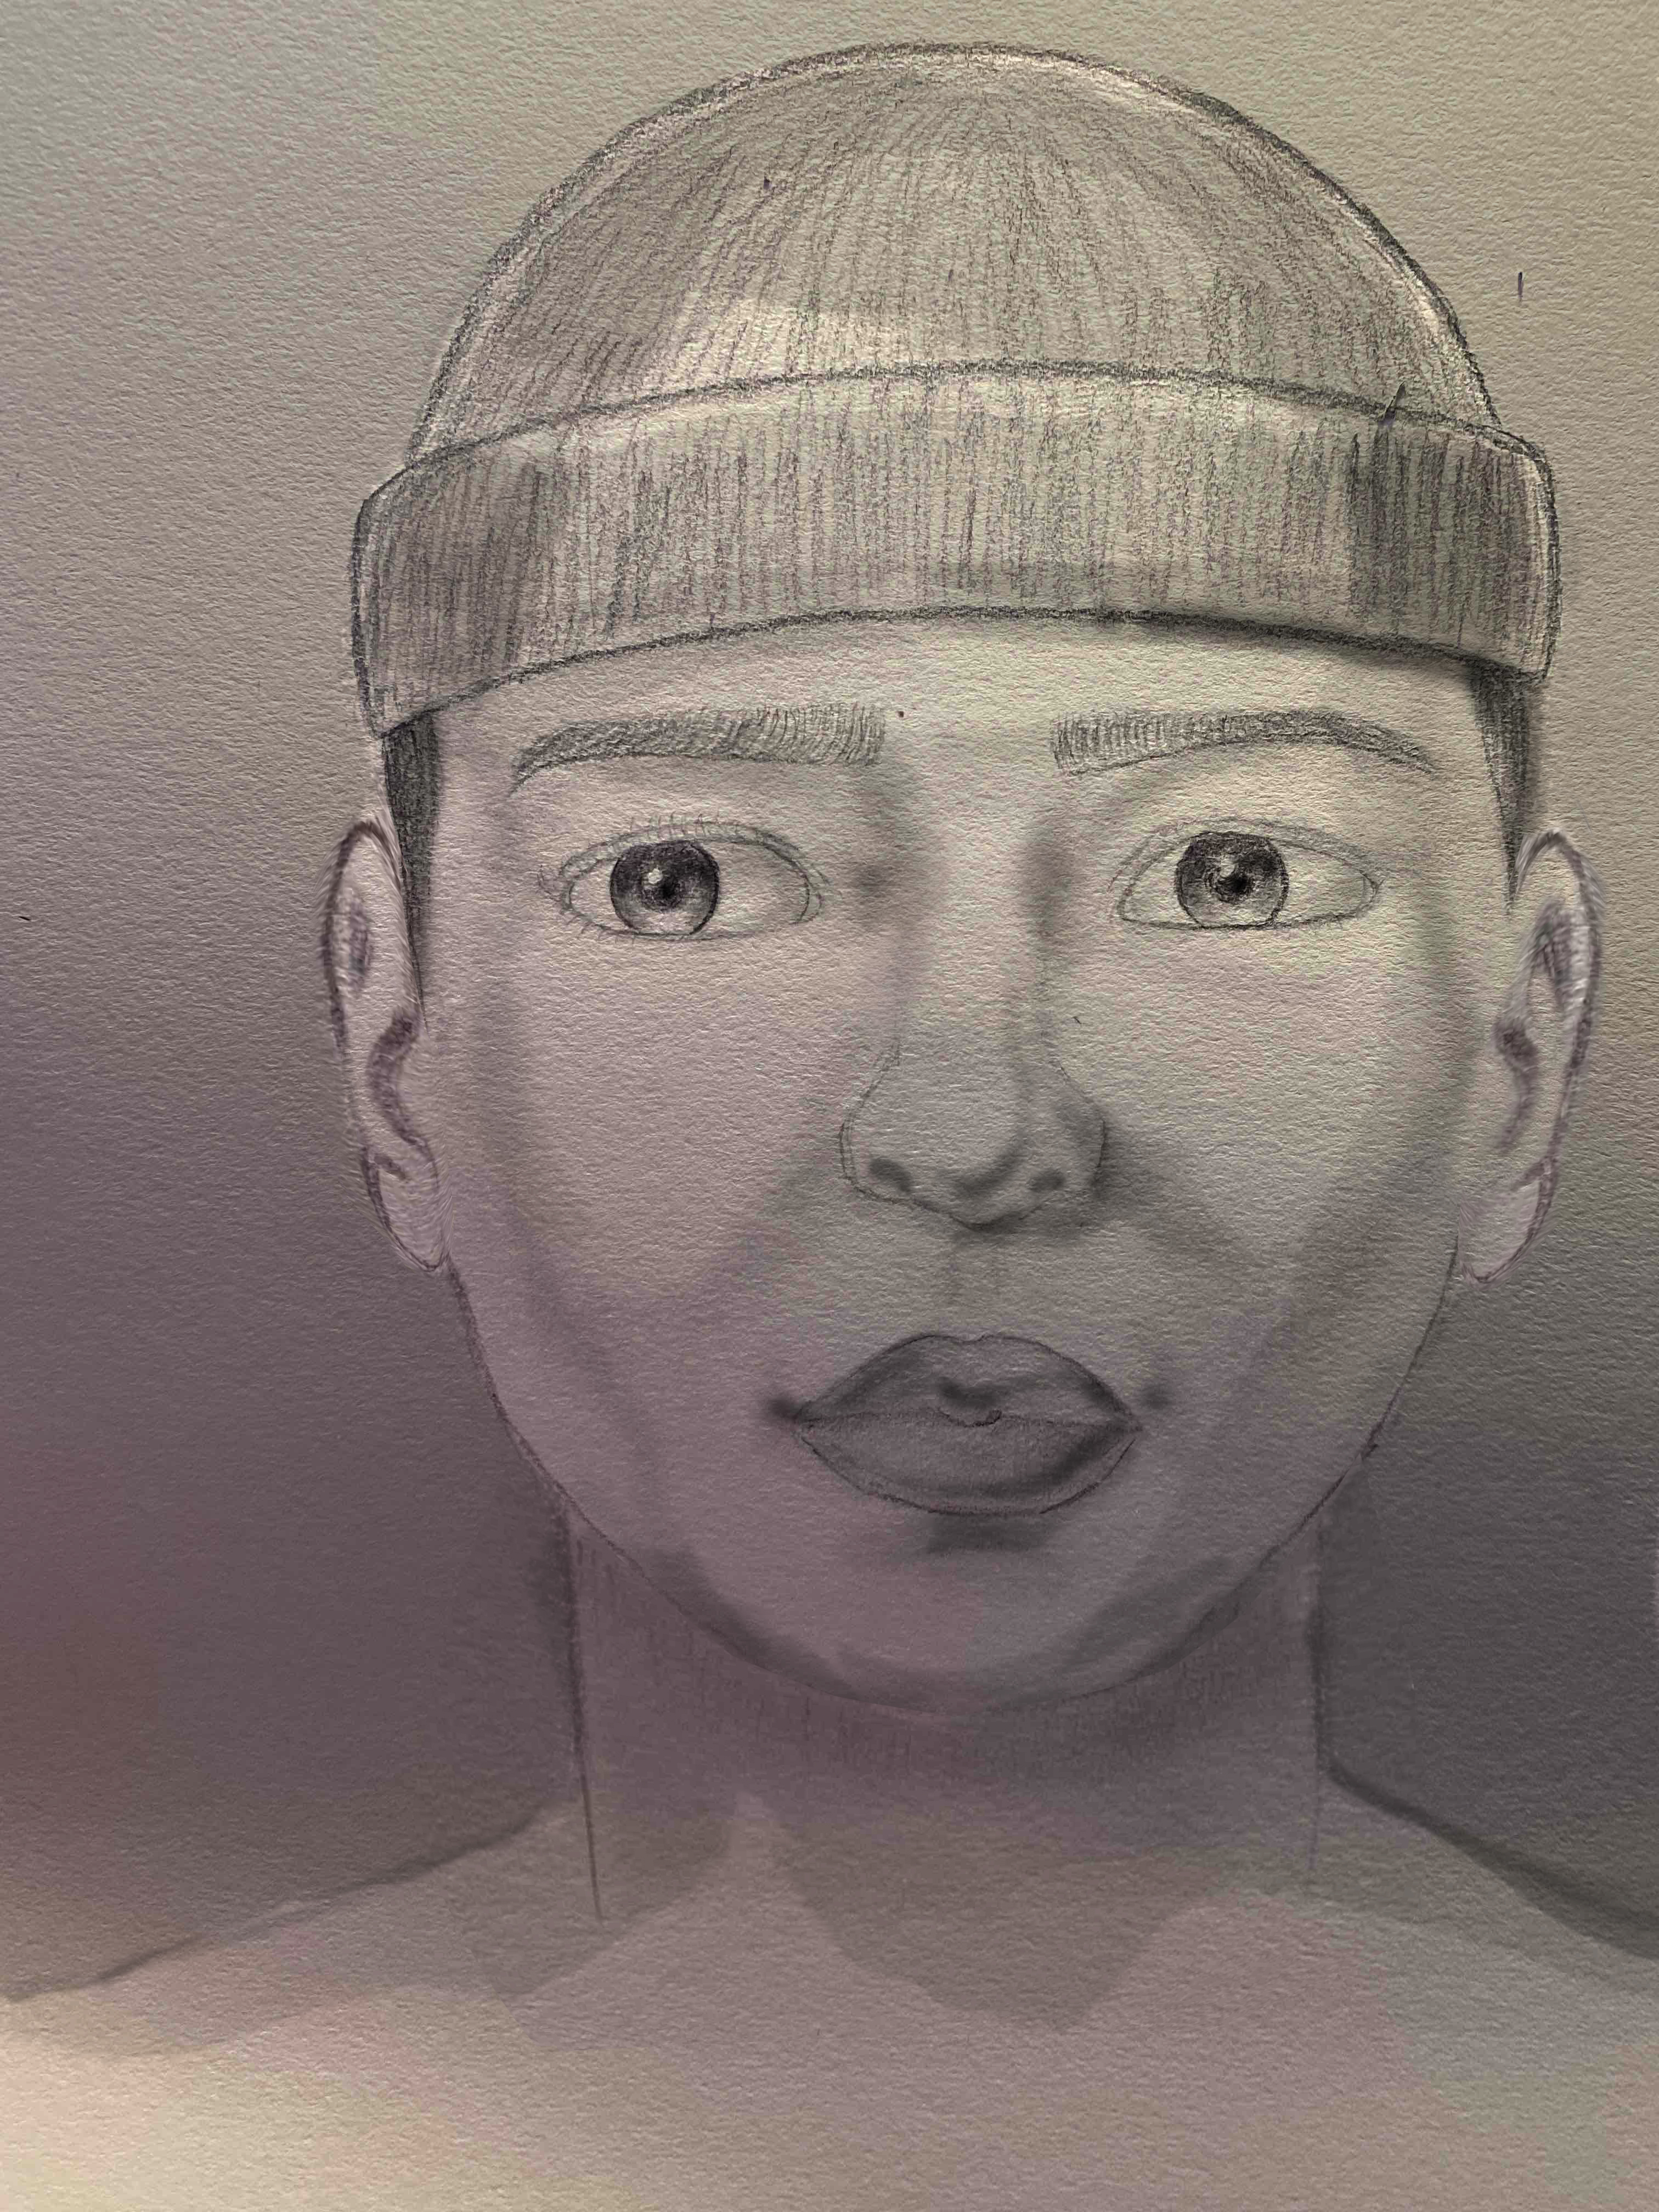
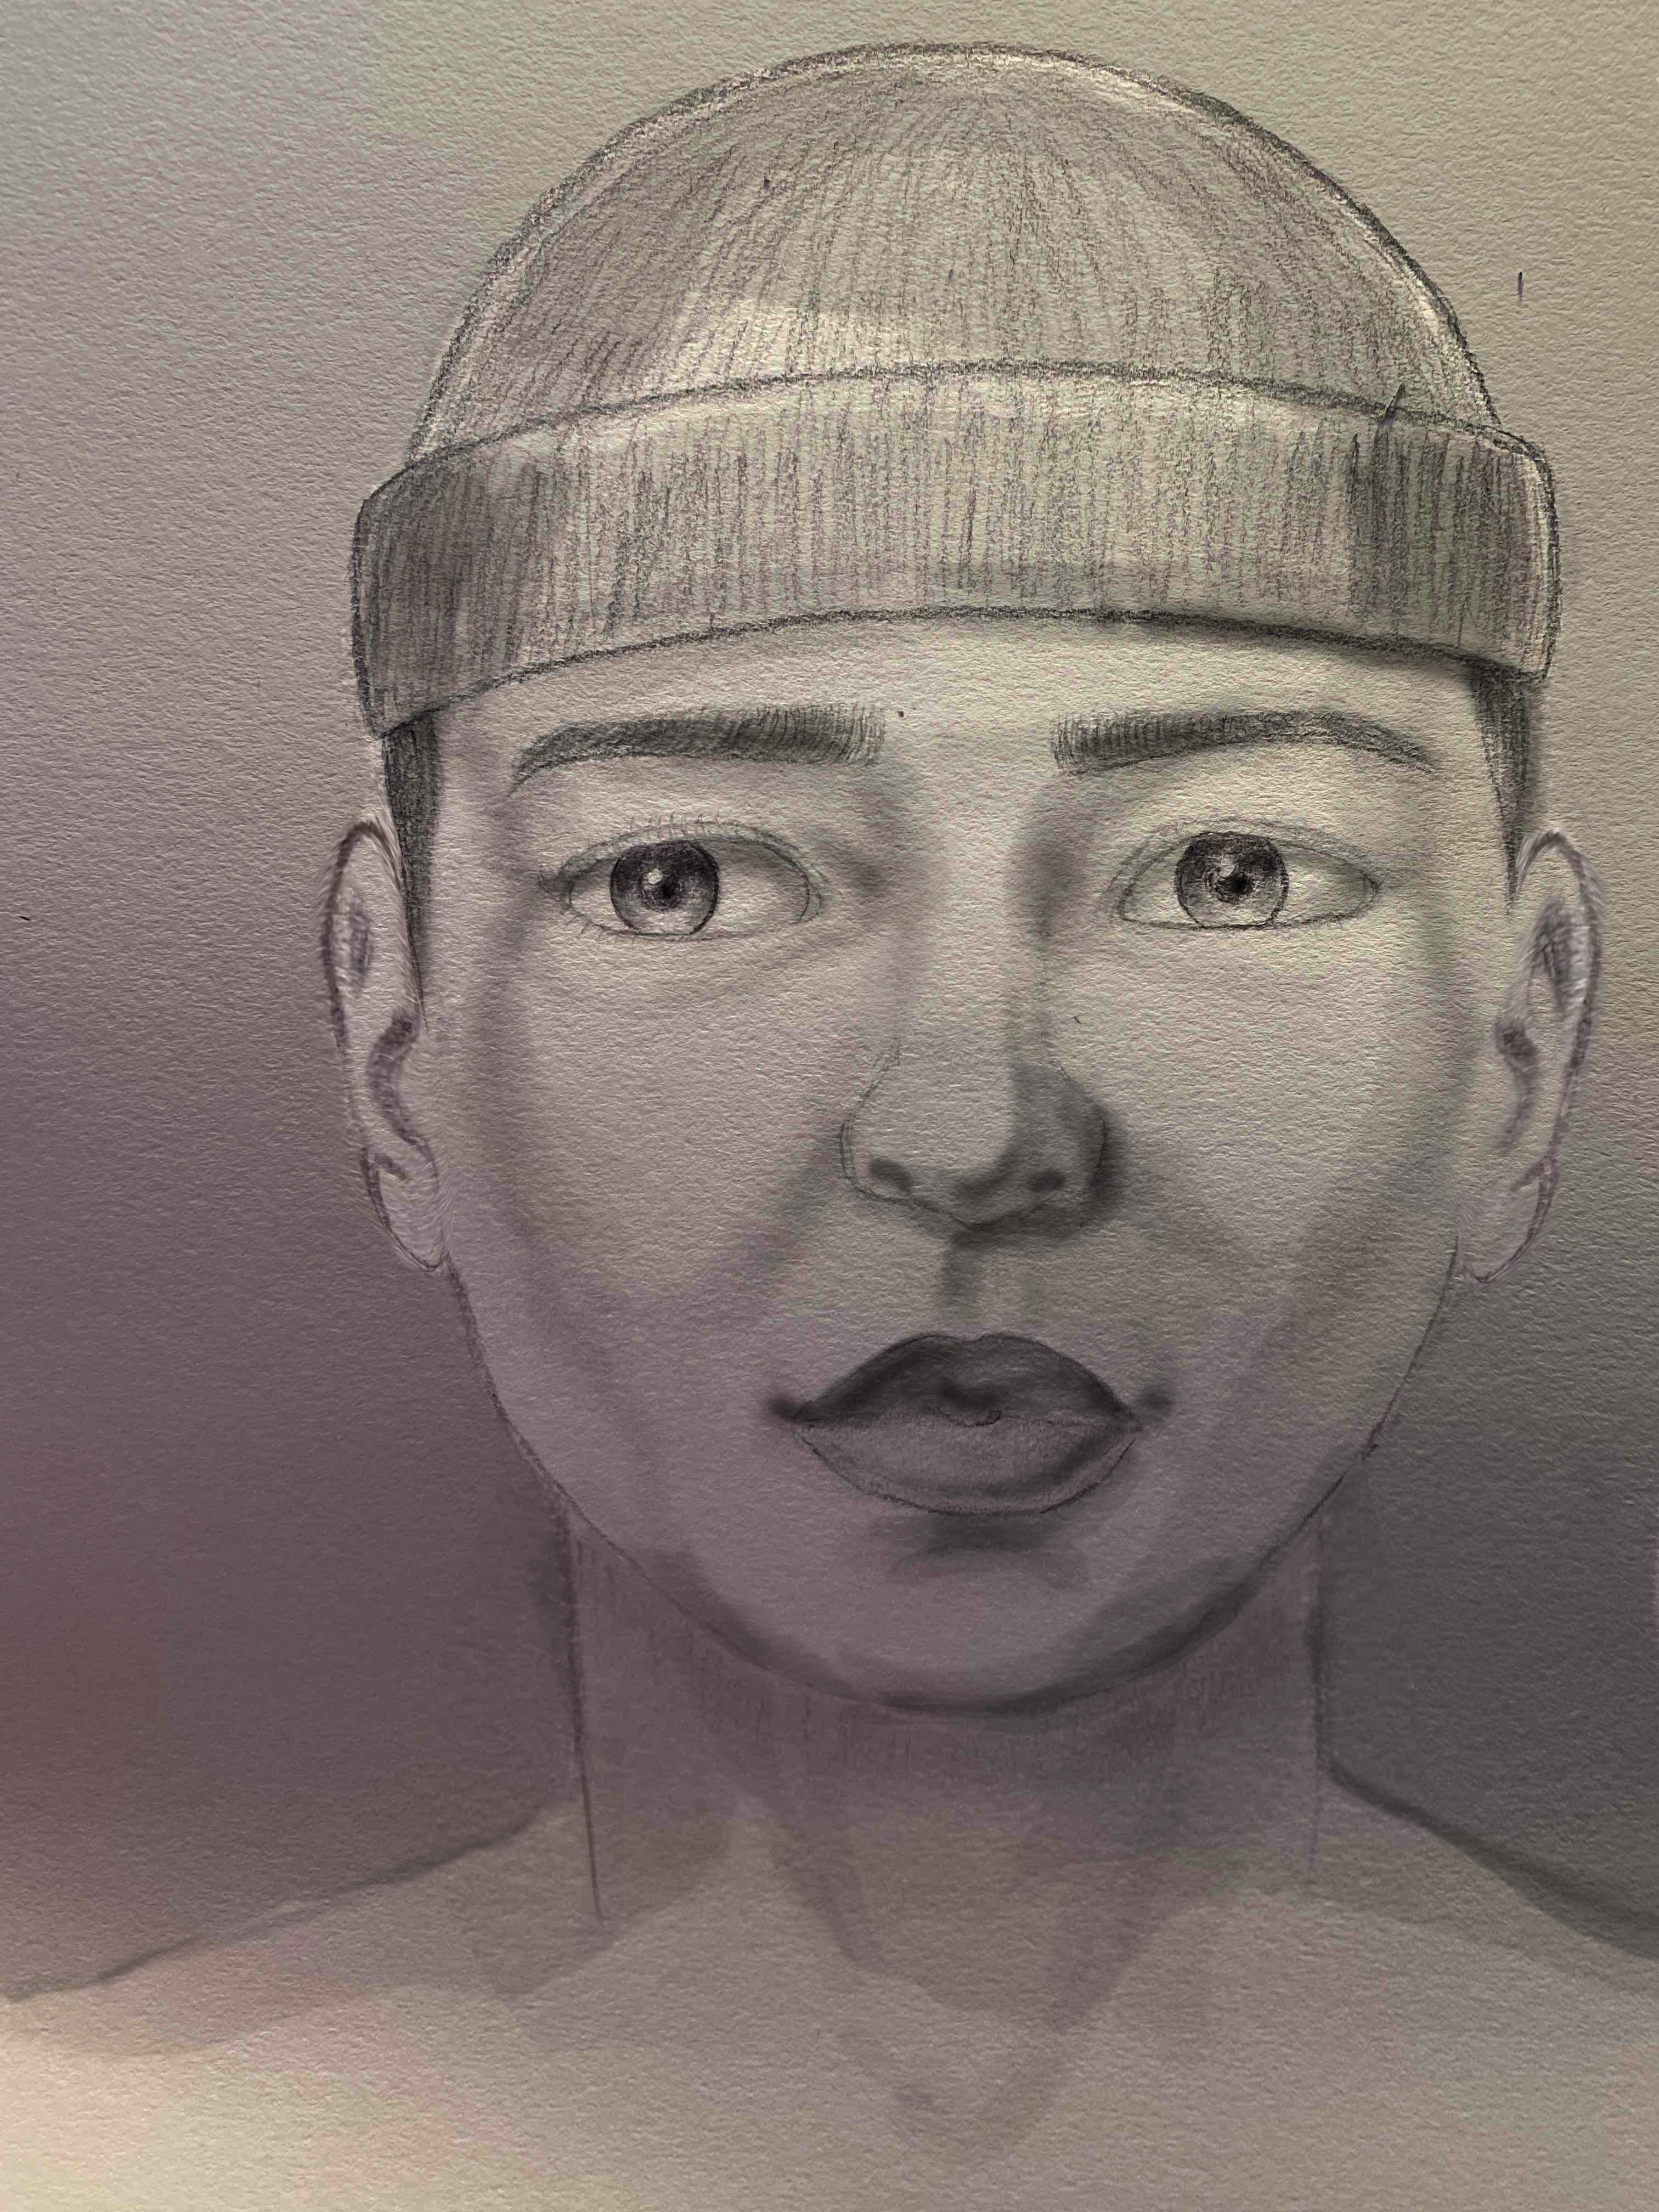
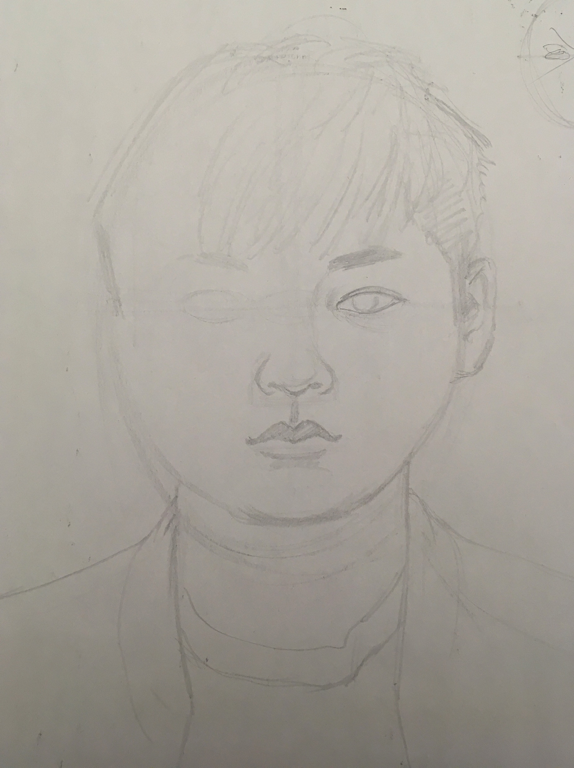
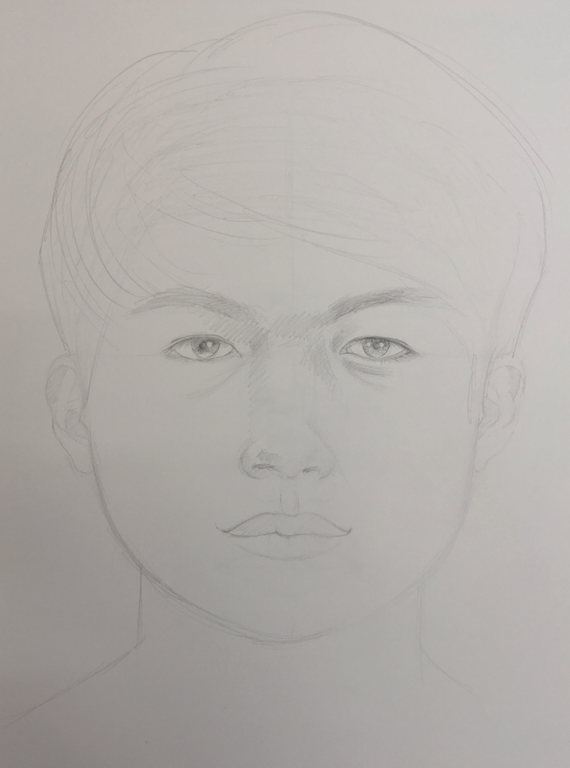
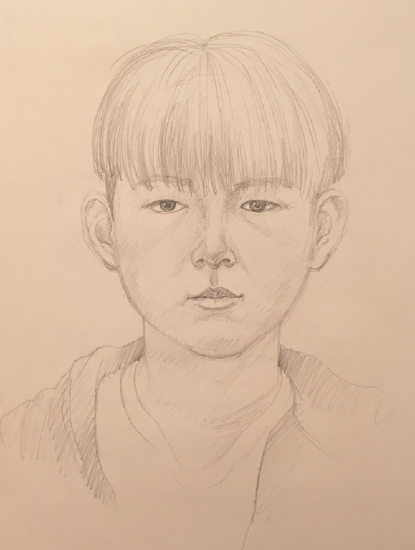
A basic template is useful when learning to draw the face from the front. When my daughter was 10 she wanted to draw a face and asked for help. Having some printing paper available I quickly drew the template as a guide and a starting point for her exploration into portrait drawing (Figure 1). This should be useful for you as well to simplify the complexities of drawing the face. Use the following steps as a guide and note that I use an underlying face to help show how the template really does match the features of the face. After this guide is explained, I include partially finished portrait drawings so you can see the various stages. Note how light the lines are and that the more finished areas are progressively becoming darker with more added details. Additionally, the anatomy section of this chapter should be carefully and thoughtfully studied since it goes into more detail about the underlying structures and portrait drawing techniques not covered in this step-by-step instruction. Read both sections of the chapter carefully before attempting to draw a portrait.
Using a full sheet of paper, visually map out the placement of the head, neck, shoulders, and upper torso on your paper. Place the head slightly above the center of the paper, not in the middle (Figure 2). Anticipate drawing the head life size or slightly larger if the paper size allows. After visualizing the placement of the head, neck, shoulders and upper torso, lightly sketch using an HB pencil an almond shape for the head. Relax as you do this using the sketching grip (Figures 3a - 3c). The top of your almond (elliptical) shape is the crown of the head (this does not include the hear, just the scalp) and the bottom margin os the chin (Figure 3d).
Step 2:
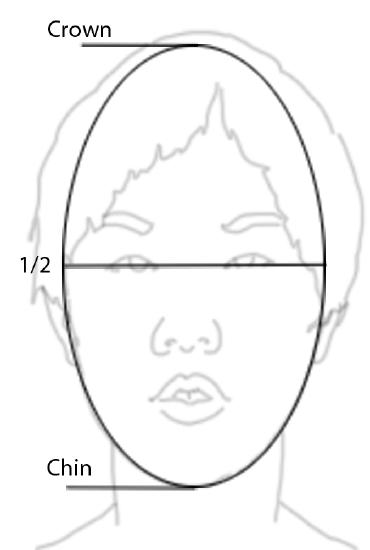


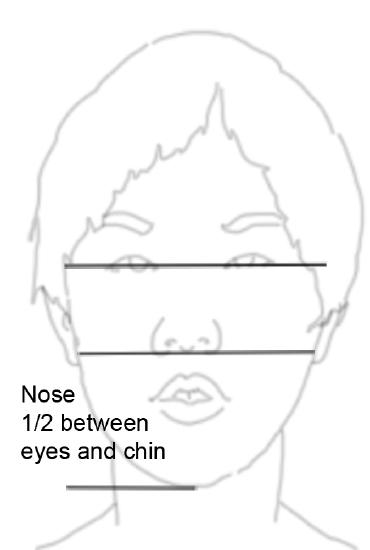
Figure 4a Figure 4b Figure 4c Figure 4d
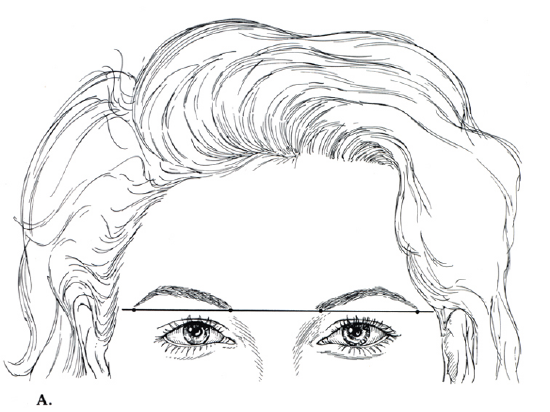
Using light guidelines, draw lines for vertical placement of the eyes (Figures 4a - 4c), nose, and mouth. The horizontal guideline for the eyes is one half the distance from the chin to the crown of the head, so right in the center of the almond shape. Note that in diagrams 4b and 4c Distance A = Distance B. The horizontal guideline for the nose is halfway between your eye guideline and the chin (Figure 4d). In this case, it is observed that the distance from the mouth to chin is slightly longer than the template and the nose ends up a bit higher than the halfway position between eyes and chin. The horizontal guideline for the mouth is approximately one third of the distance down from the nose guideline to the chin (Figure 4e). Also, place a light vertical guideline centered in the almond shaped head (Figure 4f). These are the primary guidelines to help you place the facial features.
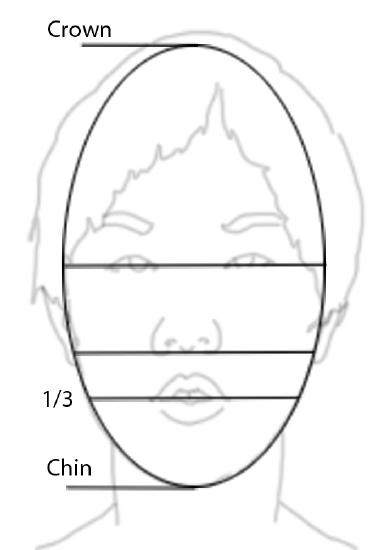

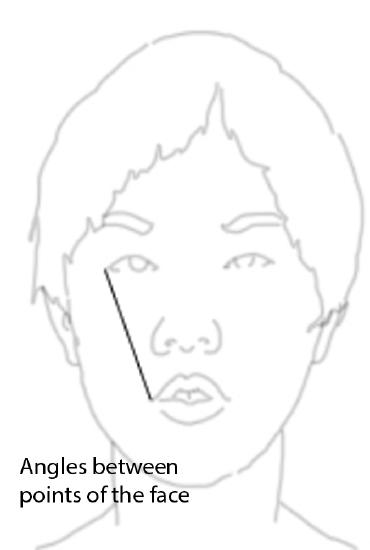
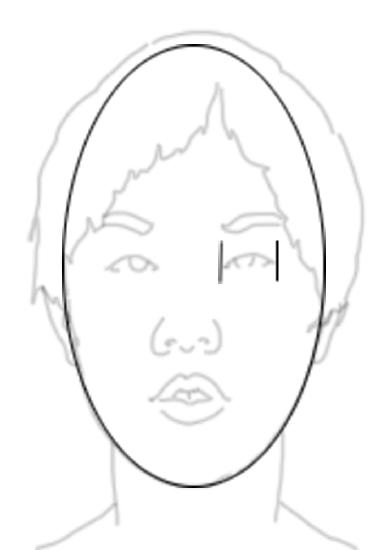
Figure 4e Figure 4f Figure 5a Figure 5b
Step 3:
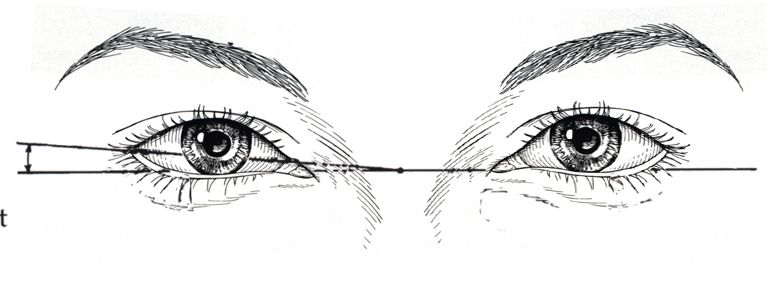
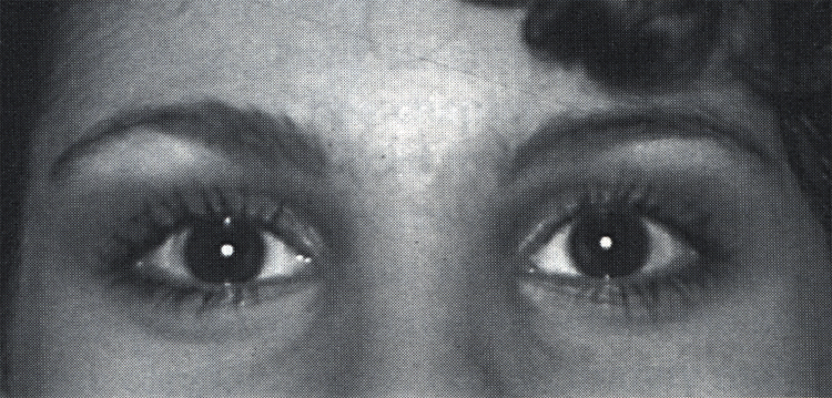
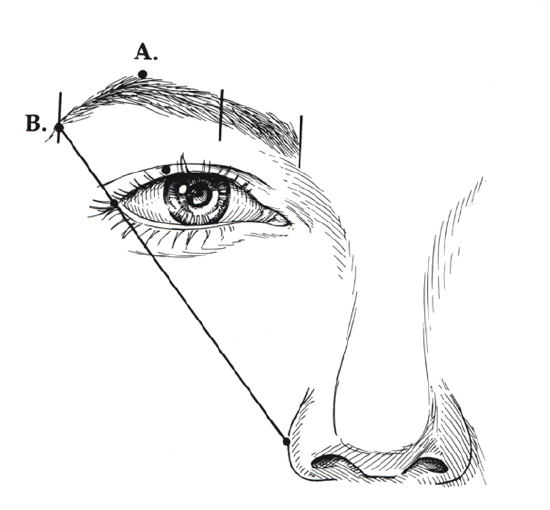
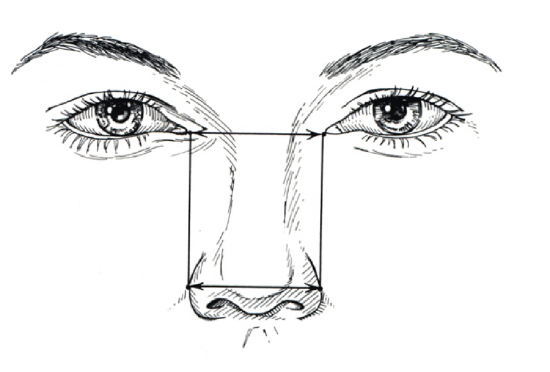
Carefully observe the face using sighting techniques. Holding the pencil out and closing one eye, look at the angles between various facial features, for example the angle of the bottom of the ear lobe to the corner of the mouth, to the bottom of the nose, and to the outer angle (corner) of the eye (Figure 5a). Do this using several of features of the face. This helps you become accustomed to sighting the face and really seeing and observing the facial proportions which may vary from the template. Now carefully sight the eyes. Where are they in relation to the width of the head? Are they slightly above the eye guideline or slightly below? Placement of the eyes is an important step since the placement, shape, and size of the eyes will be used to place the other features. This is an important step so take your time and make careful observations. Using your pencil and the unit of measure technique, measure one eye (Figure 5b). Now measure the distance of the outer corner of the eye to the side of the head (Figure 5c). Lightly draw the outer outline of one eye. Now look again at the sitter and check your measurements. Note that there is usually the distance of one eye between the eyes (Figure 5d) and you must also account for the width of the second eye and the distance of that eye to the side of the head on the opposite side of the head from the eye you placed. This is arguably the most difficult part of this drawing, so please take your time. Using sighting and unit of measure, place the second eye as a lightly sketched outline.
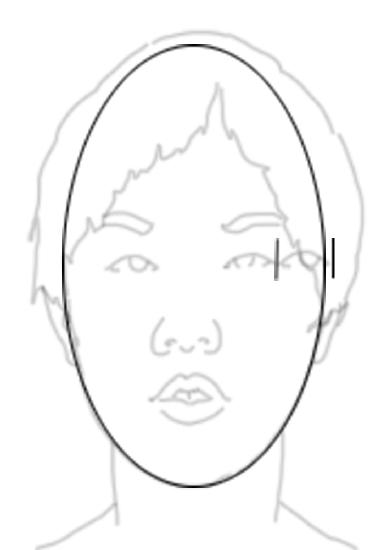


Figure 5c Figure 5d Figure 6 Figure 7
Step 4:
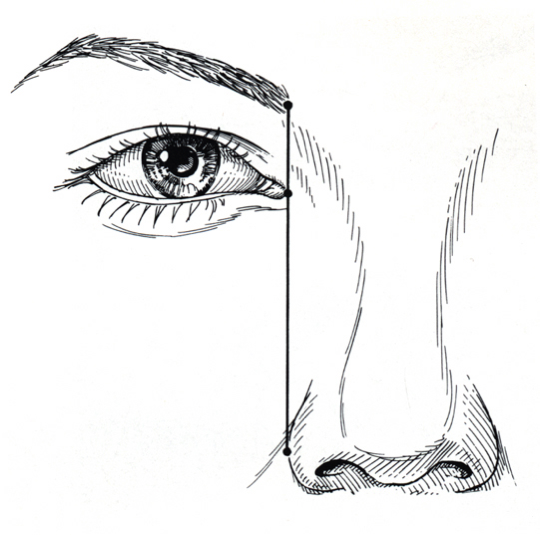
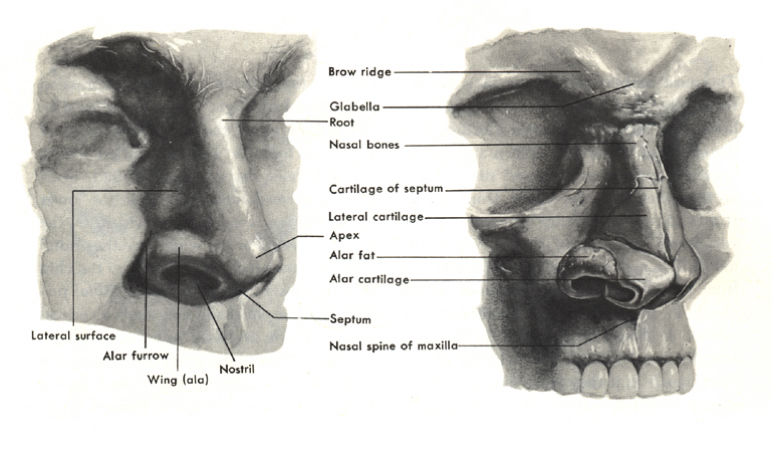
Using the same intent and careful observations, use sighting to determine the shape and placement of the nose (Figure 6). The template is a guide, but do not force what you observe into the measurements of the template. Delight when you observe slight variations since drawing these differences is what will make the drawing look like your sitter. We are interested in celebrating our uniqueness in this drawing, not creating standardized clones. Lightly draw in the root of the nose, alae, nostrils, and bulb, using the template guide. https://en.Wikipedia.org/wiki/Human_nose
Step 5:
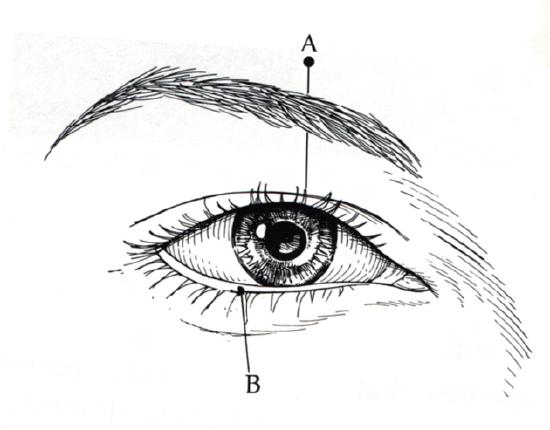
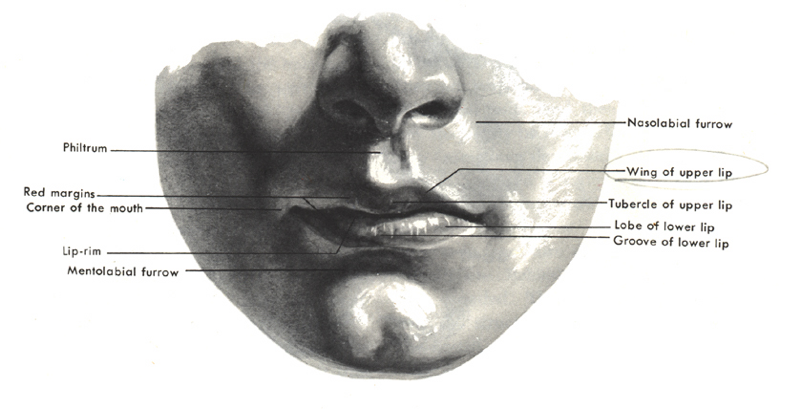
Lightly sketch the shape of the mouth using sighting similar to above. Sketch in the general shape of the eyebrows noting their placement in relation to the eyes. Look at the distance from the upper edge of the eyes and make sure your placement is allowing the right space between the two features. Is there an identifiable break in the eyebrows where the angle changes? Make that observation and include it in your drawing.
Step 6:
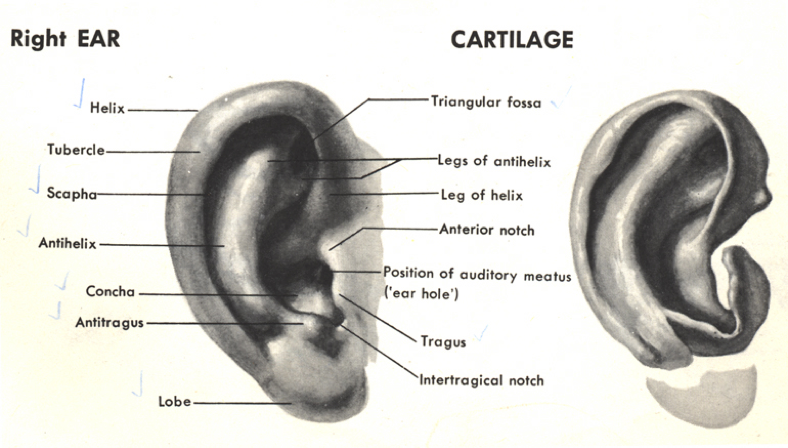
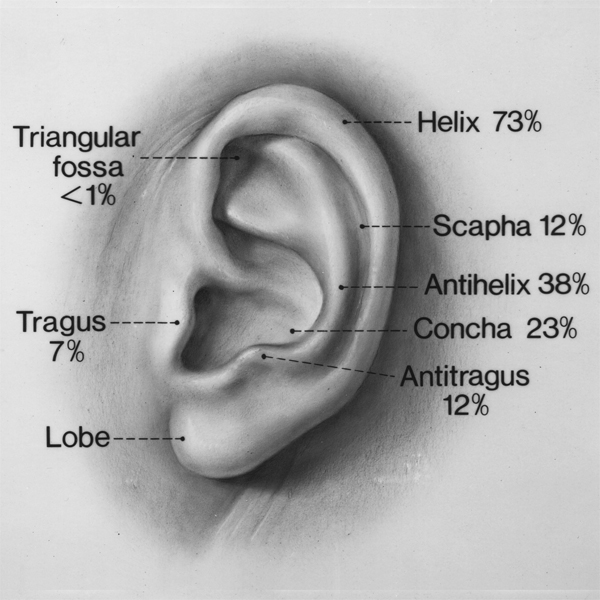
Make sure your sitter is in the position where the head is straight. Ideally, you are also at the same height. With the head straight, observe the upper and lower points of the ears. Sight the position of the top of the ear (top of the helix) in relation to the eyebrow and outer corner of the eye. On the side of the head, make a light mark with your pencil. Now observe the bottom of the ear lobe and, using sighting, compare it to nose and outer corner of the mouth (Figure 7). Make a mark on the side of the head for that placement. Double check your work. Look at the shape of the ear and the distance away from the head the feature is visible. Lightly draw in the ear. Note that you may see either the helix or the anti-helix as the outer shape of the ear. At this point check all the angles between the facial features you've drawn. If they match, move on to Step 7. If not, revise your drawing.
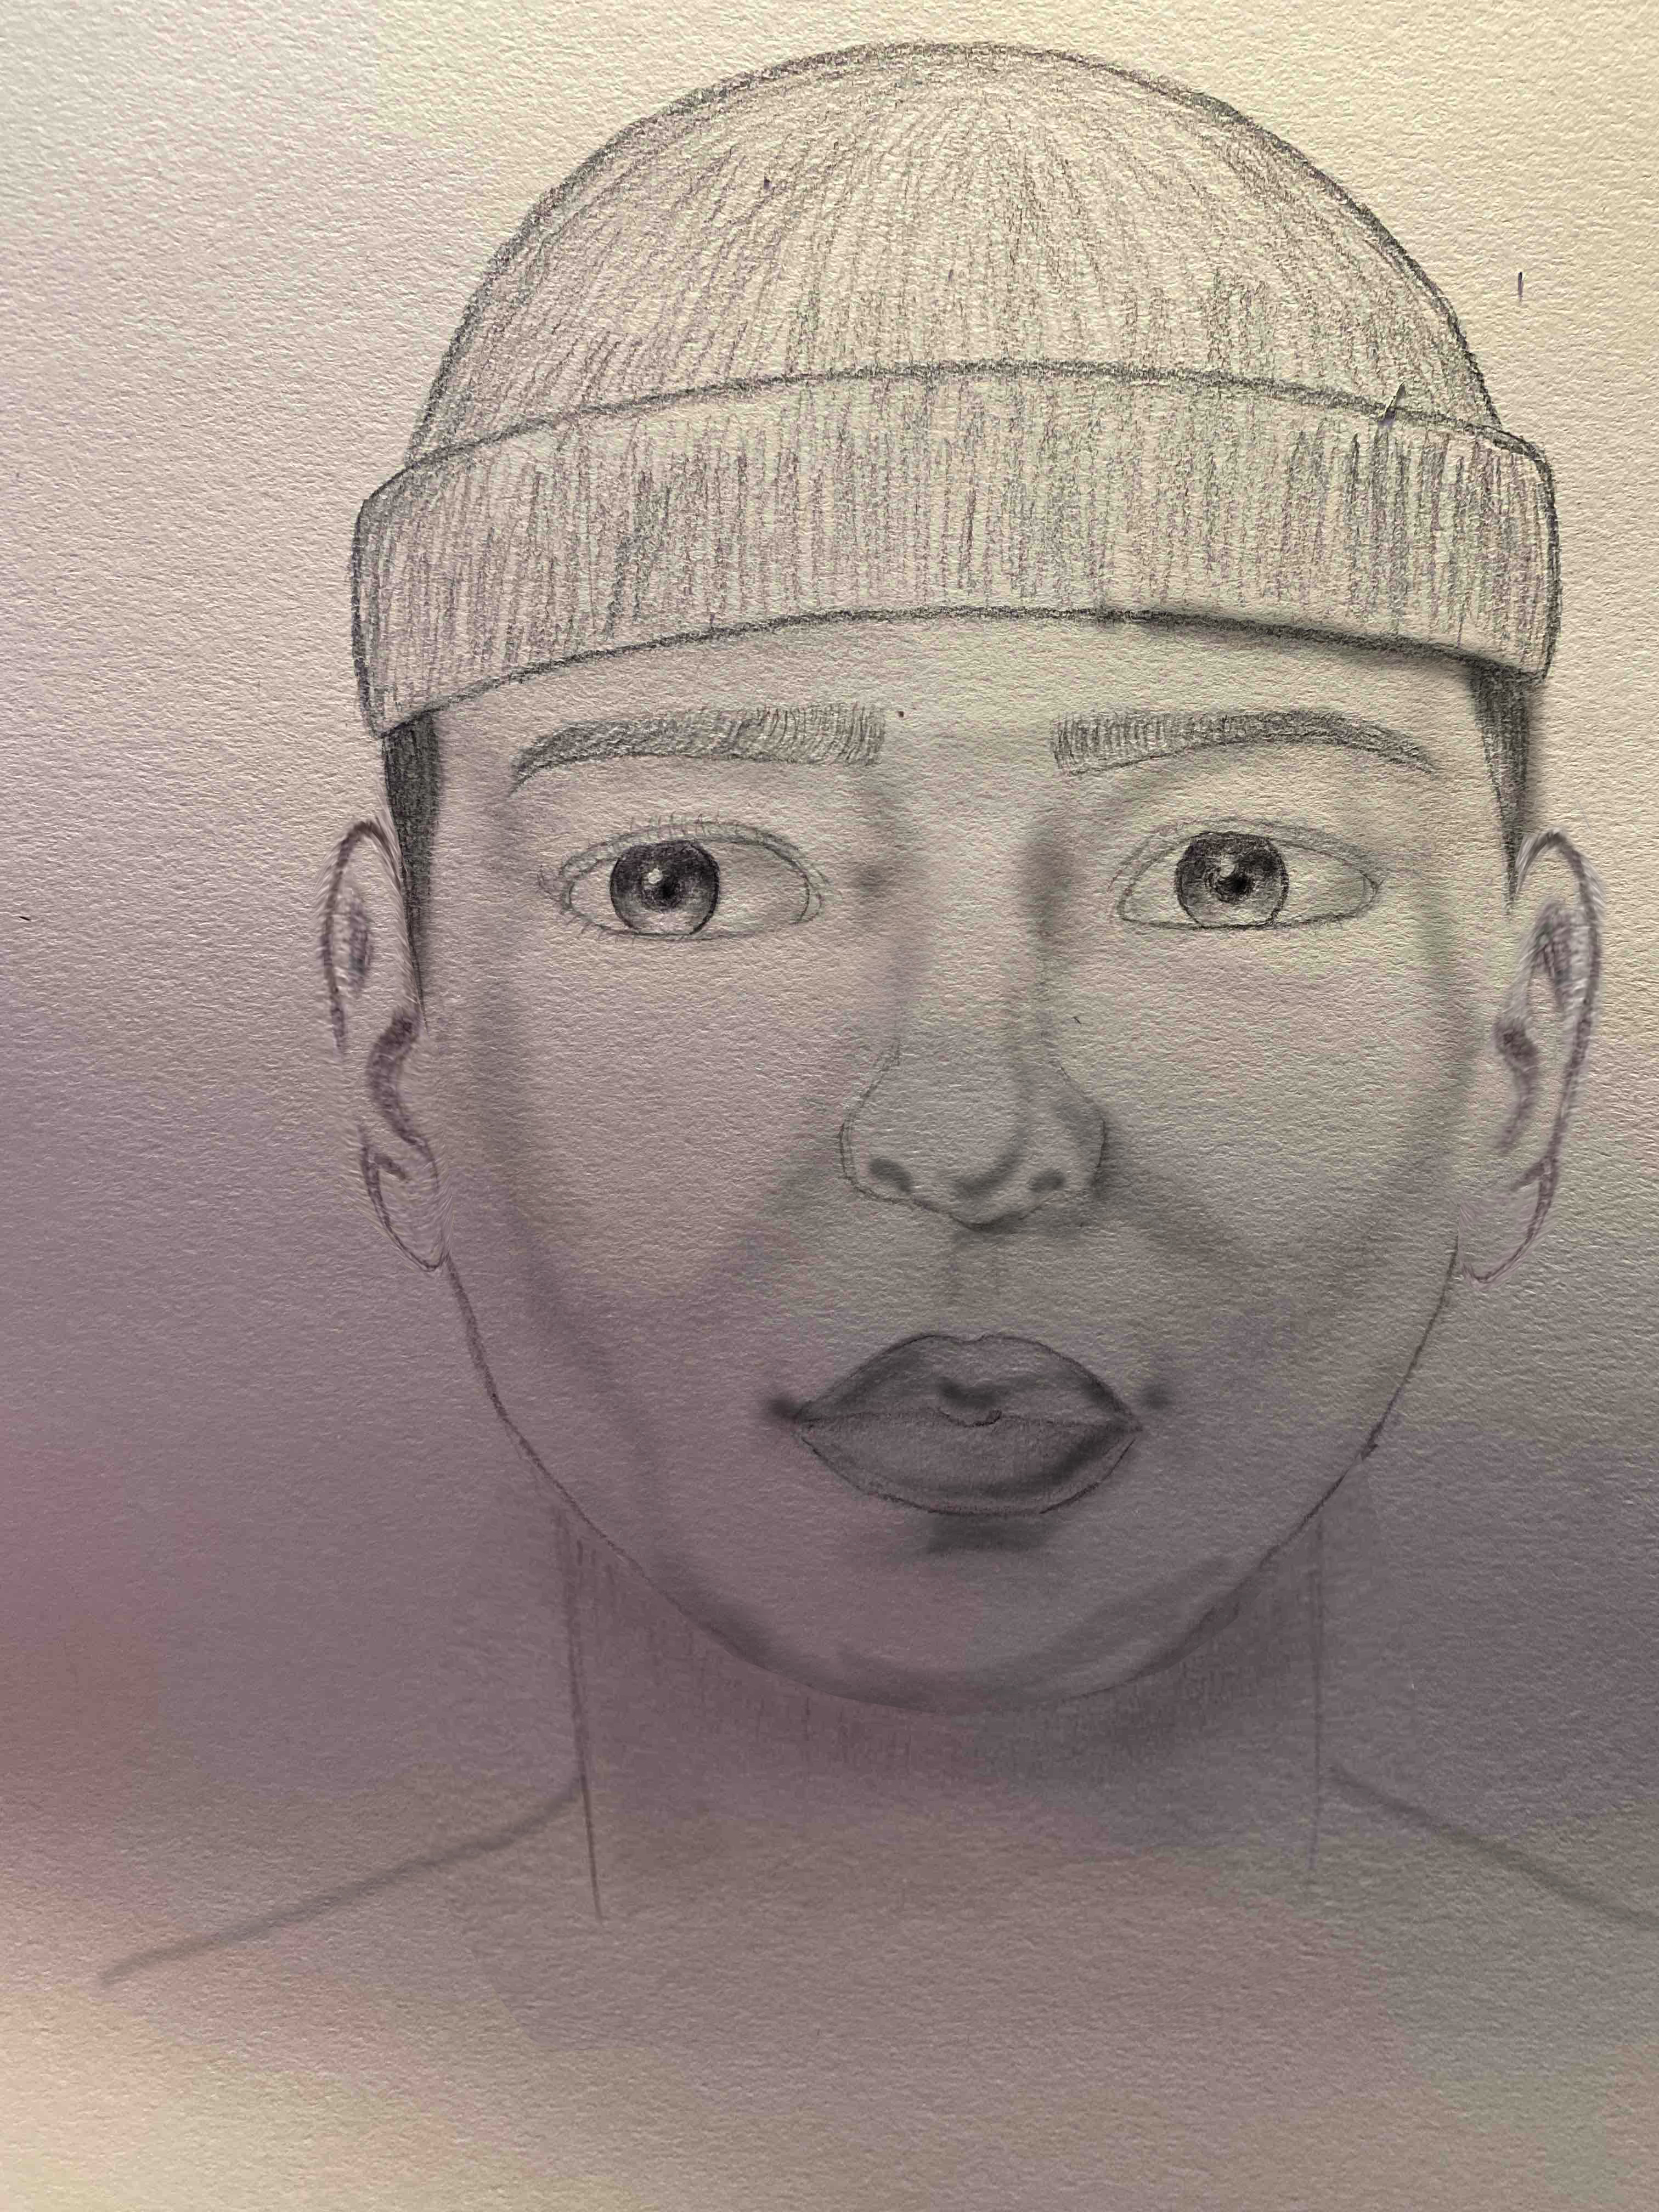
Step 7:
Look at the jaw line and make any modifications. Note that from profile the angle of the jaw using the hands of a clock as reference is usually either 4:00 or 7:00. Look for that angle of the jaw from your frontal view. Can you see the slight change of direction in the jaw line? If so, draw it. Now look at the outer edges of the neck as they relate to the jaw line. Draw the vertical lines of the neck. Also, look at the shape of the neck you just sketched in lightly in relation to the shoulders. Using sighting and unit of measure, sketch the horizontal, slightly sloping lines of the shoulder in your drawing. While sighting the shoulders, take a point at the crown of the head and an angle to the outer edge of the shoulders. This will help you properly place the shoulders. If the shoulders are too large to draw on the paper, that is OK. Let the shoulders extend in your drawing in the correct proportion, do not force them into the drawing by changing their shape and size. Check your work.
Step 8:
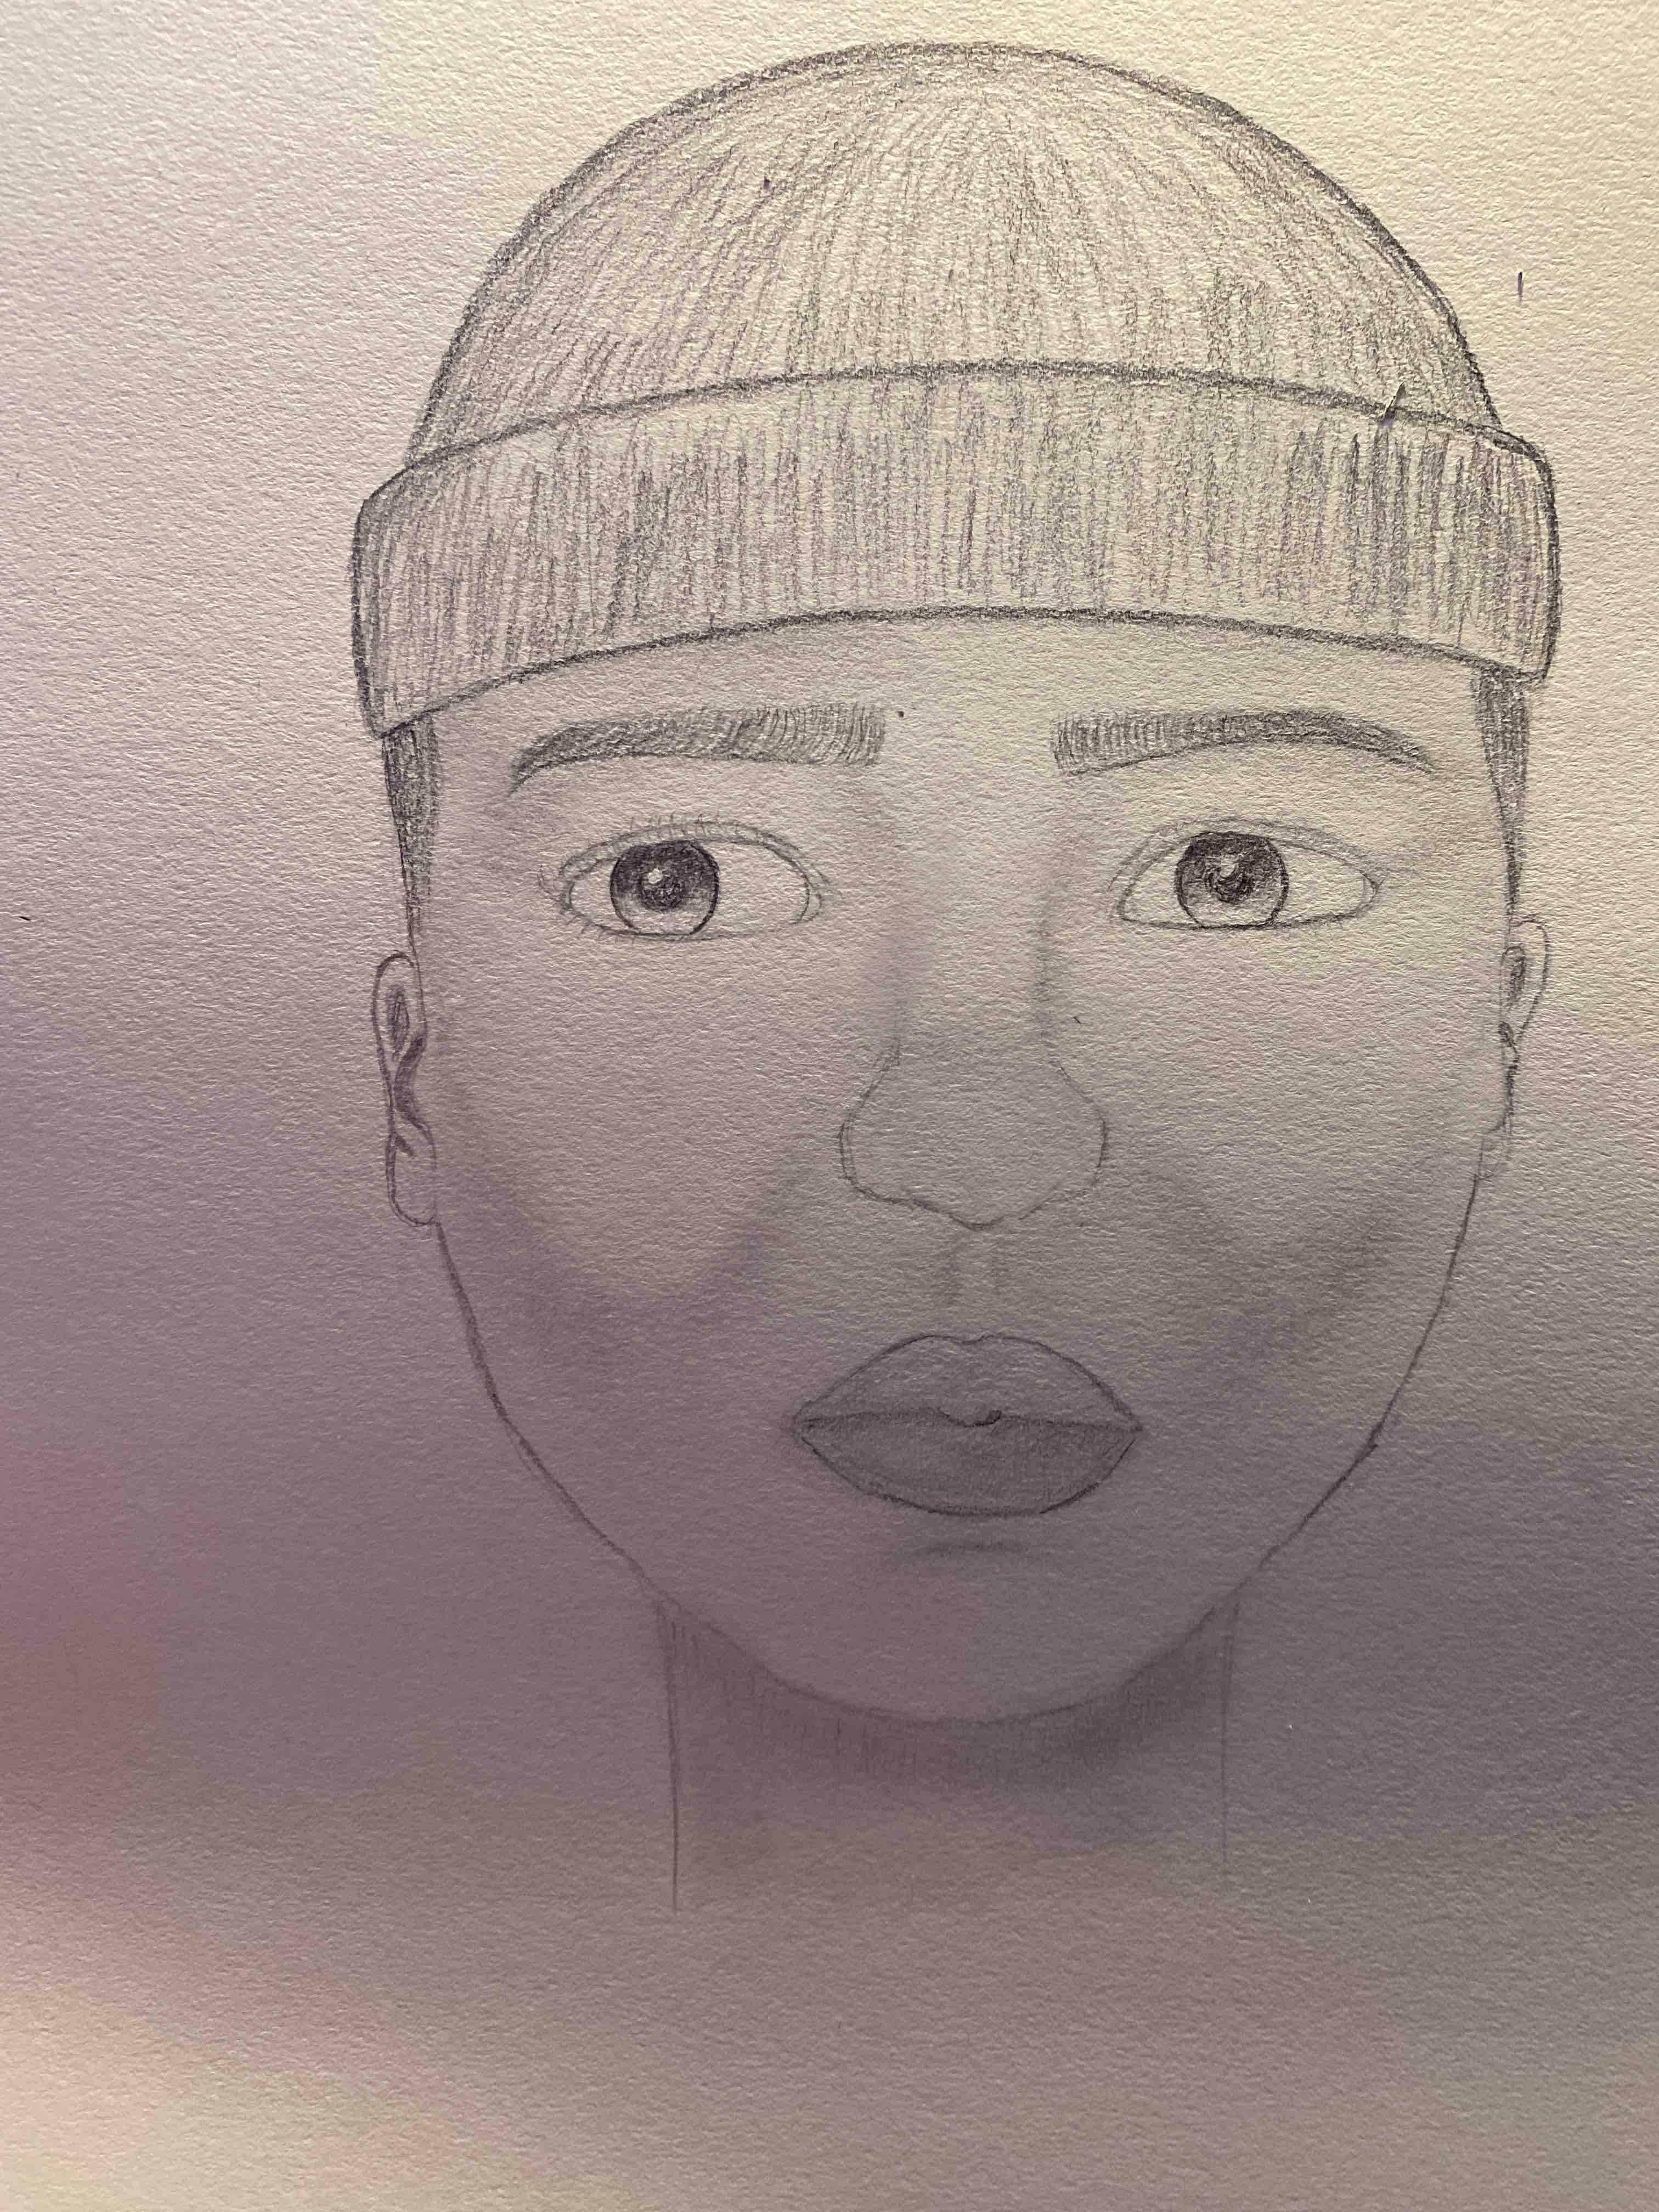
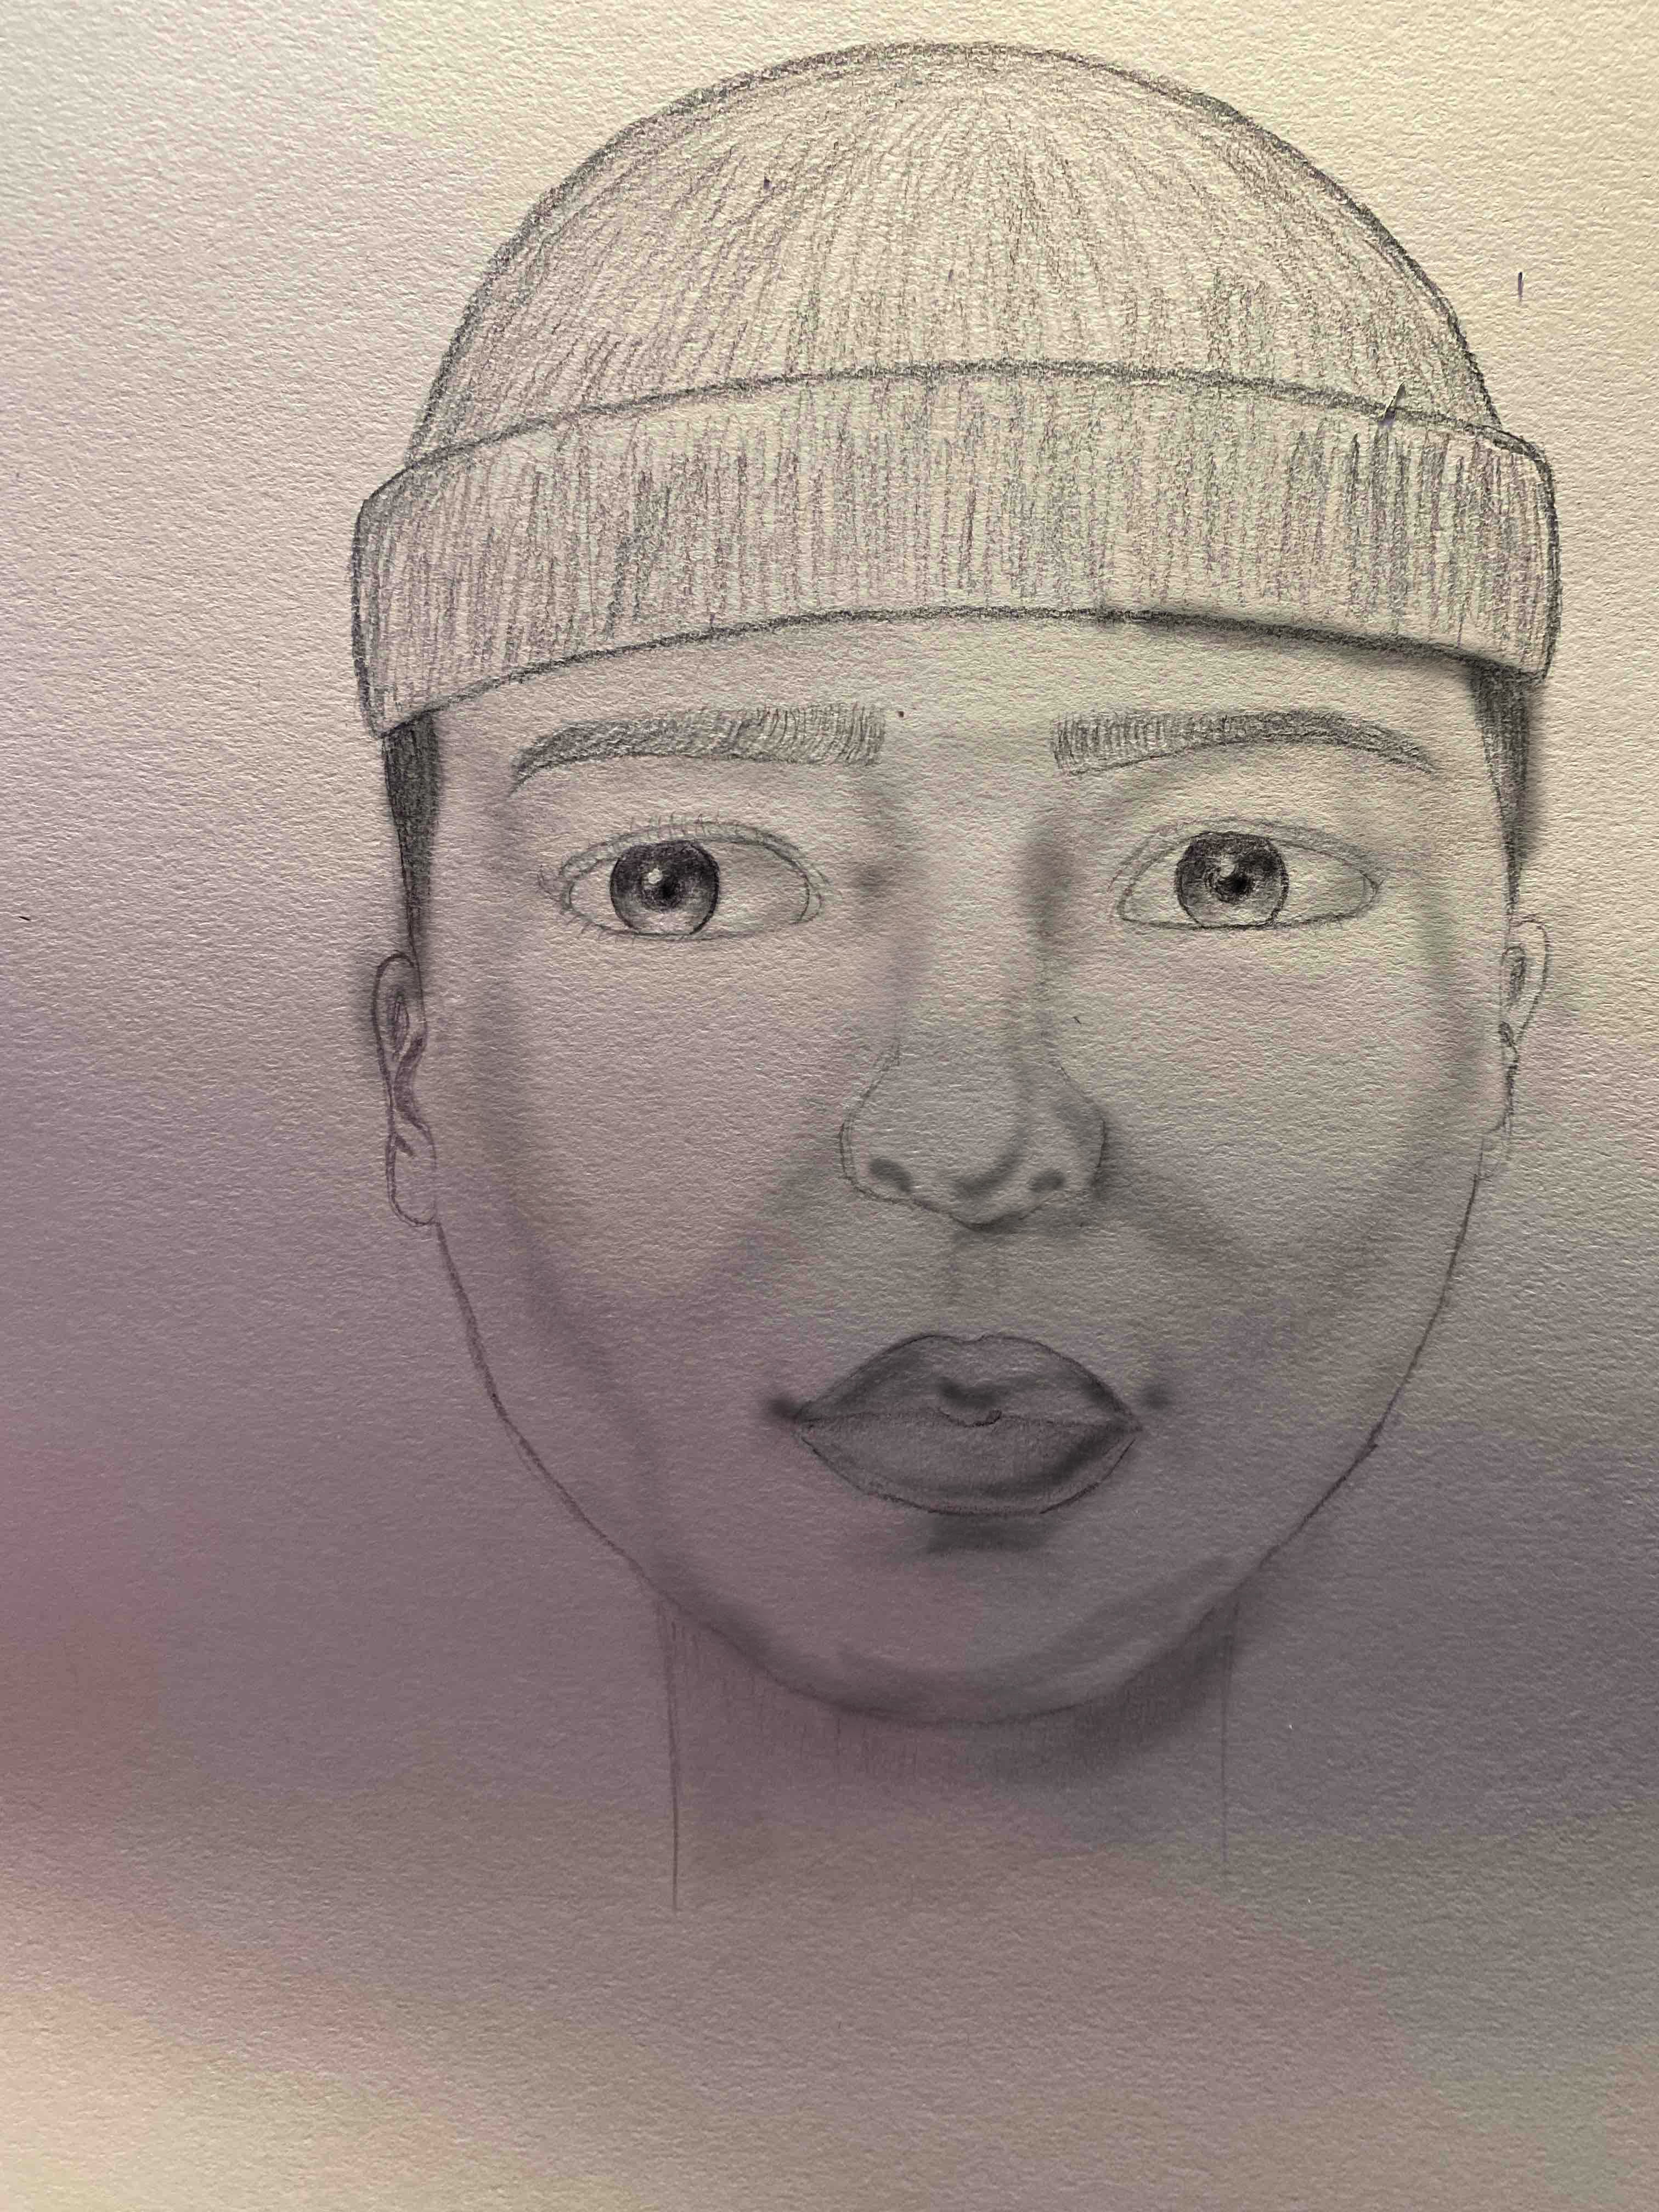
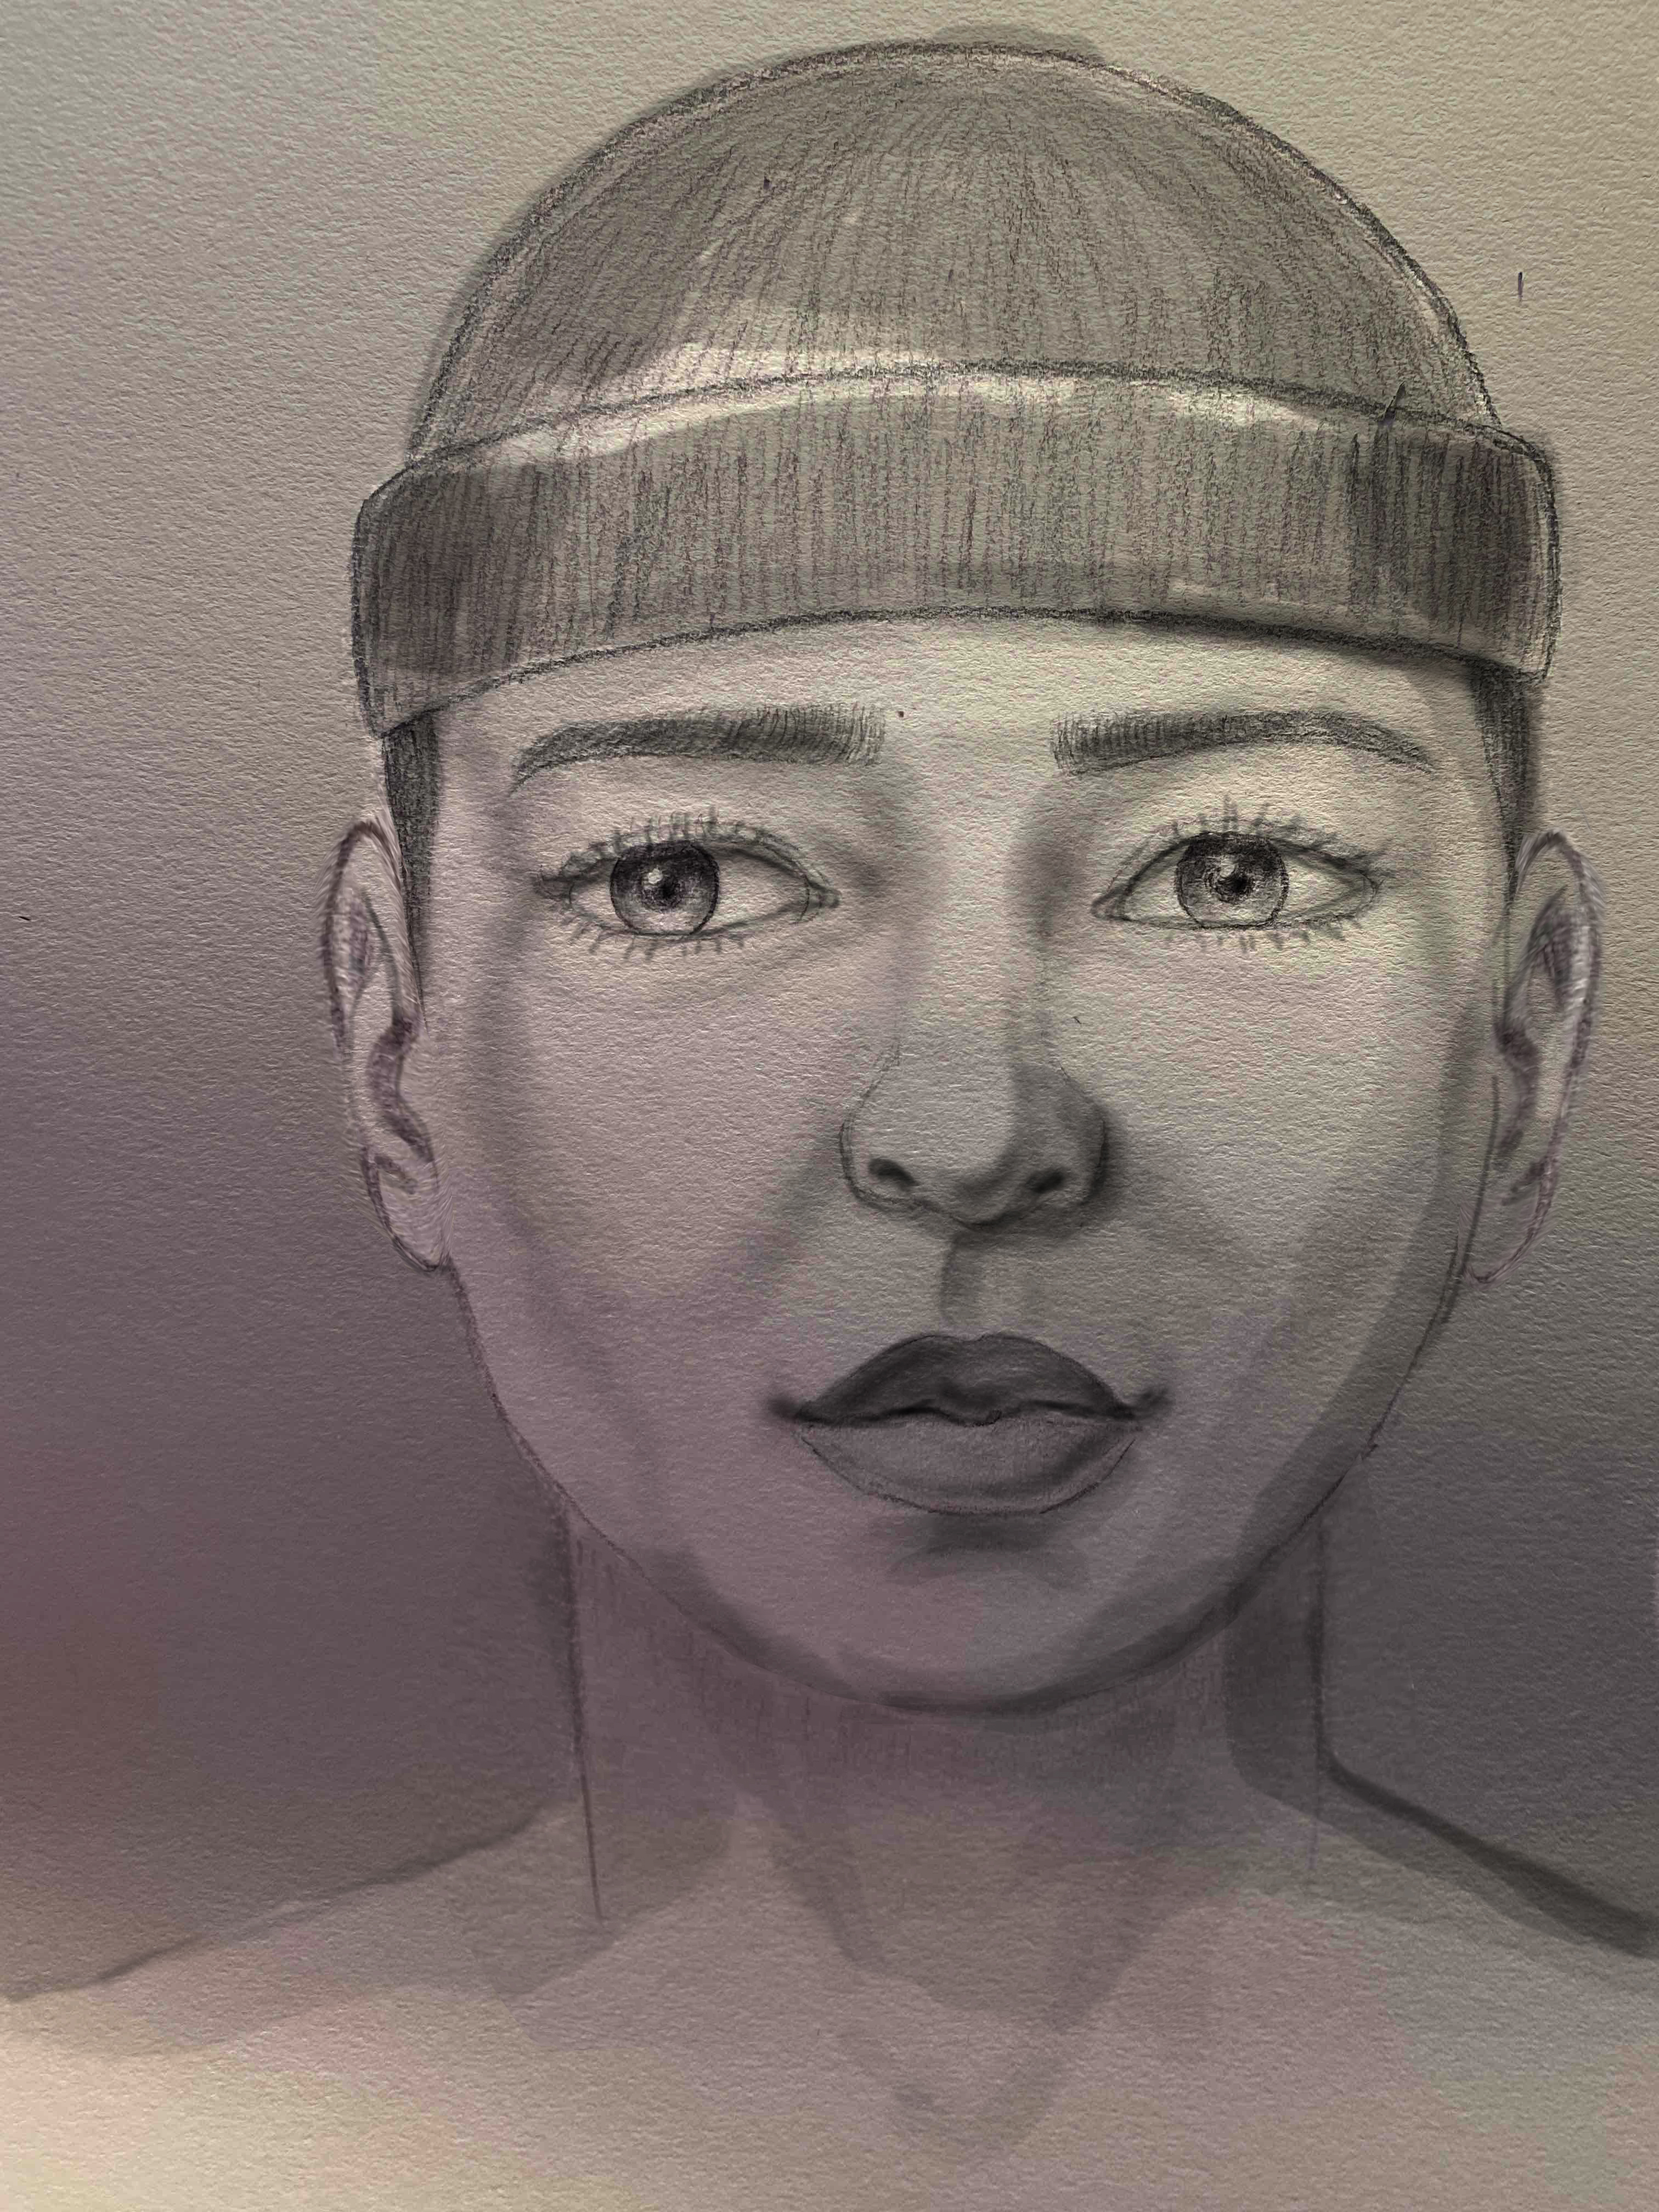
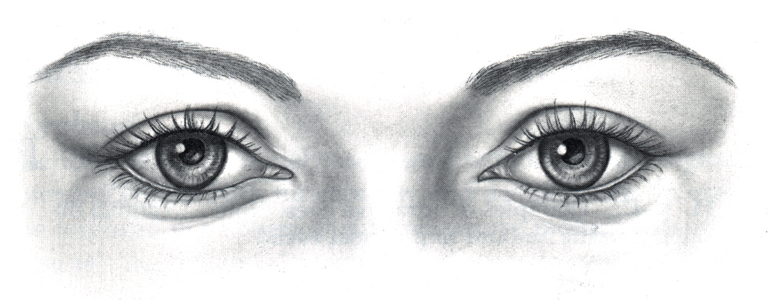
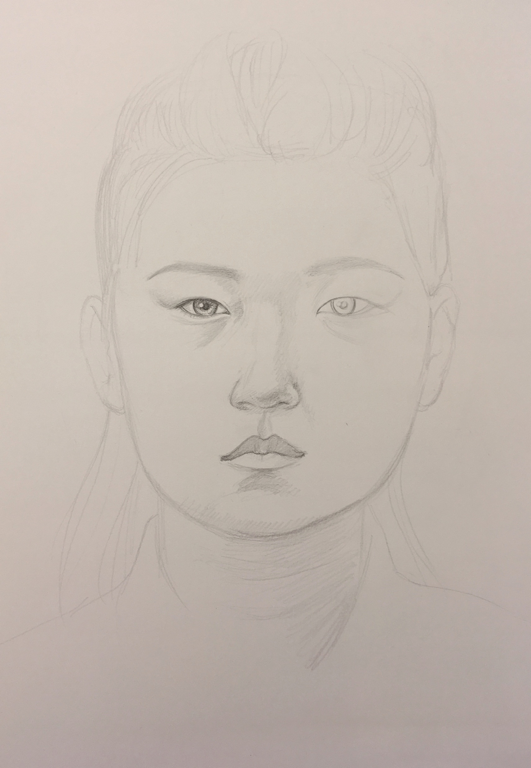
At this point you have all of the major features and shapes in place and the details are what remains. If your sighting was accurate, you have successfully mapped out your drawing. If after checking angles and using unit of measure you see errors, make adjustments at this time in your drawing. It is better to correct now while your drawing is a light sketch. Drawing in the details begins with sketching the irises into the eyes. Make sure you draw them the correct size in relation to the outlines of the eyes. Continue drawing the features of the face by working all over the face a little at a time allowing for adjustments in tone. Rather than completely drawing one feature at a time, which requires a commitment in style and values, draw in stages all across the features of the face building in a more intuitive fashion. The face in the drawing is the sum of the parts and each part is critical and individually of visual significance, yet each must work in harmony to create a unified whole. This is the art of portraiture.
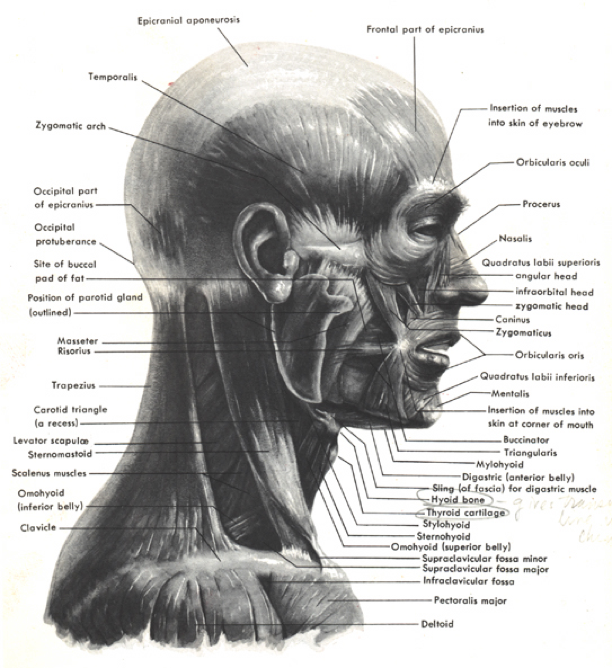
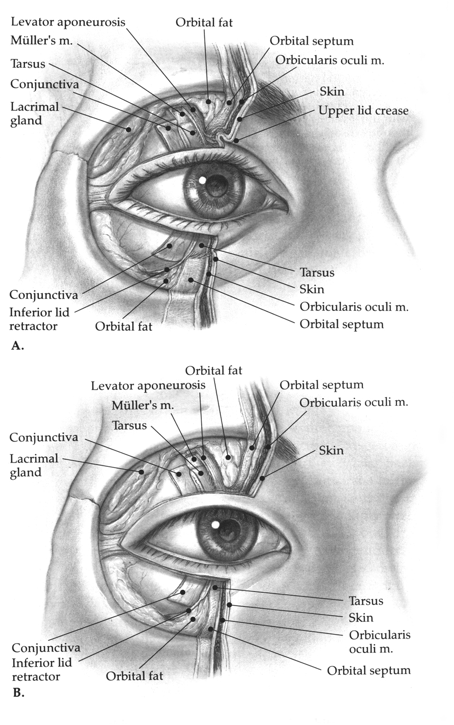
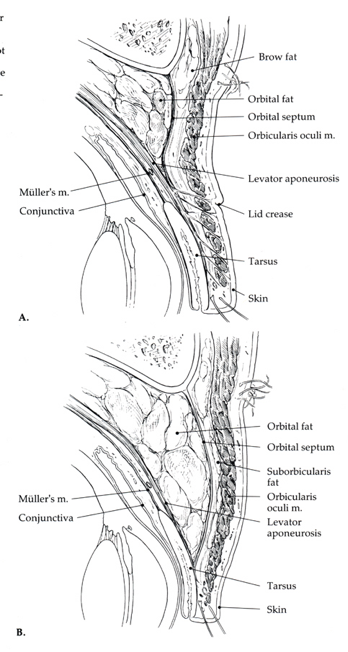
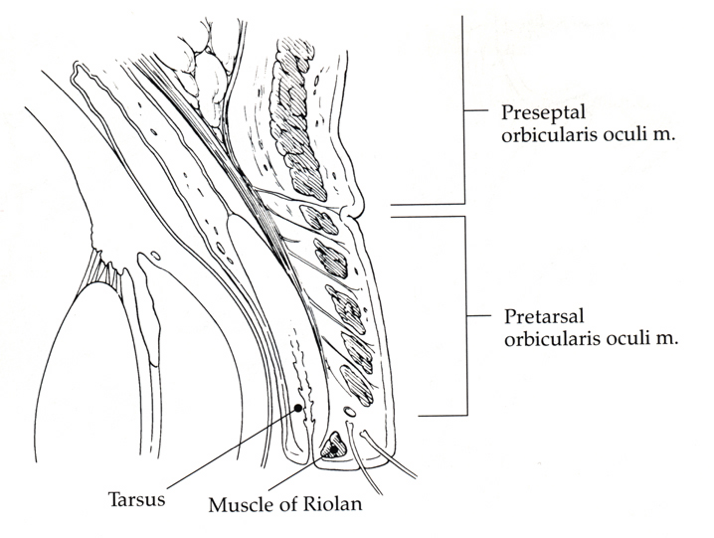
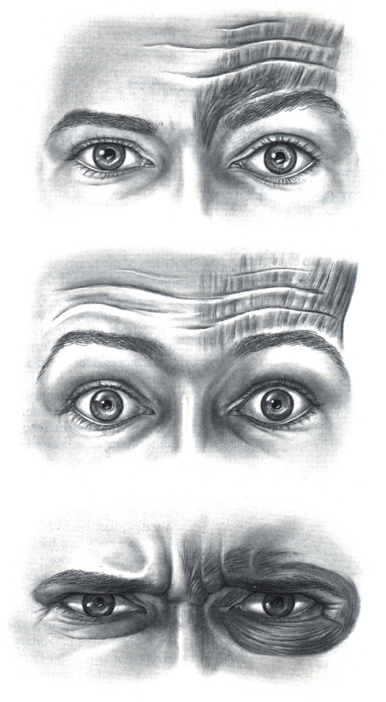
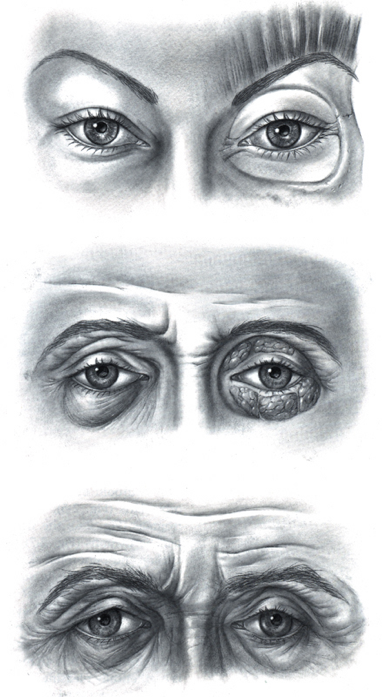
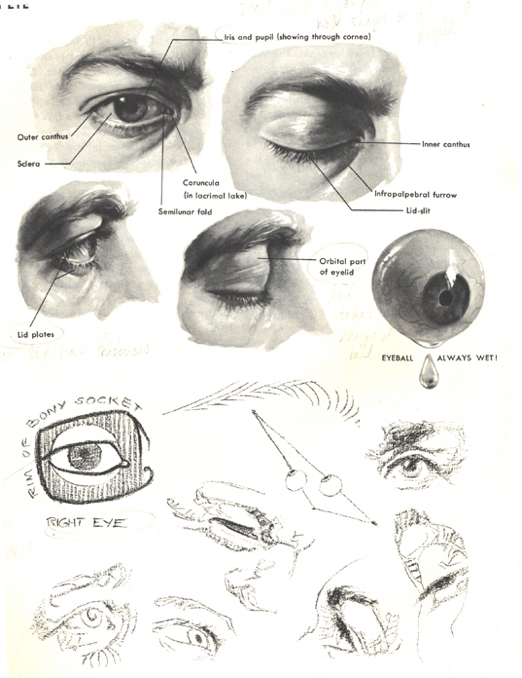
Anatomy
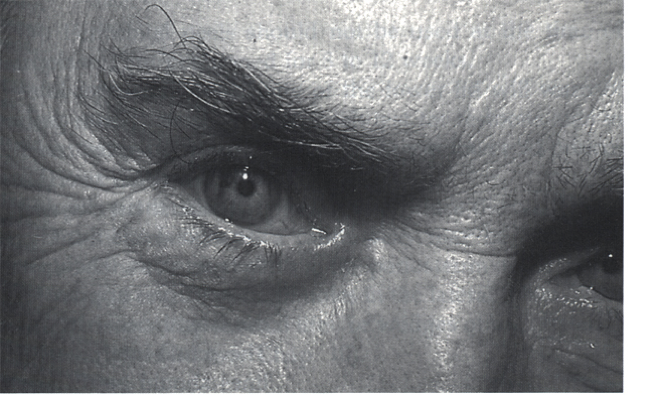
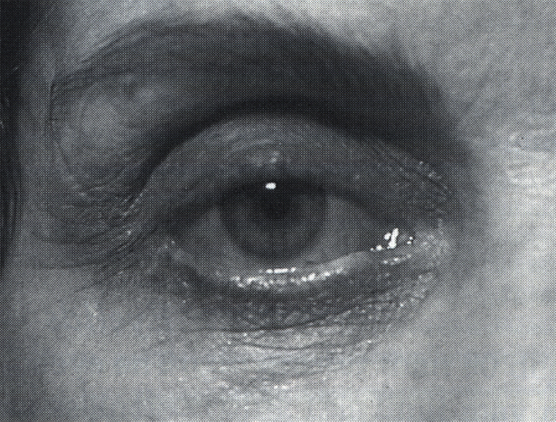
Having a basic understanding of the bones, cartilage, and muscles of the face is key to drawing a portrait with accurately and with confidence. The bones create the three-dimensional framework and is where we begin. Areas of importance are the bone around the orbits of the eyes, top of the nose, cheek bones, bones of the forehead, chin, jaw, and underlying the mouth. Unless you are studying anatomy or biology you may not know the medical or anatomic terminology associated with these structures. It is great to learn the proper terms so I will use them here and relate them to the more common lay terms as well. Below is a list of the bones to study. I will refer to them during the discussion on portraiture.
Bones
• Vertebrae of the neck (Cervical vertebrae)
• Skull (Frontal, Parietal, Zygomatic, Temporal, Occipital, Nasal, Maxilla, Mandible)
• Hyoid bone
• Manubrium
• Clavicles
• Mastoid Process
KNOWLEDGE IS POWER!
Study the following to have grater understanding and to improve your drawing:
• Bony framework
• Structure and function
• Muscular attachments
• Movement
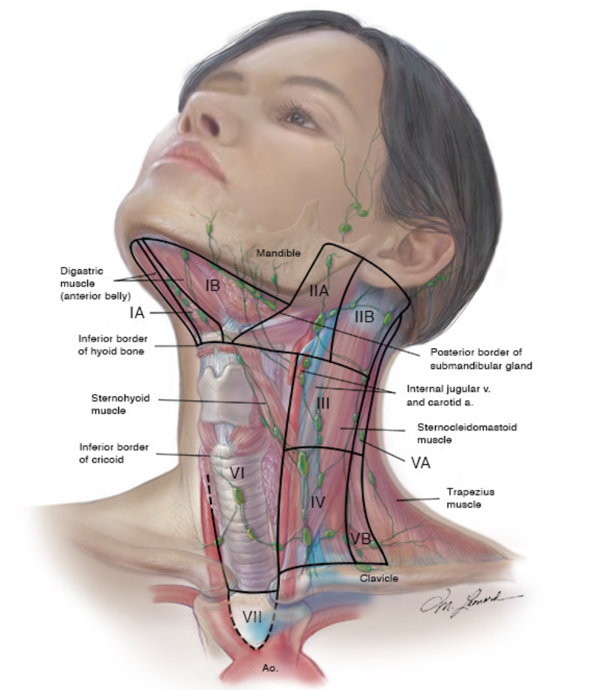
Cervical Vertebrae
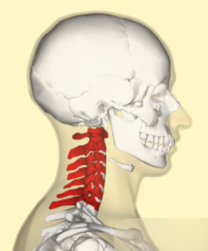
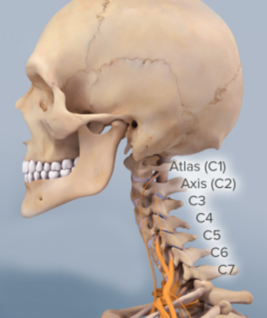
• 7 in number (C7 of particular importance)
• Atlas and Axis
- Atlas, like the name implies, bears the weight of the head
- the Axis allows the head to turn side to side
• Flexibility
- there is tremendous flexibility in the cervical vertebrae, more so than any other section of the vertebral column
- note the position of the cervical vertebrae in relation to the neck, it is positioned in the posterior (back) third of the neck

LABELED C1 –C7
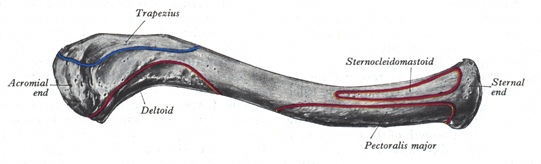
Clavicle
• The two clavicles form a wishbone shape
• They have an "S" curve rising from the center line of the torso, dipping down and then rising to meet the acromion process at the shoulder
• The muscular attachment tend to hide the edges of the clavicles where the muscular tendons attach - on the superior (upper) edge, the sternocleidomastoid and trapezius muscular attachment are seen. Inferior (lower) attachments include the pectoralis and deltoid muscles (see below)
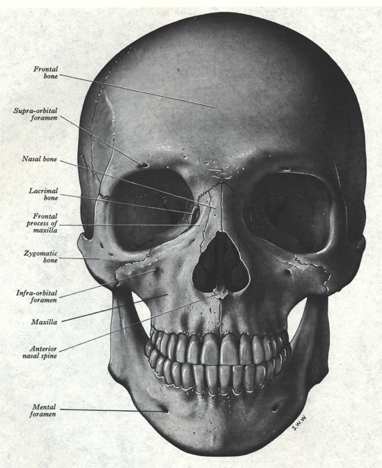
Skull
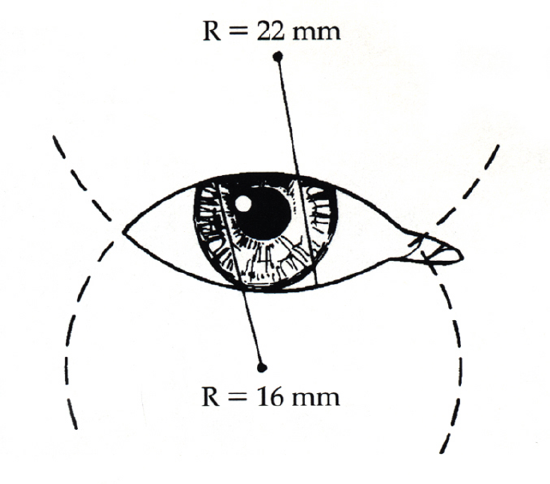
• Areas to focus with the skull are the bony orbits made by the fusion of the Frontal bone, Zygomatic bones, Maxilla, and Nasal bone
- the bony orbit creates shadows around the eyes that help create the three-dimensional look of the head
• The Zygomatic (cheek) bone creates a flat plane and is a foundation for several muscular attachments including the Masseter muscle (for chewing)
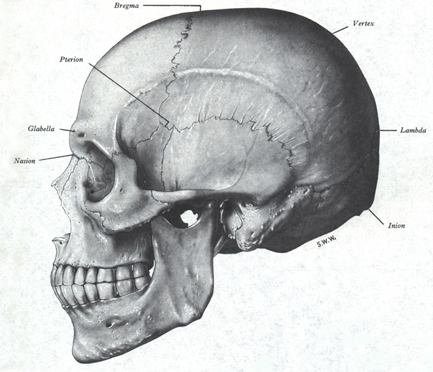
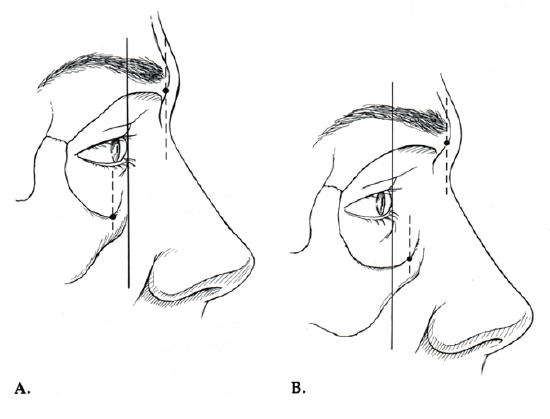
• The Mandible (jaw bone) has a visible angle at the inferior (lower) edge, often viewed from the lateral (side) position as 4:00 or 7:00 o'clock
• The combination of teeth, Maxilla, and Mandible project outward creating a three-dimensional form
• The Nasal bone creates a hard, elevated structure that, depending on the height of the bone, creates shadows and highlights
• The bulb and alae of the nose is supported by cartilage
Lateral View below: Note the 7:00 o'clock angle of the Mandible (jaw); projection of the teeth, Maxilla, and Mandible; elevation of the Nasal bone; Bony framework comprising the orbit; Planes of the Zygomatic (cheek) bone
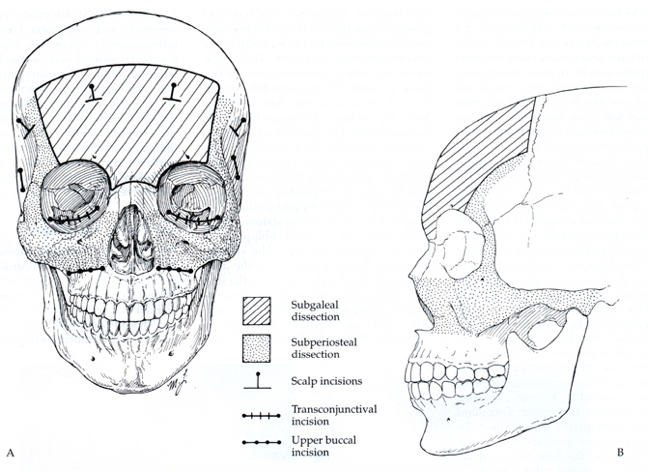
Below is a line illustration of the skull by the author.
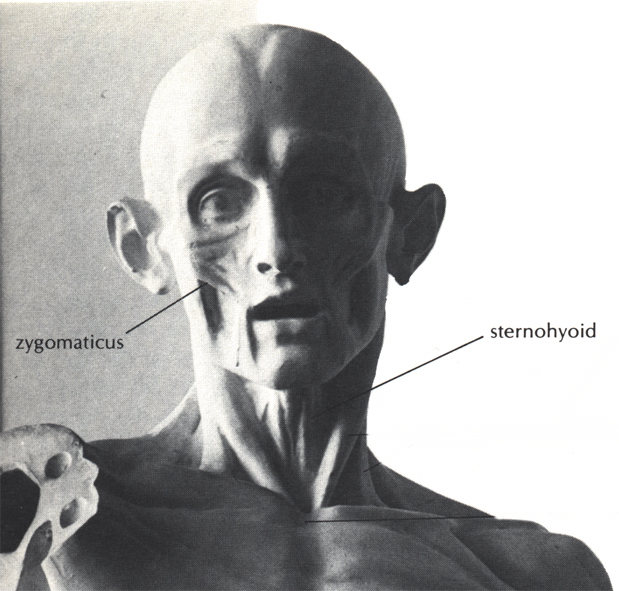
MUSCULATURE
The muscle we focus on in portraiture are listed below:
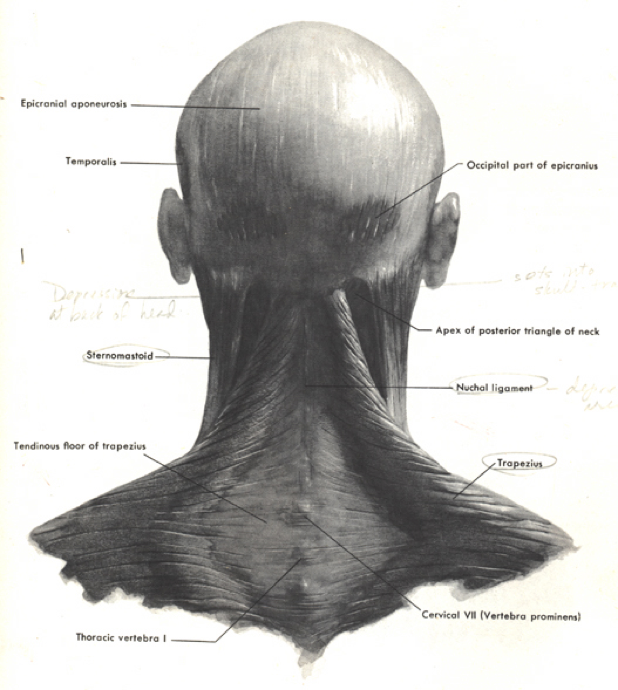
• Sternocleidomastoid
- this is the most visible muscle in portraiture so focus on the shape, planes, and how it helps establish the "pit of the neck"
• Trapezius
- this may also be visible at the clavicle, the upper portion creates the contour of the shoulder
• Masseter
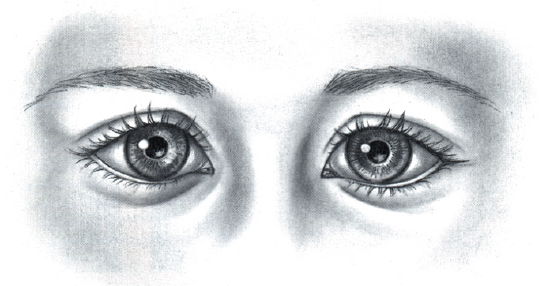
• Orbicularis oris, Orbicularis oculi
• Temporalis
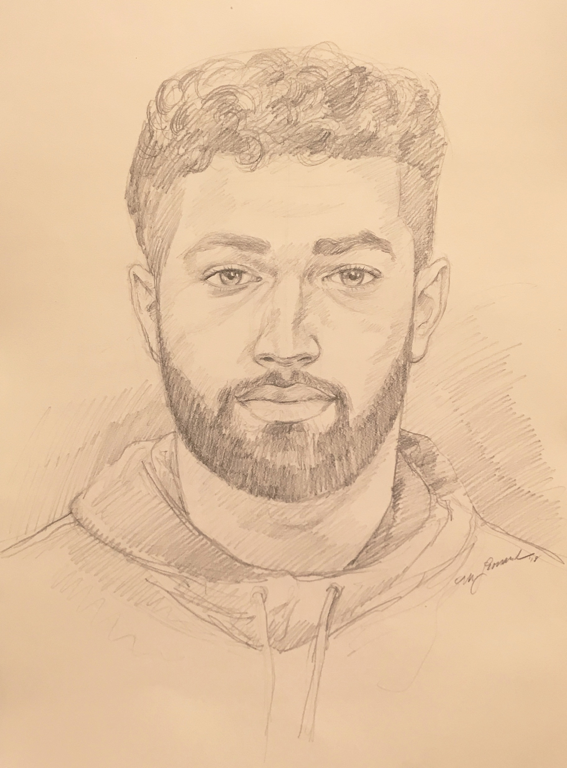
Studies (this is student work by the author) like the lithograph below are great for studying anatomy and modeling forms.


Common Pitfalls and Remedies