
1: Taking Photographs
- Page ID
- 90441
\( \newcommand{\vecs}[1]{\overset { \scriptstyle \rightharpoonup} {\mathbf{#1}} } \)
\( \newcommand{\vecd}[1]{\overset{-\!-\!\rightharpoonup}{\vphantom{a}\smash {#1}}} \)
\( \newcommand{\dsum}{\displaystyle\sum\limits} \)
\( \newcommand{\dint}{\displaystyle\int\limits} \)
\( \newcommand{\dlim}{\displaystyle\lim\limits} \)
\( \newcommand{\id}{\mathrm{id}}\) \( \newcommand{\Span}{\mathrm{span}}\)
( \newcommand{\kernel}{\mathrm{null}\,}\) \( \newcommand{\range}{\mathrm{range}\,}\)
\( \newcommand{\RealPart}{\mathrm{Re}}\) \( \newcommand{\ImaginaryPart}{\mathrm{Im}}\)
\( \newcommand{\Argument}{\mathrm{Arg}}\) \( \newcommand{\norm}[1]{\| #1 \|}\)
\( \newcommand{\inner}[2]{\langle #1, #2 \rangle}\)
\( \newcommand{\Span}{\mathrm{span}}\)
\( \newcommand{\id}{\mathrm{id}}\)
\( \newcommand{\Span}{\mathrm{span}}\)
\( \newcommand{\kernel}{\mathrm{null}\,}\)
\( \newcommand{\range}{\mathrm{range}\,}\)
\( \newcommand{\RealPart}{\mathrm{Re}}\)
\( \newcommand{\ImaginaryPart}{\mathrm{Im}}\)
\( \newcommand{\Argument}{\mathrm{Arg}}\)
\( \newcommand{\norm}[1]{\| #1 \|}\)
\( \newcommand{\inner}[2]{\langle #1, #2 \rangle}\)
\( \newcommand{\Span}{\mathrm{span}}\) \( \newcommand{\AA}{\unicode[.8,0]{x212B}}\)
\( \newcommand{\vectorA}[1]{\vec{#1}} % arrow\)
\( \newcommand{\vectorAt}[1]{\vec{\text{#1}}} % arrow\)
\( \newcommand{\vectorB}[1]{\overset { \scriptstyle \rightharpoonup} {\mathbf{#1}} } \)
\( \newcommand{\vectorC}[1]{\textbf{#1}} \)
\( \newcommand{\vectorD}[1]{\overrightarrow{#1}} \)
\( \newcommand{\vectorDt}[1]{\overrightarrow{\text{#1}}} \)
\( \newcommand{\vectE}[1]{\overset{-\!-\!\rightharpoonup}{\vphantom{a}\smash{\mathbf {#1}}}} \)
\( \newcommand{\vecs}[1]{\overset { \scriptstyle \rightharpoonup} {\mathbf{#1}} } \)
\(\newcommand{\longvect}{\overrightarrow}\)
\( \newcommand{\vecd}[1]{\overset{-\!-\!\rightharpoonup}{\vphantom{a}\smash {#1}}} \)
\(\newcommand{\avec}{\mathbf a}\) \(\newcommand{\bvec}{\mathbf b}\) \(\newcommand{\cvec}{\mathbf c}\) \(\newcommand{\dvec}{\mathbf d}\) \(\newcommand{\dtil}{\widetilde{\mathbf d}}\) \(\newcommand{\evec}{\mathbf e}\) \(\newcommand{\fvec}{\mathbf f}\) \(\newcommand{\nvec}{\mathbf n}\) \(\newcommand{\pvec}{\mathbf p}\) \(\newcommand{\qvec}{\mathbf q}\) \(\newcommand{\svec}{\mathbf s}\) \(\newcommand{\tvec}{\mathbf t}\) \(\newcommand{\uvec}{\mathbf u}\) \(\newcommand{\vvec}{\mathbf v}\) \(\newcommand{\wvec}{\mathbf w}\) \(\newcommand{\xvec}{\mathbf x}\) \(\newcommand{\yvec}{\mathbf y}\) \(\newcommand{\zvec}{\mathbf z}\) \(\newcommand{\rvec}{\mathbf r}\) \(\newcommand{\mvec}{\mathbf m}\) \(\newcommand{\zerovec}{\mathbf 0}\) \(\newcommand{\onevec}{\mathbf 1}\) \(\newcommand{\real}{\mathbb R}\) \(\newcommand{\twovec}[2]{\left[\begin{array}{r}#1 \\ #2 \end{array}\right]}\) \(\newcommand{\ctwovec}[2]{\left[\begin{array}{c}#1 \\ #2 \end{array}\right]}\) \(\newcommand{\threevec}[3]{\left[\begin{array}{r}#1 \\ #2 \\ #3 \end{array}\right]}\) \(\newcommand{\cthreevec}[3]{\left[\begin{array}{c}#1 \\ #2 \\ #3 \end{array}\right]}\) \(\newcommand{\fourvec}[4]{\left[\begin{array}{r}#1 \\ #2 \\ #3 \\ #4 \end{array}\right]}\) \(\newcommand{\cfourvec}[4]{\left[\begin{array}{c}#1 \\ #2 \\ #3 \\ #4 \end{array}\right]}\) \(\newcommand{\fivevec}[5]{\left[\begin{array}{r}#1 \\ #2 \\ #3 \\ #4 \\ #5 \\ \end{array}\right]}\) \(\newcommand{\cfivevec}[5]{\left[\begin{array}{c}#1 \\ #2 \\ #3 \\ #4 \\ #5 \\ \end{array}\right]}\) \(\newcommand{\mattwo}[4]{\left[\begin{array}{rr}#1 \amp #2 \\ #3 \amp #4 \\ \end{array}\right]}\) \(\newcommand{\laspan}[1]{\text{Span}\{#1\}}\) \(\newcommand{\bcal}{\cal B}\) \(\newcommand{\ccal}{\cal C}\) \(\newcommand{\scal}{\cal S}\) \(\newcommand{\wcal}{\cal W}\) \(\newcommand{\ecal}{\cal E}\) \(\newcommand{\coords}[2]{\left\{#1\right\}_{#2}}\) \(\newcommand{\gray}[1]{\color{gray}{#1}}\) \(\newcommand{\lgray}[1]{\color{lightgray}{#1}}\) \(\newcommand{\rank}{\operatorname{rank}}\) \(\newcommand{\row}{\text{Row}}\) \(\newcommand{\col}{\text{Col}}\) \(\renewcommand{\row}{\text{Row}}\) \(\newcommand{\nul}{\text{Nul}}\) \(\newcommand{\var}{\text{Var}}\) \(\newcommand{\corr}{\text{corr}}\) \(\newcommand{\len}[1]{\left|#1\right|}\) \(\newcommand{\bbar}{\overline{\bvec}}\) \(\newcommand{\bhat}{\widehat{\bvec}}\) \(\newcommand{\bperp}{\bvec^\perp}\) \(\newcommand{\xhat}{\widehat{\xvec}}\) \(\newcommand{\vhat}{\widehat{\vvec}}\) \(\newcommand{\uhat}{\widehat{\uvec}}\) \(\newcommand{\what}{\widehat{\wvec}}\) \(\newcommand{\Sighat}{\widehat{\Sigma}}\) \(\newcommand{\lt}{<}\) \(\newcommand{\gt}{>}\) \(\newcommand{\amp}{&}\) \(\definecolor{fillinmathshade}{gray}{0.9}\)You don’t need much instruction to start taking photographs. Chances are really really high (okay, certain) that you have already taken some. You probably even have some good images. What this text is about is giving you the tools to make you more flexible at taking photographs so that you can take better images in a variety of situations.
This chapter guides you through getting the camera settings right in preparation to take better photographs.
Camera Instructions
If you haven’t looked at your camera’s instructions yet, this is a good time to do so. If you don’t have them, it is easy to find a camera’s manual of instructions with a web search.
There is simply no way a book like this can cover all the specifics of every model of the hundreds of cameras available. But don’t worry—you will be using the camera instructions as reference, not as bed-time reading. Make sure you know where the index is.
Camera Menus
|
A quick menu
|
The controls that you need to access on a continual basis are put onto buttons, switches, wheels, and dials on your camera. Another place for these controls is a special menu that is dedicated to the most-used items. This might be called something like a quick menu or function menu, and it may display on your rear viewing screen. These are things you need to access quickly, like changing the bright-ness (exposure) of an image.
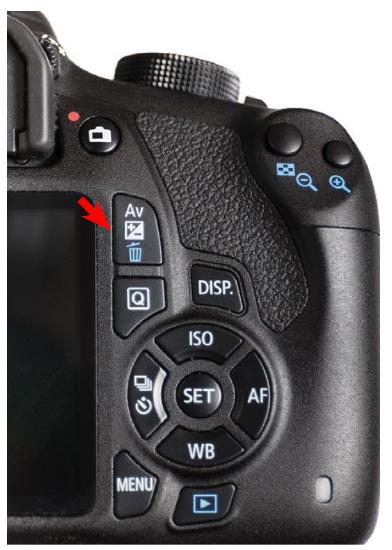
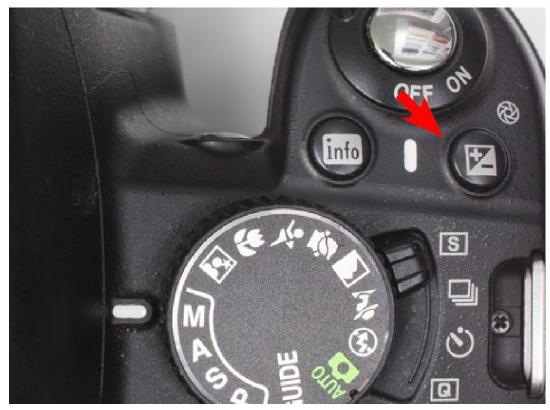
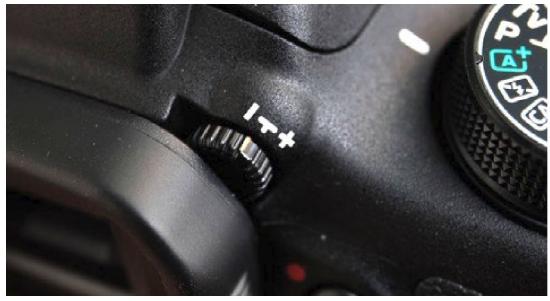
Buttons, Switches, Wheels, and DialsThe most used buttons while shooting are the easiest for your fingers to find. Some buttons, like the +/- buttons (red arrows) have to be held down while you turn a main wheel or press another button. All cameras have a menu button that brings up a series of menus for less commonly used settings. Use the camera’s instructions to familiarize yourself with the buttons, but don’t worry about figuring out how to use them all. This book will get your there soon enough.
|
Controls are also found in the general menu. Among the myriad of things here are settings to customize your camera to the way you want it, such as setting the camera to beep or not beep when it finds something to focus on. This menu is sub-divided into sets for different general options like shooting and playback.
|
General menus are broken into sets, which are represented in this menu by the icons at the top. |
Set the Camera on P
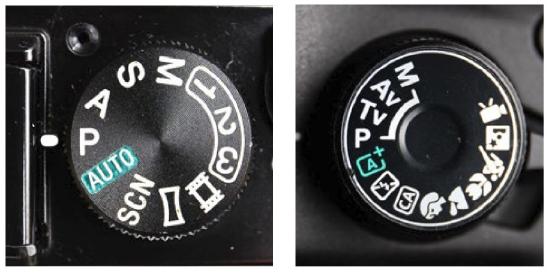
There is a big dial on your camera with different shooting modes on it. Most of these modes are not necessary if you know how the camera works, but some are crucial to learning and taking good photographs. The Auto setting is for giving the camera to someone to just point and shoot. You should go one step further and set the camera on Program (P) Mode. This setting allows more adjustments and control than the automatic mode.
|
The PASM dial. Some cameras will label the A as Av and S as Tv (on the right). |
Viewfinder Adjustment
If your camera has a viewfinder that you put up to your eye, it also has a diopter adjustment to adjust that viewfinder to your eyesight. With your camera on, look into the viewfinder and press the shutter button lightly. You should see some things on the screen, such as focus spots or camera information at the bottom of the screen. Find the small wheel or slider near to where your eye is and adjust it so that this camera information is sharp.
|
Viewfinder diopter adjustment |
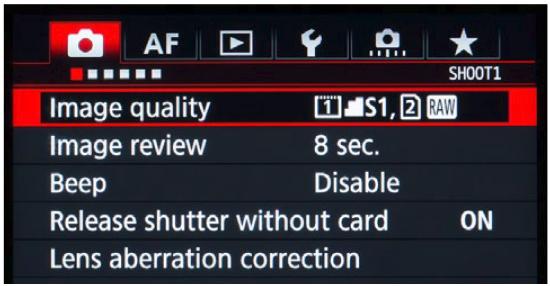
RAW Format
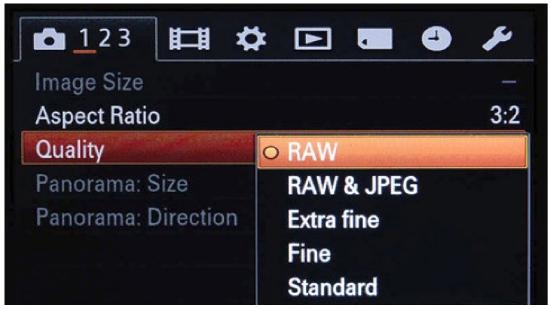
You might have to go digging around in your camera instructions to find how to set your camera to save images in RAW format, but do it. RAW format will be discussed in detail later, but for now just know that it gives you the possibility for vastly better photographs.
|
Image format setting |
There are a couple of downsides to RAW format, however. First, your camera might not have it (that is a downside!). Second, your computer might not be able to display a RAW file. If either of these is the case, use the highest quality JPEG setting.
You also might see a RAW+... setting. This will save two photographs in different formats for each photograph you take. You don’t need this now.
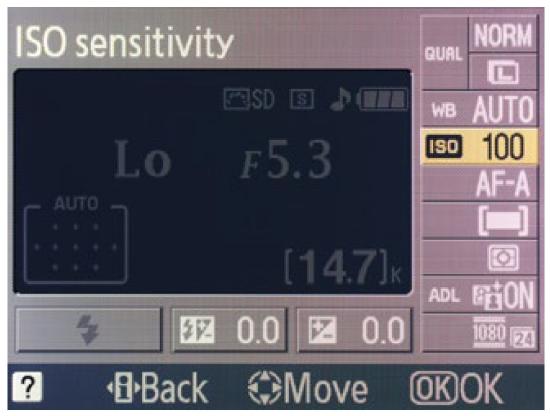
Set the ISO to 400
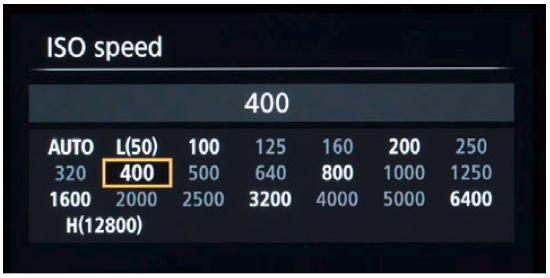
Again, you may need to consult the camera’s instructions for how to set the ISO to 400. ISO governs the sensitivity of the camera to light. Cameras often default to an Automatic ISO, which would be great, except they normally don’t do a very good job figuring out the right one. ISO 400 is a good all-around setting that gives reasonable sensitivity to light, but still retains a good bit of quality on most cameras.
Another reason to set the ISO to 400 is that ISO is a control that is best to address separate from the other camera controls at first. For now you could increase the ISO number (perhaps to ISO 1600) if you are in low light situations in which your photographs are blurry from movement. More information on ISO is in the Sensor chapter.
Why ISO 400?If you are familiar with ISO then you may be wondering why I am directing you to use 400. You and I both know that you will probably get less blurry pictures with the ISO at Auto. This book isn’t about getting the best photographs right away, but about controlling the process so that you can get far better photographs later. Getting those blurry photographs will teach you to pay attention to the light and how you hold the camera. And besides, we get to the details of ISO very soon. Until then, get some blurry photographs. They will teach you some things. |
|
Menu for ISO |
More RAWThe RAW format is often not only a different format for each camera brand, but also for each camera model. Which means a couple of things. If your camera model is newer than the software on your computer, your images might not display. Both the computer software and Adobe applications are continuously updated to recognize new cameras, so if you don’t update your computer and you have a newer model camera, you will have problems. Of course the solution is to update both your computer and the Adobe software. The other ramification is that a RAW format image is not recognized by most applications, like Word or Illustrator. This is not a problem for most uses, since you can easily generate a JPEG from your RAW image, but it is something you should be aware of. RAW files can be identified by their unfamiliar name extensions like .CR2, .AWR, .NEF, or .DNG. |
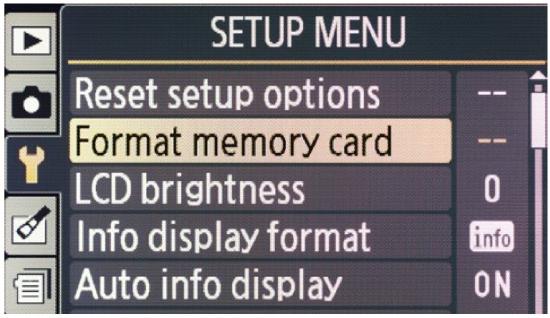
Format Memory Card
Find the menu that allows you to format the memory card on your camera. This will erase all of the images on the card (!) and prepare the card to be used with your camera.
If you don’t have a memory card (usually an SD card) you will need to get one to store your images. A 32 gigabyte card has a large enough capacity to store many images. These cards are reusable, but a larger capacity card will allow you to take more photographs before downloading them to the computer or allow you to keep images on the card as back-up.
Un-DeletesIf you mistakenly delete images from your memory card, there are applications that can retrieve the erased images. The reason this works is that when an image (like any computer file) is deleted, it is not really gone, but instead marked with a note that it can be written over. So, if you haven’t taken any more pictures, your images are still there, and an application made for the task (these are easy to find) can restore them. If you have taken photographs after deleting your images, the old ones may or may not be retrievable. |
C-RAWFor images with smaller file sizes, the newer C-RAW format compresses image files by throwing out information you probably won’t ever see. |
|
Menu for formatting (sometimes called initializing) |
|
Menu for date and time |
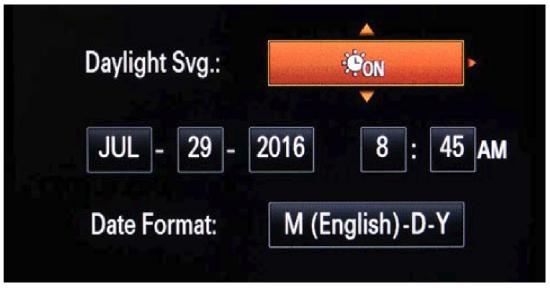
Set the Date and Time
As you collect more photographs, having the correct time information becomes more important. Image files can be organized according to this date and time information. This makes it much easier to find specific images later.
Zoom
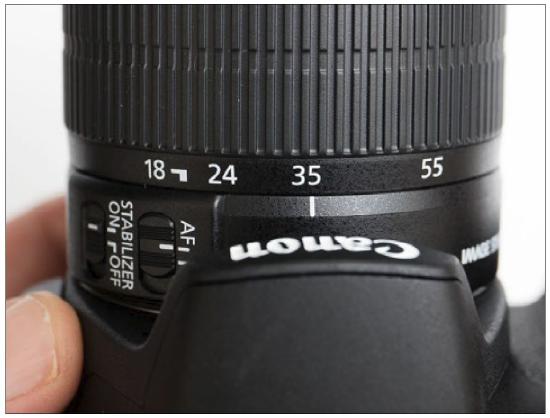
One of the first things you will notice as you play around with your camera is that by turning a ring on the lens (sometimes this is a rocker switch on the body of the camera) you can make your subject larger or smaller in the frame.
This is called the zoom. It can be used for much more than saving you a bit of walking to get closer to your subject, but for now just know a couple of things about it: The zoom position which shows the widest view is called wide angle, and the opposite setting, where things appear to be bigger, is called telephoto. Try different zoom positions with the same scene.
|
Typical zoom ring |
Don’t Take that Lens Off!
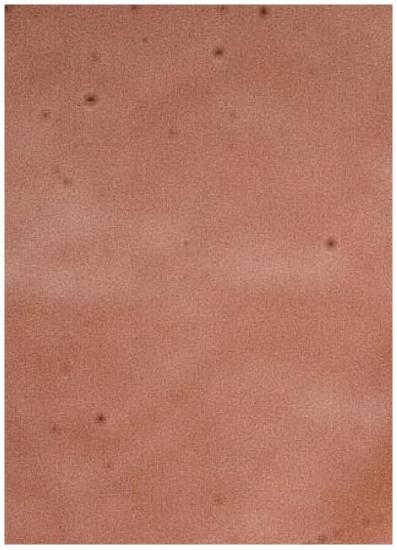
One last thing. The sensor (which constructs the image in the camera) is very sensitive to dust. Even with newer cameras that vibrate the sensor to clean it, some dust remains and will make black spots of varying fuzziness on every photograph you take. The main way dust gets into your camera is by having the lens off. If you have different lenses, refrain from removing them for very long and always be conscious of the amount of dust in the environment when changing them.
SD CardsEven though the different kinds of standard SD (Secure Digital) cards all look pretty much the same, the format has gone through an evolution which may make them unusable in your camera. The order of this evolution is SD to SDHC to SDXC, with each generation enabling faster write speeds and more memory. Some cameras, especially older ones, are not compatible with some of the newer generations. There is an alphabet soup of other numerals, letters, and symbols that go along with the card. Some of these are marketing, some are functional. Your camera instructions list the types of cards that are compatible with your camera. If you need to know more about all the different specifications of SD cards, Wikipedia has a good page that explains what everything means. |
And don’t try to clean your sensor even if you know how to get to it. Sensors are very expensive and the coatings on them are very fragile. After years of experience cleaning sensors I ruined one myself.
Now Go Shoot
When you take photographs, try to look all around your viewfinder.
|
Dust on the sensor. Depending on your camera settings, the dust can also show up as larger indistinct shapes. Often details hide sensor dust, but large areas without detail (like sky) will easily show it. If there is a small amount of dust it can be eliminated (hidden) in an image editing application. |
You might be taking a picture of one thing, but your camera (and the resulting image) communicates everything in the frame. Compose and crop your photographs when you take them instead of later in the computer. This will make your image-making more purposeful and preserve quality in the images.
Find a way of holding the camera steady that is not tiring and allows you to really inspect the image before you shoot it. Take your time and by all means experiment! Don’t just take multiple images—instead try different ways of framing. Move up, down, try getting closer or further away from your main subject. Experimenting like this doesn’t cost any money, nor does it take much time to delete the images you don’t like.
Above all, look at the light. When you are taking photographs, you are not recording the things in the world, but the light reflected off of those things. The kind of light available and how you interpret it is the most important control you have.
And by the way, if you are photographing on a sunny day, a sun that is lower in the sky will present more lighting options than a midday sun.
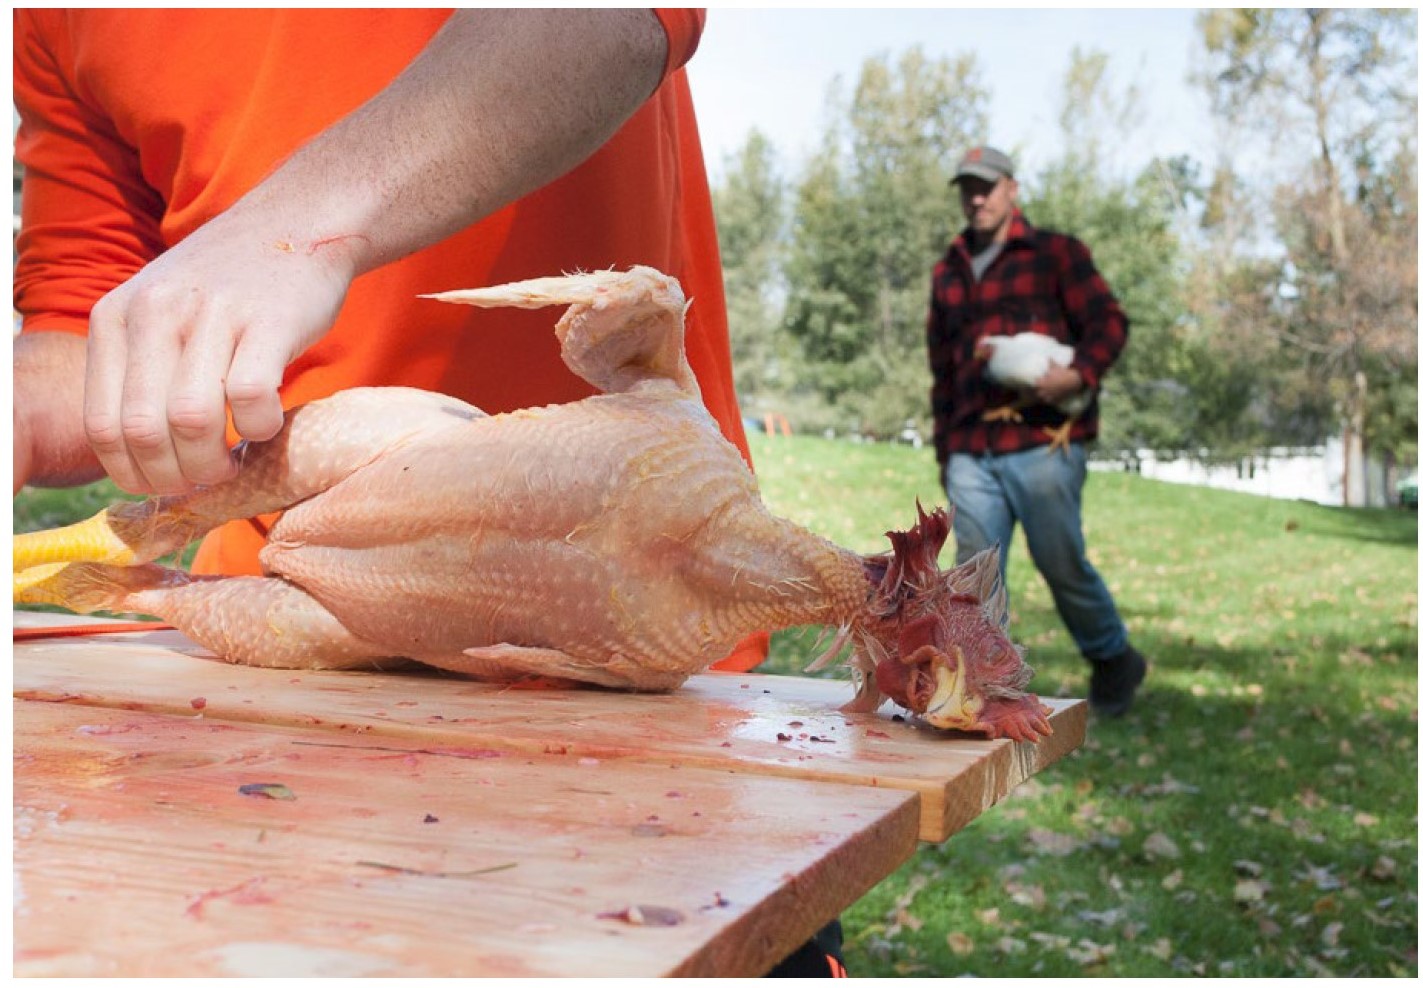
|
Jenna Sarantakos. This image tells a story using the frame (composition) and light. Timing is everything in an situation such as this. Notice how a half-second difference in shooting time would make big differences. |
Taking Photographs Questions
On most digital cameras which shooting mode gives more control?
The viewfinder’s diopter adjustment adjusts what?
What file format gives you the possibility of getting better photographs?
What ISO setting is a good all-around setting?
What does formatting the memory card do?
What determines if the lens is wide-angle or telephoto?
Why should you be careful about taking the lens off your camera?
