
2.5: Flash control
- Page ID
- 151080
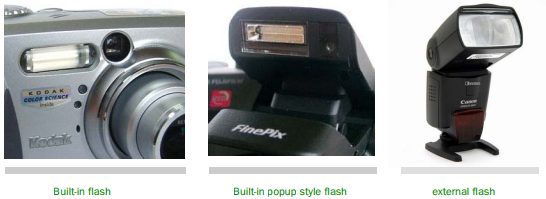
There are two types of flash for cameras: built-in flash and external flash. Many cameras have a built-in flash integrated with the camera body as the picture on the left below, or a popup style flash. All digital cameras have built-in flash units that automatically fire when sufficient light is not available to get a proper exposure. Even if you have built-in flash, you can add an external flash. The external flash has several sophisticated features, so you need to make sure which type of flash will work best with your digital camera before buying it.
Most people think that the flash should only be used at night, but there are more than two ways to use a flash in the daylight. We will now talk about when and how to use a flash effectively
When to use a flash:
• At night:
You need to use a flash at night, of course, but you should be careful about overexposing or underexposing a shot. If you are shooting too close to the subject, the subject will appear washed out or too bright. On the other hand, if you use your flash beyond its useful range (usually beyond 12 feet), the photo image will be dark.
• Under shadow:
Flash mode
Flash can be used in a daylight situation to prevent shadow. When your subject is under the shade of a hat or tree, a flash prevents the subject’s face and background from being too dark. You should use the fill flash mode (always on).
• Against light:
When you are taking a picture against light, a flash is useful, as in the following photos. You can get better photos if you use flash.

Most digital cameras have several flash modes that can be used for different lighting situations. Here are typical icons about the flash setting shown on the LCD screen.
Three kinds of flash mode
 |
Automatic mode | The flash is in shooting mode and is fired when the camera determines it is needed |
 |
Fill flash mode | The flash fires with every exposure |
 |
Flash off | The flash is turned off for every exposure when you want to control the shutter speed or aperture to take a night shot |
 |
Red eye reduction | When you taking a picture of people or animals at night |
Sometimes, your subject will have red eyes as shown here. The red eye effect occurs when you use a flash in a dark environment.
Suggestions for red eye reduction:
• Use the auto red-eye reduction mode of your digital camera.
• Increase the ambient light if you are in a room. The brighter it is the better.
• Use a bounce flash. This method can be used when you have an external flash that can be pointed toward the ceiling

Making light from the flash softer
▪ If you think your flash is too bright, you can soften the light. It is very simple. As in the following photo, tissues or a post-it note can be used to reduce the light from the flash.
Good night landscape photo
▪ Because a flash can only make a close subject brighter, you cannot take a picture like this one. You must change the shutter speed or aperture value and use a tripod. We will talk about this in part 3.