
1.5: Writing Processes
- Page ID
- 131947

Just as we use design processes to creatively solve complex problems, we use writing processes to create complex documents. In both cases, there are steps or stages, but we don’t always proceed directly from one step to next in a chronological manner. These processes are often iterative, meaning we might return to previous stages in the process from time to time. The more complex the task, the more iteration might be needed. Examine the Design Process (Figure 1.5.1) and Writing Process (Figure 1.5.2) diagrams below. What similarities and differences can you see in these two processes?

You may have come across a “writing process” before, and it may or may not have worked well for you. There is no single process that works for everyone in every situation. The key is to recognize the various steps in a typical writing process and figure out how to use or adapt them most effectively for your situation.
For example, you may have come across the 40-20-40 writing process, which suggests that you should break up the amount of time you spend on the writing task into three distinct stages of planning, drafting and revising, and give each one a specific percentage of the time you have available.
40-20-40 Writing Process
Stage 1 – Planning: spend 40% of your time planning your document (task analysis, thinking, discussing, free-writing, researching, brainstorming, concept mapping, focusing ideas, outlining, etc.)
Stage 2 – Drafting: spend 20% of your time writing a rough draft (quickly getting all your ideas down in print, in more or less complete sentences and paragraphs, in more or less the right order, without agonizing over style or grammar choices)
Stage 3 – Revising: spend 40% of your time revising, editing, and proofreading (polishing your draft, making sure the content is complete and well supported, ideas flow logically, formatting meets expectations, expression is grammatically correct and has the appropriate tone and vocabulary).
These percentages are a helpful guideline, as they emphasize the need to allot significant time for revision, but don’t always work for all people in all situations (think of a final exam situation!). It also does not clearly account for the need to iterate; sometimes while revising your draft (stage 3), you may have to go back to the planning stage (stage 1) to do additional research, adjust your focus, or reorganize ideas to create a more logical flow. Writing, like any kind of design work, demands an organic and dynamic process.
As with the design process, the writing process must begin with an understanding of the problem you are trying to solve. In an educational context, this means understanding the assignment you’ve been given, the specifications of that assignment, the objectives you are meant to achieve, and the constraints you must work within (due dates, word limits, research requirements, etc.). This is often referred to as “Task Analysis.” In professional contexts, you must also consider who your intended reader(s) will be, why they will be reading this document, and what their needs are, as well as deadlines and documentation requirements.
Exercise \(\PageIndex{1}\):
Consider an upcoming writing assignment or task you must complete. To avoid putting it off until the last minute (and possibly doing a poor job), try planning a writing process for this task, and build in milestones. Anticipate how long various sub-tasks and stages might take. Make sure to include time for “task and audience analysis” to fully understand what’s involved before you start. Consider the following:
- What is the purpose of the document? What are the specific requirements? Who will read it and why?
- How much planning is needed? What will this entail? Will you need to do research? Do you need to come up with a topic or focus, or has one been assigned to you?
- How complicated will the document be? Will it have several sections? Graphics? How much revision will be needed to perfect your document? Will you have time for a peer/tutor review?
Now try using the Assignment Calculator to see if it offers something similar to your planned writing process.
Image descriptions
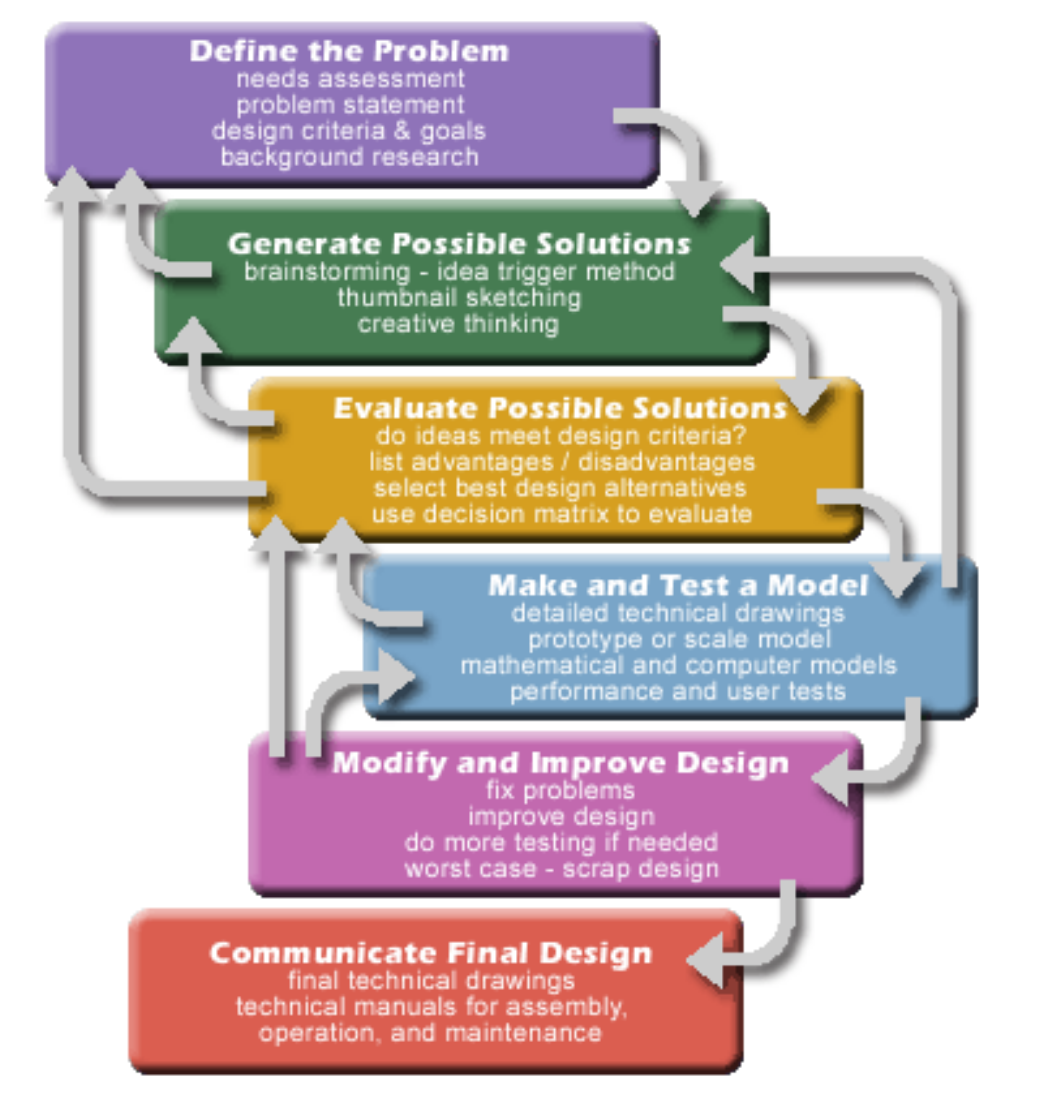
Figure 1.5.1 image description:
A design process flow chart that encourages you to revisit previous steps as needed.
- Define the problem. This involves a needs assessment, problem statement, designing criteria and goals and background research.
- Generate possible solutions. Brainstorming using the idea trigger method, thumbnail sketching, and creative thinking. At this point, you may need to revisit your problem definition. Once you have a number of possible solutions, move on to the next step.
- Evaluate possible solutions. Do ideas meet design criteria? List the advantages and disadvantages. Select the best design alternatives. Use a decision matrix to evaluation. At this point, you may need to revisit your problem definition or brainstorm some more. Once you have evaluated possible solutions, move on to the next step.
- Make and test a model. Create detailed technical drawings, prototype or scale model, mathematical and computer models, Conduct performance and user tests. At this point, you made need to go back to brainstorming solutions or evaluating possible solutions. Once you have a model you are happy with, move on to the next step.
- Modify and improve design. Fix problems, improve design, do more testing if needed. In the worse case, scrap the design. You may need to go back to evaluating possible solutions to making and testing the model. Once you have a design you are happy with, move on to the next step.
- Communicate final design. Create final technical drawings, and technical manuals for assembly, operation, and maintenance.
Figure 1.5.2 image description:
A writing process diagram that encourages constantly revisiting previous stages.
- Prewriting. This stage is for generating ideas, understanding the ideas of others, and collecting information (note taking, free-writing, brainstorming, looping).
- Planning. Here, you are organizing and focusing ideas. This may involve mind mapping, clustering, listing, and creating outlines.
- Drafting. In the drafting stage you are writing initial drafts of a text focusing mainly on the development, organization, and elaboration of ideas.
- Reflection. In the reflection stage, you can let the work sit and come back to it at a later point. You may cycle back between drafting a reflection a number of times before moving on.
- Peer/tutor review. Now you can get feedback from others. This may require you to return to the drafting and reflecting stages.
- Revision. Here you are further developing and clarifying ideas and the structure of the text. This may require you to return to the drafting and reflecting stages. If the work requires additional research or idea generation, return to the planning stage.
- Editing and proofreading. Here the focus is on surface-level features of the text.
- "The Engineering design process," Tufts University, [Online]. Available: https://engineering.tufts.edu/ggs/designprocess.htm. ↵
- M.J. Curry and A. Hewings "Approaches to teaching writing," in Teaching Academic Writing: A Toolkit for Higher Education. New York: Routledge, 2003. Used with permission. ↵