
6.3: Prototypes and Iteration
- Page ID
- 50715

Phase 3: Prototypes and Iteration
Once you’ve gotten to the point that you know your goals and have a concrete set of ideas for your audience that will be created with specific deliverables, you need to start prototyping and iterating. Having a style guide at this point can be valuable, but your guide can grow or come into being during this phase rather than before if your circumstances dictate that kind of workflow.
The goal of the prototyping phase is to get your deliverable created in a makeshift form that will let you test it and see how well it works and whether it is going to meet the expectations of those involved with your project. There is often something quite different between pitching an idea theoretically and holding that idea in front of you or seeing the idea on a screen in the case of a digital deliverable. By putting everything together, you get a clear sense of what your design will look like and work like.
Your prototyping phase should also include some testing, ideally. You’ll want to see how your design works and whether you get the impact you actually planned for with use. You can do this using some of the methods discussed in the next chapter.
Once you’ve got your design tested, you’ll want to iterate from the original design where needed. Don’t be afraid to rework a design that isn’t coming together or getting the reaction you were hoping for. The prototyping phase exists so that you can get a low-stakes reaction to your planned design without having to commit to a full production run of the deliverable. Much better to rework a prototype than to end up with finalized deliverable that just doesn’t work out.
Effective Time Usage and Templating vs. Tinkerating
One note that is of the utmost importance when you’re working on prototypes and other designs: guard your time vigorously! You will need to guard your time, more often than not, from yourselves. That may sound weird, but bear with me. Often times when you’re doing a design project, especially one with fancy elements, you can get caught up in the what-if’s of it all. This gets even worse when you’re building your templates and designs in the software you’ll publish with final deliverable with. To avoid time wastage, there are a few things you need to keep in mind: the Cake Method and Templating vs. Tinkerating.
First, let’s cover the Cake Method. It sounds silly, but it is the product of my having been involved in two birthday cake fiascos in a row in which a fondant-centered design was scrapped at midnight in exchange for cupcakes or something less amazing. It was also influenced by two student projects two years in a row that self-immolated due to 90% of the time on the project being spent on a design element that simply never came together. I’ll explain.
When you are working on a major project, many times the fancy little bits get your attention. You end up trying to tweak the one cool idea that you have about the design, and that ends up taking all of your time. It might be a logo. It might be a cool graphical effect on a website. It could be a fancy infographic idea you have. It could be fancy animations and graphics on a Power Point or Prezi. In the end, the amount of impact that cool bit has on your final deliverable is fairly negligible, but it’s just so darn cool that you spend a massive amount of time on it, resulting in a project that has a cool graphic but no real content. It’s like someone asked you to make a cake and you brought them a custom sculpted or 3D printed cake topper and a box of cake mix.
The Cake Method attempts to help you work through your design woes by breaking up your time into chunks of content that mirror the construction of a cake, sorting the content into what has to be there and what would be nice to have. The base of a cake is the actual cake itself—you need cake for a cake, right? Next, you have the bare minimum of decoration, usually some sort of icing. After that, you might have decorative trim that really brings the cake into acceptable territory. Finally, you have additions that make the cake fancy such as various scenes that might be built on top like a construction site for a kid that loves heavy equipment.
The idea behind this breakdown is that you create tiers of importance with your content, tiers that align with the most basic cake versus the final tier of fancy decor. You organize your content into each of these tiers, and then you work through each one of them in order. You’re not allowed to work on the fancy final stuff until you’ve finished everything underneath. That way, you don’t end up with fancy decorations and no cake to put them on, metaphorically speaking. See below for a chart than can help with this breakdown:
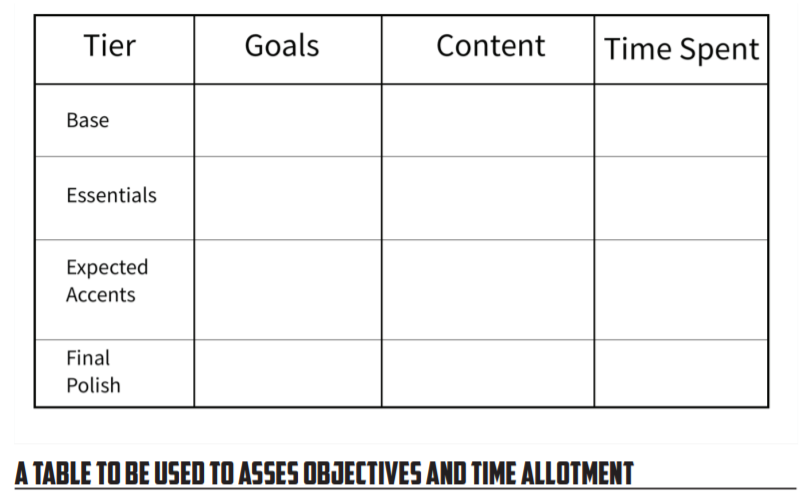
To use the chart, you’ll want to break down your project into four basic tiers, just like we broke the cake down into the bare minimums, the essential elements, the expected accent decor, and any final polish and fancy elements. The base tier is the absolute minimum for your document. This may well be the actual text elements that you need to generate to fill the text. This work isn’t sexy, but it simply has to be done and can truly suffer if you rush it. Next, you have the essential elements that would be needed—this can vary from design to design. It might be a series of simple templates that arrange things differently in a large campaign, or in a large document it might be the chapter breakdowns and sections and sub-sections. Next you have the expected accents; this might be something like color-coded headings and things along those lines in a large document. Finally, you have the final polish tier that includes the fancy elements than can take a large amount of time. This might be something like a heavily designed logo element or a complex infographic-style graphic that doesn’t have to be in the text but that makes the text more understandable.
The goal behind all of this is that you’ll have a fully-functional document that you can add elements to gracefully by the time you get to the final polish stage. It also recognizes that the fancy elements that we often want to focus on can take an inordinate amount of time, time that is fine to spend if we have managed to complete our text. You can’t build a text around a complex element that you may not be able to pull off. You build the text first and then see if you can pull off the extra element.
Sometimes your text is the fancy decorative element, or you have a design that is entirely driven by a fancy design. That’s okay. In those cases, you spend more time on the design element. It is the cake in that case, not the final topping. The goal here is to arrange your steps in the project by their importance and to spend time on what has to be there before spending time on things that would be nice to have.
One additional tool that can be useful when managing time is making a distinction between Templating and Tinkerating. When you work on a project, you often need to come up with templates and designs that you can work through and design around. What I suggest, every single time, is to design your projects with pen, paper, and colored pencils first. Do not use a design-oriented program or code (in the case of the web). Do. Not. Do. This. You’ll more likely than not end up wasting time.
The problem with designing with a design program is that you have an infinite amount of tools available to create your design, and you often end up playing with those tools rather than working on your template. I call this Tinkerating because you’re going to be tinkering as much as you are doing anything else. Now, that isn’t to say that playing with the design program is bad—that is one of the ways you get better at the program or at coding in the case of the web. But, with that said, you don’t need to be playing in the program when you’re thinking about a design. You can prototype a design much more quickly with paper and a pencil than doing the code or design work behind it. Finally, working with the design program encourages you to put in flashy elements and to spend time making things look nice when you’re not even committed to the final design you’re building! Think back to the Cake Method—this is not the way you want to spend your time!
When it comes to templating and thinking through designs, the fast route is almost always the best. A quick sketch can help you think through a design quickly without too much trouble. When I’m teaching or designing, I usually try to do lots of stuff like the example here:
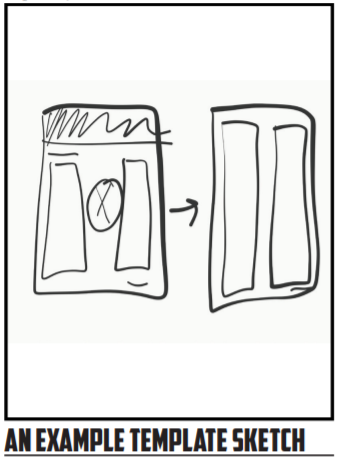
In the example on the right, I’ve got a brief template for the front page and the body of a newsletter. You have a colored heading on the first page, then two columns with an image in between. You also have a small element on the bottom corner. The main body is two major columns with the shared element in the bottom corner. This is a fairly simple design, and it helps me see issues with layout quickly. You may notice the image looks weird between the columns, so I need to rethink that. Drawing it out allows me to see spacing issues quickly without getting into the weeds. If I wanted to go a bit further, I could embellish this all with colors to get a better sense of what I’m doing:

Here you’ll see I’ve colored in the top section to give a nice colored header, I’ve added in a title to show where that would be in black, and I’ve redone the images in the middle to better use the space and tried out using red for the bottom element and red frames for the images. After seeing this, I’d likely switch to black for the images, but I like the red elements (though I might add another on the top on the second page for symmetry). Again, this has taken me just a minute or two and I’m already working through the design without having to worry about getting things lined up perfectly or getting the colors or something else right.
Use your time wisely—guard your time from the demands of others and from your own fancies. The best design is the one that gets finished and out the door, not the one with the fancy logo that never gets the polish it needs because all the time was wasted on the logo and not the actually contents of the deliverable. Use the Cake Method, avoid Tinkerating, and do your templating work as quickly and directly as possible. Don’t commit to spending real time on a design or layout until you’re sure it’s ready for that investment of time.